My Alpa Rotocamera 6070
As I've mentioned in previous blog posts, I am fond of panoramic cameras and the odd and unusual cameras that most people wouldn't guess are cameras, so I always have my eyes open for these oddball items to add to my collection. The Alpa Rotocamera is just one of these items. Not only is it an odd-looking item that resembles a miniature robot-looking item, but it's also a 360-degree panoramic camera that shoots on 120 or 70-mm film.
I've owned lenses that shoot 360-degree images and have even written posts on them. The first lens I had that shot 360-degree images was a Be Here Portal S1 lens, which fit onto my Nikon DSLR camera, and with software, it produced a tremendous 360-degree photo. That lens got damaged, and to this day, I'm continually searching for another one of these lenses. In my mind, I kept telling myself that there's something different between shooting with a 360-degree lens and having a camera that can produce a 360-degree negative.
I found an Alpa Rotocamera on an online auction. When I saw it shot 360-degree images on 120 or 70mm film, I was immediately hooked and wanted to get it. Not knowing much about the camera other than a few tidbits I quickly found online, I bid on the camera lot. To my surprise, I won the camera. I was excited to get the camera and load film into it and start to make some tremendous images that were a view that is mind-boggling when you see them.
This blog will be different from my other posts because I've spent tens of hours on this specific camera because of its condition. I want to give you a brief overview of the camera, then explain how I received it and what I've done to get it back into working condition.
The Camera:
This camera is a Beast!!!! I didn't realize until I received it, but the camera and film back weigh just under 17 lbs. and are 16 lbs. 15.6 oz. That does not include the power source and cables. It’s built from cast metal with a pebble finish and, it’s 12” tall, 9” wide, and 8” deep and was built in the early 1980s.
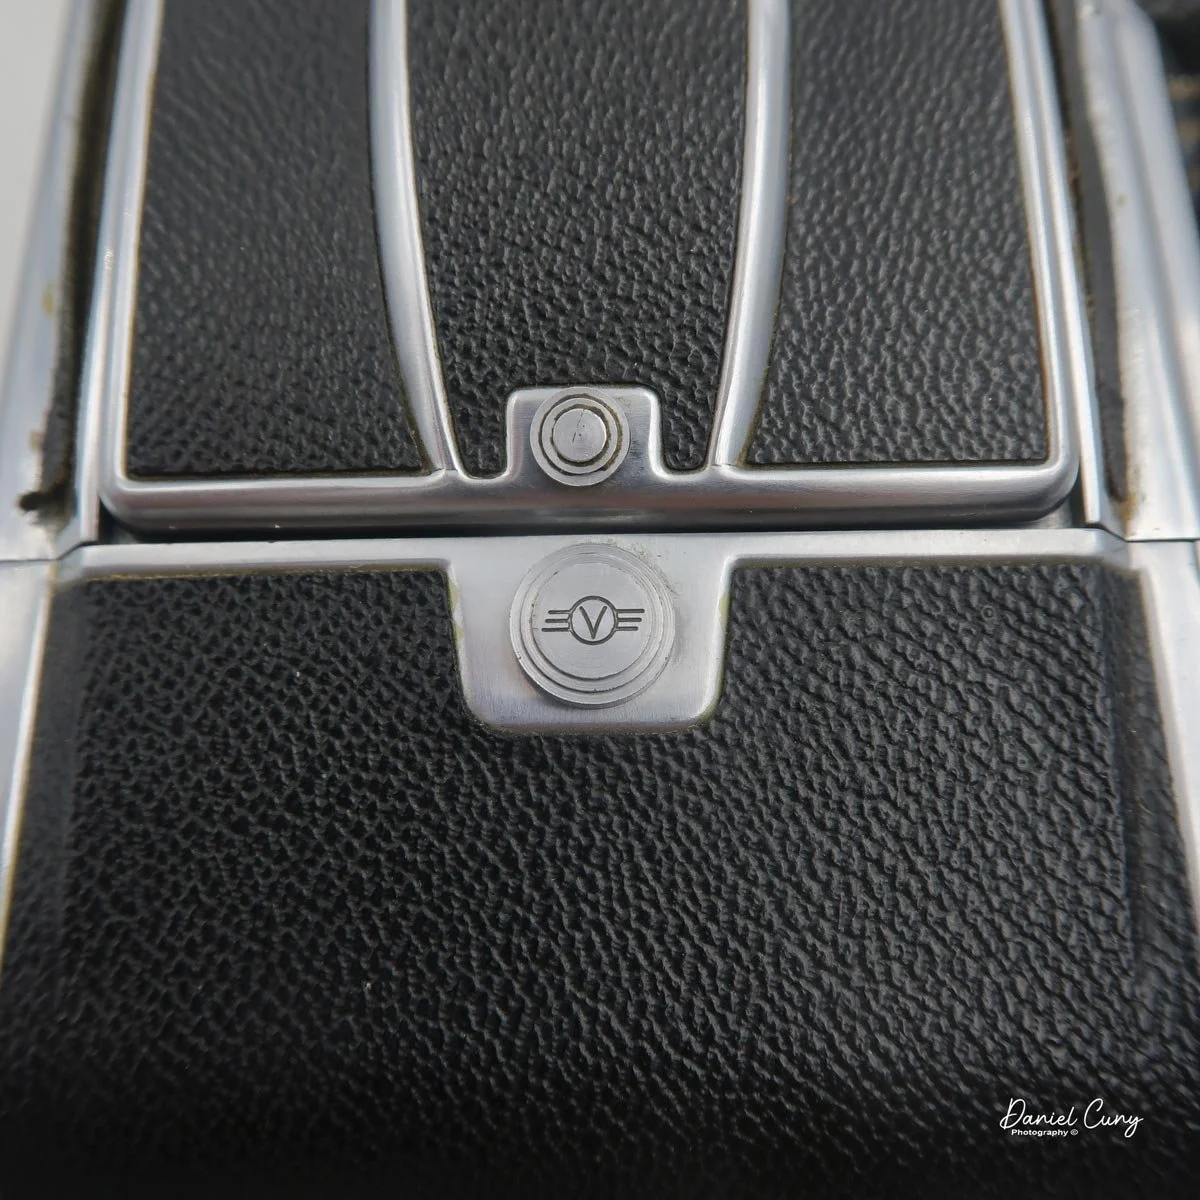
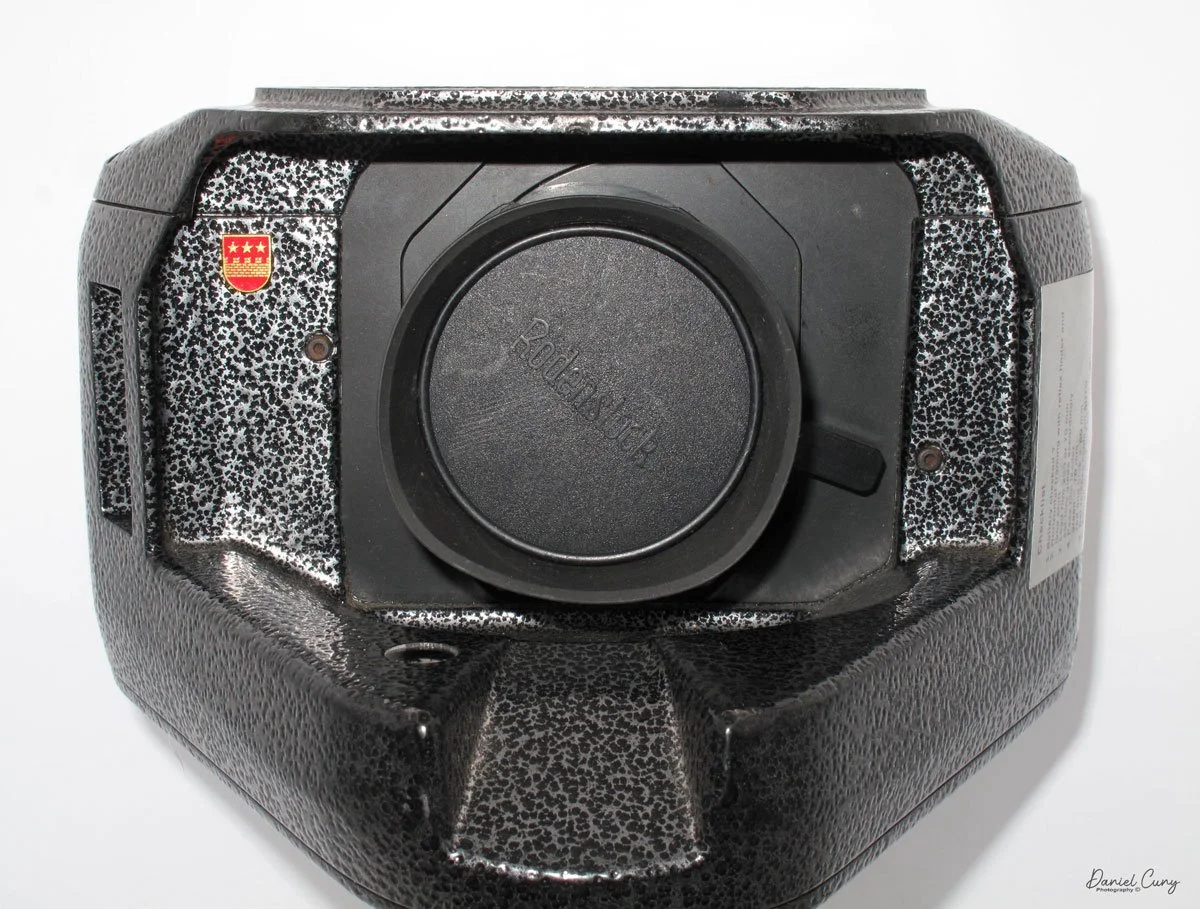
As mentioned, the Alpa RotoCamera produces a 360-degree image on either 120/220 or 70mm film. The camera is powered by a 12v rechargeable battery that powers motors in the camera's base, which rotate the head around a cylinder. According to the manual, you can produce either 90, 180, 270 or 360-degree views with the camera. On the front of the camera is a Rodenstock Grandagon-N 75mm f6.8 lens. Just to the right of the front lens is a lever used for vertical adjustment. If you want to shoot higher or lower, you can slide the lever up or down to adjust the vertical height to avoid getting too much foreground in the photos. There is also a viewer on the side that can be used to see the camera's vertical adjustment.


The camera has two speeds, and the head rotates around the cylinder. The speed is set on the center column by a switch with an "A" for the faster speeds and "B" for the slower speeds. There also are a series of slits in the head that allows for the camera to shoot at different shutter speeds depending on the motor speed and slit width. Switches on the top of the camera head control the slits. One series of switches is for the slit width, and there is another that allows for the slit angle if you're in a situation where you'll want to control excessive brightness in the sky or ground. The camera can shoot anywhere from 1/20 to 1/250 shutter speed depending on the motor speed and slit width. On the rear of the film's back is a chart showing where to put the different switches should you want faster or slower speeds, along with a controlling light on top or bottom.


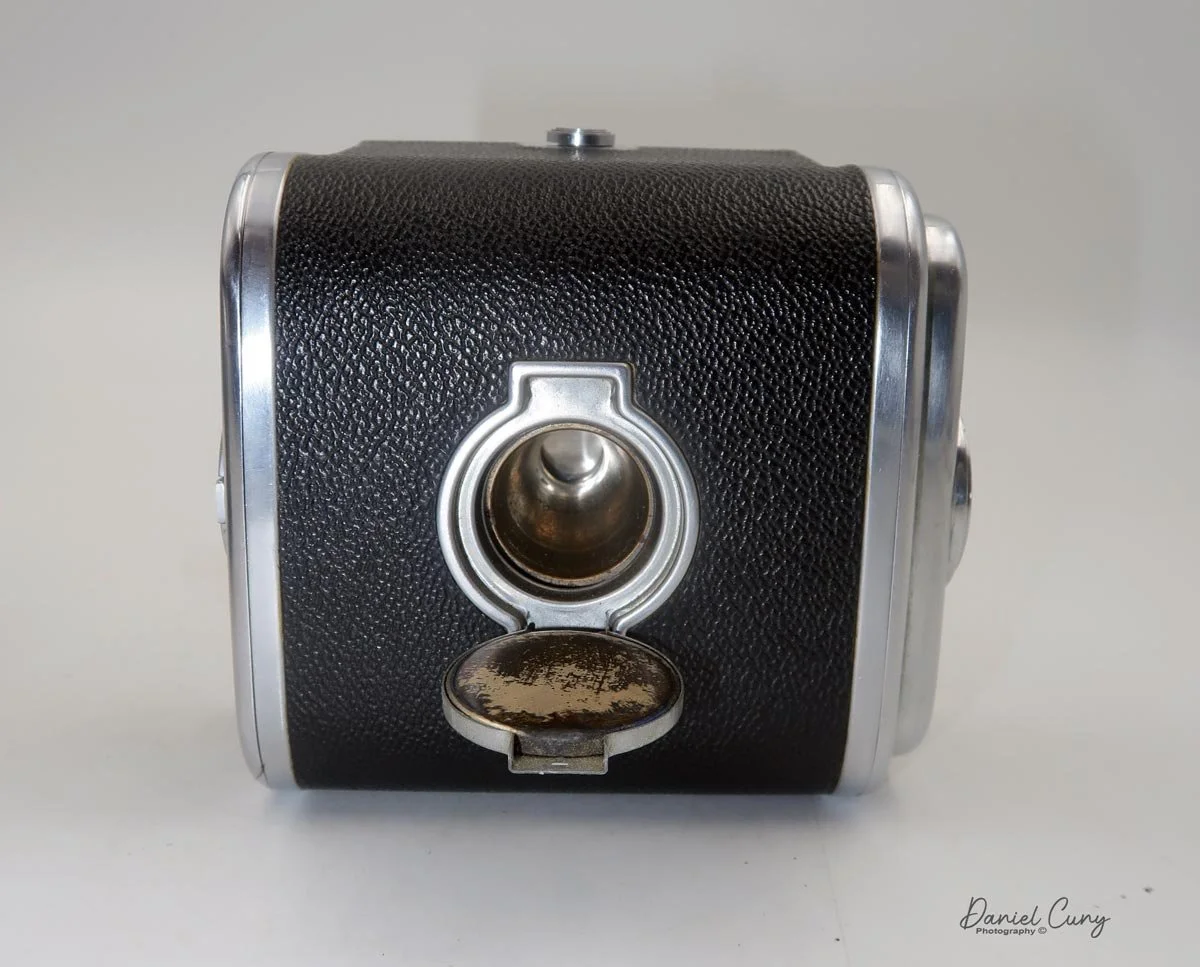
The camera also has a removable film back, and 70mm or 120/220 film can be loaded into it. There is a small hard wheel just below the take-up spool on the film back, which is connected to the film advance cog and fits into the film reel. Just below the slits on the head is a rubber band that goes all around the cylinder. As the head rotates around the cylinder, the hard wheel runs along the rubber under the slit advancing the film as the head spins around the cylinder.
There are two settings on the camera remote control. One is a switch for "Auto" or "Manual," and the other setting is "Rotation." The Auto setting works in conjunction with the angle set on the column for 90, 180, 270, or 360 pans. The manual setting allows you to press as long as you want the camera to pan for. The "rotate" button is pressed to open the shutter and start the camera rotation. The remote and power cable are joined; one end fits into the power pack, and the other fits into the bottom of the camera's center column. There is also an on/off switch for the camera close to where the power and remote cable fit into the camera.
In theory, you load film into the film back, making sure the take-up spool is engaged into the drive gear on the back. Put the back onto the camera. Plug the cables into the power supply and the camera. Turn the camera on, set the aperture on the lens, and check the height adjustment. Meter your scene, then set the appropriate shutter combination by the series of switches on top of the camera and the speed adjustment on the column. Set the rotation distance, and press "Auto" to start the camera rotation. According to the manual, on a roll of 120 film, you'll get 1- 360-degree or 270-degree images, 2-180-degree images or 4-90-degree images.


The Restoration:
The one thing I didn't realize and wasn't shown in the images at the online auction was the mechanical and physical condition of the Alpa Rotocamera internally because when I received the camera, it wasn't in "good working order." On the outside, the camera looked good. Everything seemed to be there, but when I went to take the back off the camera to view the inside of the camera body, the wheels came off the bus. My heart sank as the excitement of having a working camera came to a crashing halt.
The film back still had two 70mm film cassettes inside, but it looked like someone had packed the back of the camera with grease. For what reason, I wasn't immediately aware of it, and the rubber wheel that the film rotates on to advance the film had deteriorated into a yellow mass of goop that looked worse than it was. Another item that was missing was the power supply for the camera. I had the cables for the power supply that led to the camera and the remote control on it. I also had the instruction manual along with a car inverter to charge the battery when in your car. Still, there was no power supply, so I couldn't check whether the camera operated.


I let the camera sit for a few hours as I started thinking about how to get the camera into a somewhat presentable condition. My mind wasn't even on getting the camera, but on starting to clean up all the goop that was not only in visible areas but in areas of the camera I wasn't even sure I could get to. I did another more exhausting internet search when I came across someone who had done a restoration on the camera itself. Bayless Projects has a tremendous video on YouTube that is very comprehensive. He lives in London, so I started an email chain with him, letting him know I, too, had a camera I needed to restore. He helped me with the power supply and with many other questions I had about the camera.
It was time to get the camera back in (hopefully) working condition. I spent the next couple of days cleaning up the goop on the film back, which got into places I needed to disassemble to clean out. With many Q-tips, Isopropyl alcohol, and lightly soapy water, I cleaned the film back up nicely. The film holders moved well, and the film drive gear turned as I rotated the hard wheel, which wasn't moving smoothly previously.


Now, to move onto the camera head. I removed some of the stickers that someone placed with film data from the previous owner. Something was rattling in the head, so I needed to take the top off to see what was rattling around. Once I removed the top, I could see a ground glass still intact and not broken that went where the viewer went. This was used to check the vertical adjustment for the images. Once I got the ground glass in place, it was time to tackle the back of the camera, which had the remnants of the previous rubber band that goes around the cylinder. Luckily, this came off very easily, and I didn't need much cleaning.
Now, to move onto the camera head. I removed some of the stickers that someone placed with film data from the previous owner. Something was rattling in the head, so I needed to take the top off to see what was rattling around. Once I removed the top, I could see a ground glass still intact and not broken that went where the viewer went. This was used to check the vertical adjustment for the images. Once I got the ground glass in place, it was time to tackle the back of the camera, which had the remnants of the previous rubber band that goes around the cylinder. Luckily, this came off very easily, and I didn't need much cleaning.


Thomas (Bayless Projects) helped me with the power supply, which I purchased from him, and he made it for me and sent it over from the UK. I bought a battery to put in the housing. Once I got the battery in the power supply and connected it to see if the camera was working, my heart sank aging…..nothing. With the power on and the battery connected, I turned the head a bit, and luckily, the head on the Rotocamera started to spin. At that point, I was so happy to see the camera spinning. Was that a fluke? I unplugged the battery and let it sit for a few minutes before I tried it again. The camera started to spin without any help from me, so at this point, I knew the camera was functional. You could also hear the shutter open and close as I pressed the rotation button. What a relief. Now, I had a camera that "could" make images (hopefully). The one thing I couldn't figure out was the "Auto" setting. Nothing in the column needs to be pressed to set the camera at different angles for shooting. Thomas said his camera does the same thing, so I can only use the camera in the "manual" position, where I set the angle of view by pressing the rotation button.
I needed to replace the rubber band around the cylinder to get the film to rotate when the film was back on the camera. I purchased a replacement that had the same specs that Thomas recommended. He also said it's not perfect, but I wanted to try it. When I received the rubber, it was horrible. The glue backing didn't hold at all. It was so bad that the paper they put on the product to protect the glue didn't stick on. It was also rolled in the opposite direction, so the end of the rubber kept popping out. I tried two-sided tape to hold it in, but that didn't work either.
Then, I had the idea to turn the rubber around so the curve was going around the cylinder instead of against it. The tape on the back side of the rubber would give more friction as the film wheel rotated. I put a roll of film into the camera and gave the camera a try. Unfortunately, the camera rotated about 90-100 degrees, then stopped as one of the ends of the rubber came off and jammed in the camera. In theory, it made sense, but the rubber was too thick, and the end didn't fit together and kept coming apart.
The rubber needed to be a little thinner and without the crappy glue. I rubbed the glue off the rubber, and to get it to be a bit thinner, I stretched the rubber when I put the two-sided tape on the curved side to make it thinner. To keep the ends together, I added some two-sided tape to one side of the rubber so that when it went around the cylinder. There was extra tape to hold the second end in place. I put it back into the cylinder, and it worked well. It's time to put another roll of film into the camera for another test.
I took the camera to the front of my house, set up the tripod, and crossed my fingers to see if it would work. I put a roll of B&W film into the back, set the camera to the settings the light meter said, and pressed the rotate button. The camera worked!!!! I could hear the shutter open, the camera rotated, and the film come off the spool and wrap around the take-up spool. SUCCESS.

Thrid test worked to perfection.
With such success on the test roll, I decided to take the camera into Portland near the river with bridges and see what I could get there. Knowing the Cherry trees were recently blooming, I even packed some color film to see the river's edge and beautiful cherry blossoms in the photo. Having lugged the camera to the river's edge, setting the camera up, plugging in the power supply, and pressing the rotation button, I could hear the shutter open, but the head didn't start to turn. So I gave it a gentle push, and it began to turn. Unfortunately, I could also see it wasn't moving smoothly, which would cause banding.
The one thing I did notice is that when you have the film in the back of the camera, the camera has a little harder time doing the rotation because of the extra tension the film brings to the camera. Pulling the film out of the spool and running it across the shutter, I'm still trying to figure out if it's the rubber around the cylinder or the power to the motor. I'll continually work on how this works together to make the film move correctly.
The first roll was B&W, which I processed when I got home and has banding. I also picked up the color film and noticed. At the same time, the camera did a somewhat better job at rotating; the drive wheel that moves the film from one spool to the other didn't have as much pull as it did with the test in front of my house. For the 2-3 rolls I did away from home, the camera film transport didn't pull the film off the spool. It left the tail end of the film exposed to light. Something is going on here, whether the rubber band around the cylinder or the drive wheel needs lubrication. I also agree with the film I did on location; portions of the film look like motion blur, so the film is not transporting, causing slight banding and blur.
My Results:
Here is the image taken in front of my house during the test. I didn't change the vertical adjustment, and I had the lens pretty high, so there's no foreground or yards in the houses on my block.

These next images were taken down by the river in Portland, Or.


Conclusion:
This camera is still a work in progress. I did order a slightly thinner rubber to try on the cylinder, so I'm crossing my fingers that it will work well on the camera.
Thank you for taking a few minutes from your day to read about an odd and unusual camera that hopefully will be as rewarding in the images it creates as it is frustrating to get it back in good working order.
Until next week, please be safe.