Minolta-35 Model II

My Minolta-35, Model II

The Minolta-35 Model II camera I have was an unexpected discovery, purchased with several other cameras through an online auction. It wasn't the camera I was originally after in the lot, but the only thing that distinguished it in the photo was the fitted case, with 'Minolta' proudly displayed on the face.

 There were so many different models of camera from Minolta during this timeframe that I wasn't sure what was actually in the fitted case. Still, when I received the "lot" of cameras and uncased the Minolta-35, someone had painted the camera black. And whoever painted it did an abysmal job of it. I only wish I had photos of the camera in that state, but I didn't think of it then. The camera was painted black, and the shutter wasn't working. The good news is that the camera had a good and clean lens.

 Over the years, I have brought the camera to a few different collectible camera shows in hopes of selling it, but no sales have been made. 

 One day, a few months ago, I was browsing the cameras on my shelf, looking for one to write about, when I picked up the Minolta. I felt a personal connection to it, and determined to do a blog post, I sent it off to my trusty camera technician, Allen, at CameraWerks in NY to have it CLA'd. Despite its modest value, the fact that it's from the early 1950s and a very respectable Leica thread mount 'clone' made it worth the investment for me.

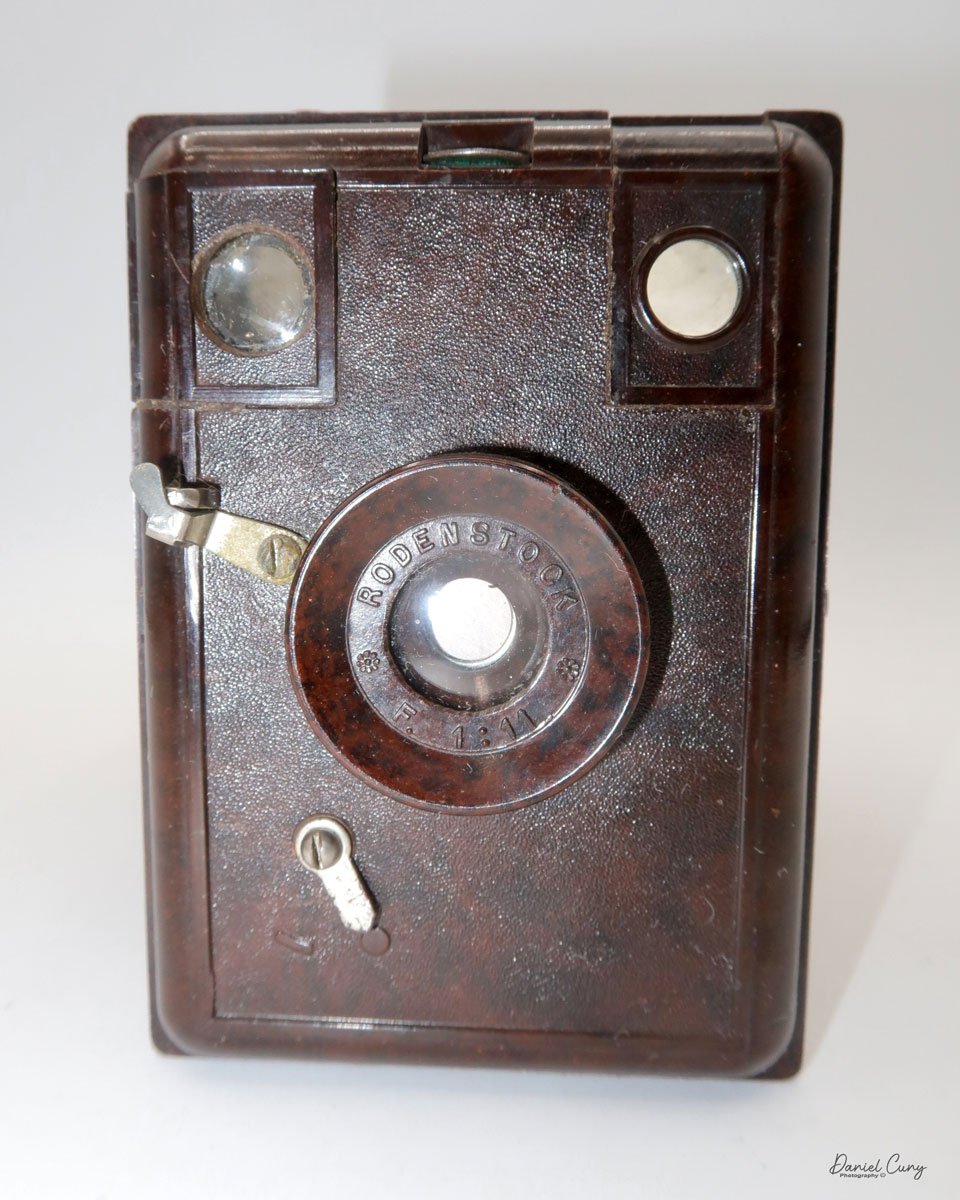
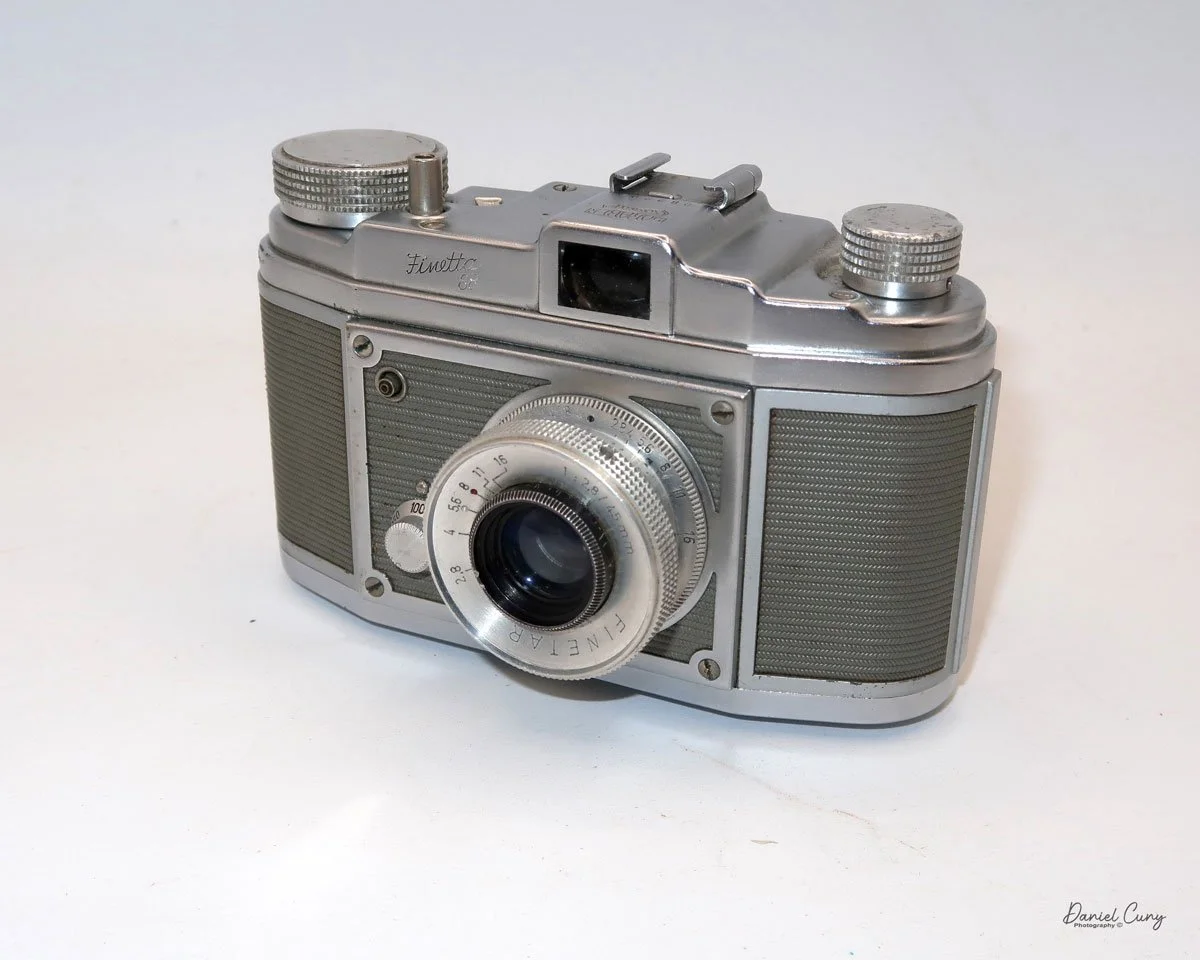
My Minolta-35, Model II with case.

 Before I sent the camera to Allen, I wanted to get the black paint off the camera and bring it back to the original chrome camera it was. I had bought some Acetone to see if I could gently get rid of the paint and not ruin any of the other parts of the camera. Unfortunately, the Acetone didn't work well and didn't take much of the paint off. Then, I noticed that if I used my fingernail, the paint would chip off reasonably easily. I also noticed that in our kitchen, we had some bamboo skewers, which seemed to work OK, so to get into some of the tighter spots, I used the bamboo skewer, and to get into the very tight areas, I used the tip of some of the metal tweezers I have for some very minor repairs.

 The camera still has some very minor spotting of black paint, as you'll see in the photos in the article, but 99.8% of the paint is gone. The camera looks considerably better than it did before. It's in great working condition, and even the rangefinder is clean and accurate, so it was time to do my blog on this early Minolta 35mm rangefinder camera.

The Company:

Minolta was a pioneering Japanese camera manufacturer known for its innovative contributions to photography. Founded in 1928 as Nichi-Doku Shashinki Shōten (which translates to "Japanese-German Camera Company"), the company was renamed Minolta in 1933. The name Minolta is derived from "Mechanismus, Instrumente, Optik und Linsen von Tashima," reflecting its German-Japanese technological collaboration.

Ad for Minolta 35 camera.

 Minolta's early cameras were heavily influenced by German designs, particularly Leica and Contax rangefinders. The company released its first camera, the Nifcarette, in 1929, followed by various medium-format folding cameras in the 1930s. After World War II, Minolta resumed camera production, releasing the Minolta-35 in 1947, which became Japan's first 35mm camera with a coupled rangefinder.

 Minolta's breakthrough came in 1958 with the Minolta SR-2, its first single-lens reflex (SLR) camera. Throughout the 1960s, the company expanded its SLR lineup, introducing the Minolta SR-T 101 in 1966, which featured an innovative through-the-lens (TTL) metering system. The 1970s saw Minolta partner with Leica, resulting in co-developed cameras like the Leica R3 and Minolta XE-7.

 One of Minolta's most revolutionary releases was the Minolta XD-7 (XD-11 in North America) in 1977, the world's first camera with aperture-priority and shutter-priority automatic exposure modes. This technological advancement set the stage for further automation in cameras.

 In 1985, Minolta changed the photography world with the Minolta Maxxum 7000 ( Alpha 7000 in Japan and Dynax 7000in Europe). This was the first SLR camera with fully integrated autofocus, making it far easier for photographers to achieve sharp images quickly. The Maxxum series gained popularity, pushing competitors like Canon and Nikon to accelerate their autofocus developments.

During the 1990s, Minolta expanded into digital imaging and compact cameras while maintaining its SLR dominance with the Dynax (Maxxum) series. The Minolta RD-175, released in 1995, was one of the earliest digital SLRs, marking Minolta's transition into the digital era.

 In 2003, Minolta merged with Konica, another Japanese camera giant, to form Konica Minolta. However, due to declining camera sales, Konica Minolta exited the camera business in 2006, selling its assets, including the popular A-mount system, to Sony. This acquisition helped Sony establish itself in the DSLR market, leading to the Alpha series that continues today.

Though Minolta as a brand no longer produces cameras, its legacy lives on through Sony's Alpha series, which traces its roots back to Minolta's innovative technologies.

My Camera:

My Minolta-35, Model II is 5 3/8" wide by 3" tall by 3" deep, which includes the Chiyoko Super Rokkor 5cm (50mm) F2.8 lens. If I take the lens off, the body only is 1.5" deep. The camera weighs 1 lb. 10.9 oz is a very comfortable camera size and weight, and it fits into my hands nicely. The Minolta-35 Model II has shutter speeds ranging from 1/500 down to 1 second, with "T" for timed exposures and "B" for bulb. 

 The Minolta-35 Model II also splits the shutter speeds into two different dials on the camera with the higher speeds on the top dial, which go from 1/500 to 1/25 and "B" and from 1/25 to 1 sec, and "T" on the secondary shutter speed dial on the front of the camera just above the self-timer. To set the shutter speed, you'll need to lift up the dial and turn it to the desired speed for the exposure. Changing the shutter speeds should only be done once you cock the shutter.

To use the secondary or lower shutter speeds, the top dial needs to be set to 1/25, and the lower speed dial needs to be set at whatever of the slower speeds you'll be shooting. This method is prevalent for Leica copy cameras from this era. 

 The Chiyoko Super Rokkor lens on my Minolta-35 is smooth and in excellent condition. To focus, similar to other Leica thread mount lenses, a locking pin is used to lock the lens to the infinity position. To release the lock and focus to a closer range, press the release button and turn the lens to the desired focus distance. Inside the camera is a built-in rangefinder, which will aid the photographer in the distance needed to take a sharp photo. Along the outer rim of the lens is the lens's aperture ring, which goes from F2.8 to F22.

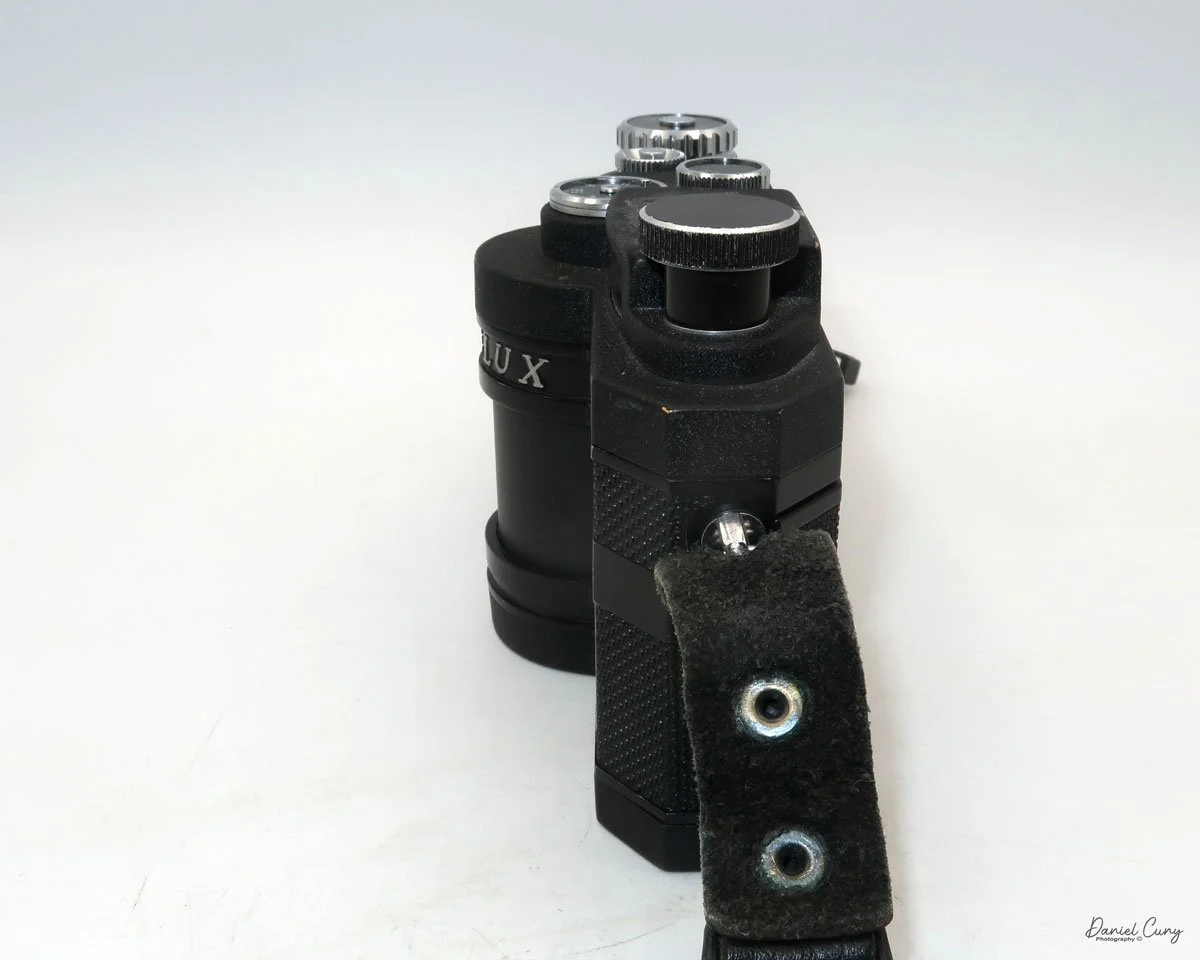
The shutter release is on the top of the camera, just to the right of the shutter speed dial. A small crown-shaped piece surrounds it, which can be removed to use a cable release for the timed or longer exposure times built into the camera.

 Just above the shutter release is the rewind switch, which you slide to the "R" position to release the camera's drive gear so you can rewind the film back into the film canister when you complete the roll of film. Just to the right of the rewind switch is the film winding knob which has an arrow on top to show the user which direction to turn to advance the film to the next frame. At the bottom of the film winding knob is the frame counter which you need to zero out when you load a new roll of film into the camera so you'll know how many photos you've taken on the roll you loaded into the camera.

On the far left of the camera is the film rewind knob. Lift the knob up to make the rewinding of the film back into the film canisters easier. Once the back of the camera is open, you can lift the rewind knob even higher to remove or load the film canister in or out of the camera.

 Right in the middle of the camera, on the top plate, is the Minolta-35 name along with the serial number, which on my camera is 90899, and Chiyoda Kogaku. I enjoy the modernistic font used on the older Minolta camera, which is very elegant.

Top plate with name on the Minolta-35, Model II camera.

 On the back of the camera is the viewfinder window for focus, and on the outside is a dioptric adjustment. This is for people who wear glasses. Turning the dial around the finder window allows you to adjust your glasses prescription to correct vision issues. You can put the camera to your eye without wearing your glasses and still get a sharp photo. In the center of the back of the camera is the flash sync plug, which is just below the accessory shoe used for a flash attachment.

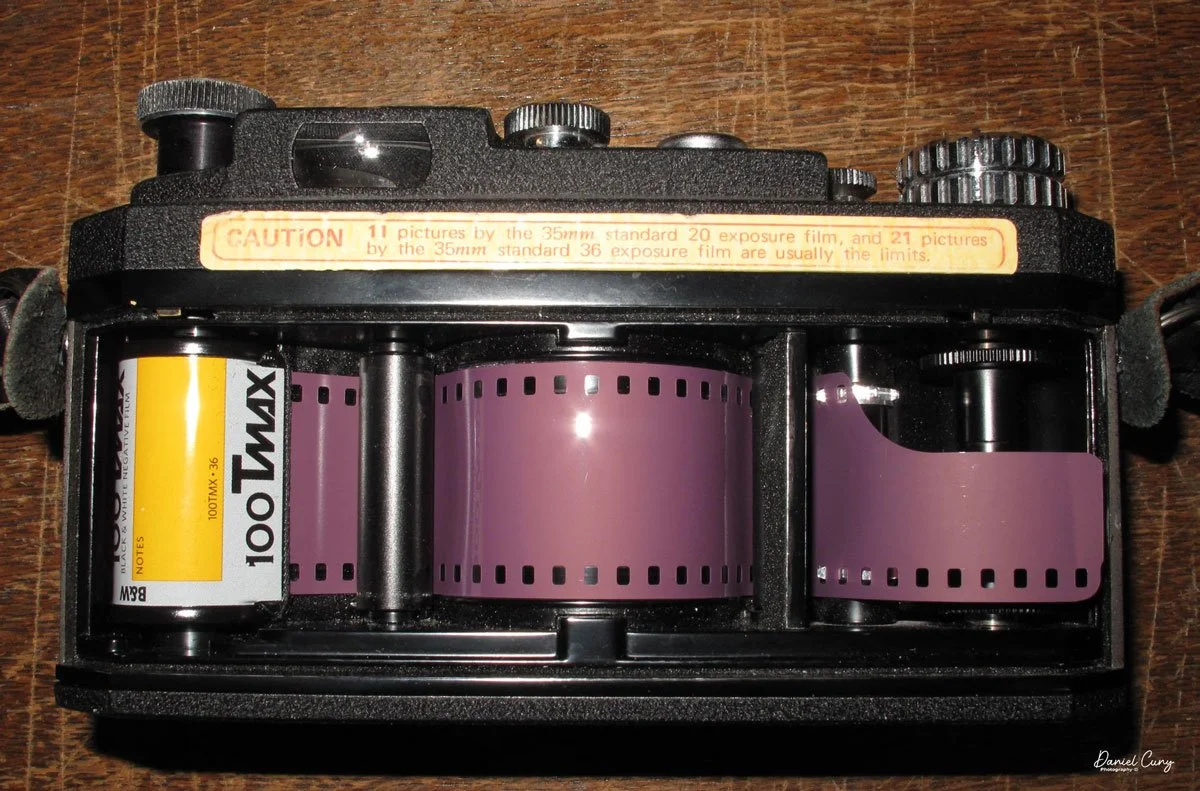
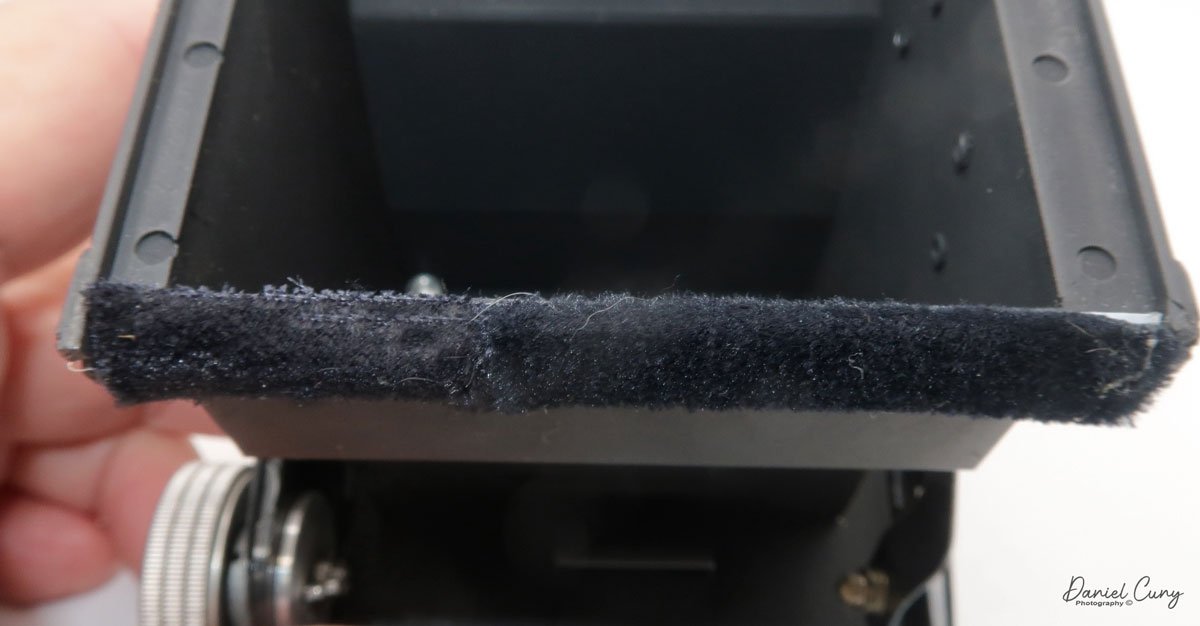
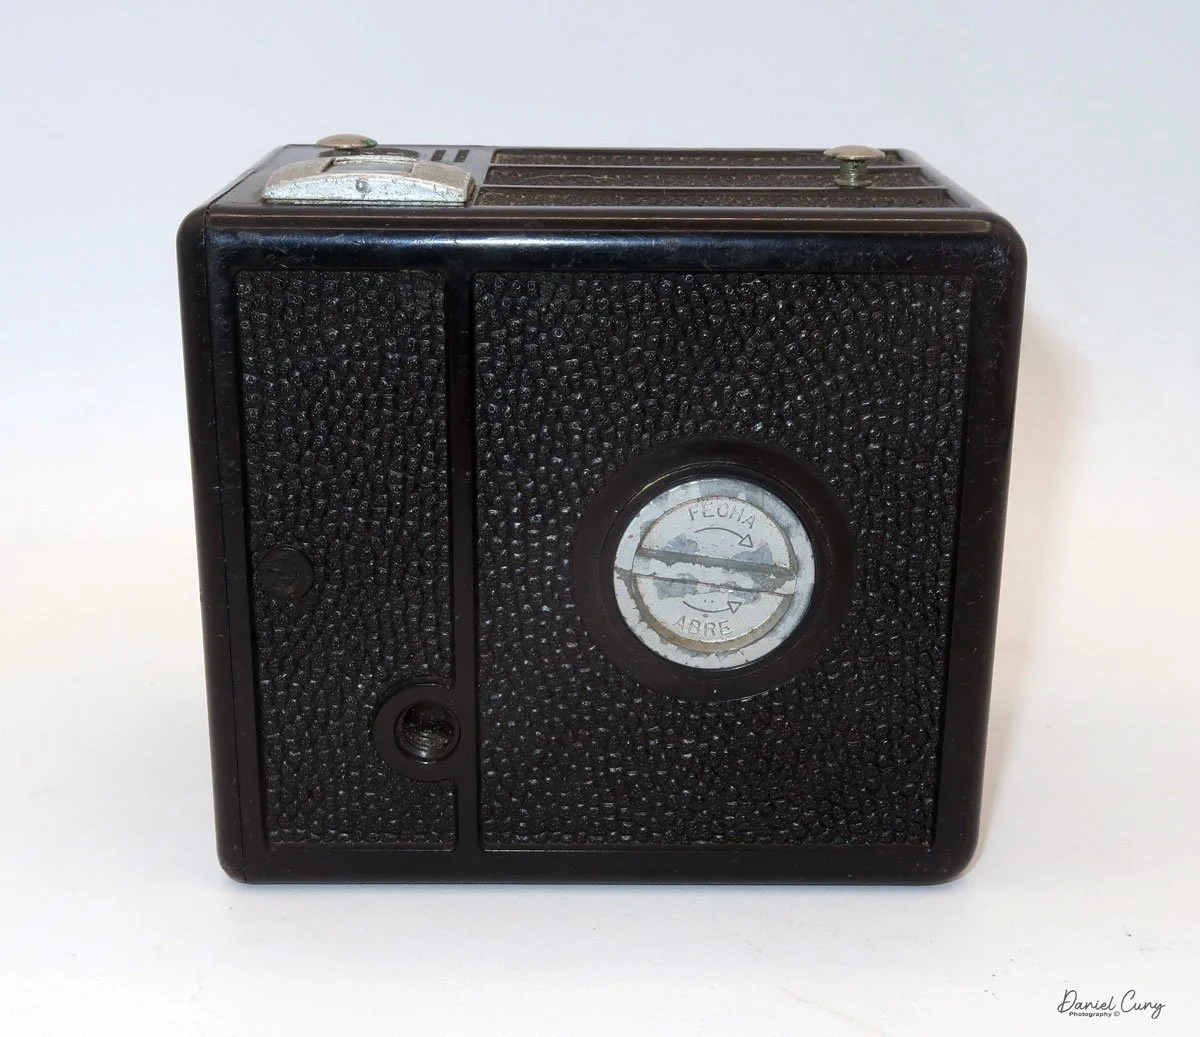
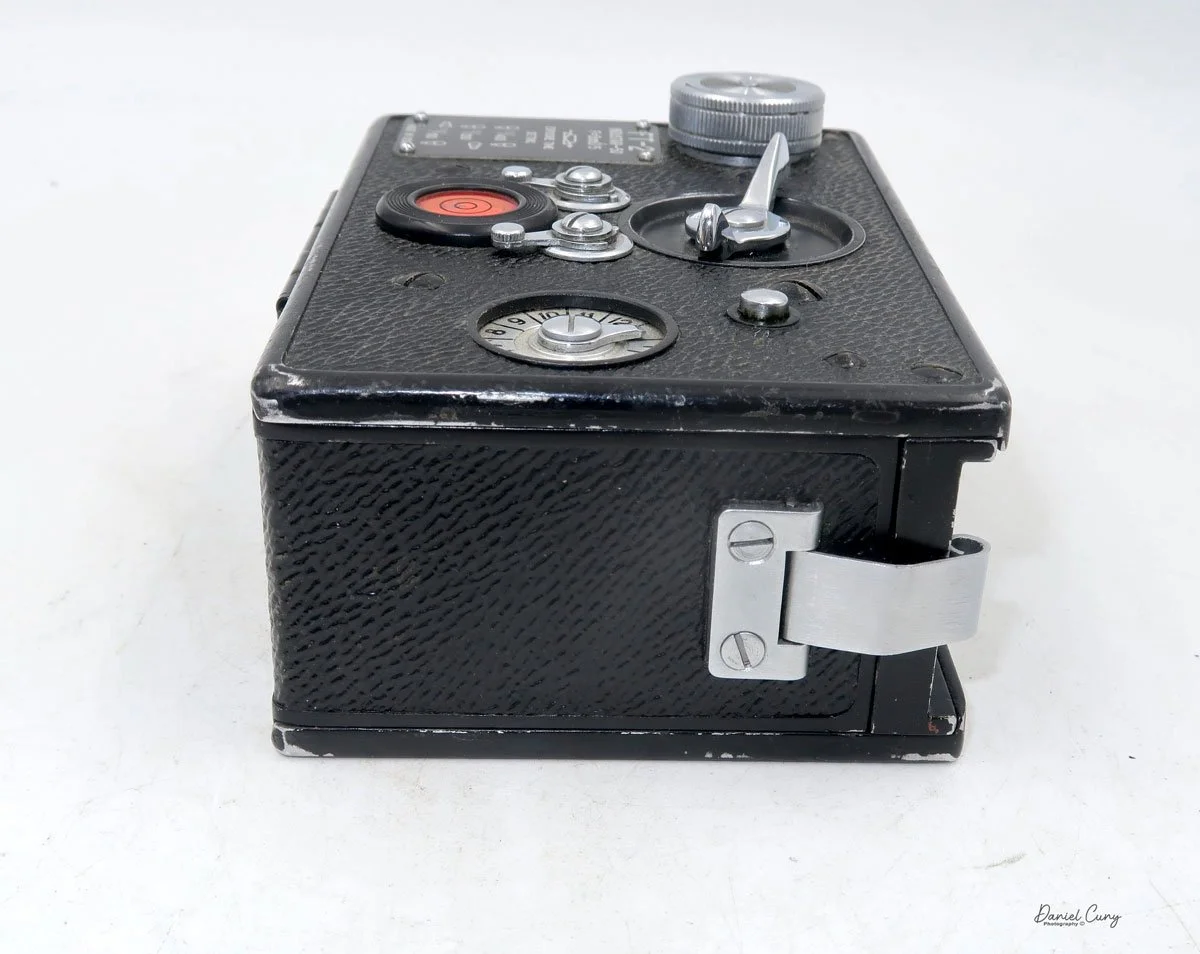
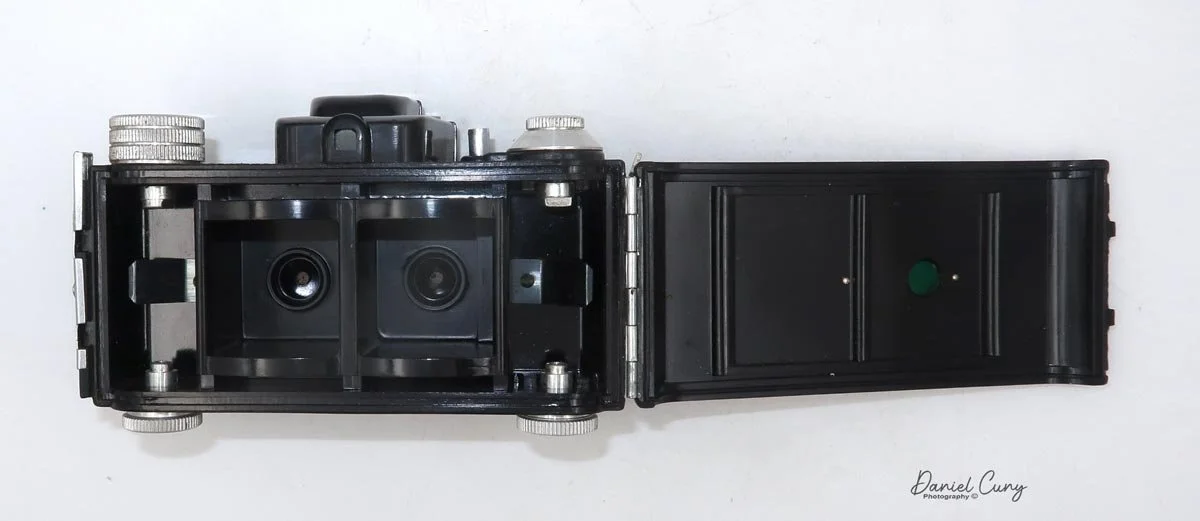
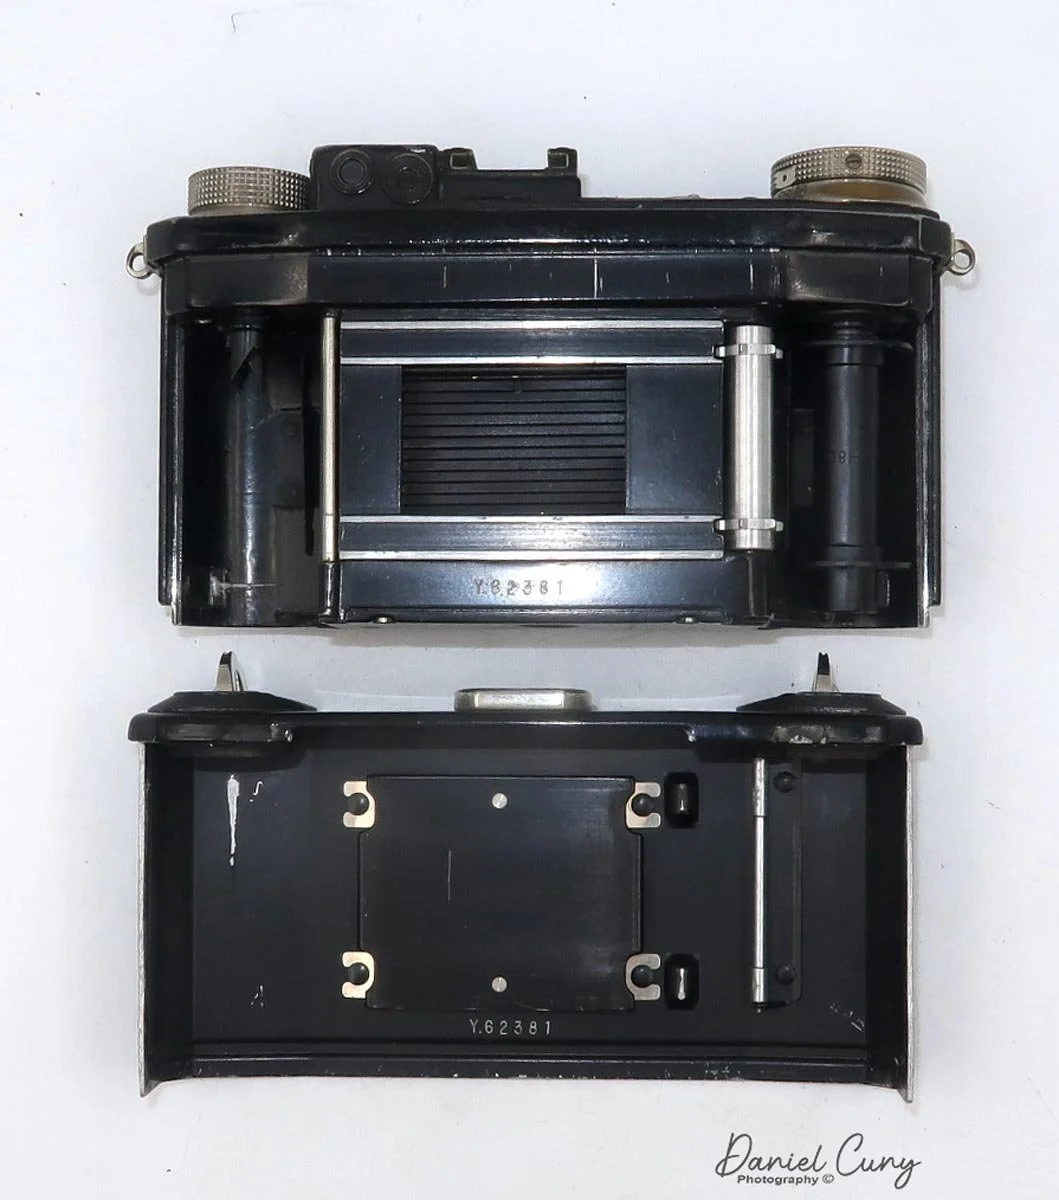
To open the camera to load film, there is a small knob on the bottom of the Minolta-35 that you'll need to turn counterclockwise until the "open" dot is lining up with the arrow. When this happens, the back of the camera springs open, and you load the camera just like you would any standard 35mm camera. 

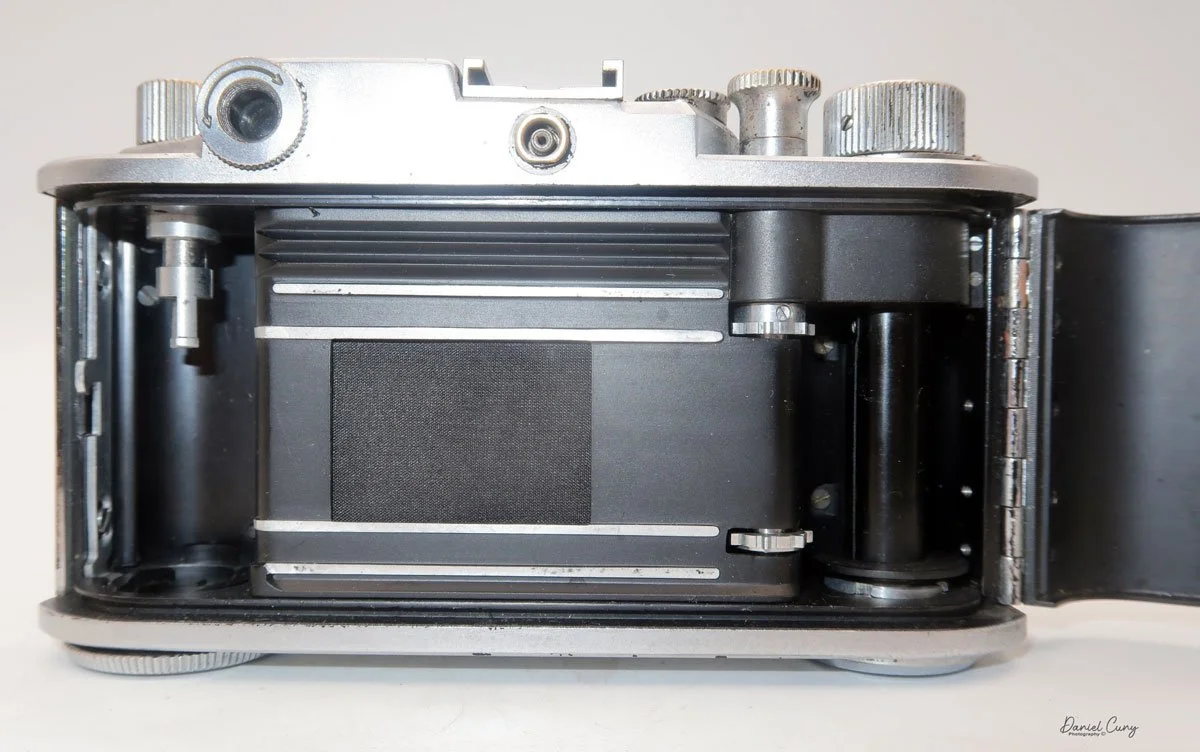
Lift the rewind knob to load the film cassette into the camera. Pull the leader across the drive gears and put the film leader into the slot on the take-up spool. Take the tension of the film up by turning the rewind knob clockwise to take the slack up on the film. Close the back turn the open/close knob to the "closed" position to lock the camera's back, and wind to your first frame. Watch that the rewind knob is turning when you advance the film so you know the film is transporting in the camera, and set the frame counter to number one.


My Results:

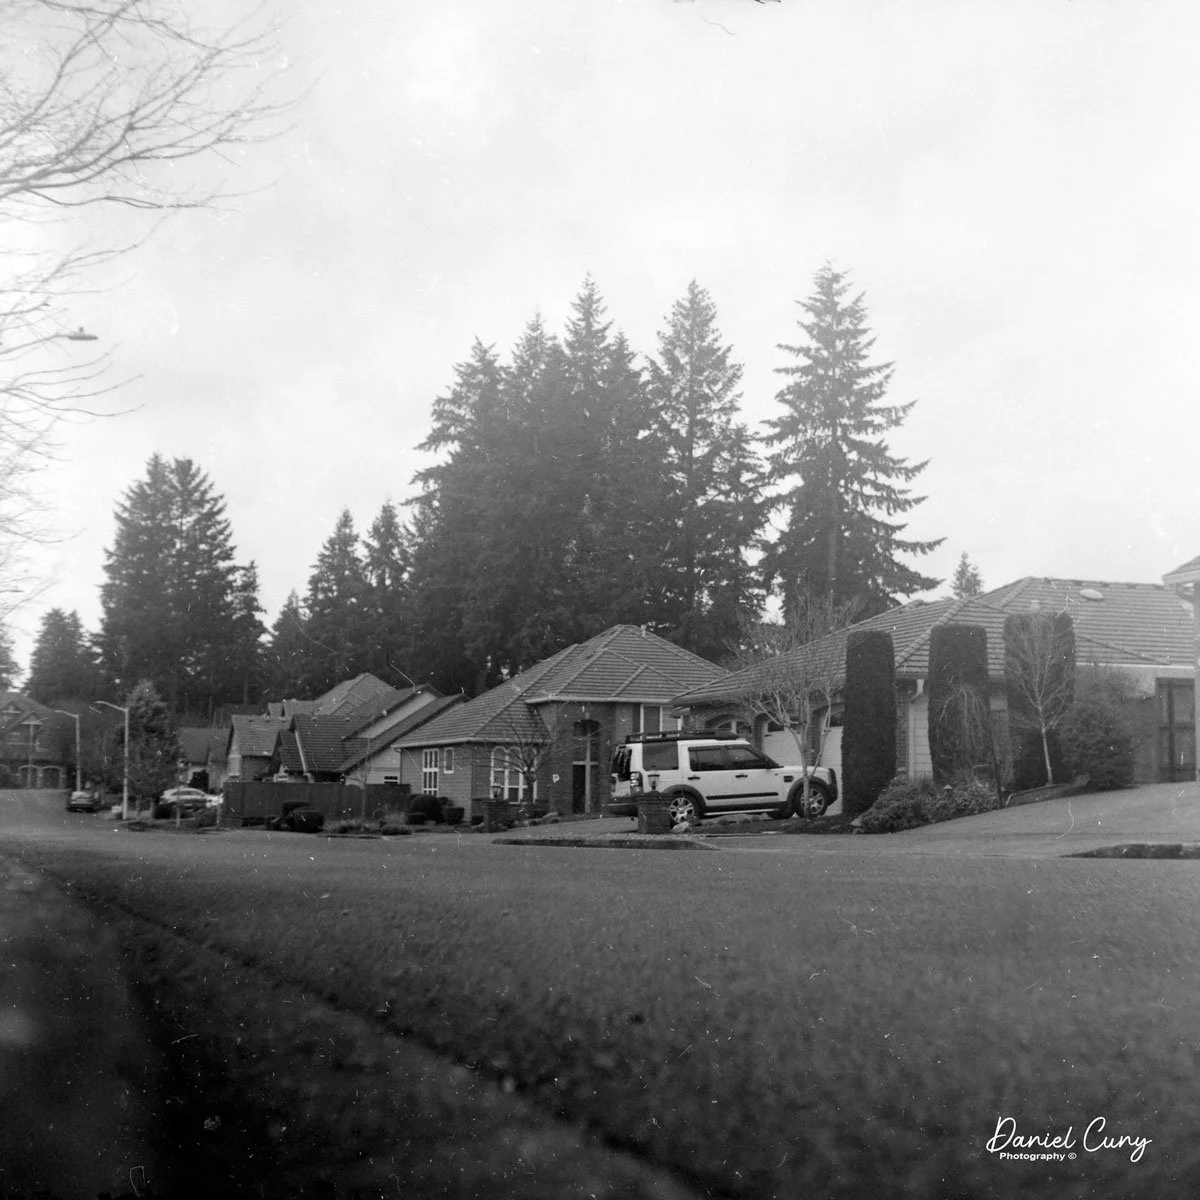
I loaded my Minolta-35 camera with a roll of Ilford Pan F Plus 50 ISO black-and-white film. I wanted to use a slow speed to see how the camera would perform in lower-light situations. I also had my trusty Sekonic L-308 meter with me to achieve accurate exposures. I knew I could always count on Sekonic to give precise light readings. 

 Now that I had film loaded into the newly serviced camera, I walked through my yard and neighborhood to take photos with the Minolta-35 camera. Here are a few of the images I took on my walk.

My Conclusion:

The camera was enjoyable to photograph with. The rangefinder was bright and accurate. I tried many slow shutter speeds to see how the camera performed under these low-light circumstances. I had a great time using this camera and want to continue using it. The overhaul made a tremendous difference; without the black paint on the camera, it also looks terrific.

 Thank you for taking a few minutes from your busy schedule to read about this excellent rangefinder camera from Minolta

 Until next week, please be safe.

Leica I

My Leica I camera

I purchased the Leica I camera and accessories around 6 years ago when I saw a local ad of someone wanting to sell off a recently departed family member's old cameras. I responded to the ad, and for some reason, the person liked my passion for cameras and photography, so when I heard that the camera they had from a grandparent was a Leica, it piqued my interest. They had mentioned that the camera was in good shape and had some accessories in a case; I told them I was interested in seeing what they had.

 I try not to get into situations where you meet someone with some valuable equipment at a random location, so for safety reasons for both parties, we met at a local police station, which was agreeable to both. When they pulled out the case and I saw it was an early Leica, my heart fluttered a bit. 

My Leica I outfit

 Pulling the camera from the case, I found it in excellent condition and working. All the shutter speeds sounded accurate to the ear, and the rangefinder and extra film cassette were in the metal container and within the case, too. The owner wanted to be sure the camera was going to a good home and not just being sold. I reassured the person that I planned on keeping the camera and shooting with it, which they loved.

 Since adding the Leica I to my collection, I've made a point to keep it in top condition. Every now and then, I take it out and give the shutter a few test clicks to ensure it's in good working order. However, due to my busy schedule, I hadn't had the chance to load a roll of film and actually use the camera until recently.

 I wanted to write about the Leica 1 for my blog about a month ago.  I took the camera out and started to put a roll of film into the camera to shoot with it, and the shutter jammed. What bad luck! I called my friend Allen Wade at CameraWerks in NY, who always does a terrific job servicing my cameras and lenses. I sent the Leica 1 along with a few other items to him to get serviced. About a month later, I received the cameras back from him, and they were in fabulous condition. At this point, I put a fresh roll of film into the camera to see how the camera worked so I could write about it.

The Company:

Oskar Barnack was a German optical engineer who revolutionized photography by inventing the first practical 35mm camera, the Leica I. Born in 1879, Barnack initially worked in the optical industry, eventually joining Ernst Leitz Optische Werke, a German company specializing in microscopes and optical instruments. His pioneering work in miniaturizing cameras led to the creation of the Leica, which forever changed the way photographs were taken.

Ad for Leica 1

 Before Barnack's innovation, photography relied on bulky, cumbersome cameras that used large-format glass plates or film sheets. These devices were difficult to transport and required long exposure times, limiting their usability. An enthusiastic amateur photographer, Barnack sought to develop a more compact and convenient camera system that would still produce high-quality images. He turned to 35mm cinema film, which was already used in the motion picture industry, and repurposed it for still photography. He aimed to create a small, lightweight camera that could capture multiple images on a single roll of film.

 Around 1913-1914, Barnack developed a prototype of what would later become the Leica (short for "Leitz Camera"). This early model, known as the "Ur-Leica," used perforated 35mm film and a horizontal transport mechanism. The key innovation was that the film was advanced in small increments, allowing multiple exposures on a roll rather than requiring a single frame per exposure. Barnack also incorporated a focal-plane shutter, providing precise control over exposure times.

 The outbreak of World War I delayed the commercialization of the Leica. Still, in 1924, Ernst Leitz II, head of the Leitz company, decided to move forward with production. The Leica I was officially introduced at the Leipzig Spring Fair in 1925, marking the beginning of the 35mm camera revolution. The camera instantly succeeded due to its portability, superior image quality, and innovative design.

 Leica cameras quickly became popular among professional and amateur photographers, particularly in journalism and street photography. Their ability to take quick, candid shots without cumbersome equipment made Leica the camera of choice for legendary photographers like Henri Cartier-Bresson and Robert Capa.

 Over the decades, Leica continued to innovate, introducing models such as the Leica II (1932) with interchangeable lenses and the Leica M series (1954), which refined the rangefinder design. The company also played a crucial role in developing optical advancements, such as high-quality lenses like the Summicron and Noctilux.

 Today, Leica remains an iconic brand known for its precision engineering and commitment to craftsmanship. Oskar Barnack's vision laid the foundation for modern photography, and his pioneering work continues to influence camera design and photographic culture worldwide.

My Camera:

The first thing I noticed when I started to use the Leica I was how compact the camera is. When the lens is retracted, the camera is one you can put into your coat pocket to have handy when traveling or just for everyday use. The camera is 5.25" wide by 2.5" tall, including the winding knobs and viewfinder, by 1 5/8" deep when the lens is retracted and 2.5" deep when the lens is extended. My Leica 1 weighs just under 1 lb. and comes in at 15.6 oz without film loaded into the camera. The serial number on my camera is 19569, which, according to the lists online, the camera was made in 1929, along with a bit over 8,000 made that year. The Leica 1 cameras were made between 1926 and 1931 and were popular, producing approximately 70,000 cameras during that time. My camera comes with a Leitz Elmar 50mm f3.5 lens, and I've looked everywhere but do not see a serial number on the lens. This could be because the camera didn't have interchangeable lenses, and the serial number for the camera was enough.

The early Leica is different from the later models as the rangefinder is separate and needs to be attached to the accessory shoe for the photographer to achieve fine focus on the subject. Once the photographer uses the rangefinder, they need to transfer the focus distance shown on the rangefinder to the lens focus before taking the photo, so the process is longer and more tedious. The viewfinder on the top is for composition purposes only.

 Also, the lens needs to be extended from the camera body and "locked" into position by turning the lens clockwise until you feel the lens cannot be turned anymore. Now you're in the "taking" position of the lens. To retract the lens for transportation or to put it away, turn it counterclockwise, press it back into the body, and put the lens cap on so you don't damage the optics. The lens on the Leica 1 isn't interchangeable due to a pin at the 11:00 position on the camera body, which prevents the lens from being unscrewed from the camera body. The pin also limits the lens's ability to focus only from the minimum focus distance of 1.5 feet to infinity. Unscrewing the pin will remove the lens from the body for servicing or cleaning if needed.

Also on top of the camera is the shutter speed dial with speeds of 1/500, 1/200, 1/100, 1/60, 1/40, 1/30, 1/20, and "Z" for timed exposures. You must lift and turn the dial to change the shutter speed. Still, it's always recommended to do so after you cock the shutter, which is done by winding the film advance lever until it stops. The shutter release is next to the film advance lever and just behind the switch for film advance, which is in the "A" position, flipping it to "R" for film rewind.

Loading the film on a Leica is different than what people are now used to when they load a 35mm camera. The back on early Leica's and rangefinder cameras do not swing open. You must remove the base plate by turning a switch on the bottom to the "open" position, then pull the baseplate off the camera. You can take out the film's take-up spool, which you can grab and pull out. The easiest way to load the camera is to put the film leader into the take-up spool, then pull a bit of the film leader out so you can slide the film cassette and take-up spool into the camera body at once. Push the cassette and take the spool into position, ensuring the film is behind the shutter. Put back on the baseplate and turn the switch to "locked." 

Before I wind to the first frame, I always take up the slack by turning the rewind knob a bit, so when I do wind to the first frame, I watch the rewind knob turn so I know the film is transporting across the shutter. Set the frame counter to 1, which is around the film advance knob and can be moved by two pegs on either side of the knob. Double-check to ensure the film advance switch is in the "A" position and wind to your first frame.

 Now that I have the camera loaded with film, I'm going to take a stroll through the neighborhood and see how it performs.

My Results.

After attaching the rangefinder to the camera, I wanted to get the whole experience of what it was like to photograph with the Leica I, as people did almost 100 years ago. I also have my trusty Sekonic L-308X-U around my neck for accurate metering; I went walking through the neighborhood, focusing on the subject, then transferring from what the rangefinder said the focus. Using the meter to get proper meter readings and setting both the shutter and aperture to the meter settings. I really took my time taking photos with this camera.

 Here are a few of the different images I took with the early Leica I camera.

Conclusion:

I can see why people would have liked and wanted to use this camera almost 100 years ago. It's small, compact, and lightweight. The process of taking photos was slower. Still, it was fun compared to what they needed to do 100 years ago. As a photographer, taking your time, metering your subject, focusing on your subject, and composing the photo was fun. It's much different than what we have now with autofocus, automatic metering, and film advance.

I made a short video on the Leica 1 Camera, which shows the controls and loading the camera with film.

 I want to start using the Leica I regularly. It's quiet to shoot with, the lens is sharp, and it's small and compact. Overall, it's a great and fun camera.

 Thank you for taking a few minutes from your day to read about this old gem of a camera.

  I'll be taking next week off, as I'll be helping at a photo conference all week. I'll see you in a couple of weeks. Until then, please be safe.

Panon Widelux F7 Camera

My Widelux F7 camera

I enjoy several different types, styles, or kinds of cameras. When I started collecting cameras over 50 years ago, I was drawn to anything out of the ordinary. If the camera had a different faceplate on a box-style camera or was a different color or shape, these were the items I've always searched for when I go out looking for cameras or anything photographic to add to my growing and now hopefully somewhat shrinking collection as I'm "trying" to downsize my collection.

 One of my favorite types and styles of cameras is panoramic cameras, which fit right in with the odd or unusual types made. They take different forms when you start to look at the various styles of panoramic cameras. They can look like a wood and bellows camera on a geared tripod, which would be a circuit camera and one of the first styles of panoramic camera. They can look like a more extended box style camera but have a lens that rotates across a curved film plane similar to the Kodak Panoram or more intricate Multiscope Al-Vista camera, which employed different sizes of "flags" to speed up or slow down the rotation of the lens. Or an elongated camera similar to the Fuji 6x17 or Horseman 6x12 camera.

Image taken from Widelux F7 Manual

 Essentially, panoramic cameras expose a longer piece of film in the camera itself. They generally have a wide-angle lens to expand the area the camera and film see. It is very similar to cropping the top and/or bottoms of any format film to give the appearance of a longer, broader photo. I remember in the 1980s and 90s when the camera had the "panoramic" feature built into the point-and-shoot camera that did nothing more than have a blade within the camera close to the film plane that would crop the top and bottom of the film frame to take what appeared to be a panoramic negative. Heck, they even had disposable cameras that did just that.

 I have several panoramic cameras, and a few years ago, I purchased a very good Widelux F7 camera. Cosmetically, it wasn't the best, and it needed some work, so I researched where and who could repair the camera for me. Ultimately, I sent the camera to Precision Camera Works in Lakeway, Texas. If the lens turret doesn't move smoothly across the film plane, the camera will cause banding due to the inconsistent movement of the lens.

 Upon completion of the overhaul, they did an outstanding job. They even replaced the difficult-to-turn rewind knob with something better, which makes the camera easier to rewind the film. The best part is the new rewind knob doesn't tear into your skin when you rewind the film, which was one of the big pet peeves of the camera before I had it serviced. They did return the old knob, so if I wanted to have it put back, it's quickly done.

The video below shows the camera being re-wound, then I changed the shutter speed to show the lens movement.

The Old and New Company:

The Old Company:

The Widelux camera was made by Panon Camera Shoko, which was started in 1952 by Nakayama Shozo. A small camera manufacturer originally made the Panon camera, which I wrote about back in 2020. It was a swing-lens camera made for 120-size film. The company was small but specialized in the swing-lens panoramic camera style and improved the larger 120-format camera.

 In 1958, the Panon company, known for its swing lens style of panoramic cameras, introduced its first 35mm panoramic camera, the Widelux F1. This camera, incorporating a 26mm f2.8 lens, exposed a film frame 24x59, approximately 65% longer than the standard 35mm frame. This extra area gives photographers a 140-degree diagonal angle of view and 126 degrees horizontally. Over the years, Panon Camera Shoko continued to innovate and improve its models, leading to the production halt of the F8 model in the mid-1990s.

 1963 Panon introduced the Panophic, a 120-film format swing-lens panoramic camera. This is an updated version of the Panon camera with an interesting design, a curved back, and a much larger viewfinder on top. In 1987, Panon introduced the Widelux 1500.

The New Company:

There is someone more famous than myself who also enjoys panoramic cameras and photography, and that's the Big Lebowski himself, Jeff Bridges, and his wife Susan, a tremendous photographer in her own right. They are partnering with Marwan El Mozayen, Editor-in-Chief of Silvergrains Classic, and Charys Schuler. They have formed SilverBridges, planning to re-introduce the new Widelux X camera. Their goal is to have the camera introduced sometime in 2025. My fingers are crossed, and if they need someone to test the camera and give it a review, I'm personally raising my hand now. I and a thousand other people have a much larger audience than I have.

My Camera:

My Widelux F7 camera is not just a piece of equipment; it's a companion on my photographic journey. It's 6.5" wide, 3 5/8" tall, and 2.25" deep from the front of the lens turret to the rear of the camera. The F7 weighs 1 lb. 14 oz. with a roll of film in the camera. Like all Widelux F7 cameras, I have a 26mm f2.8 lens, serial # 466392. The lens rotates on a cylinder across a curved film plane to get a longer negative area. Because of this longer negative, the camera only takes 21 images on a roll of 36 exposures. I generally get 22 when I use my camera. It will take approximately 13 on a roll of 24. Here is the manual for the Widelux F7.

There are only three shutter speeds on the camera: 1/250, 1/125, and 1/15. The aperture on the lens ranges from F2.8 to F11, so the exposure control, while adequate for most shooting, is less than what most people would consider normal. All of the controls are on the top of the camera, along with a bubble level to make sure things are straight, the film advance and rewind knobs, along with a wide viewfinder to give the photographer an approximate view of what they'll get within the photo.

The more tricky thing about the Widelux camera is the film loading. If not done correctly, which is what happened on my first roll, some of the negative areas won't be sharp. To take the back off the Widelux F7 camera, there is a locking knob on the back to lock by turning counterclockwise to the unlock position and clockwise to lock the back onto the camera, which is clearly seen.

 Once the back is off the camera, the typical film chamber is where you put the fresh roll on the right-hand side. Lift up the rewind knob to put the fresh roll in, then to hold it into place, press the rewind knob down to lock the film cassette into the camera. At this point, I crimp the very end of the film upwards to help the loading process.

There are two columns, one on either side of the curved film plane. The film must go under the first column on the left-hand side, then over the film plane, and then back under the column on the right-hand side. This is where I ran into a problem with my first roll of film. There is a slit between the right-hand column and what you see looking down on the camera. Make sure the film goes all the way down under the column before it comes back up by winding the camera and having the film drive gear pull the film leader back up. The first time I loaded the camera, the film went through the slot, and the right side of my negatives wasn't sharp, and I was disappointed.

One of the reasons why I crimp the end of the film leader is to grab onto the film drive gear when going under the second column. It needs something to catch onto to pull the film up and across the drive gear before I place the leader into the take-up spool. It's not that difficult, but you'll understand once you get the camera. Before I put the back onto the camera, I always take up the slack with the rewind knob, so once I put the film back onto the camera and lock it, I can see the rewind knob turn as I wind to the next frame. This way, I know my film is transporting across the shutter, and I'm taking photos. When I worked retail in a camera store, I can't tell you how many times I had people not load their cameras correctly, and watching the rewind knob turn when advancing the film is a surefire way of telling if the film is loaded correctly.

Arrows showing angle of view.

Now that the camera is loaded and you're ready to start taking photos, it's VERY important to understand how to hold the Widelux camera. You don't hold the Widelux like a regular 35mm camera because of how the lens swings and the wide angle lens; your knuckles and/or fingers will be on the sides of each negative. You want to hold the camera with your thumbs on the bottom of the camera and your fingers on the top—nothing on the sides. Take your meter reading, grab the camera on top and bottom, look through the viewfinder, and press the shutter. You'll hear the whirring of the shutter as the lens swings across the film plane. Wind the film to the next frame and repeat. It will initially feel odd, but once you see your fingers in the photos, you'll quickly correct the holding procedure.

 Now that you've finished the roll of film, press the rewind button on the bottom of the camera and rewind the film into the cassette. Open the back door and take the film to get processed. In my case, take it to the dark bag and processing tank to process the film.

My Results:

I took some photos of walking through the neighborhood for the blog post. I have taken the camera to Africa, Europe, and many other places and absolutely LOVE this camera.

My Conclusion:

What else can I say that I haven't already said in the blog? This is one of my, if not my favorite film cameras. I also love shooting with my Panon, but it's a more prominent and heavier camera, although the results are terrific with the Panon.

 I made a short video on the Widelux F7 basic controls & Loading film.

 Thank you for taking a few minutes from your day to read about this wonderful and exciting camera. I hope many of you have one; if not, you're missing a superb camera.

 Until next week, please be safe.

Kodak Beau Brownie Camera

My Rose Beau Brownie Camera

To end the unofficial box camera month for my blog post, I was thinking about writing about a few different cameras, but my thoughts kept coming back to one specific model of Eastman Kodak camera, one of the most beautiful cameras made, the Beau Brownie camera.

 The two factors of the Beau Brownie line of cameras that I enjoy are the five different colors they come in: black, tan, blue, green, and the most sought-after rose. The art deco design by one of America's outstanding industrial designers, Walter Dorwin Teague, is also bundled into a very uncomplicated camera marketed more as a fashion statement than the ordinary black box camera. 

 George Eastman and his marketing team realized early on that to broaden the photographic marketplace, they needed to expand the scope of photographers using cameras. Until the early 1900s and into the 1910s, the vast majority of photographers were males due to the time-consuming process of making photographs. While Kodak didn't invent photography, much like Henry Ford, he sold cameras to the masses due to the newer methods of making glass plates easier to obtain and process, making roll films, film processing, and printing available to the masses.

My set of Nos. 2 Beau Brownie cameras

 In the late 1920s, Eastman Kodak started a relationship with Edwin Dorwin Teague, which forged a relationship and changed the design and quality of cameras for thirty to forty years until he died in the early 1960s.

The Relationship:

Walter Dorwin Teague, born Dec. 18, 1883, is often regarded as one of the pioneers of industrial design in America. He had a long and influential relationship with the Eastman Kodak Company. His collaboration with Kodak helped shape the visual and functional identity of the company's products, particularly its cameras, during the mid-20th century.

Portrait of Walter Dorwin Teague

 Teague, known for blending aesthetics with functionality, first worked with Kodak in the late 1920s. He continued influencing the company's product designs for several decades until his death on Dec. 5, 1960. His designs embodied the principles of streamlining, an artistic and engineering approach emphasizing smooth, flowing lines and modern, user-friendly aesthetics. Kodak sought to enhance its product appeal in an increasingly competitive market. Teague's expertise gave the company a fresh, contemporary design language that resonated with consumers.

 One of Teague's most iconic contributions to Kodak was the design of the Kodak Bantam Special, introduced in 1936. The Bantam Special was a masterpiece of Art Deco design, featuring a sleek, black enamel and chrome finish. It was visually striking, compact, and easy to use, aligning with Kodak's mission to make photography accessible to a broader audience. The camera became a symbol of modern design and demonstrated how industrial design could elevate consumer products beyond mere functionality.

Walter Teague designed Kodak Super Six-20 camera

 Teague's impact on Kodak extended beyond individual products; he played a key role in shaping the brand's overall aesthetic identity. His work helped Kodak establish a reputation for producing elegantly designed, high-quality, practical, and stylish cameras. His collaboration with Kodak set a precedent for integrating industrial design into mass-market consumer products, influencing Kodak's future designs and the broader field of product design.

 Beyond the Bantam Special, Teague worked on several other Kodak models, including the Kodak Baby Brownie and the Kodak Medalist. These cameras showcased his ability to balance form and function, making photography equipment more appealing and accessible to everyday users. His designs helped Kodak maintain its position as a camera industry leader, reinforcing its image as both innovative and consumer-friendly.

 Walter Dorwin Teague's relationship with Kodak was a testament to the power of industrial design in shaping consumer products. His work not only enhanced the usability and attractiveness of Kodak cameras but also set new standards for the role of design in consumer technology. Through this partnership, Teague left an enduring mark on both Kodak and the history of industrial design.

The Camera:

Beau Brownie cameras came in two sizes: the smaller Nos. 2, which takes 120 film, and the larger No. 2A, which takes 116 film. They were both introduced in October 1930 and ended production in 1933. However, the two rarer versions, the green and rose colors, were in production for 1 year, which ended in 1931. Luckily, I have all five colors in different sizes in my collection. I've had all five for many years, and this is the second time I've owned all five colors in both sizes. 

 The camera that I used for the blog post is the smaller Nos. 2 camera due to the easily accessible 120 film the camera uses. The Beau Brownie No. 2 camera is 4" tall by 3" wide or 3 3/8" wide if you include the film advance knob by 4 3/8" deep. The camera has a 6x9 negative size and weighs 14.1 oz.

 The larger Beau Brownie, Nos. 2A is 5" tall, by 3 3/8" wide, or 3 3/4" wide if you include the film winding knob, by 5" deep. The No. 2A film format is 2.5" x 4.25" on 116 film, weighing 1 lb.—3.8 oz. 

My Nos. 2A Rose Beau Brownie (L) and Nos. 2 (R). Note the size difference

Looking online, I found a Beau Brownie Camera Manual, which is where I look for manuals for the cameras in my collection. It's a fabulous website and something we all should support.

 The front of the camera has a beautiful, enameled Art Deco geometric design that is two-toned with an accent color to enhance the camera's beauty. The black version has a dark burgundy accent color. In contrast, the other colors have a lighter and darker version of the camera's color. The rest of the camera is made of thin metal material covered in pebbled imitation leather, the same color as the camera. The carrying handle is on the top of the camera, which is the same color as the camera's body.

Also, two round windows are used for the viewfinder on the front of the camera. The top circle is for viewing vertical-format photos from the top of the camera, and the bottom is used when you turn the camera on its side for horizontal-format photos. There is no focus on this meniscus doublet lens, so like many box-style cameras, the minimum focus is around 10 feet, but items around 8 feet may still be in focus.

 The Beau Brownie cameras have two latches securing the back of the camera to the front. One latch is on the top of the camera, and one is on the side of the camera. Before you open the camera, you'll need to pull out the winding knob, which is engaged with the film transport. The winding knob needs to be pulled out; otherwise, the camera's front and back won't slide apart easily.

Once you have the camera apart, you can load the roll of film into the camera. Take the empty film spool from the top of the camera and move it to the bottom. Ensure it's adequately engaged, which will move the film from frame to frame. The fresh, unexposed roll now gets loaded into the camera's top film holder. Break the tape holding the film together and pull the leader over the opening with the paper backing looking outwards. Feed the leader into the empty spool on the bottom and wind a bit so you know the film is transporting properly. Also, check that the film fits within the walls of the spool so it can be transported easily. Wind the film until you see arrows pointing outwards. Ince you see the arrows, put the back onto the camera, press the winding knob, and secure the two latches. Now wind the film until you see the #1 in the red window. That's the indication that you're ready to make the first exposures.

 There are only two controls for the camera, located on the top of the camera. There are two levers just in front of the handle. One is on the left, and the shutter speed controller is the smaller of the two controls. There are only two settings. When the lever is down, the camera is in "instant" mode and has a shutter speed of around 1/100 sec. Pulling that small lever up puts the camera in "B" or timed exposure mode. In this setting, you'll need to set the camera on some camera tripod or bracket to hold the camera still so as not to cause a blurry photo.

The other controller is the larger of the two levers that control the aperture settings. The lever can be in three positions to change the different apertures. When the lever is down, the camera has an approximate aperture of F11, the middle position is approximately F16, and the top position is approximately F22.


My Results:

I loaded the camera with Ilford 400 ISO/ASA film and walked through the neighborhood on a very overcast and sometimes rainy afternoon in February. The neighbors are getting used to the old man walking through the streets with an odd-looking camera in his hand, taking photos of houses, objects, or other items I find on my walks.

 Here's what I took.

Conclusion:

Other than the stunning beauty of this camera, it's a fundamental camera with minimal controls and a fixed Meniscus Doublet lens that takes a significant negative. According to the manual, the minimum focus is approximately 8-10 feet. My judgment of distance was off in some photos, as the images are out of focus.

 Overall, it was a fun camera to shoot with, and I'll need to take it out on a sunnier day to get more contrast images. There are a couple of filters available for the Beau Brownie, one of which is a portrait filter that allows for closer focus for portrait photos, so I'll need to dig through the box of old filters to see if I have one of the recommended filters to try on the camera.

 Thank you for taking a few minutes to read about one of the most beautiful cameras ever made. I'm truly honored to have one in my collection.

 Until next week, please be safe.

Merten Merit Box Camera

My Merten Merit Box camera.

We're three weeks into February, which I've deemed Box Camera Month for my blog posts. I purchased this camera about five years ago at a camera show I attended in Kent, WA, a suburb of Seattle. This show, which is a gathering of camera enthusiasts and collectors, is coming up again in early April. It's a great opportunity to see a wide variety of vintage cameras and photography equipment. If you're in the Seattle or Portland area, please stop in. I plan on having another few tables to sell off some of my collection.

 Getting back to the camera of the week, I had previously owned the Merten Merit Box camera many years ago. Still, it wasn't nearly as good of condition as this one. It was missing one of the outer viewfinders, and there were many chips in the Bakelite, so I was pleased to see this example at the Kent camera show, and it was at a very reasonable price. One of the things that initially drew me to the camera was the color of the camera. It has a dark brown color with a smooth texture throughout the camera, with the exception of the faceplate, which has a pebble finish to the Bakelite.

 The other nice thing about this camera is that Merten made two different models. The one I had previously was a 6x4.5cm format camera on 127 film. This camera is a rare version as it takes 120 films and produces a 6x9cm format image, so the negative is larger, and the film type is a lot easier to purchase. The other nice thing about this camera was the handle was intact. Due to how the camera is built, I have seen many examples where the strap is broken or missing. This camera has very few chips in the Bakelite, and the strap is intact and in overall great condition. The shutter also works.

 Since all the stars are aligned with a 6x9cm format camera and a working shutter, the camera takes 120 film. I figured it was time for me to take the camera off the shelf, load film into the camera, dust off and clean the lens, and take a walk around the neighborhood to take photos with this wonderful photo-making machine.

The Company:

French ad for Merit Box

In 1906, the Merten brothers Ernst, August, and Emil founded the Gebrüder Merten Gummersbach (GMG) company in Windhagen-Gummersbach, Germany. They started manufacturing electronic installation components. In 1926, they focused their attention on manufacturing plugs and sockets, which is where their business grew.

 In the early 1930s, Mertens used their Bakelite presses for various purposes, such as producing equipment for laboratories and, yes, in 1933, even producing a series of cameras for the rapidly growing photographic market. These were the only cameras produced by Mertens, and they turned their focus back to the electronic field.

 By 1985, Mertens had grown to the point where they were producing electronic accessories items for the commercial trade, and by the year 2000, intelligent devices were added to their portfolio of electronic products. Merten's products for smart buildings are available in more than 130 countries, where they produce electronic products for residential buildings, offices, public buildings, hotels, schools, hospitals, and businesses. 100 years after they started their business, Schneider Electronics purchased Mertens in 2006.

My Camera:

My Merten Merit Box Camera is 4.5" tall, including the leather strap, 3.5" wide with the winding knob 5.5" deep from the front of the lens to the back of the camera. The camera weighs 1 lb, 1.6 oz without film loaded into the camera. The camera is a typical box camera with two different viewfinders, one for vertical images on top of the camera and one for horizontal images on the right side. 

The Merit Box camera has a Rodenstock lens, around 80mm, and the aperture is F11. There are two positions for the shutter, which is set by a toggle arm below the lens, either a line for instant photos or a round circle setting for timed exposures. There is an option to screw in either a self-timer or cable release just above the shutter release button, which is located just to the right of the lens as you're preparing to take a photo. There is also a sliding bar on top of the camera, which allows for three different aperture settings. When the sliding bar is in the lowest position, the aperture is F11. Then, slide the bar up to the following setting, F16, and all the way to the top would be F22.

On the back of the camera is the name of the camera embossed into the Bakelite, the red window to tell the photographer which frame they are on, Germany, Film B-2, which is an Agfa reference to 120-size film, and finally, the film format 6:9.

 One of the very unique features of the camera other than the beautiful dark brown color is the interwoven strap on top of the camera. The strap or top handle doesn't come off. Instead, it has two interlooped sections that allow the strap to lengthen as you take the front off the back of the camera to load film. This makes it more difficult to load the film as you need to deal with both the front of the camera and the rear when you load film into it. It's not difficult to deal with, but at the same time, it's more than most people are used to when loading a simple box camera, mainly used for the less professional photographer.

There are two locking mechanisms on each side of the camera to load the camera. Rotate the knobs counterclockwise to unlock the back from the front. Then, you'll need to slide the strap apart to allow the camera's front and back to be removed from each other. On my camera, the strap holds the two pieces together as the strap is somewhat tight and stiff. Once you slide the two strap pieces apart, the front and rear of the camera open easily; from there, you can load the film into the camera.

 Once I put a roll of film into the camera, I attached the front to the back of the camera. I turned the locking knobs clockwise to lock the two together and slid the strap back to the shorter position so it would hold the front and the back together a bit better. It could quickly be done if I needed to make the handle a bit longer to hold the strap as I used the camera.

The one thing I noticed when I went to load the film into the camera was the winding mechanism didn't engage with the film spool very well. I needed to press the winding knob, and I was turning the knob to advance the film. The flat end of the winding mechanism that fits into the spool didn't seem long or thick enough to fit tightly into the film spool. The whole winding mechanism seemed very wobbly. I did try t tighten the screw, but that didn't help. The camera is almost 100 years old (92 years), and I'm guessing that it's just worn a bit, but I doubt it's been used very much because the strap is in great condition and still intact.


My Results:

Now that I had wrestled with the strap and held both the front and rear of the camera in my lap to load the camera with a roll of 120 films, it was time to take a walk through the neighborhood to see the results from this beautiful brown bakelite camera from the early 1930s. Here are some of the results from my walk.

Conclusion:

The one thing that I struggle with when using these simple box cameras is the close distance required to get a somewhat sharp image. Since it was somewhat sunny outside, I figured that using the sunny 16 rule would be my rule of thumb for exposures. 

 For those unfamiliar with the Sunny 16 rule, you use the shutter speed closest to the ASA, or as it's known now, ISO in your camera. (Yes, I'm old school.) If it's sunny outside, you use f16. I had ASA 125 film in the camera and figured the shutter speed was close to that, so I put the aperture setting in the middle setting for my exposures outside.

 I photographed my daughter and her dog, Bean, initially about 4 to 5 feet away. Then I took a step back, and the photo still was out of focus, as were many of the images I took between 4-6 feet from the subject. The one image that is nice and sharp is the more scenic photo of one of the neighbors' houses, which turned out very well. My guess is the best minimum distance is 8-10 feet away, looking at some of the results I achieved.

 Thank you for taking a few minutes from your day to look over this unique and simple camera from about a century ago. It was fun to take it off the shelf and use it as it was intended. The results are the best, and my guess is that due to several different reasons, the Merten Merit Box camera wasn't a huge seller during its time.

 Until next week, please be safe.

Gomag Holly Camera

My Gomag Holly Camera

As I declared February as 'Box Camera' month, I found myself gazing at the camera collection on the shelf above my desk. Tucked away in the back corner was a hidden gem, the Gomag Holly camera, a treasure I had forgotten about until I reached my hand back there. The joy of rediscovering this unique piece of history was overwhelming, and it brought back a flood of memories.

 Looking back at my records, I purchased this camera in late 2010 or early 2011 from an online auction with a few other box-style cameras. What intrigued me about this camera was its unique design, with two viewfinders built into one camera, and its ability to set both shutter speeds and aperture, which was unusual for a simple box-style camera. The rarity of the Gomag Holly camera added to its allure, making it a prized possession in my collection. 

 Another thing I liked about the Gomag Holly camera was the rounded corners, which gave it a less industrial look and a more refined appearance—something you'll want to pick up and use. When I picked up the camera to start writing about it, I heard something rattling around in it. My initial thought was that the camera wouldn't be usable. Still, I opened the camera and found one of the film transport rollers lying in the back of the camera.

 When I initially purchased the camera, I can't remember if I noticed that three of the sockets that hold the two rollers on the back of the camera, which prevent the film from scraping across the film plane, were missing. If I remember correctly, I didn't think much of it then because I thought, "I'd never really put the camera to use," as it was mainly for the show in my collection. That was until recently when I viewed the camera and wanted to write about it for my weekly blog post.

The Company:

I've done exhausting searches on the web. I cannot find anything about this camera or its manufacturer. I did come across an article from the Photographic History Society of Canada named The Holly and the Ivy that did a very short article about this camera, and in the article, they state the camera was made by Allgäuer Kamerwerkstatte Gomag, which roughly translates to (Allgäuer) a region in southern Germany, (Kamerwerkstatte) Camera Workshop, (Gomag), which is my guess of the company that produced the camera. They were located in Pfonten, Germany.

Holly camera logo

The only other information I can find about this camera comes from McKeown's Camera Guide from 2005-2006 on Pg. 361, which states there were actually two versions of the camera. The first version was from Gomag and had "HOLLY" embossed above the lens in 1950. Then, the company was purchased by Dr. Riemerschmid & Co., and the later version without the embossed name and with different lenses and shutters was shown at Photokina the same year but was not released until 1952. According to the McKeowns' Guide, the earlier Gomag version has Emylar or Gomar lenses, and the later Riemerschmid has the Rictar lens. They also state that the last version has "Riemerschmid & Co. Munchen" around the shutter face. Still, my camera doesn't have that, so there must be different versions, or I didn't bother with this camera.

 I've looked at several websites about camera manufacturers but cannot find any information about them. If you're reading this and do have information, please write to me and let me know. I'd love to add that information as an update when I have it.

 The one thing that I enjoyed reading the article on the camera was that the camera they were writing about was red. Now, that excited me, as I'd love to have a red version of the camera. The thought of owning a rare and unique red Gomag Holly camera keeps me hunting for the odd and unusual cameras. There may be a red version somewhere that they won't appreciate and will let me purchase for a reasonable price. My fingers are crossed.

My Camera:

My Gomag Holly camera is a bakelite camera that measures 4.25" tall, including the viewfinder in the collapsed position, by 3.5" wide, including the winding knob, by 4" deep, and it weighs 11.3 oz. The Gomag Holly camera has an 80mm f3.5 Rictar lens; mine has serial number 1886T. The camera has three different shutter speeds: 1/200, 1/50, 1/25, and "B" for timed exposures. The shutter speeds are set by sliding a ring around until you get the black pointer pointing to the desired speed. There is a small knob on the shutter speed ring that makes moving the shutter speed dial easier. You'll need to cock the shutter t, which is above the shutter speed setting ring and is pulled in the counterclockwise motion to cock the shutter. The shutter release is in the upper right-hand corner as you hold the camera to fire. There is a flash PC outlet on the other side of the shutter release, which I find somewhat odd, especially for a box-style camera.

 When  I first picked up the camera for this blog post and started to fire the shutter, I noticed that the shutter was lagging. It would fire, but the speeds seemed very slow. One thing I learned early on was to "exercise" shutters, so I spent the next ten minutes cocking and firing the shutter, which seemed to work well. After just a few minutes, the 1/200 was working as it should, and all the shutter speeds seemed to spring back to life and were firing at what sounded like the correct speed.

 The aperture setting ranges from F3.5 to F16. It is set under the lens, indicated by a silver pointer indicating which aperture is being set. The focus on the lens ranges from 1 meter to Infinity. It is stated on the top of the camera by a black triangle, along with the depth of field scale on either side of the focus mark.

A dial on the side of the camera is turned counterclockwise to open the back to open the camera. A small red dot on the dial points forward when the camera is locked and to the rear of the camera when it is unlocked, and the camera body can pull away from the lens to load the film.

Since my camera was missing the two rollers that the film rolls across during transport, I didn't want the roll of film to drag across the shutter, causing scuffs and possible static on the film during transport from frame to frame. I wanted to add felt to the sides of the film opening to decrease the possibility of scratches. I didn't have felt in my bag of tools, etc., but I did have some very old and expired rolls of 35mm film, which I use as test rolls. I thought these canisters were made of felt material, so I took the canisters apart and peeled the felt from them. Unfortunately, the felt on the 35mm canisters is too short, so I needed a couple to cobble together.

Once I took the back off the camera and pulled the felt off the 35mm canisters, I did have some excellent double-sided tape, which I cut into strips and placed on the top and side of the film opening. After that, I cut the felt from the film canisters into lengths that would fit onto the back of the film area, and since I needed two to cover the area, I staggered them on different sides of the film chamber. I probably didn't need to stagger them, but in my mind, it was the right thing to do.

 Once the film was in place, I let them adhere for a few minutes. I took an Exakto knife and trimmed any excess from the film area so I didn't have straggler hairs from the felt hanging over the film chamber. I wanted a clean edge between frames. Once I had that done, I loaded the camera with a roll of 100 ISO/ASA film into the camera. I proceeded to advance the film until I saw the "start" on the film backing. I put the film back onto the camera body and locked the back in place, then proceeded to wind to my first frame, looking through the closable window on the back of the camera.

On top of the camera are the viewfinders. There are actually two on this camera. In the back of the collapsed viewfinder is a small ridge. You pull back, and the "sport" finder pops up. You can pull up a smaller glass finder within the more extensive sports finder. A round glass lens is on the bottom of the rear portion of the sports finder. When the glass finder is pulled up, you can view your subject through the rear glass lens, which looks clever for a simple box-style camera and does a fantastic job when viewing through. To collapse the glass finder, push it down, and a clip will hold it into place. Then, you can close the "sport" finder's back portion and the larger front folds to keep them in place. It is a straightforward but valuable addition to the camera.

My Results:

Now that I have the camera loaded with film, it's time to walk through the neighborhood and see what results I can get from it. Since the camera has a "B" setting, I wanted to see how it would do on some longer exposures, especially since, living in the Northwest, we don't get much sun between November and March.

 Here are some of the results I achieved with the Gomag Holly Camera.

Conclusion:

The camera did an outstanding job. The images were sharp, well-exposed, and very good for a relatively simple box-style camera. The camera was very fun to use, and I had a fun time getting the camera in the proper shooting condition. The felt on the back of the film chamber worked well, especially since the two film rollers were missing. I'll need to get a small swatch of felt to keep in my bag of tricks in case I need to do the same to another camera I come across. If I go to sell the camera, I can always take the tape off along with the felt and have the camera back in the condition in which I purchased it.

 Thank you for taking a few minutes from your busy schedule to read about a very unknown but fantastic camera.

 Until next week, please be safe.


KAPSA Box Camera

My Kapsa camera

On my blog, February is a special time for vintage camera enthusiasts like us-it's Box Camera Month, a time to celebrate and explore the unique charm of these classic cameras.

 Looking through my collection, I noticed I had several different box or box-style cameras that I wanted to use and write about. So, in the middle of January, I thought I should spend the month of February using and writing about the four box cameras I was thinking about.

 The first camera that I noticed was the Kapsa camera. It's been on my shelf for a couple of years, and I purchased it in a large group of cameras from an online auction. At first, I didn't think too much of the camera as the items within the group I was primarily interested in were a couple of Olympus Pen F half-frame cameras. As I was unboxing and unwrapping the items I had purchased, the Kapsa was a camera that drew my attention due to the heavy Bakelite material. The name was one that I wasn't aware of.

D. F. Vasconcellos (DFV) Logo

 After doing some research on the camera after the unwrapping, I found out that the camera is rare in North America because it was made and sold in Brazil. I thought that was unusual and dug a bit more into the camera; it also comes in an aqua-blue color, which makes me want to get that version even more because of my love for colored and unusual cameras. I found even more interesting information when I did more digging into the camera and the company that manufactured the camera.

The Company.

D. F. Vasconcellos (DFV) manufactured the Kapsa camera in the 1950s, but the company, which was founded in 1941 in Sao Paulo, Brazil, began manufacturing precision optical instruments, like surgical microscopes and other items for the Brazilian military.

 In the 1950s, D. F. Vasconcellos diversified into consumer items like binoculars, magnifying glasses, and loupes. This was also the time they ventured into camera manufacturing, a move that filled a growing market for photography in Brazil. 

Brazilian ad for Kapsa camera.

 My guess is that companies like Kodak and Agfa, which were making simple cameras and importing them into Brazil, were somewhat expensive for the average Brazilian consumer. Since D. F. Vasconcellos was getting into the consumer market, they decided to manufacture an inexpensive, well-made, but simple camera for the Brazilian market. 

Getting into the camera manufacturing business must have been successful because they made cameras other than the Kapsa for the Brazilian market. They had a total of six cameras in their lineup. Some of the different cameras D. F. Vasconcellos made are very similar to some of the cameras made by Ansco. One camera made by D. F. Vasconcellos was the Zina 25, which is a copy of the Ansco Cadet II. There are thoughts that some of the cameras made by D. F. Vasconcellos were from older Ansco molds. This makes sense, as other cameras within their lineup have similarities to the Ansco line.

 D. F. Vasconcellos continued to manufacture cameras into the mid-1960s. Still, soon after, they shut down their camera manufacturing to concentrate on the items they are known for today. According to their website, D. F. Vasconcellos manufactures surgical microscopes and other specialized equipment used in the Ophthalmology, Veterinary, Otorhinolaryngology, and Dental fields.

My Camera:

My Kapsa camera is the size of many standard box-style cameras from the 1950s. It's 4.5" tall, including the strap lug, 3.75" wide, including the winding knob, 4.75" deep, and weighs 1lb. 2.6 oz and is made of a thicker Bakelite material with a pebble finish over the camera body. The Kapsa camera has a 110mm F11 Vascromat lens. Similar to many other box-style cameras, there are two viewfinders on the camera. The viewfinder on the top of the camera is for vertical format photos, and the second one on the side of the camera is for horizontal format photos.

There are a couple of interesting items within this camera. The first is the controls on the right side of the camera as you hold it, which adds a bit of complexity to the camera. On top is the shutter settings for "I," which stands for instant and has a shutter speed of around 1/100 sec. The other setting is "T" for times exposure. Next to the shutter release is "Trava" or Lock, so the shutter doesn't accidentally trigger while transporting the camera. Under that is the ability to set three different apertures, F11, F16, or F22, and along the bottom is the focus control, which is in meters. There are also flash contacts on the camera for their bulb flash gun, which you can see in the posted ads, but something I don't have.

Camera controls on the Kapsa camera

To open the camera, the locking/unlocking lever is on the left side. This lever allows you to open the camera to load/unload the film. You turn the dial to "ABRE" to open the camera or "FECHA" to lock the camera. Once the camera is unlocked, the right side of the camera pulls away from the camera body so you can load or unload the film.

There are two "wings" on the camera that convert the camera from a 6x9 format camera to a 6x4.5 format camera. I liked this feature as it allows the photographer to get twice as many photos from their roll of film. If you're in the 6x9 format with the "wings" retracted, you'll get eight pictures on the roll, but by flipping the "wings" over the film opening, you'll get 16. The one thing that you'll need to remember, and this alludes to me at times when I do this, is it also changes the format of the image. If you're in the 6x9 format, the camera is in the vertical format when holding the camera vertically. Once you change to the 6x45 format, the format of the image is horizontal even though you're holding the camera vertically. It's just something you need to be conscious of when changing formats.

Many of the articles I read about the Kapsa camera state that it can use either 120 or 620 film. However, my camera is only set up for 120-size film, as the film reel holders have larger openings for 120-size film, not the smaller openings for 620-size film reels.

 My Kapsa camera has a couple of issues. On the back of the camera, there should be two red windows for the two formats the camera can use. The first issue is one of the red windows on the back of the camera, which reads the frame number when advancing the film, is missing.  It's the right window that's missing, and it is used for the 6x4.5 format photos. That's not a deal breaker when it comes to using the camera. I just taped a small piece of foil over the window since I didn't have red acrylic to glue into the camera. Also, there is a small ship in the Bakelite close to the seam where the film insert fits into the camera body, so I added a small piece of black tape when shooting. My camera is also missing the strap.


My Results:

Since my camera shoots 120 film, I loaded a roll of Ilford FP4 Plus, 125 ISO film into the camera with the "wings" back so I was shooting 6x9 format images. The plastic winding knob is on the right side of the camera, just behind the horizontal viewfinder. I wound the film in the first frame, walked through the neighborhood, and snapped a few images.

 Once I was done, I got out the dark bag and processing equipment, loaded the reel with the film, and processed it. Here are some of the results. 

Conclusion:

Shooting a box camera brought back some great memories from childhood. I still enjoy holding the camera in a lower position and looking through the waist-level finder to frame the image. Maybe that's why I enjoy medium-format cameras so much; it's the tactile feel of using this mechanical instrument to capture memories that I'm fascinated with.

 The camera was fun to use, and the images are good, especially considering what many people feel is a toy. But the world took millions of images with this style of camera.

 Thank you for taking a few minutes from your busy day to read about this fun and somewhat rare camera from Brazil. Now, I will be on the hunt for the blue model, preferably in better condition than the camera I have.

 Until next week, please be safe.

Finetta 88 Camera

My Finetta 88 camera

The Finetta 88 camera caught my eye on a visit to London a year or so ago when I had about an hour during a walk down Portabello Road. I met with Juliano, the owner of Cameras London, who was still in the process of setting up. As I was looking over his extensive items on the multiple tables he has, I saw the grey body of the Finetta 88 camera. 

 If you are a camera enthusiast and can go to Portabello Road during the weekends, I highly recommend seeing Juliano. He has an incredible selection of older wood cameras with brass lenses and many of the more common 35mm point-and-shoot cameras that seem to be all the rage now.

 As I've mentioned a few times, I'm always drawn to the camera with either a different color or if there is something odd or unusual about the item. Not only is the Finetta that I saw covered in a gray covering on the camera, but the lens is somewhat off-center, giving the camera an "out of the ordinary" look. I put the Finetta 88 camera aside and looked over many other cameras I wanted to purchase. As we discussed the price, I picked up the Finetta again and added it to the few items I purchased that day, and I'm glad I did.

The Company

Finetta-Werk was a German camera manufacturer with roots tracing back to Kamerawerk Peter Saraber, a company founded by Peter Saraber in 1945 in Goslar, Germany. Saraber, a Dutch engineer, initially focused on producing precision optical equipment in the post-war era during heightened demand for affordable and efficient photographic devices. Saraber teamed up with a Voigtlander engineer, Helmet Finke, around 1947 to design and develop a new camera.

 "Finetta" was introduced in the late 1940s, marking the company's transition toward a more consumer-friendly image. The Finetta cameras, characterized by their simplicity, durability, and relatively low cost, appealed to post-war Europe's growing middle class. Early models, such as the Finetta 88, showcased Saraber's dedication to compactness and practicality, featuring a straightforward mechanism for capturing 35mm images, including a new two-leaf shutter system, which they applied for a patent. They also invented a new film advance system with double exposure prevention.

Ad for Finetta 88 camera taken from Mike Eckman website.

 By the 1950s, the company rebranded as Finetta-Werk and expanded its product lineup. The Finetta 99 was notable for its interchangeable lenses, which had a new three-prong lens mount and included a series of four different lenses. The lenses included a Colorfinar 70mm f/5.3, a Telec 90mm f/4.5, a wide-angle 35mm Berthiot lens, and the normal Finetar 45mm f2.8 lens. Along with the lenses, Finetta improved design quality, reflecting a shift toward competing with established brands like Kodak and Agfa. 

 Another interesting fact is that in 1954, Finetta started working with Jacques Bolesy of the Bolsey camera company to help with the design and production of their small, compact Bolsey 8 subminiature still and movie camera. Unfortunately, Finetta went out of business soon after and closed their factory in 1957.

 Finetta cameras were often praised for their ergonomic designs and mechanical reliability, offering a stepping stone for amateur photographers transitioning into more serious photographic endeavors.

My Camera:

My Finetta 88 camera is covered in an odd fabric. It has a herringbone-style pattern and is not the normal leather or leatherette covered in most cameras. It is more of a fabric material, but it does have a great feel to it, and I like the greyish color, which gives the camera an elegant appearance. 


The Finetta is 3" tall by 5 1/8" wide by 2.5" deep from the front of the lens to the back of the camera, and weighs 1lb, and .7 ozs, and comes with a Finetar 45mm f2.8 lens which has a three-prong bayonet. There is no locking mechanism on the lens mount, so you must be careful when focusing on the camera. If you turn the lens too far, the mount will start to move, and the lens will pop off, which is pretty small. The lens does "click" into place, but it can somewhat easily come off without the locking pin.

My lens focuses from 2.8 feet to infinity. It may focus closer as the lens rotates past the 2.8-foot mark on the lens. The aperture settings are on the inside of the focus ring. The camera doesn't have an internal focus system, so all the focus is guesswork, judging the distance, and setting focus. The aperture range is from f2.8 to f16 and is indicated by a small notch on the setting ring.

 With the lens removed, you can easily see the two-leaf shutter system. The camera only has a few different shutter speeds, ranging from 1/250, 1/100, 1/50, 1/25, and "B" for timed exposures. The shutter speeds are set on a very small and challenging knob next to the lens. 

One thing I noticed about the camera when I first picked it up and started to play with it was that things seemed backward from what I am used to. I'm used to filming advanced turning in a clockwise movement, but this camera goes counterclockwise. It's the same as taking the back off the camera to load the film. To open the back, you turn the knob on the bottom in a clockwise motion. The back is held onto the camera with none other than a bolt-style fastener which is held onto the camera with a larger circular nut that screws on to keep the back onto the camera body. To me, that is the motion to tighten, but on this camera, it's the motion to untighten and remove the back to load the film.

 When I removed the back from the camera, I noticed a couple of things right away. My Finetta 88 had a film cassette in the camera. I'm not 100% sure who makes this cassette. Still, it's very similar to the Leica cassettes in design, with two outer compartments and an inner spool. The cassette is also held into the camera with a locking lever that slides over the end of the cassette to keep it in place. The second item I noticed was a bright and shiny pressure plate over the shutter area to keep the film flat as it's transported across the chamber. The pressure plate needs to be lifted when loading the 35mm film. The third item noticed was a larger, thicker take-up spool on the camera's right side. This one is similar to what I wrote about with the Corfield Periflex camera. There is a slot to put the 35mm leader into, which is needed to load the camera.

A built-in, double exposure prevention system is within the camera's transport. Once you trip the shutter, under the take-up spool is a small piece of metal that pushes out and stays out until you wind the camera, which cocks the shutter and flattens that piece of metal, allowing you to take the next photo. I guess there's a pin that pushes out the metal piece, and when the film is advanced, it will enable the pin to fall back into place for the next photo.

On top of the camera is nothing more than the film advance knob on the right side, which turns counterclockwise to advance to the next frame. The frame counter, accessory/flash shoe, and rewind knob are on the far left.


My Results:

The camera is very straightforward and somewhat basic in its operations. I didn't use the 35mm cassette that came with the camera; I just used a regular 35mm roll of film. I put in a roll of T-Max 125 film and walked through the neighborhood to see what kind of results the camera could produce. After I got back from my walk through the neighborhood, I processed the film, and here are a few of the shots I took.

My Conclusion:

The Finetta 88 camera took a bit to get used to. I kept on trying to turn the advance knob in the wrong direction; the shutter speed dial was small and difficult to turn. That may be more of a camera cleaning issue, but I changed to other speeds. The lens did start to unmount a couple of times, but nothing disastrous to the point where the lens fell off the camera. The focus is smooth on my camera; it was more operator malfunction than anything, but overall, the camera was enjoyable to shoot with, and I think the lens I have on this camera is sharp.

 I'll definitely want to shoot with this camera in the future. It was fun and a pleasant experience overall.

 Thank you for taking a few minutes from your day to learn about this interesting mid-century camera I have in my collection.

 Until next week, please be safe.

KMZ FT-2 Panoramic Camera

Since I got into photography, I have been a fan of panoramic cameras and images. The ability to see wide views of subjects similar to what you see in person seems very natural, so it's not unrealistic for me to have a variety of cameras to use during trips and other photographic jaunts I take to make images.

My KMZ FT-2 Camera

I came across a Russian-made KMZ FT-2 camera many years ago when I was a sales representative for one of the companies I worked for. I remember visiting EP Levine in Waltham, MA, and seeing the FT-2 and a Spinshot they had. I asked about the Spinshot because, at the time, I knew the Spinshot was something out of my price range. One of the owners gave me a reasonable price on the camera and case because, like many of these cameras, they take a unique film cassette, which this camera didn't have. I knew at that time I was buying it more for my collection rather than using it, but always in the back of my mind, it was something I wanted to put a roll of film into and shoot with. 

The Company:

KMZ (Krasnogorsky Zavod), also known as the Krasnogorsk Mechanical Works, is a prominent camera and optical equipment manufacturer based in Russia. Founded in 1942 in the city of Krasnogorsk, near Moscow, KMZ played a significant role in the Soviet Union's photographic and optical industries. Initially established to support wartime needs, the company shifted its focus to producing civilian products, becoming a key player in developing photographic technology in the Soviet era.

FT-2 camera, leather case and 2 different 3D printed cassettes

 KMZ became widely known for producing cameras and optical devices for civilian and military use. One of its most famous products is the Zenit series of single-lens reflex cameras, which gained a strong reputation for their durability and affordability. First introduced in the late 1940s, the Zenit cameras became popular among amateur photographers and professionals worldwide, especially during the mid-20th century. These cameras were equipped with reliable optics, often branded under the Helios or Jupiter trademarks, known for their exceptional image quality.

Another well-known KMZ product is the Zorki rangefinder cameras, which were modeled after early Leica designs. The Zorki cameras, like the Zenit series, were affordable and accessible, making photography more attainable for the average user. These cameras are now considered collector's items, valued for their vintage appeal and craftsmanship.

 KMZ also contributed to advancements in optical engineering. The company developed lenses for photography, cinema, and scientific applications, as well as optical sights and instruments for military use. The Helios-44 lens, often paired with Zenit cameras, became legendary for its unique bokeh effect and remains highly sought after by enthusiasts.

 Following the dissolution of the Soviet Union in 1991, KMZ faced challenges adapting to a market economy. While the demand for traditional film cameras declined with the rise of digital photography, KMZ continued producing optical devices and exploring new markets. The Zenit brand was revived by introducing modern digital cameras like the Zenit M, which combines vintage aesthetics with contemporary technology.

KMZ's contributions to the photographic and optical fields testify to its innovation and resilience. Despite economic and technological shifts, the company remains a symbol of Soviet ingenuity, with its cameras and lenses appreciated by photographers and collectors worldwide.

The Camera:

The KMZ FT-2, one of the first 35mm panoramic cameras, is a model of simplicity in design. Its bare-bones appearance, resembling a small black brick, belies its robust mechanical construction. The camera measures 4.75" wide by 3.25" deep by 2.25" tall, including the winding knob, and weighs 1 lb. 7oz. The FT-5 boasts a 50mm fixed F5 lens that swings across the curved film plane to produce 110mm long images on your 35mm film. This unique design eliminates barrel distortion, ensuring your horizontal lines remain straight when holding the camera level. However, due to the extended negative size, 24mm x 110mm rather than the typical 24mm x 36mm, you only get 12 images on a roll of 36 exposures, a testament to the camera's straightforward and uncomplicated nature.

 The FT-2 only has 3 shutter speeds: 1/400, 1/200, and 1/100 second. The shutter speeds are set by changing two levers on top of the camera and located just below the shutter cocking lever. The shutter cocking lever is a larger finger and thumb knob, which you turn clockwise to cock the shutter, and it swings back to the starting position at approximately 11:00 when the exposure is finished. A mechanical braking system slows the shutter to these speeds when shooting at the two slower speeds. When shooting at the maximum speed, the camera jolts when the exposure ends and has a reasonably noisy snap when the shutter spins on its axis and comes to a vibrating finish of the exposure. The shutter release is to the right of the shutter cocking knob and just above the frame counter.

Since the camera produces such a long negative, the manual states that you need to turn the winding lever so that the frame counter does three full revolutions around, then add one number to get to the next frame. So, if you were on frame number 5, after taking the photo, you'd turn the winding lever, watch the frame counter go three revolutions around, and then stop at number 6 to be ready for that photo.

Top view of KMZ FT-2 camera where all the controls are located.

 There is no optical viewfinder, but rather a flip-up mask that you put your eye up to and guess that that's the approximate area that will be in your photo. There is a bubble level on top of the camera, so it's easy to level out the photos. This is not so helpful when looking through the viewfinder, but if you use the camera on a tripod or hold it more at waist level, then it makes sense.

 To open the back of the camera to load film, the front of the camera, in both corners, are silver clips holding the back close to the front. Snap these clips out, and holding the back with one hand and the body with the other, you slide the back off the camera. To put the back onto the camera, there are small channels on the body that the back fits into to slide back onto the camera. Make sure the back fits into the channel slide, then back onto the camera, and snap the clips into position.

Using the Camera:

Fast forward about 25 years, and I pulled the FT-2 out of my shelf and started to play with it. The camera is in excellent mechanical shape, so I wondered if there's a way to adapt a regular 35mm film cassette into the camera for shooting with it. Doing my usual looking on the internet to see what advancements have been made, I came across Roger Hyam's website discussing how he had the same camera and  1 set of cassettes. To make the camera more enjoyable, having multiple cassettes would make shooting with the camera more manageable. Since loading the cassettes is time-consuming, he made film cassettes for his FT-2 with a 3D printer. In that article, he has a CAD design and explains the process.

 At this point, seeing that there is a somewhat easy way to get cassettes made for the camera, I looked into buying a 3D printer for this and possibly other projects down the road. While I still may do that, I found a local company close to my house that does 3d printing, Rex Plastics in Vancouver, WA., and Harvey, one of the engineers who does the 3D printing for the company. I called on a Friday to see if they could do this and sent them the CAD file. While Harvey was off that day, I received a call from him early Monday to say that this could be done fairly easily, and they had produced a Minolta 16 cassette and a 126 film cassette someone else needed, so he was familiar with working with film. 

 On Thursday or Friday, I stopped by Rex Plastics to pick up the cassettes I had ordered, which looked tremendous. They fit into the camera and looked like the items I saw online. I took them home and started to load film into the cassettes, only to find that the design I sent had a minor flaw. Once there was film in the cassettes, the amount of film pushed the knob of the spool through the top of the cassette, making it impossible to fit back into the camera. 

 I told Harvey what the issue was and brought it back to him with film inside to show him the issue. Rex Plastics is such a good company that Harvey said it wasn't a big issue and went back and made the spool smaller to accommodate the film capacity and changed the cassette top to accommodate a different spool that fits into the cassette. This took just a few days, and now I had cassettes I could take home and shoot with the FT-2 camera. One thing I did to the 3D-printed cassettes was to add some felt to the inside cassette to avoid any scratches that may happen when transporting the film from one cassette to the other. I took some old 35mm canisters, pulled the felt off them, and taped them into the 3D-printed cassettes with double-sided tape.

Loading the Cassettes:

Here's the process I used to load the new 3D-printed cassettes with film to put into the FT-2 camera. Most of this process has to be done in complete darkness. I used my light-tight changing bag, which I use to load film onto reels for processing, but this time, here are the items I needed to keep in the changing bag.

 2-3D printed cassettes

1 roll of 35mm film (unexposed)

1 piece of tape taped to one of the spools

1-pencil used to wind film

1-FT-2 camera with the back partially off

 I'll break this down into the steps I used. You may find an easier way, but this process went much quicker than I thought and seemed manageable.


  1. Out in the daylight, I took the leader from the unexposed 35mm film and taped it onto the take-up spool. I then took up some of the slack and put it into one of the 3D-printed cassettes. This is what you can do in the light; all the other steps are done in the changing bag.

  2. Put all the items from the above list into the changing bag.

  3. At this point, I wound all the film from the unexposed film into the take-up spool until I reached the end of the roll. To make the winding easier, I put a pencil into the end of the spool and turned the pencil. Do this for step 7, too.

  4. Tear the end of the film of the unexposed film from its cartridge.

  5. Open the second cassette and tape the end of the unexposed film to the spool of the second 3D-printed cassette.

  6. Slide the spool into the second 3D-printed cassette and put it on the cover.

  7. Rewind the exposed film from the first cassette into the second cassette.

  8. Once you feel the leader, stop winding. Now, you have all your unexposed film into the second cassette.

  9. Put both cassettes into the back of the camera. 

  10. Make sure the winding knob is engaged into the first 3D printed cassette and starts to wind, making sure the film is moving across the film path.

  11. You don't need to wind much, just enough to ensure the film is transporting.

  12. Put the back of the camera on the loaded camera and snap closed.


Now, you can open the changing bag, remove the film-loaded camera, and wind it to the first frame, which should only take a few turns.

 PLEASE REMEMBER: When you're at the end of the roll, you don't rewind it back into the cassette like a standard 35mm camera. You take the camera and load it back into the changing bag so you can load it onto your developing tank for processing. If you wanted to wind hard enough to pull the tape off one spool onto the other, you could do that, but that risks exposing the film if you don't tape the cassettes closed.

My Results:

With the camera loaded into my newly made 3D printed film cassettes and the sun shining on a typically overcast November afternoon, there was a chill in the air and a panoramic camera in my hands. I walked through my neighborhood to see what the camera would produce. After taking the photos, I was excited to see the results, so I loaded the camera, developing tank, and reels into the changing bag. I took the film out of the camera, loaded it onto the developing reel, put it in my developing tank, and processed the negatives. 

The overexposed area on the left of the images must have caused a slight light leak. Here's what I produced.

Conclusion:

What a fun camera! I really enjoyed using it. Loading the cassettes wasn't as big of an issue as others I've read about make it out to be if you think about the process. If you have one and need technical or repair information, I found this very informative website, The FT-2 Panoramic Camera Guide.

If you have one and need cassettes, don't hesitate to get in touch with Harvey at Rex Plastics. I'm confident he can print some for you, and they can ship them to you.

Thank you for taking some time from your day to read about this fun panoramic camera that produces excellent images. 

Until next week, please be safe.

References:

The FT-2 Panoramic Camera Guide: https://lens-club.ru/public/files/pdfs/4e9b2081c1c77ede9e70d985d6bacc5d.pdf

FT-2 Camera Manual: https://cameramanuals.org/russian_pdf/russian_ft-2_panaromic.pdf

Roger Hyam’s Website: https://www.hyam.net/blog/archives/10727

Rex Plastics: https://rexplastics.com/3d-printing-and-plastic-product-design

Expo Watch Camera

This week's camera blog is about another unusual camera given to me many years ago by one of my sisters' in-laws who passed away. The family members knew I enjoyed cameras, so they gifted the camera to me and asked me to take care of it for the man who passed. 

My Expo Watch Camera

 When I first received the Expo Watch camera, I was utterly surprised and deeply touched by the generosity. Opening the small box to reveal the fantastic camera in good working condition was a moment I'll never forget. It was a revelation that the person who passed knew about my love for cameras. It could have been my wonderful sister who had shared my passion with the family.

 Needless to say, it's in a prominent place in my collection and something I look at almost daily and think about the generosity of the person who gifted it to me.

 To add to the story of this blog and the Expo Watch camera, about three to four years ago, I purchased a "lot" of camera items. Among the other items I bought were accessories from what I thought were for the Expo Watch camera. However, after researching the cameras, I found that they are actually for the slightly later British version made by Houghton, the Ticka camera. They fit and work on both the Expo and Ticka cameras.

The Company:

Patent for Expo Camera

The camera was designed and invented by a Swedish designer, Magnus Niéll, who lived in Sweden and New York. The patent for the Expo Watch camera was approved on September 6, 1904. This camera was a significant innovation in the history of photography, as it was one of the first to feature a daylight-loadable film cassette with 25, 16mm x 22mm, or 5/8" x 7/8" exposures in each cassette.

 The Expo Camera Company, located at 256 West 23rd Street, New York, manufactured the Expo Watch camera. It also produced the Expo Police Camera and developed and enlarged accessories for both cameras. The company offered film processing and printing to its customers. If interested, here's a copy of the full Expo Camera Pricelist and Manual.

In an ad I found published in 1917, the purchase price for the Expo Watch Camera was $2.50. According to the price list above, the processing fee was 10 cents to develop per roll of film. Contact prints (5/8"x7/8") were .10 cents per dozen, .07 cents per 2x3 enlargement, and .10 cents per 3x4 enlargement. I also enjoyed their statement that "Cash should accompany all orders for development, printing, and enlarging."

Ad for Expo Watch Camera

 The Expo Watch camera started in 1905, was taken over in the late 1920s by the dealer G Gennart, who produced several different names on the camera. In 1935, there were red, blue, and black enamel cameras, which were extremely rare. 

 In 1905, or shortly after, Magnus Niéll offered the camera's design to the British camera manufacturer Houghton, who produced the same camera under the Ticka name. The Ticka camera was available in the United Kingdom from 1905 to 1914. Some of the later Ticka models had a replica watch face on the front, with the hand indicating the angle of view the photographer would have when taking a photo.

Magnus Niéll designed other cameras for Houghton, such as the Ensign Midget, Ensignette, and the unusual design folding plate Lopa camera made by Kindermann. 

My Camera:

My Expo Watch camera measures 2 3/8" in diameter across the body of the camera, and if you measure from the front of the lens, including the fob ring, to the rear of the camera is 3" long and 1" deep, including the winding knob and the camera weighs 2.7oz. The camera is made from Nickel and has a highly polished chrome top and bottom.

The camera was designed like a pocket watch so it would be inconspicuous for the people the photographer wanted to photograph. This design feature allowed the user of the Expo Watch camera to easily keep it in one of his vest pockets, making it ideal for candid photography. The photographer could remove the camera from his pocket, take the cap off the lens, point it at his subject, and take a photo.

Beneath the fob ring is a lens cap resembling a pocket camera's winding stem. Under the lens cap is a fixed focus, 25mm lens. The camera has two settings for shutter speeds. There is "I" for an instant, approximately 1/125 speed, and the other setting is "T" for a time exposure. The shutter settings are done on the side of the camera with a lever you pull down. The shutter release butting is a small pin on the underside of the camera set at the one o'clock position. Once the camera's shutter is cocked, you press that pin in, and the shutter releases, making the photo.

The shutter release button on Expo Watch Camera

The shutter is not self-capping, meaning that when you cock the shutter, you're exposing the film to light, so it was recommended to keep the lens cap on until you're ready to make the exposure. 

Shutter cocking Mechanist and settings for Shutter speed.

 The lens cap served as the shutter time if you were doing time exposures. You set it to "T," click the shutter, take the lens cap off for exposure, put the lens cap on to end exposure, and the cock the shutter again for the following exposure. I can almost 100% guarantee that 99.9% of these images are blurry due to the person's hand holding the camera for any period of time, along with the movement of taking off and putting on the lens cap, and the negative being so small.

On the underside of the camera, or the opposite side of the removable plate with the beautifully etched "EXPO," is the winding lever you turn to advance the film. Just to the left of the winding knob is a small window that tells the photographer what frame number they're on. Above the winding knob is another logo for the camera company, which includes EXPO in the center of an oval. Around the oval is Pat throughout the world. On top and under is The Expo Camera New York USA

On the bottom of the camera is a lever you can turn to help pop off the etched plate, which comes off to load the film. I'm too afraid to turn this lever too hard, as I don't want the lever to snap off, so to remove the etched plate, I use my fingernails and pull the plate off to expose where the film goes. Once the plate is removed, the film cassette fits into the bottom portion of the camera.

The Expo Camera did have two different viewfinders available that would fit around the collar of the lens, under the winding stem. A simple model A ground glass viewfinder sold for .50 cents, and a model B brilliant finder sold for .75 cents.

 I also have an item made for the Ticka Camera in the group. There were a few accessories, such as the time exposure lens cap. This item fits over the lens and is held into place by a tension screw. Once in place, you can pull the lever up/down depending on how it is mounted to open the lens, exposing the film to light. Using the time exposure cap is considerably easier than taking the lens cap on and off for time exposures. Another item I have is a separate finder lens which is a larger glass item with a convex lens and attaches onto the camera like the other viewfinders. It has the exact attaching mechanism that fits around the lens collar. From what I'm seeing online, both the time exposure lens cap and the larger window finder were made for the TICKA camera.

Conclusion:

The Expo Watch Camera is a fun and exciting camera to have in my collection. I cherish the way I received it. The more I researched the camera and its different variations, the more I'd like to expand my collection to include the Ticka model with the watch face on it or even some of the colored models I'm always drawn to.


Reference:

Pacific Rim:  https://www.pacificrimcamera.com/rl/01266/01266.pdf

Historic Cameras:  http://www.historiccamera.com/cgi-bin/librarium2/pm.cgi?action=app_display&app=datasheet&app_id=919&

Submini.com:  http://www.submin.com/large/collection/expo/introduction.htm

Vintage photo:  http://www.vintagephoto.tv/expowatch.shtml

Kodak Chevron Camera

A week or so ago, when I was looking for another camera to write about in my weekly camera blog, I looked up on the shelf above my desk, and one camera stood above the rest. Maybe that's because I have it on a small tabletop tripod, and it literally was above many of the other cameras on my shelf. The camera is one of my favorite designs, the Kodak Chevron camera.

My Kodak Chevron camera

 I've owned the Kodak Chevron camera for many years. I remember buying it at a camera show early in my camera collecting years. It caught my eye because the design, along with the look and feel, is just wonderful. The camera is large, striking in design, and a medium-format camera with wonderful optics. 

 The Chevron, produced between 1953 and 1956, mirrors the post-war American era. Its design philosophy echoes the American auto industry of the time, reminiscent of the large, sturdy, and well-crafted automobiles by Chevrolet, Ford, and Cadillac. The Kodak Chevron is a testament to the classic cameras of this era.

The Company:

I don't believe I've ever written about one of my favorite companies. The Eastman Kodak Company, known to many as Kodak, was founded in 1888 by George Eastman, a visionary who revolutionized photography by making it accessible to the general public. Before Kodak, photography was an elaborate and expensive process that required significant expertise. Eastman's innovations in camera design and film processing transformed the photography industry.

A wonderful ad showing the benefits of the Chevron camera

 George Eastman, a former bank clerk in Rochester, New York, initially became interested in photography as a hobby in the late 1870s. Frustrated by the cumbersome process of wet plate photography, which involved heavy equipment and complicated chemical preparations, Eastman sought to simplify the process. In 1880, he patented a dry-plate coating machine, which allowed for the mass production of photographic plates, and soon opened the Eastman Dry Plate Company.

Eastman's breakthrough came when he shifted focus from plates to roll film. In 1884, Eastman and businessman Henry A. Strong, who would later become the company's first president, formed a partnership to expand the business. They developed a flexible roll film, which replaced glass plates that had previously been used. This was a significant innovation because it created simpler, more portable cameras.


In 1888, the company launched its first Kodak camera, a compact box camera preloaded with enough film for 100 exposures. The marketing slogan, "You press the button, we do the rest," succinctly captured Kodak's appeal. After taking pictures, customers would send the entire camera back to Kodak for developing and reloading, eliminating the need for users to handle the film or chemicals themselves. This ease of use democratized photography and made it accessible to amateur photographers for the first time.

 Eastman chose "Kodak" because he wanted a distinctive and memorable trademark that was not associated with any existing words. He believed the letter "K" had a solid and unforgettable sound, so he experimented with various combinations of letters before arriving at Kodak.

 Kodak continued to innovate through the late 19th and early 20th centuries, producing increasingly sophisticated 35mm cameras like the Kodak Ektra and Retina lines, along with many medium—and larger-format cameras used during international conflicts. All the while refining its film development processes.

 Eastman built Kodak into a dominant force in the photography industry by introducing flexible film and creating simple, user-friendly cameras.

My Camera:

The Chevron camera is a rather large, heavy, and, some say, "bulky" camera that measures 6.25" wide, by 4.5" tall, by 4"deep, and weighs in at a whopping 2 lbs. 9.9 oz. without film loaded. I like how the camera feels. It's taller and wider than the Medalist, after which this camera was made. The Kodak Medalist is a marvel for its time, but when I hold the Medalist, the body feels too "fat" in my hands, although I do like the 6x9 format the Medalist has, whereas the Chevron is a proper 6x6 square format camera.

Some people discuss cameras in a much more technical manner, which I genuinely enjoy reading. There are times when I don't understand many of the technical "hows and whys," but that allows me to learn new things, which I enjoy. I prefer to talk about using the camera and my personal experiences.

To load the camera, you can open the back from the left or right side, which I like. You can take the whole back off if you want to. The empty spool will go onto the camera's left side, as the film advance lever is on the left. You put the fresh roll on the right, which is counterintuitive for many photographers, but it didn't bother me when using the camera. Before you load the film into the camera, the frame counter is on top of the camera, which you need to set to "N." The camera is supposed to have an automatic film advance stop when the film reaches the next frame. My auto-stop camera wasn't working, so I just used what was normal to me and looked at the red window on the back of the camera to get to the next frame. Here is the Chevron Camera Instruction manual. Thank you, M. Butkus, for your service in supplying manuals.

Now that I have film in the camera, it's time to take photos. To focus the camera on the subject, the rear viewfinder has two windows. The top window is used to frame your subject, and the bottom is to use the rangefinder, which uses a magnified split image to focus on the subject. Both windows are very close together, and for me, who wears glasses was a bit more challenging to use, but once I got used to it, it wasn't difficult. This is the same rangefinder system used in the Medalist and Ektra cameras.

One of the most delightful aspects of this camera is its exceptionally smooth focus ring. It's not so loose that it slips, like some lenses that feel very sloppy. Instead, it's a perfect balance of smoothness and precision, making the process of focusing a joy. It's a testament to the high-quality design and construction of the Kodak Chevron, and it's a feature that I find truly fabulous to use.

It's time to set the shutter speeds and aperture to create the proper exposure. The shutter speeds are located on the far outside ring around the lens. They go from a fantastic speed of 1/800 sec on the top end to "B", going down by half to get the "B" setting, so 1/400, 1/200, 1/100, etc.

The lens is a Kodak Ektar 78mm f3.5 lens. The aperture settings are set by a bar on the bottom of the lens. Sliding the bar over to the next setting is smooth and easy. The setting also has click stops, so there is no getting it if the aperture is set correctly. A visual setting is on the bottom by the bar and on top of the lens, which you can see with a red arrow. The aperture indication is just behind the arm you cock the shutter.

I've yet to make an image, the film advance was very smooth to move the film to the next frame. I would advance the lever four times to get to the next frame. The red window is on the back of the camera to check where you are advancing the film. The red window has a blackout bar, which you slide up to view the film inside. Being right-handed, it was easy to hold the camera, slide the bar up with my right hand, and advance the film to the next frame with my left hand.

One of the advantages Chevron offered was the ability to shoot 828-size films. The 828 film accessory kit consisted of a film mask for 828 film, 2- 828 film spool holders and an 828 spool. This would have been purchased as an accessory. To use the 828 adapter, the photographer needed to do a couple of things to adapt to the film format. First, a switch from the regular 620 to 828 film is on top of the camera. You take a coin and turn the "finder" settings to 828. Then, a switch at the back of the camera changes the viewfinder from the standard 620 film to the smaller 828 film. By using the 828 film, there is a magnification factor of 1.5x.


My results:

Recently, at a local camera show, I purchased about 50 rolls of Agfa ISS 620 film, which I have for sale on my eBay store. I wanted to test the film to see how usable it was, so I loaded it into the camera and went to the local farmers market to take photos. Here are some of the results from the camera, along with the film I have for sale.

My Conclusion:

WOW!!!! What a fun camera to use. The camera fits very nicely in my hand; the focus is smooth, and I prefer using it over many of the folders and TLR cameras I've used. The Chevron camera outperformed my expectations. It felt similar to what a Mamiya Seven feels like in your hand. While it didn't have the capabilities of interchangeable lenses or TTL viewing of the Mamiya Seven, the camera handled great. 

 The only downside to this camera is the small viewfinder and rangefinder window. There were times when I was walking around the market and just pre-focused, especially when I wanted to be somewhat inconspicuous when shooting. The light was fairly dim, too, so my shutter speed was generally 1/50, and my aperture was wide open.

 I also understand that due to the low number of cameras made, especially compared to the very popular Medalist and Medalist II cameras, they are selling at a premium price on the used market.

 Thank you for taking a few minutes from your day to read my post on this lovely camera. I plan on shooting with it more often, especially since I have many rolls to shoot with.

 Until next week, please be safe.


Bussox-Sport Luxe Camera

he Bussox-Sport Luxe camera is another beautiful camera purchased at the Paris flea market when my wife and I traveled there this past summer. While visiting one of the hundreds of stalls within many buildings comprising the Paris flea market, I found a wonderful gentleman with a case of cameras and other photographic items for sale. 

My Bussox-Sport Luxe Camera

As I mentioned in many of my previous blog posts, I love cameras that are colorful or unusual. Maybe they are toy cameras shaped like a soccer ball or a cartoon character. I own many colored box and folding cameras that are different from ordinary black box or folding cameras. That's what drew me to this wonderful, small, and odd camera.

 Within the stall, there was a case containing a group of glass negatives, the Zeiss Super Nettel that I previously wrote about, and this lovely exotic brown camera, which looked very familiar but had a name that I wasn't familiar with. I purchased all the items and went on my way to find other treasures.

 When I returned to the hotel, I took the brown bakelite camera from its case and did some more research. I found out the camera is called Bussox-Sport Luxe, made by Ruberg & Renner and explicitly exported to France from their factory in Germany. Also, looking at the back of the camera, it appeared to have a roll of film still in the camera, and the number on the frame was four, so with any luck, I could process the film and find other photos that might interest me.

The Company:

A few years ago, I wrote a blog post on a different Ruberg & Renner camera, and at that time, there needed to be more information regarding the company. In that post, I wrote: The Ruberg cameras were manufactured by the Ruberg & Renner company, located in the Delstern district of Hagen, Germany, during the 1930s.  The company was started in 1918 by Josef Ruberg, who originally started producing drive trains for bicycles, motorcycles, and automobiles. After 1930, the company began making simple cameras. In 1931, Josef obtained a patent for constructing a simple camera in Germany. He also received a patent in the United States in February 1932.

 The patent application states that the simple and very inexpensive production of all the camera parts from synthetic resin, which was done from a single pressing process, "makes it possible to place a cheap camera on the market that is affordable to all. " In the 1930s, Ruberg & Renner manufactured four models with 25 designs for export to the USA, Great Britain, and France. The cameras' construction ended in the mid-1930s when the company started producing products to help the German war effort.

 After doing some digging, I came up with the following: Along with cameras, chains remained the company's main business. From 1935 onwards, the series production of ammunition belts marked the end of camera production in Hagen, which shortly afterward followed. 

 Josef Ruberg had designed new metal cartridge belts for machine guns in 1917. The Treaty of Versailles banned the production of automatic weapons and accessories from 1919 to 1935. In February 1936, Ruberg & Renner applied for a patent for a metal cartridge belt for the MG 17 (caliber 7.92x57 mm). These specialized units are equipped with ammunition for machine guns and military equipment in the military air force. The sons also worked in the company. Felix (1909-1994) was born in 1937 in Delstern. It manufactured on-board gun carriages until the beginning of 1945. In 1941, his son Werner (1912-2005) took over the management of the Ruberg & Renner chain works.

 Ruberg & Renner continued producing drive and transport chains in 1947. The Felix Ruberg metal goods factory manufactured household appliances. From the early 1950s, Ruberg & Renner promoted cycling and motorcycle sports. Roller chains were used in particular here. Until 1967, the company, like the Schweinfurt Torpedo Works and Fichtel & Sachs, had its racing teams in the Federal Republic. In the following years, the firm of the US-American company Rexnord was taken over. Rexnord Kette GmbH relocated its production from Delstern to its current location in the Lennetal near Fley in 1982. Much of the historical information comes from the Westfalen Museum.

My Camera:

My Bussox-Sport Luxe camera is 3" tall, including the winding knobs, by 3 5/8" wide, by 1 5/8" deep with the lens retracted and 2.5" deep with the lens away from the body and focused to the closest focus distance, which is 1 meter. The camera weighs 6.1 oz, which is very small and compact, and takes 127 rolls of film, producing 1.25" by 1 5/8" sized negatives. On my camera, it's etched by the previous owner 4x6 1/2 in many different places.

To open the camera to load the film, a chrome button is on the left side of the camera if you're holding it to take a photo. Press the chrome button, moving a brass grip from holding the door closed on the camera. There are a couple of "thumb grips" on both the back door's top and bottom, which you hold onto to open the back. The back door doesn't come off the camera as it's hinged, and the door swings to the right to open.

On many cameras, to load the film into the camera, you pull up the tabs that hold the spool into place, which I tried, but the knobs didn't move. You need to turn the knobs which make you think you're unthreading them. By doing so, the knobs move away from the body of the camera, and you can load a roll of film or move the empty spool into the take-up position. The fresh roll of film goes into the camera's right side and you pull the leader to the left side where the take up spool is. This is backward to many cameras, or the many that I use, as the take-up spool is generally on the camera's right side.

Now that the film is loaded into the camera, it's time to take photos. The camera has a straightforward meniscus lens. There is a knurled collar around the lens that you need to turn in a clockwise motion to extend before taking a photo. The lens barrel is on a helicoid, which extends the lens when the knurled ring turns, much like on a bolt.

 For the shutter, two settings are located in the upper right of the lens and include settings "I" for instant or turn the wheel to "T" for time. Below the lens are the aperture settings. On this camera, since it's for the French market, there is Grand for the widest setting and Petit for a smaller aperture setting. One of the settings is Ferme, which means firm. When the aperture is set at Ferme, it does not open over the lens or block all light from reaching the film. 

Focus control on Bussox-Sport camera

Since there is no lock for the shutter, the shutter release in the 7 o'clock position on the lens can fire at any time when pressed. Whether the lens is out or in, the shutter will fire. This setting is similar to a lens cap, and by putting it in position, if the shutter fires, no frame will be exposed to light or wasting film. The photographer would need to consciously set the camera into and out of this setting every time they put it into the case or pocket, then change it when taking a photo.

To retract the lens to put it back into the camera case, you turn the knurled ring counterclockwise, and the lens retracts into the camera body. I can now understand the "Ferme" setting, as many of the negatives on the roll in the camera when purchased were exposed with the lens in the retracted position, as you can see in the results area on the post.

The results:

As mentioned, the camera had a roll of 127 Agfa film, so I walked in front of my house and took photos of a planter box and some trees in our neighborhood. There were only about four photos left. After taking the photos, I went home and processed the film. It didn't surprise me, but the images within the camera didn't turn out, and the ones I did around our hose turned out barely and were extremely thin in the exposure on the negatives.

 Here are the results from the film in the camera. As I mentioned earlier, I did note that it's easy to take a photo when the lens is retracted, making the image size smaller on the negative, which you can see on the negatives.

My Conclusion:

The shutter on my camera doesn't always work, so while I'd like to put a fresh roll in it and try it again, I don't think the shutter can take it as it's barely opening and closing as it is. I'll get brave and see if I can take the front off and fix it, but it's resting along with many other cameras in my collection. I love the color and the helicoid lens system.

Thank you for taking a few minutes to look over this week's blog post. I'd love to hear from you, so let me know your thoughts and if you have any of the Ruberg & Renner cameras in your collection.

Until next week, please be safe.


SportShot Senior Twenty Camera

One of the first memories I have of the SportShot Senior Twenty camera was looking through McKeown's camera (bible), collecting cameras, and noticing the odd shape of the camera as I thumbed through the pages. Then, upon doing a little more digging into what made this camera special to me, a company in Australia made it, and it only existed for a couple of years. These are the cameras I desire, and these it's these items separate cameras in my collection. 

My ACMA Sport Shot Senior Twenty camera.

 Whenever I travel alone for business or when my wife and I travel internationally, I always try to find the local flea market to see if I can find items that are rare in my part of the world. There are thousands of extremely popular Kodak box-style cameras, whether made from cardboard and leatherette covered or the bakelite cameras you see in every corner of the world. When I first started collecting, I would snatch up any camera because they were a "camera." But as time goes on and I see more of the odd and unusual items, I increasingly appreciate them.

I traded the SportShot Senior Twenty camera about a year ago for some items I had from a dealer who frequents the US occasionally from Australia. The trade happened at a camera show near to me. I got the SportShot Senior Twenty camera. I picked up a few other cameras from Australia, like the red Swiftshot and the Lexa box camera with an excellent metal faceplate. I believe he was happy getting tradeable items he could return to Australia, as it was hard to find items here in the United States.

The Company:

The SportShot Senior Twenty camera maker was the very short-lived ACMA, which stands for Australasian Camera Manufacturers Australia. They were based in Sydney, NSW, Australia, and existed from 1948 to 1950. I've looked at many different commerce sites in Australia and cannot find anything new about the ACMA company. They were one of Australia's only post-WWII camera manufacturers producing cameras. Inside the logo on the camera where the wording Australasian Camera Manufacturers Australia is located, the words British Make are there. There must have been British backing in the company to produce the cameras. 

My best guess is that while the camera is somewhat awkward to hold and use, it wasn't very popular, and sales never caught on, so the company folded, and what was made are the only examples available today.

 Since a large part of my collection is colored cameras or cameras other than black, I like the fact that this camera came in red and green as well and had a matching plastic strap to match the camera itself. These are now on my radar for future purchases. 

My Camera:

The SportShot Senior Twenty camera is triangular or trapezoidal in shape with what appear to be wings in the back to hold onto when taking a photo. The camera measures 5.5" wide in the back and 2.25" in the front. The camera is 4.5" deep, including the lens, and is 3.5" tall with the viewfinder closed but including the winding knob. The camera weighs 13.2 oz without the strap, which I don't have for this camera. The camera has a single red window on the back and shoots 6x9 format, producing eight exposures on either 120 or 620 film.

The camera is comprised of two separate parts. The top comes off with an effortless latch on the back that is somewhat spring tensioned with a hole that fits into a small knob holding the top to the bottom of the camera. On the top portion of the Sport Shot Twenty camera is also a pop-up viewfinder, along with a very odd winding knob. The winding portion of the film advance that fits into the film roll has a triangular shape; it will fit both 120 and 620 films. 

 Because the camera can shoot both 120 and 620 films, the useability is a bit more interesting as this opens the camera's film up to different types. The downside of having the winding portion shaped as it is is that the film advance is more difficult to use, which is what I experienced when I shot a roll of film through the camera. On the top of the camera adjacent to the film advance knob is stamped ACMA S20.

The camera loading is also not the easiest thing to do. Once you have the top off, you can take the empty roll from the right side and put t on the left side where the advance knob is. When loading the film, the tricky part was the channel it slid into to keep it flat for exposure. You can't just put in the roll, slide it over the shutter, and attach it to the empty spool like you do on the majority of cameras. The SportShot Senior Twenty has a thin slot the film needs to go into to keep the film flat, as you can see in the photos.

To load the film, I put the leader into the take-up spool and rolled out a bit of film to slide it into the thin channel. It took me a few times to get it in because the channel was so thin the film paper packing would crinkle and fold a bit, along with the curvature of the channel. It wasn't an easy load, but eventually, It slid in, and I got the camera loaded. How you load the camera was another factor against it when trying to sell to the masses. You don't want to make things more complicated than they need to be.

Note the thin slot film needs to be slid into to load film.

When I went to shoot the film, I loaded it into the camera, and I went to clean the lens. When cleaning it, one of the sides pressed in. I thought, "This wouldn't work with one side of the lens, not in the right position." I turned the lens, and it unscrewed from the camera body. I pressed the lens back into place, then re-screwed it back onto the camera.

 There are only two settings for the shutter. "T" for time, where the shutter stays open as long as you keep the shutter button depressed, and "I" for an instant for everyday shooting. The lens is a 13.5cm or 135mm lenticular lens f3.5 aperture. The lever above the lens is the shutter release, and you press it down towards the lens to take the photos. The viewfinder is a simple pop-up style and closes when not in use. There are no other settings to choose a different aperture, which makes this an extremely simple-to-operate camera.

My Results:

After struggling to load the camera, I had put a roll of Ilford FP-4 in the camera and walked out in front of my house to see how it did, and here's the results.

Conclusion:

Other than struggling to load the film into the camera, along with advancing the film. Due to the shape of the advanced knob that fits into the take-up spool, it didn't grab very well, and there were several times when the knob turned, and the film didn't move, but as long as I took my time, it did advance. Maybe it would do better with 620 film since the slot on the spool is thinner, and the advance knob would fit and hold into the spool better. I'm not going to say the camera was hard to use, but it wasn't the easiest, and I can understand why people would get frustrated using it. None of the images are sharp, but some are better than others. This may have been caused by removing the lens.

 Thank you for taking a few minutes from your day to look over this review. I realize it's not a sophisticated camera, but it definitely has an unusual shape.

 I have an odd camera set for next week's post and hope to hear your thoughts on it or other cameras I've written about.

 Until next week, please be safe.

Inoca Six Stereo Camera

This week's camera is the Inoca Six Stereo Camera. I'm perplexed by it and wanted to see if others have it or have any information besides the very sparse information I can find online. I'm particularly interested in learning more about its history and the context of its production. If you have any insights, I'd love to hear from you.  

My Inoca Six Stereo Camera

 Four to five years ago, I stumbled upon a unique find on an online app I frequent for camera and photo items. The Inoca Six Stereo Camera, a seemingly familiar yet rare gem, caught my eye. The seller's claim of its extreme rarity, with only three known to exist, further fueled my interest.

 At that time, I did the average online search and couldn't find much on the camera or its manufacturer, Morita Trading Co., so I decided to take a chance on it. The camera wasn't cheap, but it wasn't overly expensive, so I couldn't take a chance on it, especially if it was so rare. There were only three cameras left.

The Company:

Morita Shōkai, or from what I can find online, was Morita Trading Company, a camera manufacturer and distributor in Japan during the 1950s. Their most prominent and most well-known cameras were subminiature cameras that had a resemblance to the Leica rangefinder cameras. I've seen many, like the Gem 16, Kiku 16, and Saica, which took 10-14x14mm images on miniature 17.5m film. They also made Bolta Film cameras like the Kikuflex camera in 1957 and the Inoca Stereo camera in 1956.

 There is a Japanese book, Japanese Camera History, as seen in advertisements, 1935–1965. The book was written by the publishers of Asahi Camera, which was a Japanese Camera magazine from 1926 until June 2020, where some of the Morita cameras are advertised.

My assumption was that the camera/distributor was very short-lived with the subminiature market's rapid rise and quick fall. In that specific timeframe, from 1955 to 1957, when these cameras were made, Morita tried to expand into Bolta film cameras like the Kikuflex, which is more common than the Inoca Stereo camera I have.

My Camera:

According to the case, I own an Inoca Six Stereo Camera. The camera is a straightforward bakelite stereo camera. All I see online is the Inoca Stereo camera. None of the cameras I see online have or show the fitted leather case; honestly, I have only seen three examples of this camera. One is on Camera-Wiki, and this is the camera I own. The eBay seller isn’t available on eBay so that I couldn’t contact them for more information. The second example I've seen is a camera sold at auction by Auction-team.de, and Leitz Photographica Auction sold the third example of the camera. The camera sold for quite a bit on the Leitz site many years ago.

My camera measures 4.5" wide by 3" tall by 2.25" deep and weighs 7.6 oz without the case, but the roll of film was in the camera. My camera has two chrome lens caps attached to the lenses. Looking on top of the camera, the winding knob is on the far left, and on my camera, the winding knob has three rings around the top of the knob. Looking at the camera from the Auction Team website, the winding knob is flat and looks to have leatherette or paint on top. Right next to the winding knob is where "Morita" should be printed, but someone took a hot implement and erased "Morita," but below where it's erased, & Company can be seen. On the other side is "patent" written.

On either side of the "Inoca" script, on top of the viewfinder, are two small sockets, which I'm guessing were for a flash, but that's just my guess. The shutter release is next to one of the small sockets, and the film holder is on the far right side of the camera. On the film holder is a knurled ring with an indent in the center with black paint.

 Upon inspecting the back of the camera, I discovered a film counting window with a side cover and a green window to view the frame numbers. To my surprise, a roll of film was still in the camera, held closed by white replacement tape. With 'MINORI' printed on the ends, the film spool added to the intrigue.

On the front of the camera is the word "STEREO" italicized and just under the front viewfinder glass. To the right of the word "stereo" is the shutter cocking lever. When the camera has already shot, and the shutter is not cocked, you see a red arrow pointing towards the left, and the cocking knob is to the far right position. Sliding the knob to the left, you've cocked the shutter(s) for both lenses, and the word "set" written in red is visible. Pressing the shutter release resets the knob to the right side position, and the arrow is visible again. On the outside of either lens is a screw which I've seen a chain with a lens cap attached to it, but unsure if that's really what they are for. My guess is to remove the front with the lenses, shutter, and aperture.

 Below the left lens is where you set the shutter speeds. The camera can only shoot at 1/25, 1/50, and 1/100 sec, along with "B" for exposure times. Below the right lens are the aperture settings with your choice of F8 or F11. Both the shutter speeds and aperture setting are controlled by a simple knob similar to the knob used to cock the shutter. 

Lastly, the bottom of the camera is printed "Made in Japan," along with a tripod mount for timed exposures if needed. There is no cable release capability if you want to do a time exposure. Another interesting item on the camera is a triangle pointing upwards between the two lenses with the letters M.W.T, and along the bottom line is a curved line, which generally represents a lens symbol. I'm wondering what M.W.T means, Morita, something?

 My camera also has a leather-fitted case, which is pretty tattered but still comes with the camera. You can see Inoca Six embossed on the front, so that's my guess at the official name, but I've only seen the Inoca Stereo camera.

Conclusion:

I realize this is a short post, but I could have developed the film found in the camera. Unfortunately, I didn't have a film ready to fit the size of the film, so I left it until I got something I could do. The camera is fundamental, and I like its design. It reminds me of the Start 35 K-II camera, another Bolta film camera made in Japan during the same timeframe.

 Thank you for taking the time to look over this post. If you have more information on this camera, please let me know. Otherwise, I think I have one of three cameras I know of and have seen online.

 Until next week, please be safe and well.

Zeiss Ikon Super Nettel

Upon my first encounter with the Super Nettel camera, I was immediately drawn to its understated elegance and subtle Art Deco influence. This is my second Super Nettel, having previously owned the Super Nettel II, a similar model with a few distinct modifications.

My Zeiss Ikon Super Nettel Camera from 1934

 When my wife and I were in Paris earlier this year, I always enjoyed visiting local flea markets to look for anything photographic, whether it's cameras, lenses, old negatives to digitize, daguerreotypes, or just photo nickknacks or accessories. I made my way to their larger flea market area on a Saturday morning, and in one of the stalls, a lovely gentleman had some Leicas and other rarer cameras. I would have liked to purchase more than I did, but I'd pick up this very nice looking and working Super Nettel camera. In the back of my mind, I always pictured myself doing a blog post on it, especially since the camera was in good working condition, especially for a camera built 90 years ago.

 The Company:

Zeiss Ikon, a company formed in 1929 through the merger of four prominent camera companies in Germany, including Ernemann, Goerz, Ica, and Contessa-Nettel, was a significant investment by the Carl Zeiss Foundation. The company had two main divisions: the camera and the optical. 

 With the new company's formation, almost all of the cameras had Carl Zeiss lenses, and the other companies that had optical manufacturing, like Goerz, had to shut down their optical divisions. With the formation of the new company, almost all of the cameras were using Compur shutters, and like the optical companies, the majority of the shutter companies were also absorbed within the new company.

This group was one of the biggest manufacturers of cameras and lenses in the world, producing many top-quality 35mm cameras like Contax and several high-quality folding cameras like Super Ikonta, which to this day are highly desirable due to their workmanship and quality optics. Until WWII, Zeiss was also a major manufacturer of movie cameras and medical optics.

The cover of the instruction manual. Thank you Pacific Rim Camera.

 After WWII, Zeiss was split into East and West German companies. The company was in Stuttgart in the West, and there were disputes with East Germany about the trademark. The West German ceased production of cameras in 1972. In East Germany, many of the factories were dismantled and sent to the Soviet Union. The Soviet camera manufacturer Kiev received much of the equipment, and in 1948, the Zeiss company became government-owned

 In 1948, the company introduced the new Contax S model, which had a different look from their earlier line of rangefinder cameras, but due to the split between different countries, there were trademark and naming disputes with West Germany, so in 1958, the company changed the name to VEB Kinowerke Dresden and later was rolled into Pentacon.

 After Germany's unification, Carl Zeiss reintroduced the Zeiss Ikon name and produced a rangefinder camera that was introduced at Photokina in 2004. The camera was built by Cosina in Japan and had the Leica M mount for lenses. Like the Contax G and G2, there were lenses made in both Japan and Germany for the camera.

My Camera:

For me, the reason I enjoy shooting with a Rangefinder 35mm camera is due to a few different reasons. The cameras are smaller and more compact to carry. They are less noisy to photograph due to the shutter system and not having the noise of the clunking mirror flopping up and down. Granted, the rangefinder focus is more challenging to use. It takes some time to get used to, or the ability to see what you're getting when you put on different lenses, so there is a trade-off between an SLR and a Rangefinder-style camera.

 The Super Nettel camera was made in 1934 as a "less expensive" camera to their Contax line. To open the front door to expose the lens system, there is a button on the top center of the top plate you press in, and the lens, which is attached to the bellows, pops out. My camera has the less expensive Carl Zeiss Jena 5cm (50mm) f3.5 Triotar lens. The camera had a more expensive Zeiss Tessar 5cm f2.8  or 5cm f3.5 lens. Around the lens are three screws in the 2 O'clock, 5 O'clock, and 8 O'clock positions, which are for holding on an accessory filter or the lens hood.

When closed, my camera measures 5.5" wide by 3" tall by 1.5" deep. When the lens is exposed, it is 4" deep, including the front door, which folds down. The camera weighs 1 lb, 6.3oz. 

 Around the lens is the aperture control, which goes from F3.5 to f22. The Super Nettle incorporates the same or a very similar rangefinder system as the Super Ikonta cameras. Around the outer rangefinder window is a knurled ring that you turn to focus the rangefinder system, bringing the two images together to get a focused image. On the outside of the knurled ring is the focus distance in meters, along with a small depth of field scale.

Note the three screws aaround the lens to hold the accessory filters and hood.

 To retract the lens and close the front door for travel, there are two knobs on the outside of the door that you press in, and at that point, you can press the lens back into the camera body, which will also close the front door, which will lock once pushed in.

 On the back of the camera are two windows. The window on the left is the viewfinder for composing the photo, and the window on the right is the rangefinder window for focus. They are both pretty small windows, but they do an adequate job.

The left window is the viewfinder, and the right is the rangefinder.

On top of the camera is an accessory show for putting on an accessory viewfinder, which has a few different options according to the instruction manual. Next to the accessory show is the frame counter, and next to the frame counter is the advancing knob which also incorporates the shutter speed settings and cocks the shutter. Inside the winding knob is the shutter release. On the far left side is the camera's rewind knob to retract the film when you're finished shooting the entire roll of film. In between the frame counter and the winding knob is a small button. This button unlocks the winding sprocket, so when you rewind the film into the canister, you don't rip off the sprockets of the film.

From left to right are Rewind knob, Viewfinder window, Accessory Shoe with Opening button in front of AS, Frame Counter, Rewind unlock, Winding knob with Shutter Speeds.

To take the back off to load the film, you'll need to look at the bottom of the camera, where there are two handles on either end of the camera. Flip up the handle and turn the handle 90 degrees. One knob will go clockwise and the other counterclockwise. The back will slide off the camera, exposing the incredible metal rolling curtain-style shutter system, the same as the Contax and other Zeiss cameras have incorporated into them.

 You load the camera like you would any other 35mm camera with the film canister going on the left, pulling the leader to the take-up spool, and making sure the sprockets are engaged with the "advancing" sprocket, which is advancing the film across the shutter. Once on the take-up spool, I always take up the slack on the rewind knob, so when I put the back on and advance the film, I watch for the knob to turn when the film pulls out of the canister s. I know the camera is loaded correctly. To put the back on, slide the back into the camera and turn the locking handles the opposite way, and the back is locked into position.

My results:

I need to practice what I teach. I only got a few good photos from this roll of film, as after the sixth frame, the film sprockets tore, and the film didn't advance through the camera. However, the frames I did get were well-exposed and very sharp.

Conclusion:

What another fun camera to shoot with! I enjoyed the camera's ability to focus and handle when out and about shooting. Since I had a mishap with the film tearing, I wanted to get the blog out. I will add more photos down the road when I take the camera for a trip some weekend, and I want a great-quality camera with a very sharp lens to be creative.

 I already have the camera picked for my post next week, which I hope you'll come back to look at at your leisure. 

 Until next week's post, please be well and safe.


Minolta Six Camera

It seems like I purchase items from camera auctions in "lots," and there is always a treasure hidden in the background that you either didn't notice at first, is hidden within all the photos of the items, or, in this case, the camera wasn't taken out of the case, and the case was obscured, so there was no visual evidence that the camera was.

 As I unwrapped the cameras won from the auction, one brown case caught my eye. It bore a striking resemblance to the Mamiya Six in my collection. But upon closer inspection, the name 'Minolta Six' was revealed. I initially thought it might be similar to the Mamiya Six, but the truth was far more exciting, as I'll reveal when I introduce the camera.

History:

In an earlier post, I did on the Minoltaflex CDS, I did a brief history of the company, which read, 

Kazuo Tashima founded Minolta in Osaka, Japan, in 1928 as Nichi-Doku Shashinki Shōten, which means Japanese-German Camera Shop. In 1931, the company updated its name to Minolta, which stands for Mechanism, Instruments, Optics, and Lenses by Tashima. In 1937, the company was reorganized as Chiyoda Kogaku Seikō, K.K. They are now introducing their first Twin Lens Reflex (TLR) camera, the MinoltaFlex, based on the German Rolleiflex cameras. The MinoltaFlex was only the second TLR introduced from Japan after the Prince Flex by Neumann & Heilemann. In 1947, Minolta introduced rangefinder cameras like the Minolta-35, and in 1959, the Single Lens Reflex (SLR) SR-1 camera. In later years, they signed agreements with Leica and came out with the first autofocus SLR, The Minolta Maxxum 7000, which carried on to several in their autofocus system.

 To expand slightly from the above text, in the early years, there was a big German influence on the Minolta company, which was known as Nichidoku Shashinki Shōten, which means Japanese, German camera shop. In the early years, the company received help from camera technicians Billy Neumann and Willy Heilemann, and the shutters and lenses were supplied from Germany. Their first camera was the Nicarette, which was released in 1929.

In 1931, the company was transformed into a stock corporation named Molta Gōshi-gaisha. Molta is an abbreviation of Mechanism, Optics, and Lenses by Tashima. Neumann and Heilemann left the company in 1932, returning to Germany to start their own company, and the German influence left with them. In 1933, the name Minolta was adopted. In 1937, the company became Chiyoda Kōgaku Seikō K.K anexpanded the production of cameras into TLR and press cameras similar to the Plaubel Makina. 

Minolta Six in the July 1938 catalogue and price list by Asanuma Shōkai. Scan by A. Apra. (Image rights)

 In 1940, the famous Minolta Rokkor lens was produced, but it was only used for the military. Consumer camera production ended in 1943 to concentrate on the war effort. Three of its four plants were destroyed by Allied forces during WWII. Soon after the war, Minolta released the Semi Minolta III, and throughout the 1950s, Minolta expanded its line of cameras to include folding cameras, TLRs, SLRs, and rangefinder cameras.

 In 1958, the SR-2 was released, and it was Minolta's first system camera. This reign of SLR system cameras included partnerships with Leitz in the 1970s, which helped produce CLE cameras. Minolta had a full line of autofocus cameras, the Maxxum line of bodies and lenses, and Minoltas final SLR camera ended in 1995 with their X-370.

 Minolta produced many different 35mm, APS, and DISC cameras and partnered with Konica in 2003, but by 2006, the camera company had discontinued camera production and relied heavily on the copier business.

My Camera:

Opening the case and looking at the camera for the first time, I was surprised by the Minolta logo and text on top. Since it was made in 1936, it has a genuine Art Deco design in the look and feel of the camera. My biggest surprise was when I initially pulled the lens out from the body and found the camera didn't have a cloth bellows. Instead, it has a series of stacking cubes that pull away from the camera body, AND these boxes are reinforced with another Art Deco element, metal brackets that resemble an "M" when the camera is laid on its back with the lens pointing up. WOW, Just a fantastic design.

The Minolta Six camera measures 6 inches in width, 4.75 inches in height with the finder up, 3.75 inches with the finder closed, and 4 inches in depth with the lens out, or 2.25 inches with the lens closed. It weighs 1 lb. 5.7oz. without the case or loaded with film. The camera's body is made from a bakelite or plastic material, covered in a high-quality leatherette.

 To pull the lens out to take photos, there are two grips, one on either side of the lens, that you grab onto to pull the lens out and away from the body. You need to expose three stacking cubes before the camera is ready to take the photos. Under the lens are two curved chrome bars you can slide down to prop the camera up so that when the lens is out, it doesn't tip forward and keeps the lens level.

Around the top of the lens is Patents-Nippon, and below is Crown, which is the shutter on the camera. The actual lens is an 80mm f5.6 Coronar Anastigmat Nippon lens. Around the lens is a manual focus ring that focuses from under 1 meter to infinity. The focus line to judge distance is a protruding tab with a line at approximately 10 O'Clock on the lens face. The lens also has a stopping screw that prevents the lens from rotating past the infinity mark on the tab.


My camera has only four shutter speeds: 1/150, 1/100, 1/50, and 1/25, along with "b" and "T" for timed exposures. On the top of the camera is a pop-up viewfinder with etched or lined crosshairs to line up horizontal or vertical subjects as needed. The back of my camera sports three red windows with different numbers, which are used to line up with the number on the paper backing to get to the proper frame number. In later cameras, they went to a single window system, which is more common with current 6x6 format cameras using 120 film.


To open the back of the camera, there is a latch behind the strap on the left side with an arrow pointing down. Slide the button down, and the camera's back opens. The chrome winding lever was used on the older models. Later they went to a plastic or bakelite knob in the later models. My first thought when I looked at the back of the camera was that it was not a full-frame 6x6 camera, but that was because I was looking at the retracted plastic cubes from the bellows. It is indeed a full 6x6 format camera. Load the film on the right side and bring the leader to the left to take up the spool. The knobs on the bottom of the camera pull out so you can put in the film and take up the reel easily.

 The case for my camera is in great condition. There's a pretty cool instruction tab on the inside of the case, which was made for the three window cameras.

 The crown shutter doesn't have a cocking mechanism. There's just the shutter release to take the photos. I loaded the film. I pulled out the cube below and started to take pictures of the neighborhood with my trusty light meter. Once I reached the end, I unloaded the film and processed the negatives.

My Results:

Here are some of the photos taken with the Minolta Six camera. The photos were a bit flat in exposure and contrast.

Conclusion:

I enjoyed shooting with the camera, but I am still primarily impressed with the innovative and beautiful bellows system in the camera. Not only is it functional, but it is very light and tight and only wears out slowly compared to the style bellows. The flip side is, if something happens to this bellows, the replacement is hard to replace due to the material. I wished there were faster shutter speeds, but I was using 125 iso film, and with the aperture range of the lens, I didn't have an issue.

 I have a great and fun camera for next week's blog post, so I hope you'll stick around to read that one, too. Thank you for your time, and please be safe until then.

Update:

According to Andrea Apra, who corrected and let me know initially, a small cardstock table was provided with this camera. This table was used to calculate the Depth of Field. The card I have in the case with the wrong translation is just instructions for using this table provided with the camera, which I don’t have.

The table has a horizontal scale at the top with the various distances on the focus ring: 7, 5, 3, 2, 1.5, 1 Mtr.

Then, on the vertical column, the diaphragm has various apertures: F 5.6, 6.3, 9, 12.5, 18, 25.

Two pairs of values, the minimum and maximum distance of the DoF, are intersecting at the table's intersection.

This explains how to read the table.

This is the text translated in its original graphic structure of the text.