KMZ FT-2 Panoramic Camera

Since I got into photography, I have been a fan of panoramic cameras and images. The ability to see wide views of subjects similar to what you see in person seems very natural, so it's not unrealistic for me to have a variety of cameras to use during trips and other photographic jaunts I take to make images.

My KMZ FT-2 Camera

I came across a Russian-made KMZ FT-2 camera many years ago when I was a sales representative for one of the companies I worked for. I remember visiting EP Levine in Waltham, MA, and seeing the FT-2 and a Spinshot they had. I asked about the Spinshot because, at the time, I knew the Spinshot was something out of my price range. One of the owners gave me a reasonable price on the camera and case because, like many of these cameras, they take a unique film cassette, which this camera didn't have. I knew at that time I was buying it more for my collection rather than using it, but always in the back of my mind, it was something I wanted to put a roll of film into and shoot with. 

The Company:

KMZ (Krasnogorsky Zavod), also known as the Krasnogorsk Mechanical Works, is a prominent camera and optical equipment manufacturer based in Russia. Founded in 1942 in the city of Krasnogorsk, near Moscow, KMZ played a significant role in the Soviet Union's photographic and optical industries. Initially established to support wartime needs, the company shifted its focus to producing civilian products, becoming a key player in developing photographic technology in the Soviet era.

FT-2 camera, leather case and 2 different 3D printed cassettes

 KMZ became widely known for producing cameras and optical devices for civilian and military use. One of its most famous products is the Zenit series of single-lens reflex cameras, which gained a strong reputation for their durability and affordability. First introduced in the late 1940s, the Zenit cameras became popular among amateur photographers and professionals worldwide, especially during the mid-20th century. These cameras were equipped with reliable optics, often branded under the Helios or Jupiter trademarks, known for their exceptional image quality.

Another well-known KMZ product is the Zorki rangefinder cameras, which were modeled after early Leica designs. The Zorki cameras, like the Zenit series, were affordable and accessible, making photography more attainable for the average user. These cameras are now considered collector's items, valued for their vintage appeal and craftsmanship.

 KMZ also contributed to advancements in optical engineering. The company developed lenses for photography, cinema, and scientific applications, as well as optical sights and instruments for military use. The Helios-44 lens, often paired with Zenit cameras, became legendary for its unique bokeh effect and remains highly sought after by enthusiasts.

 Following the dissolution of the Soviet Union in 1991, KMZ faced challenges adapting to a market economy. While the demand for traditional film cameras declined with the rise of digital photography, KMZ continued producing optical devices and exploring new markets. The Zenit brand was revived by introducing modern digital cameras like the Zenit M, which combines vintage aesthetics with contemporary technology.

KMZ's contributions to the photographic and optical fields testify to its innovation and resilience. Despite economic and technological shifts, the company remains a symbol of Soviet ingenuity, with its cameras and lenses appreciated by photographers and collectors worldwide.

The Camera:

The KMZ FT-2, one of the first 35mm panoramic cameras, is a model of simplicity in design. Its bare-bones appearance, resembling a small black brick, belies its robust mechanical construction. The camera measures 4.75" wide by 3.25" deep by 2.25" tall, including the winding knob, and weighs 1 lb. 7oz. The FT-5 boasts a 50mm fixed F5 lens that swings across the curved film plane to produce 110mm long images on your 35mm film. This unique design eliminates barrel distortion, ensuring your horizontal lines remain straight when holding the camera level. However, due to the extended negative size, 24mm x 110mm rather than the typical 24mm x 36mm, you only get 12 images on a roll of 36 exposures, a testament to the camera's straightforward and uncomplicated nature.

 The FT-2 only has 3 shutter speeds: 1/400, 1/200, and 1/100 second. The shutter speeds are set by changing two levers on top of the camera and located just below the shutter cocking lever. The shutter cocking lever is a larger finger and thumb knob, which you turn clockwise to cock the shutter, and it swings back to the starting position at approximately 11:00 when the exposure is finished. A mechanical braking system slows the shutter to these speeds when shooting at the two slower speeds. When shooting at the maximum speed, the camera jolts when the exposure ends and has a reasonably noisy snap when the shutter spins on its axis and comes to a vibrating finish of the exposure. The shutter release is to the right of the shutter cocking knob and just above the frame counter.

Since the camera produces such a long negative, the manual states that you need to turn the winding lever so that the frame counter does three full revolutions around, then add one number to get to the next frame. So, if you were on frame number 5, after taking the photo, you'd turn the winding lever, watch the frame counter go three revolutions around, and then stop at number 6 to be ready for that photo.

Top view of KMZ FT-2 camera where all the controls are located.

 There is no optical viewfinder, but rather a flip-up mask that you put your eye up to and guess that that's the approximate area that will be in your photo. There is a bubble level on top of the camera, so it's easy to level out the photos. This is not so helpful when looking through the viewfinder, but if you use the camera on a tripod or hold it more at waist level, then it makes sense.

 To open the back of the camera to load film, the front of the camera, in both corners, are silver clips holding the back close to the front. Snap these clips out, and holding the back with one hand and the body with the other, you slide the back off the camera. To put the back onto the camera, there are small channels on the body that the back fits into to slide back onto the camera. Make sure the back fits into the channel slide, then back onto the camera, and snap the clips into position.

Using the Camera:

Fast forward about 25 years, and I pulled the FT-2 out of my shelf and started to play with it. The camera is in excellent mechanical shape, so I wondered if there's a way to adapt a regular 35mm film cassette into the camera for shooting with it. Doing my usual looking on the internet to see what advancements have been made, I came across Roger Hyam's website discussing how he had the same camera and  1 set of cassettes. To make the camera more enjoyable, having multiple cassettes would make shooting with the camera more manageable. Since loading the cassettes is time-consuming, he made film cassettes for his FT-2 with a 3D printer. In that article, he has a CAD design and explains the process.

 At this point, seeing that there is a somewhat easy way to get cassettes made for the camera, I looked into buying a 3D printer for this and possibly other projects down the road. While I still may do that, I found a local company close to my house that does 3d printing, Rex Plastics in Vancouver, WA., and Harvey, one of the engineers who does the 3D printing for the company. I called on a Friday to see if they could do this and sent them the CAD file. While Harvey was off that day, I received a call from him early Monday to say that this could be done fairly easily, and they had produced a Minolta 16 cassette and a 126 film cassette someone else needed, so he was familiar with working with film. 

 On Thursday or Friday, I stopped by Rex Plastics to pick up the cassettes I had ordered, which looked tremendous. They fit into the camera and looked like the items I saw online. I took them home and started to load film into the cassettes, only to find that the design I sent had a minor flaw. Once there was film in the cassettes, the amount of film pushed the knob of the spool through the top of the cassette, making it impossible to fit back into the camera. 

 I told Harvey what the issue was and brought it back to him with film inside to show him the issue. Rex Plastics is such a good company that Harvey said it wasn't a big issue and went back and made the spool smaller to accommodate the film capacity and changed the cassette top to accommodate a different spool that fits into the cassette. This took just a few days, and now I had cassettes I could take home and shoot with the FT-2 camera. One thing I did to the 3D-printed cassettes was to add some felt to the inside cassette to avoid any scratches that may happen when transporting the film from one cassette to the other. I took some old 35mm canisters, pulled the felt off them, and taped them into the 3D-printed cassettes with double-sided tape.

Loading the Cassettes:

Here's the process I used to load the new 3D-printed cassettes with film to put into the FT-2 camera. Most of this process has to be done in complete darkness. I used my light-tight changing bag, which I use to load film onto reels for processing, but this time, here are the items I needed to keep in the changing bag.

 2-3D printed cassettes

1 roll of 35mm film (unexposed)

1 piece of tape taped to one of the spools

1-pencil used to wind film

1-FT-2 camera with the back partially off

 I'll break this down into the steps I used. You may find an easier way, but this process went much quicker than I thought and seemed manageable.


  1. Out in the daylight, I took the leader from the unexposed 35mm film and taped it onto the take-up spool. I then took up some of the slack and put it into one of the 3D-printed cassettes. This is what you can do in the light; all the other steps are done in the changing bag.

  2. Put all the items from the above list into the changing bag.

  3. At this point, I wound all the film from the unexposed film into the take-up spool until I reached the end of the roll. To make the winding easier, I put a pencil into the end of the spool and turned the pencil. Do this for step 7, too.

  4. Tear the end of the film of the unexposed film from its cartridge.

  5. Open the second cassette and tape the end of the unexposed film to the spool of the second 3D-printed cassette.

  6. Slide the spool into the second 3D-printed cassette and put it on the cover.

  7. Rewind the exposed film from the first cassette into the second cassette.

  8. Once you feel the leader, stop winding. Now, you have all your unexposed film into the second cassette.

  9. Put both cassettes into the back of the camera. 

  10. Make sure the winding knob is engaged into the first 3D printed cassette and starts to wind, making sure the film is moving across the film path.

  11. You don't need to wind much, just enough to ensure the film is transporting.

  12. Put the back of the camera on the loaded camera and snap closed.


Now, you can open the changing bag, remove the film-loaded camera, and wind it to the first frame, which should only take a few turns.

 PLEASE REMEMBER: When you're at the end of the roll, you don't rewind it back into the cassette like a standard 35mm camera. You take the camera and load it back into the changing bag so you can load it onto your developing tank for processing. If you wanted to wind hard enough to pull the tape off one spool onto the other, you could do that, but that risks exposing the film if you don't tape the cassettes closed.

My Results:

With the camera loaded into my newly made 3D printed film cassettes and the sun shining on a typically overcast November afternoon, there was a chill in the air and a panoramic camera in my hands. I walked through my neighborhood to see what the camera would produce. After taking the photos, I was excited to see the results, so I loaded the camera, developing tank, and reels into the changing bag. I took the film out of the camera, loaded it onto the developing reel, put it in my developing tank, and processed the negatives. 

The overexposed area on the left of the images must have caused a slight light leak. Here's what I produced.

Conclusion:

What a fun camera! I really enjoyed using it. Loading the cassettes wasn't as big of an issue as others I've read about make it out to be if you think about the process. If you have one and need technical or repair information, I found this very informative website, The FT-2 Panoramic Camera Guide.

If you have one and need cassettes, don't hesitate to get in touch with Harvey at Rex Plastics. I'm confident he can print some for you, and they can ship them to you.

Thank you for taking some time from your day to read about this fun panoramic camera that produces excellent images. 

Until next week, please be safe.

References:

The FT-2 Panoramic Camera Guide: https://lens-club.ru/public/files/pdfs/4e9b2081c1c77ede9e70d985d6bacc5d.pdf

FT-2 Camera Manual: https://cameramanuals.org/russian_pdf/russian_ft-2_panaromic.pdf

Roger Hyam’s Website: https://www.hyam.net/blog/archives/10727

Rex Plastics: https://rexplastics.com/3d-printing-and-plastic-product-design

Corfield Periflex Camera

The Corfield Periflex is a relatively new camera to my collection. I've only had it for a few months, but I've desired to own one for many years. The opportunity arose to purchase one of the earlier models that was in good working condition and at a reasonable price for this camera in its condition, so I grabbed the opportunity and purchased it.

My Corfield Periflex Camera

 When the camera arrived, it was in good working condition and in the cosmetic condition described, so I was pleased with the purchase. I knew from purchasing the camera that my aim was to do a blog post on it, as the camera has many unique features that have not been seen in cameras before or since. 

 The Periflex is a 35mm camera with an appearance that resembles a Leica only because of the size and initial shape of the camera. Unlike the Leica cameras, the Periflex doesn't offer the photographer rangefinder focus, sprockets film advance, removable baseplate, or take-up spool, but it does offer the same lens thread mount and excellent optics in a small and compact camera made in the United Kingdom.

The Company:

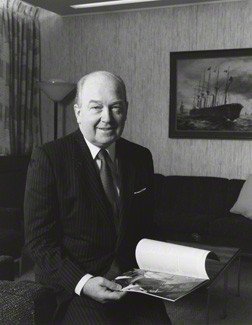
Sir Kenneth Corfield

Sir Kenneth Corfield (1924–2016) was a British engineer, entrepreneur, and photographer whose work significantly influenced the photographic industry in the UK, mainly through his company, Corfield Ltd. Known for his pioneering approach to camera design, Sir Kenneth's legacy is deeply intertwined with the Corfield Camera Company, which he founded in the mid-20th century. His innovative ideas, especially those focused on making quality, compact cameras, helped the brand gain a reputation in the photography community, although its operations ended in the 1970s.

 Kenneth Corfield was born in the UK in 1924 and trained as an engineer. He developed a passion for cameras and photography from an early age, and this interest led him to create camera equipment designed to fill the gaps he observed in the photographic tools available at the time. His mechanical expertise and curiosity about precision instruments motivated him to create Corfield Ltd., a company that produces cameras for professional and amateur photographers alike.

 Corfield founded his company in the post-war period when there was increasing demand for affordable, portable, high-quality photographic equipment. Starting in the 1940s, Corfield Ltd. initially operated as a small workshop but soon expanded to meet the needs of a growing photography market in the UK. Unlike the more prominent, established companies primarily located in Germany and Japan, Corfield's British roots gave his products a unique appeal in the domestic market. They also partnered with British Optical Lens Co. in Walsall, which designed and made the Lumar optics for Corfield.

Ad for the Corfield Camera

The company's first significant product was the Periflex, introduced in 1953. This camera became known for its innovative use of a periscope-type viewing system. This device made the Periflex one of the more unique 35mm cameras available at the time, as it allowed users to see the image through the lens without needing an expensive reflex mirror. The camera was compact, affordable, and relatively simple compared to other rangefinders, and it catered to a market that wanted quality at an accessible price.

The Periflex series became the backbone of Corfield Ltd.'s reputation. The first model, the Periflex I, was followed by several iterations, including the Periflex II, III, and Gold Star. Each version introduced new features and enhancements to meet photographers' increasing demands, such as improved shutter speeds, lens mounts, and more durable designs. 

The defining characteristic of the Periflex cameras was the periscope-like focusing mechanism. This mechanism, placed directly above the lens, allowed photographers to focus accurately without the bulk or complexity of a traditional single-lens reflex (SLR) system. This feature made the Periflex a unique hybrid of a rangefinder and SLR qualities, appealing to those who valued compact design but still wanted accurate focus control. Although some photographers found the system unorthodox, others appreciated the camera's compactness and precision, making it popular among professionals and amateurs.

Despite its successes, Corfield Ltd. faced stiff competition from German and Japanese camera manufacturers, producing high-quality cameras on a much larger scale. Companies like Leica, Nikon, and Canon dominated the market with advanced SLRs, and Corfield's unique designs needed to catch up with the rapid technological advancements. While the Periflex series had gained a loyal following, it required more sophistication and reliability than its competitors, ultimately limiting its market appeal.

In the 1970s, Corfield Ltd. ceased producing its cameras, and the Periflex series also ended production. Although the brand did not survive, the innovations introduced by Kenneth Corfield influenced camera design and highlighted the potential for high-quality British-made photographic equipment.

Kenneth Corfield's contributions to the photographic world extended beyond his camera company. Even after Corfield Ltd. ceased operations, he remained active in the photography industry. Later in his career, Corfield was involved with Gandolfi, a British large-format camera manufacturer, and his influence continued to be felt through his consulting and design work in the field.

Corfield's legacy is remembered by photography enthusiasts and collectors who admire his innovative approach to camera design. The Periflex cameras, in particular, are valued among collectors for their uniqueness and historical significance. Sir Kenneth's work reflects a time of British ingenuity in the photographic industry. It is a testament to a small, independent company's impact on a competitive global market.

Bev Parker has a wonderful website dedicated to The Corfield Company.

My Camera:

My Corfield Periflex camera isn't the first model, as the first 200 Periflex camera had a black top and bottom plate like mine. Still, they were covered in brownish pigskin on the body. I believe mine is the third version, as the engraving has been moved to the periscope but still has the black top and bottom plate, black leatherette covering, and chrome lens.

 My Periflex camera is 5.5" wide by 3.25" tall, including the periscope, and 3.25" deep from the back of the camera to the front of the lens focused to infinity. With the standard Lumar 50mm f3.5 lens, it weighs 1 lb 1.4 oz. The camera is made from aluminum, as opposed to brass, which was a more common construction material at the time. Aluminum was easy to work with for both the body and lenses and was less expensive.

This hybrid camera doesn't have a rangefinder to focus. Still, it has a very small mirror that drops down into the camera and points out through the lens, allowing the photographer to focus on the subject, which is very similar to a single-lens reflex camera. The periscope is achieved by the center tube over the lens, which has a small knob on the back that you pull down and look through the optics on the top to view your subject.

Periscope mirror when depredded in the film chamber

I was very skeptical at first, but it does work and focuses very crisply on the subject as it should. There are some things that could be improved in this system. First, you need to open the aperture to get the brightest image to focus on, so you don't do this quickly. Once the camera is focused, you stop the lens down to the desired aperture setting to get the proper exposure, move your eye to the mounted viewfinder on the top to frame your subject, and then take the photo. Once you do it a few times, it becomes manageable. But it would be best if you remembered to reset your aperture, which I didn't do on a few frames. That's just a matter of getting to know the camera and using it more often. I DID like looking through the lens in a small compact camera to focus on the subject.

 My Periflex has shutter speeds from 1/1000 to 1/30 sec exposure times along with "B" for timed exposures. Above the shutter speed indicator is a knob that needs to be turned to cock the shutter before making an exposure. Advancing the film DOES NOT cock the shutter. These are two separate operations and are not intertwined. You do, however, need to advance the film winding lever AND cock the shutter before the camera will fire. This makes it impossible to take a double exposure on this camera. At least, I am still looking for a way to do it. The shutter release button is on the front of the camera, similar to the Topcon cameras, so it's more of a squeezing motion than a pressing down motion. There is a removable collar around the shutter release to attach a Leica-style cable release for time exposures.

Top view of Corfield Periflex. from L-R, Rewind knob, Removable viewfinder, Periscope mirror, Shutter speed dial with Shutter cocking knob, Rewind button, Film advance knob

Another oddity about my camera is that I didn’t discover it until after I had shot all the photos for this post. I didn’t think there were aperture settings on the lens, but after I reread the instruction manual, there is a small black mark on the lens that goes along the depth of field scale which indicates what aperture you’re using. Looking at the Corfield Periflex instruction manual, they discuss apertures and depth of field, but there is where the aperture settings are. All my exposures were guesses of the size of the aperture needed. The focus on my lens is smooth, the aperture ring moves well, too, and the Lumar lens system has a Leica Thread mount, so the advantage is you can use any LTM lens with this camera.


Loading the film is very simple, and there is another camera oddity in the loading process on the camera. To open the back to load the film, you turn the chrome circle on the camera next to the tripod socket until the arrow points to the white dot. Once that is done, the camera's back will slide downward, exposing the film chamber. I first noticed that there was no drive gear to advance the film, and the take-up spool (drum) on the camera was much larger than the usual 35mm cameras on the market. The take-up spool is actually a drum that advances 180 degrees per wind of the film advance, so as the film is pulled and wrapped around the drum, the spacing of the film frames becomes more significant as you go from the first to the last frame.

Once the film is loaded, you slide the back into position on the camera and turn the chrome wheel on the bottom away from the white dot to lock the back onto the camera. When finished taking the roll of photos, rewind the film back into the film cassette. The drum/take-up spool release is a small chrome button between the shutter and film advance knobs. Press that button down, and you can rewind the film back into the cassette for processing.

My results:

I took the camera for a walk in the neighborhood on a sunny afternoon to see what I could do with the camera. It took some time to think about the metering process on the subject. Opening the aperture, setting the shutter speed, pressing down the periscope to focus (which was fun and easy), resetting the aperture to a size opening I thought might be the correct aperture size, putting the viewfinder to my eye to compose the photo, then taking the photo. Certainly not like cameras today with autofocus, automatic light meter settings, etc. You slow down, take your time and compose the shot, which I enjoy doing.

Here are a few of the images from the camera.

Conclusion:

I enjoyed shooting with the Corfield Periflex. It slows you down and makes you think about the process of creating an image rather than taking one. Not that the photos shown are any works of art, but I like the slower and more methodical process of taking the photo.

 The camera is small and compact, has the shutter speeds needed, and has good optical sharpness. After finding where the aperture settings are, it makes more sense on how to do the aperture settings. I only wish I knew that before using the camera for the first time.

 Thank you for taking a few minutes from your day to read my review of the Corfield Periflex, a gem of a camera. 

 Until next week, please be safe.

Ilford Advocate Camera

It's been a year since I first laid eyes on the Ilford Advocate camera, and I've been eager to share my experience with it. The journey began in England, where my wife and I stumbled upon a charming camera and photo reseller, Juliano of Cameras London, on Portabello Road. Little did I know that this encounter would lead to the acquisition of a unique piece of photographic history.

My Ilford Advocate camera and case.

 My wife and I went to Portabello Rd in London on Friday to look at the antiques there and for me to look for photo items, which there were few of, but I was told that Juliano would be there the next day and he was the person to see. While there wasn't much time to return the next day, I took the bus early and arrived while Juliano set up. My intention wasn't to purchase an Advocate, but as we talked and I mentioned I had one before, he said he had a couple and was willing to part with one. He didn't have it with him, so we arranged to have it shipped to my home in the US.

When the camera arrived and a couple of other items I was buying from him, it was in excellent working condition. I was delighted, as the camera isn't typical but more of an oddity. While I collect "colored" cameras, the white color of this camera makes it stand out in the crowd of mainly back cameras. I was happy to have the Ilford Advocate back in the collection, in excellent working condition, and the full-fitted leather case, too.

The Company:

Front view of Ilford Advocate camera

Ilford is known less for its cameras than for its film, photo paper, and now inkjet printing paper, at least within the photo community. The company has had a long history with many name changes. Still, it's always been a significant name in the photo industry before companies like Leica, Rollei, or even Kodak.

 The original company name was Britannia Works, which was started by Alfred Harman in 1879 by making Gelatine Dry Plates in his basement on Cranbrook Rd, in Ilford, Essex. Harman initially started printing services in 1863, and in 1878, he patented "producing enlarged photographs with artistic finish." By 1880, Harman moved to Roden St. and started trading as Brittania Works Company. By 1883, the company was expanding with the popularity of photography, and Harman opened a new factory to produce plates.

Ilford Ad from 1890s

By 1890, Harman produced a popular book, "The Manual of Photography," and the book, "The Ilford Manual of Photography," was created under that name until 1958, when it was in its 5th edition. In 1891, Kodak started producing plates in Harlow, Middlesex, as a competitor to Britannia Works. In 1897 and again in 1903, Eastman Kodak attempted to purchase Britannia Works Company, but both times were unsuccessful. In 1898, Alfred Harman retired at age 50 but did consulting work for many years. In 1900, the company changed its name to Ilford, Ltd. The town council was happy and objected, but with persistence, the name was changed.

 In the 1960s, the company was owned by Ciba, and they merged with the French company Lumiere and Swiss company Tellko and became the Ilford Group. In 1989, the Ilford Group was purchased by the US-based International Paper Company, and together, they merged to become Ilford Anitec. From 1990 to now, the company has gone through a few other acquisitions and receiverships, and the current time is when the parent company is Harman Technology. Through it all, they still produce tremendous film, photo paper, film, and paper chemistry.

 To my knowledge, only one camera manufacturer was under the Ilford umbrella in this long-winded explanation of the Ilford company. That is Kennedy Instruments Ltd., which designed and built the Advocate starting in 1947 and updated it in 1952. The rarely-seen Monobar cameras were produced from 1958 to 1967. All the other cameras with the Ilford name were created by companies like Dacora, AGI, or Kershaw-Soho.

My Camera:

The first thing I noticed about the camera, other than the apparent white color, is the weight of the camera. Or the camera's lack of weight as it's a very light camera. The camera is made from a die-cast aluminum body with an enameled white finish. The camera body is smooth to the touch and lacks any leather or leatherette, which is uncommon for cameras. My camera measures 5 3/8" wide by 3" tall by 2.5" deep and weighs 1lb 1.5oz without the fitted leather case.

 The camera is straightforward and doesn't have a lot of extra knobs or buttons to do different things on a camera which is what makes this one so unique. To open the back to load the film, you only need to pull open the aluminum bar on the right side of the camera, which releases the lock holding the back closed. Once you open the, I noted chrome gear by the advancing cogs and onto the film advance spool. My first thought was, That's unusual. Then when I tried to put in the film, the rewind knob didn't pull up like the majority of 35mm cameras to load the film. As I poked around, I noticed that the rewind knob is actually hinged, and it pulls away from the body, which allows the photographer to put the film into the camera body.

It's always my inclination to put the film cassette into the camera first, then bring the leader to the take-up spool to load. But looking at the instruction manual, they suggest putting the film leader into the take-up spool first, then putting the cassette after. Having the rewind knob on a hinge makes perfect sense to do it that way. Once I put in the film, I always take the slack of the film with the rewind knob, so when I go to advance the film, I know the film is transporting when I see the rewind knob turn ad I advance to the next frame.

 The only other settings needed to take photos are all around the Dallmeyer Anastigmat 35mm f3.5 lens on my camera. There are three different rings around the lens. On the outer or the largest ring, which has "Advocate" printed on the top, is the shutter speed dial, with speeds of 1/200, 1/150, 1/100, 1/50, 1/25, and "B," which are set according to a red dot on the out portion of the ring. The next ring from the shutter speeds is the focus distance, which has the closest focus distance of 3 feet to Infinity. The inner ring has aperture settings, which go from f3.5 to f22. My first inclination was that the inner ring, which is actually on the lens itself, would have the focus ability, but it's the aperture settings. I had to get used to that when shooting.

To take the photos, the shutter release is a pulling action as you pull the shutter release back towards the camera body as opposed to the most common pressing the shutter release down. It's more similar to an Exakta or Topcon Super D. You get used to it when shooting. The feel of the shutter is firm, and you can hear the rotary shutter releasing and firing, so there is no missing if the camera took the photo. There is an auxiliary remote shutter socket on the front of the camera if you choose to put the camera on a tripod and shoot with a more prolonged exposure.

 The viewfinder on the camera is bright and easy to compose images. My camera is the second version made, as the original Advocate cameras didn't have the flash sync capability, which is located at about five O'clock on the lens and is a double-prong sync cable. The original model also has a chrome pressure plate to hold the film flat.

Viewfinder and shutter release on Ilford Advocate camera

 Here's the fun and one of the more exciting things I like about this camera. Once you've shot all the photos and want to rewind the film, there is no button to disengage the winding sprocket. All you need to do is press down the winding knob down, which presses the gearing system down, and the winding gear is free moving, and the film can easily rewind into the canister. I really enjoyed the simplicity of this system.

My Results:

I took the camera to a local farmers market and used a real "shoot from the hip" method. I tried to be somewhat discrete, which may be difficult with a bright white camera around your neck, but here are some of the results.

Conclusion:

I really enjoyed shooting with this camera. The biggest obstacle I had was remembering which ring did which function. I kept going back to the inner ring, which was closest to the lens and was the focus, but it was an aperture, so I needed to keep this in mind during shooting. If I were to use it more often, it wouldn't be that big of an issue; I also liked that the case was in excellent condition, which is only sometimes the case for older cameras.

 Thank you for taking time from your schedule to look over this post.

 Until next week, please be safe.

Zeiss Ikon Super Nettel

Upon my first encounter with the Super Nettel camera, I was immediately drawn to its understated elegance and subtle Art Deco influence. This is my second Super Nettel, having previously owned the Super Nettel II, a similar model with a few distinct modifications.

My Zeiss Ikon Super Nettel Camera from 1934

 When my wife and I were in Paris earlier this year, I always enjoyed visiting local flea markets to look for anything photographic, whether it's cameras, lenses, old negatives to digitize, daguerreotypes, or just photo nickknacks or accessories. I made my way to their larger flea market area on a Saturday morning, and in one of the stalls, a lovely gentleman had some Leicas and other rarer cameras. I would have liked to purchase more than I did, but I'd pick up this very nice looking and working Super Nettel camera. In the back of my mind, I always pictured myself doing a blog post on it, especially since the camera was in good working condition, especially for a camera built 90 years ago.

 The Company:

Zeiss Ikon, a company formed in 1929 through the merger of four prominent camera companies in Germany, including Ernemann, Goerz, Ica, and Contessa-Nettel, was a significant investment by the Carl Zeiss Foundation. The company had two main divisions: the camera and the optical. 

 With the new company's formation, almost all of the cameras had Carl Zeiss lenses, and the other companies that had optical manufacturing, like Goerz, had to shut down their optical divisions. With the formation of the new company, almost all of the cameras were using Compur shutters, and like the optical companies, the majority of the shutter companies were also absorbed within the new company.

This group was one of the biggest manufacturers of cameras and lenses in the world, producing many top-quality 35mm cameras like Contax and several high-quality folding cameras like Super Ikonta, which to this day are highly desirable due to their workmanship and quality optics. Until WWII, Zeiss was also a major manufacturer of movie cameras and medical optics.

The cover of the instruction manual. Thank you Pacific Rim Camera.

 After WWII, Zeiss was split into East and West German companies. The company was in Stuttgart in the West, and there were disputes with East Germany about the trademark. The West German ceased production of cameras in 1972. In East Germany, many of the factories were dismantled and sent to the Soviet Union. The Soviet camera manufacturer Kiev received much of the equipment, and in 1948, the Zeiss company became government-owned

 In 1948, the company introduced the new Contax S model, which had a different look from their earlier line of rangefinder cameras, but due to the split between different countries, there were trademark and naming disputes with West Germany, so in 1958, the company changed the name to VEB Kinowerke Dresden and later was rolled into Pentacon.

 After Germany's unification, Carl Zeiss reintroduced the Zeiss Ikon name and produced a rangefinder camera that was introduced at Photokina in 2004. The camera was built by Cosina in Japan and had the Leica M mount for lenses. Like the Contax G and G2, there were lenses made in both Japan and Germany for the camera.

My Camera:

For me, the reason I enjoy shooting with a Rangefinder 35mm camera is due to a few different reasons. The cameras are smaller and more compact to carry. They are less noisy to photograph due to the shutter system and not having the noise of the clunking mirror flopping up and down. Granted, the rangefinder focus is more challenging to use. It takes some time to get used to, or the ability to see what you're getting when you put on different lenses, so there is a trade-off between an SLR and a Rangefinder-style camera.

 The Super Nettel camera was made in 1934 as a "less expensive" camera to their Contax line. To open the front door to expose the lens system, there is a button on the top center of the top plate you press in, and the lens, which is attached to the bellows, pops out. My camera has the less expensive Carl Zeiss Jena 5cm (50mm) f3.5 Triotar lens. The camera had a more expensive Zeiss Tessar 5cm f2.8  or 5cm f3.5 lens. Around the lens are three screws in the 2 O'clock, 5 O'clock, and 8 O'clock positions, which are for holding on an accessory filter or the lens hood.

When closed, my camera measures 5.5" wide by 3" tall by 1.5" deep. When the lens is exposed, it is 4" deep, including the front door, which folds down. The camera weighs 1 lb, 6.3oz. 

 Around the lens is the aperture control, which goes from F3.5 to f22. The Super Nettle incorporates the same or a very similar rangefinder system as the Super Ikonta cameras. Around the outer rangefinder window is a knurled ring that you turn to focus the rangefinder system, bringing the two images together to get a focused image. On the outside of the knurled ring is the focus distance in meters, along with a small depth of field scale.

Note the three screws aaround the lens to hold the accessory filters and hood.

 To retract the lens and close the front door for travel, there are two knobs on the outside of the door that you press in, and at that point, you can press the lens back into the camera body, which will also close the front door, which will lock once pushed in.

 On the back of the camera are two windows. The window on the left is the viewfinder for composing the photo, and the window on the right is the rangefinder window for focus. They are both pretty small windows, but they do an adequate job.

The left window is the viewfinder, and the right is the rangefinder.

On top of the camera is an accessory show for putting on an accessory viewfinder, which has a few different options according to the instruction manual. Next to the accessory show is the frame counter, and next to the frame counter is the advancing knob which also incorporates the shutter speed settings and cocks the shutter. Inside the winding knob is the shutter release. On the far left side is the camera's rewind knob to retract the film when you're finished shooting the entire roll of film. In between the frame counter and the winding knob is a small button. This button unlocks the winding sprocket, so when you rewind the film into the canister, you don't rip off the sprockets of the film.

From left to right are Rewind knob, Viewfinder window, Accessory Shoe with Opening button in front of AS, Frame Counter, Rewind unlock, Winding knob with Shutter Speeds.

To take the back off to load the film, you'll need to look at the bottom of the camera, where there are two handles on either end of the camera. Flip up the handle and turn the handle 90 degrees. One knob will go clockwise and the other counterclockwise. The back will slide off the camera, exposing the incredible metal rolling curtain-style shutter system, the same as the Contax and other Zeiss cameras have incorporated into them.

 You load the camera like you would any other 35mm camera with the film canister going on the left, pulling the leader to the take-up spool, and making sure the sprockets are engaged with the "advancing" sprocket, which is advancing the film across the shutter. Once on the take-up spool, I always take up the slack on the rewind knob, so when I put the back on and advance the film, I watch for the knob to turn when the film pulls out of the canister s. I know the camera is loaded correctly. To put the back on, slide the back into the camera and turn the locking handles the opposite way, and the back is locked into position.

My results:

I need to practice what I teach. I only got a few good photos from this roll of film, as after the sixth frame, the film sprockets tore, and the film didn't advance through the camera. However, the frames I did get were well-exposed and very sharp.

Conclusion:

What another fun camera to shoot with! I enjoyed the camera's ability to focus and handle when out and about shooting. Since I had a mishap with the film tearing, I wanted to get the blog out. I will add more photos down the road when I take the camera for a trip some weekend, and I want a great-quality camera with a very sharp lens to be creative.

 I already have the camera picked for my post next week, which I hope you'll come back to look at at your leisure. 

 Until next week's post, please be well and safe.


Robot Royal 36 Camera

Being a big fan of The Robot cameras and having done an earlier blog post on the Robot Luftwaffen Eigentum camera, I wanted to get a camera I could use when we went on vacation or just out for the weekend. Years ago, I came across an excellent and working condition Robot Royal 36 camera. It was from an online auction, so I made a relatively low offer and won it.

 When I received it, I was surprised by the weight and heft of this particular camera. I put it through routine tests to see if the shutter was indeed opening and closing, which it was. The lens was clean, another positive, and the transport was active and in good working condition.

 When COVID hit, I was laid off from one of my favorite jobs. I started writing my camera blog. After being off work for ten months, I got hired for a better position and loved the job, company, and boss, but I put the camera on my shelf for the next four years until I recently retired and started writing my camera blog again.

History:

Otto Berning & Co. started in Dusseldorf, Germany, in 1933. Otto Berning and Co. began to manufacture amateur cameras in 1934 when a young watchmaker in his 30s, Heinz Kilfitt, designed the first compact camera for what Robot would be so well known for. The design had a spring-loaded motor winder, a unique item brought to the camera industry due to his watchmaking skills. Heinz Kilfitt also designed the camera to have a 24x24mm film format. He offered the format size to both Kodak and Agfa, who rejected it, so he sold the design to a young Hans Berning, who was only 23 and worked for his father's company. 

 Robot cameras provide a film format of 24x24mm on most of their cameras. An advantage of the 24x24mm frame size was that the photographer could get 50 images on a roll of film instead of the standard 36 in the traditional 24x36mm format. Another advantage was that there was no need to turn the camera for vertical shots.

Some unique features of the Robot cameras are that they use a rotary shutter and sprocket film drive system, which are more common in the cine cameras of the time. Robot cameras also have a 90-degree switchable viewfinder, allowing the photographer to point the camera in a different direction while looking through the viewfinder and taking photos. All the cameras have a winding motor of film advance system that allows the photographer to wind the motor and shoot rapidly up to 5-6 frames on a single wind, depending on the camera.

 Robot also provided either Carl Zeiss or Schneider-designed lenses on their cameras, which gave the photographer unparalleled sharpness in their images. The cameras were die-cast zinc and stamped stainless steel bodies chalked full of clockwork inside, and they are very sturdy and extremely well made, a testament to the high-quality materials used in their construction. 

During WWII, Robot produced cameras for the German Luftwaffe to put on their Stuka dive bombers. After the war, Robot continued producing high-end cameras like the Robot Star and Junior cameras. Robot produced the Robot Royal in three formats, with a few feature and film format variations. 

My Camera:

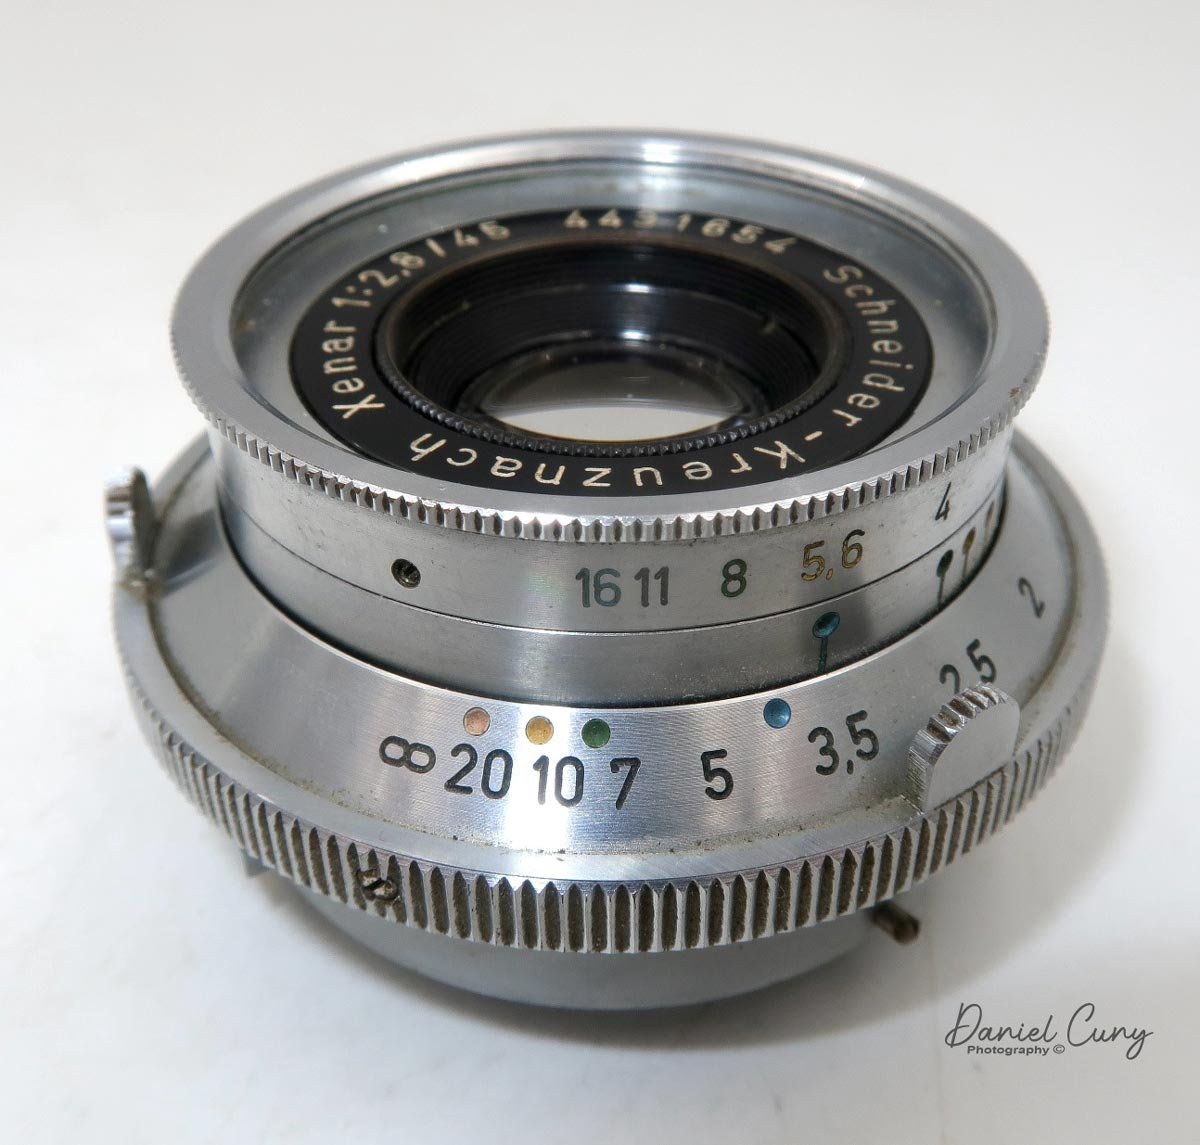
My model is the Robot Royal 36, model III, and it has the film format of 24x36, the most common film format for 35mm cameras. My camera has a Schneider Xenar 45 mm f2.8 lens. My camera has a Schneider Xenar 45mm f2.8 lens. It measures 5.5" wide x 3" tall x 2.75" deep from the front of the lens to the back of the camera and weighs a whopping 2 lbs. 0.4 oz. That's the first thing I noticed when I unwrapped the camera. This is a very solid and well-built camera with unique features that set it apart from other cameras. 

To open the camera, as you hold the camera there is a chrome tab with etching on it on the left side. With your thumb, you lift that and the latch and open the back of the camera. Unlike most 35mm cameras, this camera has a take-up spool you need to load the leader into as opposed to just putting the film leader into the take-up slot, and the camera takes up the film. You need to take the take-up spool apart and thread the film leader into the spool, then put the cassette back together and load the film and take-up cassette into the camera. Then fire two frames, and you're ready to go.

My camera has shutter speeds from 1/2 sec to 1/500 sec, along with B for timed exposures. The bottom of the camera has a winding mechanism that allows me to fire 12 photos at full wind, which takes me about ten and a half cranks to wind fully.

Yellow, Green and Blue dots on lens and Aperture number for Zone Focus.

 The rangefinder on my camera is very bright and easy to focus. The other significant item about the Robot camera and lens system is they allow the photographer to shoot with zone focusing, which is fantastic for street photography. The lenses have yellow, green, and blue dots, which correspond to the colored apertures on the lens. The lens's apertures 2.8 and 5.6 are in yellow, F8 is in green, and f16 is blue. All you need to do is match up the color dot on the focus dial and the aperture used, and the lens shows you your depth of field. This procedure is similar to all other lenses, but the color coding makes the system more "user-friendly."

Removing and reattaching the lens of the Robot Royal 36 is simple. A tabbed collar at the bottom of the lens, when moved to the left, allows the lens to be detached. To reattach the lens, align the two red dots and slide the collar counterclockwise. This careful procedure ensures the lens is securely in place.

Switch for “Green Dot” normal film advance, “Red Dot” Close viewfinder and “R” Rewind film back into canister.

Once I shot the film, One the back of the camera and to the right of the viewfinder is a switch with a green dot for regular forward film transport, there is a red dot which closed the viewfinder half way and "R" for film rewind. I put the camera in the "R" position and reminded the film as a regular 35mm camera procedure. On the bottom front of the camera are the flash sync ports for "X" (electric flash) or "M" (bulb flash) settings.

Results:

 I took a roll of film, put it through my camera, and walked around my backyard to see how the camera performed. This is the first time I got to shoot with the camera since I bought it 4-5 years ago, and there were a few anomalies in the camera. There seems to be a slight light leak, but to be 100% transparent, the film I used was old, and one I had shot just a few frames with and rewound the film with the leader exposed more than ten years ago, so I can't 100% blame it on this camera.

Conclusion:

While Leica has the prestige, Robot and Alpa are probably the best-built cameras in terms of craftsmanship and overall quality. The camera is excellent, the lenses are fantastic, and it offers things built into the system, like motor advancement and an excellent feel. I had a great time shooting with it, and I need to run a fresh roll of film through this beauty more often.

Thank you for taking time from your busy day to review this blog.

Until next time, please be safe.