Merten Merit Box Camera

My Merten Merit Box camera.

We're three weeks into February, which I've deemed Box Camera Month for my blog posts. I purchased this camera about five years ago at a camera show I attended in Kent, WA, a suburb of Seattle. This show, which is a gathering of camera enthusiasts and collectors, is coming up again in early April. It's a great opportunity to see a wide variety of vintage cameras and photography equipment. If you're in the Seattle or Portland area, please stop in. I plan on having another few tables to sell off some of my collection.

 Getting back to the camera of the week, I had previously owned the Merten Merit Box camera many years ago. Still, it wasn't nearly as good of condition as this one. It was missing one of the outer viewfinders, and there were many chips in the Bakelite, so I was pleased to see this example at the Kent camera show, and it was at a very reasonable price. One of the things that initially drew me to the camera was the color of the camera. It has a dark brown color with a smooth texture throughout the camera, with the exception of the faceplate, which has a pebble finish to the Bakelite.

 The other nice thing about this camera is that Merten made two different models. The one I had previously was a 6x4.5cm format camera on 127 film. This camera is a rare version as it takes 120 films and produces a 6x9cm format image, so the negative is larger, and the film type is a lot easier to purchase. The other nice thing about this camera was the handle was intact. Due to how the camera is built, I have seen many examples where the strap is broken or missing. This camera has very few chips in the Bakelite, and the strap is intact and in overall great condition. The shutter also works.

 Since all the stars are aligned with a 6x9cm format camera and a working shutter, the camera takes 120 film. I figured it was time for me to take the camera off the shelf, load film into the camera, dust off and clean the lens, and take a walk around the neighborhood to take photos with this wonderful photo-making machine.

The Company:

French ad for Merit Box

In 1906, the Merten brothers Ernst, August, and Emil founded the Gebrüder Merten Gummersbach (GMG) company in Windhagen-Gummersbach, Germany. They started manufacturing electronic installation components. In 1926, they focused their attention on manufacturing plugs and sockets, which is where their business grew.

 In the early 1930s, Mertens used their Bakelite presses for various purposes, such as producing equipment for laboratories and, yes, in 1933, even producing a series of cameras for the rapidly growing photographic market. These were the only cameras produced by Mertens, and they turned their focus back to the electronic field.

 By 1985, Mertens had grown to the point where they were producing electronic accessories items for the commercial trade, and by the year 2000, intelligent devices were added to their portfolio of electronic products. Merten's products for smart buildings are available in more than 130 countries, where they produce electronic products for residential buildings, offices, public buildings, hotels, schools, hospitals, and businesses. 100 years after they started their business, Schneider Electronics purchased Mertens in 2006.

My Camera:

My Merten Merit Box Camera is 4.5" tall, including the leather strap, 3.5" wide with the winding knob 5.5" deep from the front of the lens to the back of the camera. The camera weighs 1 lb, 1.6 oz without film loaded into the camera. The camera is a typical box camera with two different viewfinders, one for vertical images on top of the camera and one for horizontal images on the right side. 

The Merit Box camera has a Rodenstock lens, around 80mm, and the aperture is F11. There are two positions for the shutter, which is set by a toggle arm below the lens, either a line for instant photos or a round circle setting for timed exposures. There is an option to screw in either a self-timer or cable release just above the shutter release button, which is located just to the right of the lens as you're preparing to take a photo. There is also a sliding bar on top of the camera, which allows for three different aperture settings. When the sliding bar is in the lowest position, the aperture is F11. Then, slide the bar up to the following setting, F16, and all the way to the top would be F22.

On the back of the camera is the name of the camera embossed into the Bakelite, the red window to tell the photographer which frame they are on, Germany, Film B-2, which is an Agfa reference to 120-size film, and finally, the film format 6:9.

 One of the very unique features of the camera other than the beautiful dark brown color is the interwoven strap on top of the camera. The strap or top handle doesn't come off. Instead, it has two interlooped sections that allow the strap to lengthen as you take the front off the back of the camera to load film. This makes it more difficult to load the film as you need to deal with both the front of the camera and the rear when you load film into it. It's not difficult to deal with, but at the same time, it's more than most people are used to when loading a simple box camera, mainly used for the less professional photographer.

There are two locking mechanisms on each side of the camera to load the camera. Rotate the knobs counterclockwise to unlock the back from the front. Then, you'll need to slide the strap apart to allow the camera's front and back to be removed from each other. On my camera, the strap holds the two pieces together as the strap is somewhat tight and stiff. Once you slide the two strap pieces apart, the front and rear of the camera open easily; from there, you can load the film into the camera.

 Once I put a roll of film into the camera, I attached the front to the back of the camera. I turned the locking knobs clockwise to lock the two together and slid the strap back to the shorter position so it would hold the front and the back together a bit better. It could quickly be done if I needed to make the handle a bit longer to hold the strap as I used the camera.

The one thing I noticed when I went to load the film into the camera was the winding mechanism didn't engage with the film spool very well. I needed to press the winding knob, and I was turning the knob to advance the film. The flat end of the winding mechanism that fits into the spool didn't seem long or thick enough to fit tightly into the film spool. The whole winding mechanism seemed very wobbly. I did try t tighten the screw, but that didn't help. The camera is almost 100 years old (92 years), and I'm guessing that it's just worn a bit, but I doubt it's been used very much because the strap is in great condition and still intact.


My Results:

Now that I had wrestled with the strap and held both the front and rear of the camera in my lap to load the camera with a roll of 120 films, it was time to take a walk through the neighborhood to see the results from this beautiful brown bakelite camera from the early 1930s. Here are some of the results from my walk.

Conclusion:

The one thing that I struggle with when using these simple box cameras is the close distance required to get a somewhat sharp image. Since it was somewhat sunny outside, I figured that using the sunny 16 rule would be my rule of thumb for exposures. 

 For those unfamiliar with the Sunny 16 rule, you use the shutter speed closest to the ASA, or as it's known now, ISO in your camera. (Yes, I'm old school.) If it's sunny outside, you use f16. I had ASA 125 film in the camera and figured the shutter speed was close to that, so I put the aperture setting in the middle setting for my exposures outside.

 I photographed my daughter and her dog, Bean, initially about 4 to 5 feet away. Then I took a step back, and the photo still was out of focus, as were many of the images I took between 4-6 feet from the subject. The one image that is nice and sharp is the more scenic photo of one of the neighbors' houses, which turned out very well. My guess is the best minimum distance is 8-10 feet away, looking at some of the results I achieved.

 Thank you for taking a few minutes from your day to look over this unique and simple camera from about a century ago. It was fun to take it off the shelf and use it as it was intended. The results are the best, and my guess is that due to several different reasons, the Merten Merit Box camera wasn't a huge seller during its time.

 Until next week, please be safe.

KAPSA Box Camera

My Kapsa camera

On my blog, February is a special time for vintage camera enthusiasts like us-it's Box Camera Month, a time to celebrate and explore the unique charm of these classic cameras.

 Looking through my collection, I noticed I had several different box or box-style cameras that I wanted to use and write about. So, in the middle of January, I thought I should spend the month of February using and writing about the four box cameras I was thinking about.

 The first camera that I noticed was the Kapsa camera. It's been on my shelf for a couple of years, and I purchased it in a large group of cameras from an online auction. At first, I didn't think too much of the camera as the items within the group I was primarily interested in were a couple of Olympus Pen F half-frame cameras. As I was unboxing and unwrapping the items I had purchased, the Kapsa was a camera that drew my attention due to the heavy Bakelite material. The name was one that I wasn't aware of.

D. F. Vasconcellos (DFV) Logo

 After doing some research on the camera after the unwrapping, I found out that the camera is rare in North America because it was made and sold in Brazil. I thought that was unusual and dug a bit more into the camera; it also comes in an aqua-blue color, which makes me want to get that version even more because of my love for colored and unusual cameras. I found even more interesting information when I did more digging into the camera and the company that manufactured the camera.

The Company.

D. F. Vasconcellos (DFV) manufactured the Kapsa camera in the 1950s, but the company, which was founded in 1941 in Sao Paulo, Brazil, began manufacturing precision optical instruments, like surgical microscopes and other items for the Brazilian military.

 In the 1950s, D. F. Vasconcellos diversified into consumer items like binoculars, magnifying glasses, and loupes. This was also the time they ventured into camera manufacturing, a move that filled a growing market for photography in Brazil. 

Brazilian ad for Kapsa camera.

 My guess is that companies like Kodak and Agfa, which were making simple cameras and importing them into Brazil, were somewhat expensive for the average Brazilian consumer. Since D. F. Vasconcellos was getting into the consumer market, they decided to manufacture an inexpensive, well-made, but simple camera for the Brazilian market. 

Getting into the camera manufacturing business must have been successful because they made cameras other than the Kapsa for the Brazilian market. They had a total of six cameras in their lineup. Some of the different cameras D. F. Vasconcellos made are very similar to some of the cameras made by Ansco. One camera made by D. F. Vasconcellos was the Zina 25, which is a copy of the Ansco Cadet II. There are thoughts that some of the cameras made by D. F. Vasconcellos were from older Ansco molds. This makes sense, as other cameras within their lineup have similarities to the Ansco line.

 D. F. Vasconcellos continued to manufacture cameras into the mid-1960s. Still, soon after, they shut down their camera manufacturing to concentrate on the items they are known for today. According to their website, D. F. Vasconcellos manufactures surgical microscopes and other specialized equipment used in the Ophthalmology, Veterinary, Otorhinolaryngology, and Dental fields.

My Camera:

My Kapsa camera is the size of many standard box-style cameras from the 1950s. It's 4.5" tall, including the strap lug, 3.75" wide, including the winding knob, 4.75" deep, and weighs 1lb. 2.6 oz and is made of a thicker Bakelite material with a pebble finish over the camera body. The Kapsa camera has a 110mm F11 Vascromat lens. Similar to many other box-style cameras, there are two viewfinders on the camera. The viewfinder on the top of the camera is for vertical format photos, and the second one on the side of the camera is for horizontal format photos.

There are a couple of interesting items within this camera. The first is the controls on the right side of the camera as you hold it, which adds a bit of complexity to the camera. On top is the shutter settings for "I," which stands for instant and has a shutter speed of around 1/100 sec. The other setting is "T" for times exposure. Next to the shutter release is "Trava" or Lock, so the shutter doesn't accidentally trigger while transporting the camera. Under that is the ability to set three different apertures, F11, F16, or F22, and along the bottom is the focus control, which is in meters. There are also flash contacts on the camera for their bulb flash gun, which you can see in the posted ads, but something I don't have.

Camera controls on the Kapsa camera

To open the camera, the locking/unlocking lever is on the left side. This lever allows you to open the camera to load/unload the film. You turn the dial to "ABRE" to open the camera or "FECHA" to lock the camera. Once the camera is unlocked, the right side of the camera pulls away from the camera body so you can load or unload the film.

There are two "wings" on the camera that convert the camera from a 6x9 format camera to a 6x4.5 format camera. I liked this feature as it allows the photographer to get twice as many photos from their roll of film. If you're in the 6x9 format with the "wings" retracted, you'll get eight pictures on the roll, but by flipping the "wings" over the film opening, you'll get 16. The one thing that you'll need to remember, and this alludes to me at times when I do this, is it also changes the format of the image. If you're in the 6x9 format, the camera is in the vertical format when holding the camera vertically. Once you change to the 6x45 format, the format of the image is horizontal even though you're holding the camera vertically. It's just something you need to be conscious of when changing formats.

Many of the articles I read about the Kapsa camera state that it can use either 120 or 620 film. However, my camera is only set up for 120-size film, as the film reel holders have larger openings for 120-size film, not the smaller openings for 620-size film reels.

 My Kapsa camera has a couple of issues. On the back of the camera, there should be two red windows for the two formats the camera can use. The first issue is one of the red windows on the back of the camera, which reads the frame number when advancing the film, is missing.  It's the right window that's missing, and it is used for the 6x4.5 format photos. That's not a deal breaker when it comes to using the camera. I just taped a small piece of foil over the window since I didn't have red acrylic to glue into the camera. Also, there is a small ship in the Bakelite close to the seam where the film insert fits into the camera body, so I added a small piece of black tape when shooting. My camera is also missing the strap.


My Results:

Since my camera shoots 120 film, I loaded a roll of Ilford FP4 Plus, 125 ISO film into the camera with the "wings" back so I was shooting 6x9 format images. The plastic winding knob is on the right side of the camera, just behind the horizontal viewfinder. I wound the film in the first frame, walked through the neighborhood, and snapped a few images.

 Once I was done, I got out the dark bag and processing equipment, loaded the reel with the film, and processed it. Here are some of the results. 

Conclusion:

Shooting a box camera brought back some great memories from childhood. I still enjoy holding the camera in a lower position and looking through the waist-level finder to frame the image. Maybe that's why I enjoy medium-format cameras so much; it's the tactile feel of using this mechanical instrument to capture memories that I'm fascinated with.

 The camera was fun to use, and the images are good, especially considering what many people feel is a toy. But the world took millions of images with this style of camera.

 Thank you for taking a few minutes from your busy day to read about this fun and somewhat rare camera from Brazil. Now, I will be on the hunt for the blue model, preferably in better condition than the camera I have.

 Until next week, please be safe.

Kodak Retina Model 117

My Kodak Retina 117 camera

I purchased this original Kodak Retina 117 with a group of various Kodak and other branded cameras from the daughter of a Kodak engineer several years ago. She mentioned that the Retina was in his office in Rochester and was one of his favorite cameras, and she could remember him using it to take family photos. She didn't know what this model was other than it was the camera that Dad used to take family photos with.

 These stories bring a human element to purchasing items from family members. The cameras are not just mechanical items, which I happen to enjoy, but they are objects that evoke memories of dad, mom, aunt, or uncle holding the camera and taking photos at family Bar-B-Ques, birthday parties, Christmas morning, and so many other memories families have together.

Kodak Retina 117 Front View

 When the group of cameras arrived, I knew there was an early Retina in the group. Still, I didn't realize that it was the first Retinas model to be made. During the unwrapping of the camera, I first noticed how worn the camera's leatherette was. The was smooth in many locations, which gave the first indication that the camera was well used and most likely loved by the person using it. The front door was a bit sticky to open, but that's not unusual for a camera made 90 years ago. I'm sure the spring has lost some of its pulling power with age. Once opened, I wanted first to check the shutter. That seemed in great shape; even the 1 second seemed accurate to the ear. The transport was working, and I didn't see any real issues with the camera. I put it on my shelf with many of the other cameras I have.

 This week, while thinking about what camera to write about, I started to look over one of the shelves with cameras, and the Retina popped out to me. I know it was in good working condition, at least when I put it on my shelf a year or so ago. Opening the camera was as good as the day I put it on the shelf, so I decided to put a roll of film into the camera and see what a 90-year-old, German-made 35mm camera could offer. 

Retina History

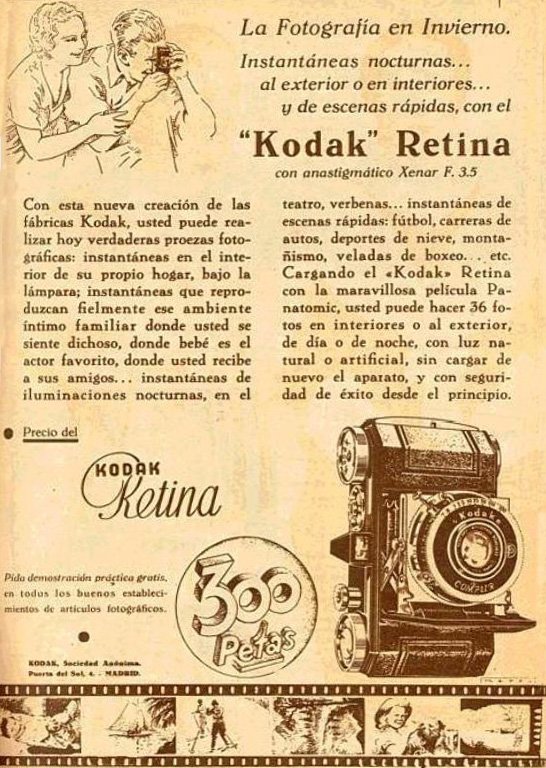
The Kodak Retina series is a fantastic camera design, blending American ingenuity with German precision. Introduced by Kodak in 1934, the Retina cameras were manufactured in Stuttgart, Germany, by Kodak AG, formerly known as Nagel Kamerawerk, which Kodak had acquired in 1931. The Retina line is celebrated for its compact design, quality construction, and innovations in photography, becoming a favorite among amateurs and professionals. The Retina series began with the Kodak Retina I (Type 117), a 35mm folding camera. The Retina was one of the first cameras to use Kodak's new 135 film cartridge, which would become the industry standard. The Retina I was compact, featuring a collapsible lens and a rugged design. The model underwent several iterations, improving lens quality, shutter speeds, and build but always retaining the folding design that defined the early Retinas.

Spanish ad for Kodak Retina 117 camera

 In 1936, Kodak introduced the Retina II (Type 122), which added a coupled rangefinder, making focusing more precise. This feature positioned the Retina as a premium camera for enthusiasts. By the mid-1950s, the Retina line had evolved into non-folding models with the introduction of the Retina Reflex series. These single-lens reflex (SLR) cameras incorporated interchangeable lenses, advanced metering, and a sharp Schneider-Kreuznach or Rodenstock lens, which appealed to serious photographers.

 The post-war years saw significant advancements. The Retina IIc and IIIc, introduced in the 1950s, became icons of the series. They featured interchangeable front lens elements, making the cameras versatile while maintaining their compact, folding design. These models also integrated advancements like exposure meters and faster shutters, ensuring the Retina line kept pace with competitors.

The Retina Reflex series launched in 1957, showcasing Kodak's foray into the SLR market. While innovative, these cameras faced stiff competition from Japanese manufacturers like Nikon and Canon. Despite this, they remain a testament to Kodak's ability to innovate during an era of rapid technological change.

 By the 1960s, the Retina line gradually faded due to the rise of inexpensive, high-quality Japanese cameras. The last Retina camera, the Retina S2, was produced in 1969. Despite their discontinuation, Kodak Retina cameras remain highly collectible, admired for their craftsmanship and role in popularizing 35mm photography. Their legacy remains a reminder of Kodak's golden era in the photography industry.

My Camera:

My Kodak Retina 117 camera is a wonderfully small and compact camera that you can put into your pocket and travel with very easily. One thing I enjoy about the look of the camera is all the knobs on the outside of the camera are nickel as opposed to the shinier chrome, which can give reflections when using the camera.

 The camera is 5" wide, just under 3" tall, and 1.5" deep with the lens closed and 3.5" deep with the front door opened and the lens out, ready to take a photo, and weighs just under a pound at 15.7 oz. My camera has a Schneider-Kreuznach Xenar 5cm f3.5 lens in a Compur-Rapid shutter. The shutter has speeds from 1/500 of a second to 1 second, along with "B" and "T" settings for timed exposures. The aperture of the lens has a range of f3.5 to f16.

 To open the lens on the camera, you press a small button on the bottom of the camera. Once depressed, the front door should usually spring open, and the lens, which is on a very short bellows system, should come out into the erect position. As previously mentioned, my front door doesn't spring open, so I needed to give it a little bit of help and pull it open.

Once opened, the camera is relatively straightforward in the settings. The shutter speeds are set by turning a dial on the top of the camera if you have it in the vertical position. Like many Kodak cameras from this era, or for many folding styles of cameras, the front door has the ability to set the camera upright just by pulling out the "Kodak" logo on the front door, which will make for a leg for the camera to rest on if you want to set it down for display or to take a photo. I always do that when in a store or seeing a folding camera on display. I'll flip down the camera's leg, allowing the camera to stand upright instead of on the platform the lens pulls out onto.

Select shutter speed by turning wheel. The top lever cocks the shutter and the one on the left side trips the shutter.

A small slider sets the aperture on top of the shutter as you hold the camera horizontally. The focus on the camera is by guess only as this camera doesn't incorporate a rangefinder. This function will come in later models. There are two different sets of focus distance numbers, both on the top of the shutter, but it depends on if you have the camera either vertically, in which the numbers are black, or if you're holding the camera horizontally, then the numbers are red. To focus the lens, there is a small knob on the bottom of the lens as you hold the camera horizontally that rotates the focus collar.

To take a photo, you'll need to cock the shutter with the lever on the top of the shutter while holding the camera vertically. Once the shutter is cocked, the other lever releases the shutter making the exposure. I've seen a very small shutter release button that fits into the cable release socket on the Retina camera. Unfortunately, my camera is missing this. I wish it did have it because when I was taking photos with the camera and looking through the viewfinder on top of the camera, my finger would cover some of the viewfinder, obstructing the subject when releasing the shutter. It wasn't too bad, but the small release would have made the experience a bit better. Now, I'm hunting for a small release to put onto the camera for future use.

 To close the front door, the lens must be focused to infinity so it is in the retracted position on the camera. You'll need to depress two small buttons on the lens strut, one on top and one on the bottom, to retract the lens back into the camera body. Once this is done, the front door will click closed.

Loading the camera with film is pretty straightforward. On the side of the camera is a lever you pull down, and the back door unlocks so it can be opened. Loading the film is just like any other 35mm camera. I needed to do a couple of operational things to advance the film to the next frame. Looking on top of the camera going from left to right is the rewind wheel, the frame counter, the viewfinder, a round knurled wheel with an arrow pointing counterclockwise, and the film advance wheel. Inside the advance wheel is a second rotating wheel with a small cutout and arrows pointing in clockwise and counterclockwise directions. This inner wheel can rotate to have either an "A" showing for advancing the film forward or an "R" for rewinding the film into the film canister when all the photos have been taken. 

After making an exposure, keep the inner wheel to "A." To wind to the next frame, the knurled wheel just to the left of the advance wheel needs to be turned slightly until you feel a slight release, then you can use the larger wheel to advance to the next frame. If you don't move the knurled ring slightly, the film won't advance. This wheel is the unlocking lever that allows the camera to advance to the next frame. Also, once you load the film, be sure to set the frame counter to the number 1 to keep track of how many exposures you've taken. Once you've taken the entire roll of photos, turn the inner wheel on the advance wheel to the "R" position to rewind the film back into the film cassette. Open the back of the camera and process your film.


My Results:

I loaded the camera with a roll of T-Max 125 film, and while taking our dog, Ernie, a 15-year-old Pug, through the neighborhood, I took photos of things that caught my eye. Here are some of the results of our walk.

Conclusion:

I must be getting better at guessing distance, which has always been a problem (one of many) of mine. I also understand that the sunny day and smaller aperture helped with some of the focusing distances I would generally have with "guesstimate" focusing. Nonetheless, the camera was small, compact, accurate in the exposures, and fun to shoot.

 As I previously mentioned, if I could find one of the small shutter release items to add to the cable release socket, this would have helped and made the camera easier to use. Besides that small item, I can see why the previous owner enjoyed shooting with this camera.

 While I enjoyed this camera, I have it for sale on my eBay store. If you're interested in this or any other items in my eBay store, please email me to work out a deal.

 Thank you for taking a few minutes from your day to read about this fun and historic Eastman Kodak camera. The Retina line of cameras is often overlooked but highly collectible and usable.

 Until next week, please be safe.


Finetta 88 Camera

My Finetta 88 camera

The Finetta 88 camera caught my eye on a visit to London a year or so ago when I had about an hour during a walk down Portabello Road. I met with Juliano, the owner of Cameras London, who was still in the process of setting up. As I was looking over his extensive items on the multiple tables he has, I saw the grey body of the Finetta 88 camera. 

 If you are a camera enthusiast and can go to Portabello Road during the weekends, I highly recommend seeing Juliano. He has an incredible selection of older wood cameras with brass lenses and many of the more common 35mm point-and-shoot cameras that seem to be all the rage now.

 As I've mentioned a few times, I'm always drawn to the camera with either a different color or if there is something odd or unusual about the item. Not only is the Finetta that I saw covered in a gray covering on the camera, but the lens is somewhat off-center, giving the camera an "out of the ordinary" look. I put the Finetta 88 camera aside and looked over many other cameras I wanted to purchase. As we discussed the price, I picked up the Finetta again and added it to the few items I purchased that day, and I'm glad I did.

The Company

Finetta-Werk was a German camera manufacturer with roots tracing back to Kamerawerk Peter Saraber, a company founded by Peter Saraber in 1945 in Goslar, Germany. Saraber, a Dutch engineer, initially focused on producing precision optical equipment in the post-war era during heightened demand for affordable and efficient photographic devices. Saraber teamed up with a Voigtlander engineer, Helmet Finke, around 1947 to design and develop a new camera.

 "Finetta" was introduced in the late 1940s, marking the company's transition toward a more consumer-friendly image. The Finetta cameras, characterized by their simplicity, durability, and relatively low cost, appealed to post-war Europe's growing middle class. Early models, such as the Finetta 88, showcased Saraber's dedication to compactness and practicality, featuring a straightforward mechanism for capturing 35mm images, including a new two-leaf shutter system, which they applied for a patent. They also invented a new film advance system with double exposure prevention.

Ad for Finetta 88 camera taken from Mike Eckman website.

 By the 1950s, the company rebranded as Finetta-Werk and expanded its product lineup. The Finetta 99 was notable for its interchangeable lenses, which had a new three-prong lens mount and included a series of four different lenses. The lenses included a Colorfinar 70mm f/5.3, a Telec 90mm f/4.5, a wide-angle 35mm Berthiot lens, and the normal Finetar 45mm f2.8 lens. Along with the lenses, Finetta improved design quality, reflecting a shift toward competing with established brands like Kodak and Agfa. 

 Another interesting fact is that in 1954, Finetta started working with Jacques Bolesy of the Bolsey camera company to help with the design and production of their small, compact Bolsey 8 subminiature still and movie camera. Unfortunately, Finetta went out of business soon after and closed their factory in 1957.

 Finetta cameras were often praised for their ergonomic designs and mechanical reliability, offering a stepping stone for amateur photographers transitioning into more serious photographic endeavors.

My Camera:

My Finetta 88 camera is covered in an odd fabric. It has a herringbone-style pattern and is not the normal leather or leatherette covered in most cameras. It is more of a fabric material, but it does have a great feel to it, and I like the greyish color, which gives the camera an elegant appearance. 


The Finetta is 3" tall by 5 1/8" wide by 2.5" deep from the front of the lens to the back of the camera, and weighs 1lb, and .7 ozs, and comes with a Finetar 45mm f2.8 lens which has a three-prong bayonet. There is no locking mechanism on the lens mount, so you must be careful when focusing on the camera. If you turn the lens too far, the mount will start to move, and the lens will pop off, which is pretty small. The lens does "click" into place, but it can somewhat easily come off without the locking pin.

My lens focuses from 2.8 feet to infinity. It may focus closer as the lens rotates past the 2.8-foot mark on the lens. The aperture settings are on the inside of the focus ring. The camera doesn't have an internal focus system, so all the focus is guesswork, judging the distance, and setting focus. The aperture range is from f2.8 to f16 and is indicated by a small notch on the setting ring.

 With the lens removed, you can easily see the two-leaf shutter system. The camera only has a few different shutter speeds, ranging from 1/250, 1/100, 1/50, 1/25, and "B" for timed exposures. The shutter speeds are set on a very small and challenging knob next to the lens. 

One thing I noticed about the camera when I first picked it up and started to play with it was that things seemed backward from what I am used to. I'm used to filming advanced turning in a clockwise movement, but this camera goes counterclockwise. It's the same as taking the back off the camera to load the film. To open the back, you turn the knob on the bottom in a clockwise motion. The back is held onto the camera with none other than a bolt-style fastener which is held onto the camera with a larger circular nut that screws on to keep the back onto the camera body. To me, that is the motion to tighten, but on this camera, it's the motion to untighten and remove the back to load the film.

 When I removed the back from the camera, I noticed a couple of things right away. My Finetta 88 had a film cassette in the camera. I'm not 100% sure who makes this cassette. Still, it's very similar to the Leica cassettes in design, with two outer compartments and an inner spool. The cassette is also held into the camera with a locking lever that slides over the end of the cassette to keep it in place. The second item I noticed was a bright and shiny pressure plate over the shutter area to keep the film flat as it's transported across the chamber. The pressure plate needs to be lifted when loading the 35mm film. The third item noticed was a larger, thicker take-up spool on the camera's right side. This one is similar to what I wrote about with the Corfield Periflex camera. There is a slot to put the 35mm leader into, which is needed to load the camera.

A built-in, double exposure prevention system is within the camera's transport. Once you trip the shutter, under the take-up spool is a small piece of metal that pushes out and stays out until you wind the camera, which cocks the shutter and flattens that piece of metal, allowing you to take the next photo. I guess there's a pin that pushes out the metal piece, and when the film is advanced, it will enable the pin to fall back into place for the next photo.

On top of the camera is nothing more than the film advance knob on the right side, which turns counterclockwise to advance to the next frame. The frame counter, accessory/flash shoe, and rewind knob are on the far left.


My Results:

The camera is very straightforward and somewhat basic in its operations. I didn't use the 35mm cassette that came with the camera; I just used a regular 35mm roll of film. I put in a roll of T-Max 125 film and walked through the neighborhood to see what kind of results the camera could produce. After I got back from my walk through the neighborhood, I processed the film, and here are a few of the shots I took.

My Conclusion:

The Finetta 88 camera took a bit to get used to. I kept on trying to turn the advance knob in the wrong direction; the shutter speed dial was small and difficult to turn. That may be more of a camera cleaning issue, but I changed to other speeds. The lens did start to unmount a couple of times, but nothing disastrous to the point where the lens fell off the camera. The focus is smooth on my camera; it was more operator malfunction than anything, but overall, the camera was enjoyable to shoot with, and I think the lens I have on this camera is sharp.

 I'll definitely want to shoot with this camera in the future. It was fun and a pleasant experience overall.

 Thank you for taking a few minutes from your day to learn about this interesting mid-century camera I have in my collection.

 Until next week, please be safe.

Gallus Derlux Camera

I can still remember when my wife and I visited Paris about 10-12 years ago and went to a small flea market in one of the arrondissements we were staying near and seeing for the first time the Gallus Derlux camera. My first impression was the camera needed the leather coverings that usually adorn cameras. Still, upon further inspection of the camera, it was made to have a silverish metal body as its covering. This was a camera I needed to have since its appearance was so different from any camera I had seen in the past.

My Gallus Derlux camera

 That was the first Gallus Derlux I've owned over the years. I sold that camera at the Paris flea market a couple of years after purchasing it, and I have bought and sold a couple of other Gallus Derlux cameras over the years. Recently, I had the bug to purchase it again to add to my collection. 

 I talked to a fellow camera collector, and he told me he had one and would sell it to me for a reasonable price, as I know he's downsizing his collection. I need to do the same thing but I purchased it from him. This camera has a working shutter and a nice pouch case. At this point, since I've had a few of these in my life, it's time to put some film in the camera, take it for a spin around the neighborhood, and write a post on it.

The Company:

To discuss the camera company, Gallus, we need to include the German company Foth in this discussion. After WWII, Gallus, which was in Paris, was either licensed by Foth or Foth moved their operation to Pari and renamed the company Gallus due to what was going on in Germany after the war. Let's start with a bit of information on Foth and work our way forward.

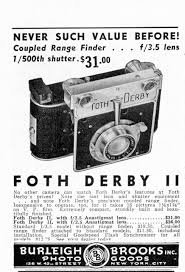
 The C.F. Foth Company, established in 1930 in Berlin, Germany, gained recognition for its innovative design and engineering of compact cameras. The Foth Derby series stands out as a celebrated line of cameras known for their portability, affordability, and reliability. The original models were a less expensive alternative to the more expensive Leica and Contax cameras of their time, but they utilized 127 film as opposed to 35mm from Leica and Contax. These cameras catered to the needs of amateur photographers and gained a reputation for their high-quality performance in a compact form.

 The Foth Derby cameras were introduced in the 1930s and remained in production through the late 1940s. They were designed with portability in mind, featuring a folding bellows system and compact dimensions that made them a popular choice for travelers and casual photographers. The cameras used 127 roll film, producing images in 4x6.5 cm format, a size well-suited for personal and artistic photography.

One of the defining features of the Foth Derby was its focal-plane shutter, which was uncommon in compact cameras of its time. This shutter system allowed for faster shutter speeds, up to 1/500th of a second, allowing photographers to capture motion and shoot in bright lighting conditions. The Derby series was also equipped with high-quality lenses, such as the Foth Anastigmat, or later upgraded models like the Foth Derby Anastigmat f/3.5, ensuring sharp and well-resolved images.


The Foth Derby evolved through several iterations, each offering incremental improvements and adaptations to meet changing photographic trends. Here are some general differences:

  1. Foth Derby I (1930): The original model featured a basic lens and a simple shutter mechanism. It utilized a 24x36mm format on 127 film and was praised for its ease of use and portability, making it accessible to novice photographers. 

  2. Foth Derby II (1931-): This version introduced the 3x4 (30x40mm) film format. The camera's build quality was also refined for greater durability, and several different lens options were offered.

  3. Foth Derby III (1935-39): This model had several different viewfinder and lens options. Some models had interchangeable mounts that allowed the use of some Zeiss and Dallmeyer lenses.

  4. Foth Derby IV (1936-40): This model had an aluminum front standard that housed an integrated rangefinder for focus. It also offered a choice of different lens options.

 Somewhere around 1937, the combination of both Foth and Gallus became intertwined because in 1937, Foth came out with:

  1. Derby V: Made by C.F. Foth & Cie in Paris. It still has the 30x40 film format on 127 film, but the build quality was a bit rougher coming out of the French factory.

  2. Gallus Derby (1937-) was the start of the Gallus line of cameras, taken from the Foth Derby. The build quality was rougher than that of the German-made cameras and about 10% heavier.

 As a collector, you can see the progression of design and features from the Foth Derby and how it morphed into the Gallus Derlux, using part of the Derby and Delux naming and wanting to separate from the originating company.

My Camera:

My Gallus Derlux camera is 5" wide by 3" tall by 2" deep with the lens retracted and 3" with the lens extended in the usual picture-taking position. My camera weighs just under 15 oz, at 14.9 oz. and has a Gallus 50mm f3.5 lens built into the camera. The camera is a fundamental one without an integrated focusing system, but rather a simple viewfinder on top of the camera for general framing of the photo you desire. The Gallus Derlux has a vertical focal plane shutter and takes 16 30x40mm exposures on a roll of 127 film. 

To take a photo, you must pull the front lens section from the body. The lens plate has a small "hump: on the top and bottom to grip onto to pull the lens plate away from the camera body. The lens plate is on a strut on either side of the plate, which exposes the internal bellows built into the camera. After taking photos, you push the lens plate back into the body, where it stays for transportation. This makes the camera slimmer and more manageable to slip into the case or pocket for transportation.

 The lens and focus system are located on the lens plate. To focus the lens, hold onto the larger focus arm, which is very similar to what's used on the Leica system, and rotate the helicoid lens to the desired guessed distance to the subject. There is a stop arm, so you cannot unscrew the lens from the body. The minimum focus distance is 1 meter to infinity. The aperture settings are on the lens. The aperture goes from f3.5 to F18. To adjust the aperture, turn the lens to the desired aperture settings, which is the same indicator that tells the focus distance. This makes it easy to use because you can set aperture and focus in the same area.

The shutter speeds are set on the camera's top. The shutter speeds go from 1/500 down to 1/25, along with "B" for timed exposures. To set the different shutter speeds, you need to lift the shutter speed dial and rotate the dial to the desired speed, which is indicated by a small dot. You also need to wind the shutter to cock the shutter as it's not incorporated in the winding process, which is what most current cameras have. To cock the shutter, just turn the knob on top of the camera, which have the shutter speed on it in the clockwise direction until it stops. The shutter is now cocked and ready for the subsequent exposure. The shutter release is located on the front of the camera on the right side and just next to the film plate.

Shutter speed dial. Lift and turn to set speed..

The Gallus Derlux utilizes two red (and green) windows on the back of the camera. These two windows are inside an immense depth-of-field scale on the back of the camera. Two windows allow the photographer to get 16 images on 127-size film. 

Back of Gallus Derlux camera

The film doors release is located on the right side of the camera to load the camera with film. Pull down the release button and swing the door open, which exposes the film chamber. Take the blank 127 reels from the right side of the film chamber by pulling up the knob above it and taking out the blank reel. Put the blank 127 film reel into the left side where the film transport knob is located. Lift the winding knob to insert the blank reel. Put your fresh and unexposed roll in the right chamber and press down the knob that holds it into place. Put the paper from the unexposed toll into the blank reel and wind it, ensuring the film moves. Stop when you see "start" and close the back of the camera.


To get 16 exposures on your roll of 127 film, wind the roll of film in the camera to frame number 1 to the first window, which on this camera is the window on the right-hand side of the backdoor. After you take that photo, wind the film until you see frame number 1 in the other window or the one on the left side of the backdoor. After you take that photo, frame number 2 will appear on the right side of the red window. Continue this process until frame number 8 is taken on the left side of the window. Wind until the film is all the way onto the take-up spool, open the back, and take the film out for processing.

My Results:

I put a roll of 400 ISO film in the camera and wandered around my backyard and the neighborhood streets. I used 400 ISO because the fall and winter in my neck of the woods are usually overcast. During my walk, the sun just so happened to come out, so I was forced to use the faster speeds on the camera.

After I took the photos and processed the film, I also noticed a gap between the two shutter curtains when winding the shutter to the next photo, causing a light leak on many of the images. I must have pointed the camera down or had the lens in a darker area several times because there were a few good images, but many were terrible. I also don't have a lens cap for this camera, so the next time I use the camera, I'll need to cover the lens when cocking the shutter so I don't expose the film to light before or after exposure.


If you have this or similar cameras and are mechanically inclined, I found a great article on someone overhauling the shutter on his Gallus Derby Lux camera.


Conclusion:

This was a fun camera to use. It's very simple, takes a nice larger image, and is small and compact. I'll need to find a lens cap for the one before I shoot again or just place my hand over the lens when cocking the shutter.

 Thank you for taking a few minutes from your day to look over this post.

 Until next week, please be safe.