Gallus Derlux Camera

I can still remember when my wife and I visited Paris about 10-12 years ago and went to a small flea market in one of the arrondissements we were staying near and seeing for the first time the Gallus Derlux camera. My first impression was the camera needed the leather coverings that usually adorn cameras. Still, upon further inspection of the camera, it was made to have a silverish metal body as its covering. This was a camera I needed to have since its appearance was so different from any camera I had seen in the past.

My Gallus Derlux camera

 That was the first Gallus Derlux I've owned over the years. I sold that camera at the Paris flea market a couple of years after purchasing it, and I have bought and sold a couple of other Gallus Derlux cameras over the years. Recently, I had the bug to purchase it again to add to my collection. 

 I talked to a fellow camera collector, and he told me he had one and would sell it to me for a reasonable price, as I know he's downsizing his collection. I need to do the same thing but I purchased it from him. This camera has a working shutter and a nice pouch case. At this point, since I've had a few of these in my life, it's time to put some film in the camera, take it for a spin around the neighborhood, and write a post on it.

The Company:

To discuss the camera company, Gallus, we need to include the German company Foth in this discussion. After WWII, Gallus, which was in Paris, was either licensed by Foth or Foth moved their operation to Pari and renamed the company Gallus due to what was going on in Germany after the war. Let's start with a bit of information on Foth and work our way forward.

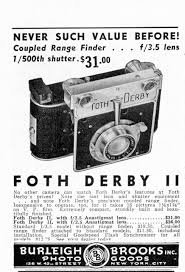
 The C.F. Foth Company, established in 1930 in Berlin, Germany, gained recognition for its innovative design and engineering of compact cameras. The Foth Derby series stands out as a celebrated line of cameras known for their portability, affordability, and reliability. The original models were a less expensive alternative to the more expensive Leica and Contax cameras of their time, but they utilized 127 film as opposed to 35mm from Leica and Contax. These cameras catered to the needs of amateur photographers and gained a reputation for their high-quality performance in a compact form.

 The Foth Derby cameras were introduced in the 1930s and remained in production through the late 1940s. They were designed with portability in mind, featuring a folding bellows system and compact dimensions that made them a popular choice for travelers and casual photographers. The cameras used 127 roll film, producing images in 4x6.5 cm format, a size well-suited for personal and artistic photography.

One of the defining features of the Foth Derby was its focal-plane shutter, which was uncommon in compact cameras of its time. This shutter system allowed for faster shutter speeds, up to 1/500th of a second, allowing photographers to capture motion and shoot in bright lighting conditions. The Derby series was also equipped with high-quality lenses, such as the Foth Anastigmat, or later upgraded models like the Foth Derby Anastigmat f/3.5, ensuring sharp and well-resolved images.


The Foth Derby evolved through several iterations, each offering incremental improvements and adaptations to meet changing photographic trends. Here are some general differences:

  1. Foth Derby I (1930): The original model featured a basic lens and a simple shutter mechanism. It utilized a 24x36mm format on 127 film and was praised for its ease of use and portability, making it accessible to novice photographers. 

  2. Foth Derby II (1931-): This version introduced the 3x4 (30x40mm) film format. The camera's build quality was also refined for greater durability, and several different lens options were offered.

  3. Foth Derby III (1935-39): This model had several different viewfinder and lens options. Some models had interchangeable mounts that allowed the use of some Zeiss and Dallmeyer lenses.

  4. Foth Derby IV (1936-40): This model had an aluminum front standard that housed an integrated rangefinder for focus. It also offered a choice of different lens options.

 Somewhere around 1937, the combination of both Foth and Gallus became intertwined because in 1937, Foth came out with:

  1. Derby V: Made by C.F. Foth & Cie in Paris. It still has the 30x40 film format on 127 film, but the build quality was a bit rougher coming out of the French factory.

  2. Gallus Derby (1937-) was the start of the Gallus line of cameras, taken from the Foth Derby. The build quality was rougher than that of the German-made cameras and about 10% heavier.

 As a collector, you can see the progression of design and features from the Foth Derby and how it morphed into the Gallus Derlux, using part of the Derby and Delux naming and wanting to separate from the originating company.

My Camera:

My Gallus Derlux camera is 5" wide by 3" tall by 2" deep with the lens retracted and 3" with the lens extended in the usual picture-taking position. My camera weighs just under 15 oz, at 14.9 oz. and has a Gallus 50mm f3.5 lens built into the camera. The camera is a fundamental one without an integrated focusing system, but rather a simple viewfinder on top of the camera for general framing of the photo you desire. The Gallus Derlux has a vertical focal plane shutter and takes 16 30x40mm exposures on a roll of 127 film. 

To take a photo, you must pull the front lens section from the body. The lens plate has a small "hump: on the top and bottom to grip onto to pull the lens plate away from the camera body. The lens plate is on a strut on either side of the plate, which exposes the internal bellows built into the camera. After taking photos, you push the lens plate back into the body, where it stays for transportation. This makes the camera slimmer and more manageable to slip into the case or pocket for transportation.

 The lens and focus system are located on the lens plate. To focus the lens, hold onto the larger focus arm, which is very similar to what's used on the Leica system, and rotate the helicoid lens to the desired guessed distance to the subject. There is a stop arm, so you cannot unscrew the lens from the body. The minimum focus distance is 1 meter to infinity. The aperture settings are on the lens. The aperture goes from f3.5 to F18. To adjust the aperture, turn the lens to the desired aperture settings, which is the same indicator that tells the focus distance. This makes it easy to use because you can set aperture and focus in the same area.

The shutter speeds are set on the camera's top. The shutter speeds go from 1/500 down to 1/25, along with "B" for timed exposures. To set the different shutter speeds, you need to lift the shutter speed dial and rotate the dial to the desired speed, which is indicated by a small dot. You also need to wind the shutter to cock the shutter as it's not incorporated in the winding process, which is what most current cameras have. To cock the shutter, just turn the knob on top of the camera, which have the shutter speed on it in the clockwise direction until it stops. The shutter is now cocked and ready for the subsequent exposure. The shutter release is located on the front of the camera on the right side and just next to the film plate.

Shutter speed dial. Lift and turn to set speed..

The Gallus Derlux utilizes two red (and green) windows on the back of the camera. These two windows are inside an immense depth-of-field scale on the back of the camera. Two windows allow the photographer to get 16 images on 127-size film. 

Back of Gallus Derlux camera

The film doors release is located on the right side of the camera to load the camera with film. Pull down the release button and swing the door open, which exposes the film chamber. Take the blank 127 reels from the right side of the film chamber by pulling up the knob above it and taking out the blank reel. Put the blank 127 film reel into the left side where the film transport knob is located. Lift the winding knob to insert the blank reel. Put your fresh and unexposed roll in the right chamber and press down the knob that holds it into place. Put the paper from the unexposed toll into the blank reel and wind it, ensuring the film moves. Stop when you see "start" and close the back of the camera.


To get 16 exposures on your roll of 127 film, wind the roll of film in the camera to frame number 1 to the first window, which on this camera is the window on the right-hand side of the backdoor. After you take that photo, wind the film until you see frame number 1 in the other window or the one on the left side of the backdoor. After you take that photo, frame number 2 will appear on the right side of the red window. Continue this process until frame number 8 is taken on the left side of the window. Wind until the film is all the way onto the take-up spool, open the back, and take the film out for processing.

My Results:

I put a roll of 400 ISO film in the camera and wandered around my backyard and the neighborhood streets. I used 400 ISO because the fall and winter in my neck of the woods are usually overcast. During my walk, the sun just so happened to come out, so I was forced to use the faster speeds on the camera.

After I took the photos and processed the film, I also noticed a gap between the two shutter curtains when winding the shutter to the next photo, causing a light leak on many of the images. I must have pointed the camera down or had the lens in a darker area several times because there were a few good images, but many were terrible. I also don't have a lens cap for this camera, so the next time I use the camera, I'll need to cover the lens when cocking the shutter so I don't expose the film to light before or after exposure.


If you have this or similar cameras and are mechanically inclined, I found a great article on someone overhauling the shutter on his Gallus Derby Lux camera.


Conclusion:

This was a fun camera to use. It's very simple, takes a nice larger image, and is small and compact. I'll need to find a lens cap for the one before I shoot again or just place my hand over the lens when cocking the shutter.

 Thank you for taking a few minutes from your day to look over this post.

 Until next week, please be safe.


Corfield Periflex Camera

The Corfield Periflex is a relatively new camera to my collection. I've only had it for a few months, but I've desired to own one for many years. The opportunity arose to purchase one of the earlier models that was in good working condition and at a reasonable price for this camera in its condition, so I grabbed the opportunity and purchased it.

My Corfield Periflex Camera

 When the camera arrived, it was in good working condition and in the cosmetic condition described, so I was pleased with the purchase. I knew from purchasing the camera that my aim was to do a blog post on it, as the camera has many unique features that have not been seen in cameras before or since. 

 The Periflex is a 35mm camera with an appearance that resembles a Leica only because of the size and initial shape of the camera. Unlike the Leica cameras, the Periflex doesn't offer the photographer rangefinder focus, sprockets film advance, removable baseplate, or take-up spool, but it does offer the same lens thread mount and excellent optics in a small and compact camera made in the United Kingdom.

The Company:

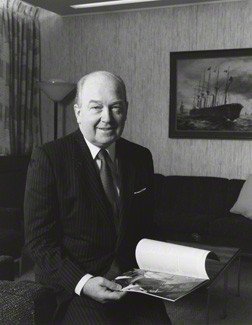
Sir Kenneth Corfield

Sir Kenneth Corfield (1924–2016) was a British engineer, entrepreneur, and photographer whose work significantly influenced the photographic industry in the UK, mainly through his company, Corfield Ltd. Known for his pioneering approach to camera design, Sir Kenneth's legacy is deeply intertwined with the Corfield Camera Company, which he founded in the mid-20th century. His innovative ideas, especially those focused on making quality, compact cameras, helped the brand gain a reputation in the photography community, although its operations ended in the 1970s.

 Kenneth Corfield was born in the UK in 1924 and trained as an engineer. He developed a passion for cameras and photography from an early age, and this interest led him to create camera equipment designed to fill the gaps he observed in the photographic tools available at the time. His mechanical expertise and curiosity about precision instruments motivated him to create Corfield Ltd., a company that produces cameras for professional and amateur photographers alike.

 Corfield founded his company in the post-war period when there was increasing demand for affordable, portable, high-quality photographic equipment. Starting in the 1940s, Corfield Ltd. initially operated as a small workshop but soon expanded to meet the needs of a growing photography market in the UK. Unlike the more prominent, established companies primarily located in Germany and Japan, Corfield's British roots gave his products a unique appeal in the domestic market. They also partnered with British Optical Lens Co. in Walsall, which designed and made the Lumar optics for Corfield.

Ad for the Corfield Camera

The company's first significant product was the Periflex, introduced in 1953. This camera became known for its innovative use of a periscope-type viewing system. This device made the Periflex one of the more unique 35mm cameras available at the time, as it allowed users to see the image through the lens without needing an expensive reflex mirror. The camera was compact, affordable, and relatively simple compared to other rangefinders, and it catered to a market that wanted quality at an accessible price.

The Periflex series became the backbone of Corfield Ltd.'s reputation. The first model, the Periflex I, was followed by several iterations, including the Periflex II, III, and Gold Star. Each version introduced new features and enhancements to meet photographers' increasing demands, such as improved shutter speeds, lens mounts, and more durable designs. 

The defining characteristic of the Periflex cameras was the periscope-like focusing mechanism. This mechanism, placed directly above the lens, allowed photographers to focus accurately without the bulk or complexity of a traditional single-lens reflex (SLR) system. This feature made the Periflex a unique hybrid of a rangefinder and SLR qualities, appealing to those who valued compact design but still wanted accurate focus control. Although some photographers found the system unorthodox, others appreciated the camera's compactness and precision, making it popular among professionals and amateurs.

Despite its successes, Corfield Ltd. faced stiff competition from German and Japanese camera manufacturers, producing high-quality cameras on a much larger scale. Companies like Leica, Nikon, and Canon dominated the market with advanced SLRs, and Corfield's unique designs needed to catch up with the rapid technological advancements. While the Periflex series had gained a loyal following, it required more sophistication and reliability than its competitors, ultimately limiting its market appeal.

In the 1970s, Corfield Ltd. ceased producing its cameras, and the Periflex series also ended production. Although the brand did not survive, the innovations introduced by Kenneth Corfield influenced camera design and highlighted the potential for high-quality British-made photographic equipment.

Kenneth Corfield's contributions to the photographic world extended beyond his camera company. Even after Corfield Ltd. ceased operations, he remained active in the photography industry. Later in his career, Corfield was involved with Gandolfi, a British large-format camera manufacturer, and his influence continued to be felt through his consulting and design work in the field.

Corfield's legacy is remembered by photography enthusiasts and collectors who admire his innovative approach to camera design. The Periflex cameras, in particular, are valued among collectors for their uniqueness and historical significance. Sir Kenneth's work reflects a time of British ingenuity in the photographic industry. It is a testament to a small, independent company's impact on a competitive global market.

Bev Parker has a wonderful website dedicated to The Corfield Company.

My Camera:

My Corfield Periflex camera isn't the first model, as the first 200 Periflex camera had a black top and bottom plate like mine. Still, they were covered in brownish pigskin on the body. I believe mine is the third version, as the engraving has been moved to the periscope but still has the black top and bottom plate, black leatherette covering, and chrome lens.

 My Periflex camera is 5.5" wide by 3.25" tall, including the periscope, and 3.25" deep from the back of the camera to the front of the lens focused to infinity. With the standard Lumar 50mm f3.5 lens, it weighs 1 lb 1.4 oz. The camera is made from aluminum, as opposed to brass, which was a more common construction material at the time. Aluminum was easy to work with for both the body and lenses and was less expensive.

This hybrid camera doesn't have a rangefinder to focus. Still, it has a very small mirror that drops down into the camera and points out through the lens, allowing the photographer to focus on the subject, which is very similar to a single-lens reflex camera. The periscope is achieved by the center tube over the lens, which has a small knob on the back that you pull down and look through the optics on the top to view your subject.

Periscope mirror when depredded in the film chamber

I was very skeptical at first, but it does work and focuses very crisply on the subject as it should. There are some things that could be improved in this system. First, you need to open the aperture to get the brightest image to focus on, so you don't do this quickly. Once the camera is focused, you stop the lens down to the desired aperture setting to get the proper exposure, move your eye to the mounted viewfinder on the top to frame your subject, and then take the photo. Once you do it a few times, it becomes manageable. But it would be best if you remembered to reset your aperture, which I didn't do on a few frames. That's just a matter of getting to know the camera and using it more often. I DID like looking through the lens in a small compact camera to focus on the subject.

 My Periflex has shutter speeds from 1/1000 to 1/30 sec exposure times along with "B" for timed exposures. Above the shutter speed indicator is a knob that needs to be turned to cock the shutter before making an exposure. Advancing the film DOES NOT cock the shutter. These are two separate operations and are not intertwined. You do, however, need to advance the film winding lever AND cock the shutter before the camera will fire. This makes it impossible to take a double exposure on this camera. At least, I am still looking for a way to do it. The shutter release button is on the front of the camera, similar to the Topcon cameras, so it's more of a squeezing motion than a pressing down motion. There is a removable collar around the shutter release to attach a Leica-style cable release for time exposures.

Top view of Corfield Periflex. from L-R, Rewind knob, Removable viewfinder, Periscope mirror, Shutter speed dial with Shutter cocking knob, Rewind button, Film advance knob

Another oddity about my camera is that I didn’t discover it until after I had shot all the photos for this post. I didn’t think there were aperture settings on the lens, but after I reread the instruction manual, there is a small black mark on the lens that goes along the depth of field scale which indicates what aperture you’re using. Looking at the Corfield Periflex instruction manual, they discuss apertures and depth of field, but there is where the aperture settings are. All my exposures were guesses of the size of the aperture needed. The focus on my lens is smooth, the aperture ring moves well, too, and the Lumar lens system has a Leica Thread mount, so the advantage is you can use any LTM lens with this camera.


Loading the film is very simple, and there is another camera oddity in the loading process on the camera. To open the back to load the film, you turn the chrome circle on the camera next to the tripod socket until the arrow points to the white dot. Once that is done, the camera's back will slide downward, exposing the film chamber. I first noticed that there was no drive gear to advance the film, and the take-up spool (drum) on the camera was much larger than the usual 35mm cameras on the market. The take-up spool is actually a drum that advances 180 degrees per wind of the film advance, so as the film is pulled and wrapped around the drum, the spacing of the film frames becomes more significant as you go from the first to the last frame.

Once the film is loaded, you slide the back into position on the camera and turn the chrome wheel on the bottom away from the white dot to lock the back onto the camera. When finished taking the roll of photos, rewind the film back into the film cassette. The drum/take-up spool release is a small chrome button between the shutter and film advance knobs. Press that button down, and you can rewind the film back into the cassette for processing.

My results:

I took the camera for a walk in the neighborhood on a sunny afternoon to see what I could do with the camera. It took some time to think about the metering process on the subject. Opening the aperture, setting the shutter speed, pressing down the periscope to focus (which was fun and easy), resetting the aperture to a size opening I thought might be the correct aperture size, putting the viewfinder to my eye to compose the photo, then taking the photo. Certainly not like cameras today with autofocus, automatic light meter settings, etc. You slow down, take your time and compose the shot, which I enjoy doing.

Here are a few of the images from the camera.

Conclusion:

I enjoyed shooting with the Corfield Periflex. It slows you down and makes you think about the process of creating an image rather than taking one. Not that the photos shown are any works of art, but I like the slower and more methodical process of taking the photo.

 The camera is small and compact, has the shutter speeds needed, and has good optical sharpness. After finding where the aperture settings are, it makes more sense on how to do the aperture settings. I only wish I knew that before using the camera for the first time.

 Thank you for taking a few minutes from your day to read my review of the Corfield Periflex, a gem of a camera. 

 Until next week, please be safe.