KAPSA Box Camera

My Kapsa camera

On my blog, February is a special time for vintage camera enthusiasts like us-it's Box Camera Month, a time to celebrate and explore the unique charm of these classic cameras.

 Looking through my collection, I noticed I had several different box or box-style cameras that I wanted to use and write about. So, in the middle of January, I thought I should spend the month of February using and writing about the four box cameras I was thinking about.

 The first camera that I noticed was the Kapsa camera. It's been on my shelf for a couple of years, and I purchased it in a large group of cameras from an online auction. At first, I didn't think too much of the camera as the items within the group I was primarily interested in were a couple of Olympus Pen F half-frame cameras. As I was unboxing and unwrapping the items I had purchased, the Kapsa was a camera that drew my attention due to the heavy Bakelite material. The name was one that I wasn't aware of.

D. F. Vasconcellos (DFV) Logo

 After doing some research on the camera after the unwrapping, I found out that the camera is rare in North America because it was made and sold in Brazil. I thought that was unusual and dug a bit more into the camera; it also comes in an aqua-blue color, which makes me want to get that version even more because of my love for colored and unusual cameras. I found even more interesting information when I did more digging into the camera and the company that manufactured the camera.

The Company.

D. F. Vasconcellos (DFV) manufactured the Kapsa camera in the 1950s, but the company, which was founded in 1941 in Sao Paulo, Brazil, began manufacturing precision optical instruments, like surgical microscopes and other items for the Brazilian military.

 In the 1950s, D. F. Vasconcellos diversified into consumer items like binoculars, magnifying glasses, and loupes. This was also the time they ventured into camera manufacturing, a move that filled a growing market for photography in Brazil. 

Brazilian ad for Kapsa camera.

 My guess is that companies like Kodak and Agfa, which were making simple cameras and importing them into Brazil, were somewhat expensive for the average Brazilian consumer. Since D. F. Vasconcellos was getting into the consumer market, they decided to manufacture an inexpensive, well-made, but simple camera for the Brazilian market. 

Getting into the camera manufacturing business must have been successful because they made cameras other than the Kapsa for the Brazilian market. They had a total of six cameras in their lineup. Some of the different cameras D. F. Vasconcellos made are very similar to some of the cameras made by Ansco. One camera made by D. F. Vasconcellos was the Zina 25, which is a copy of the Ansco Cadet II. There are thoughts that some of the cameras made by D. F. Vasconcellos were from older Ansco molds. This makes sense, as other cameras within their lineup have similarities to the Ansco line.

 D. F. Vasconcellos continued to manufacture cameras into the mid-1960s. Still, soon after, they shut down their camera manufacturing to concentrate on the items they are known for today. According to their website, D. F. Vasconcellos manufactures surgical microscopes and other specialized equipment used in the Ophthalmology, Veterinary, Otorhinolaryngology, and Dental fields.

My Camera:

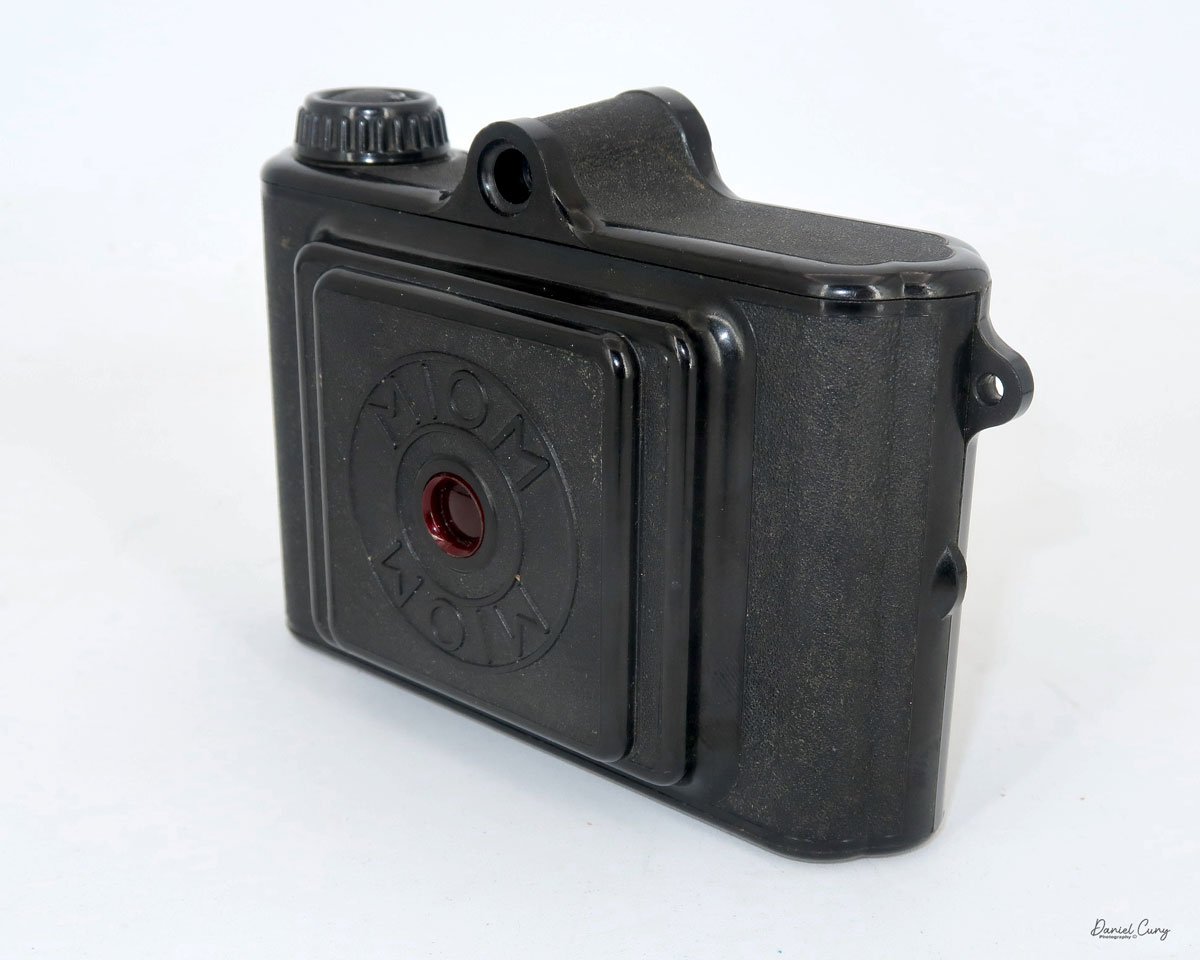
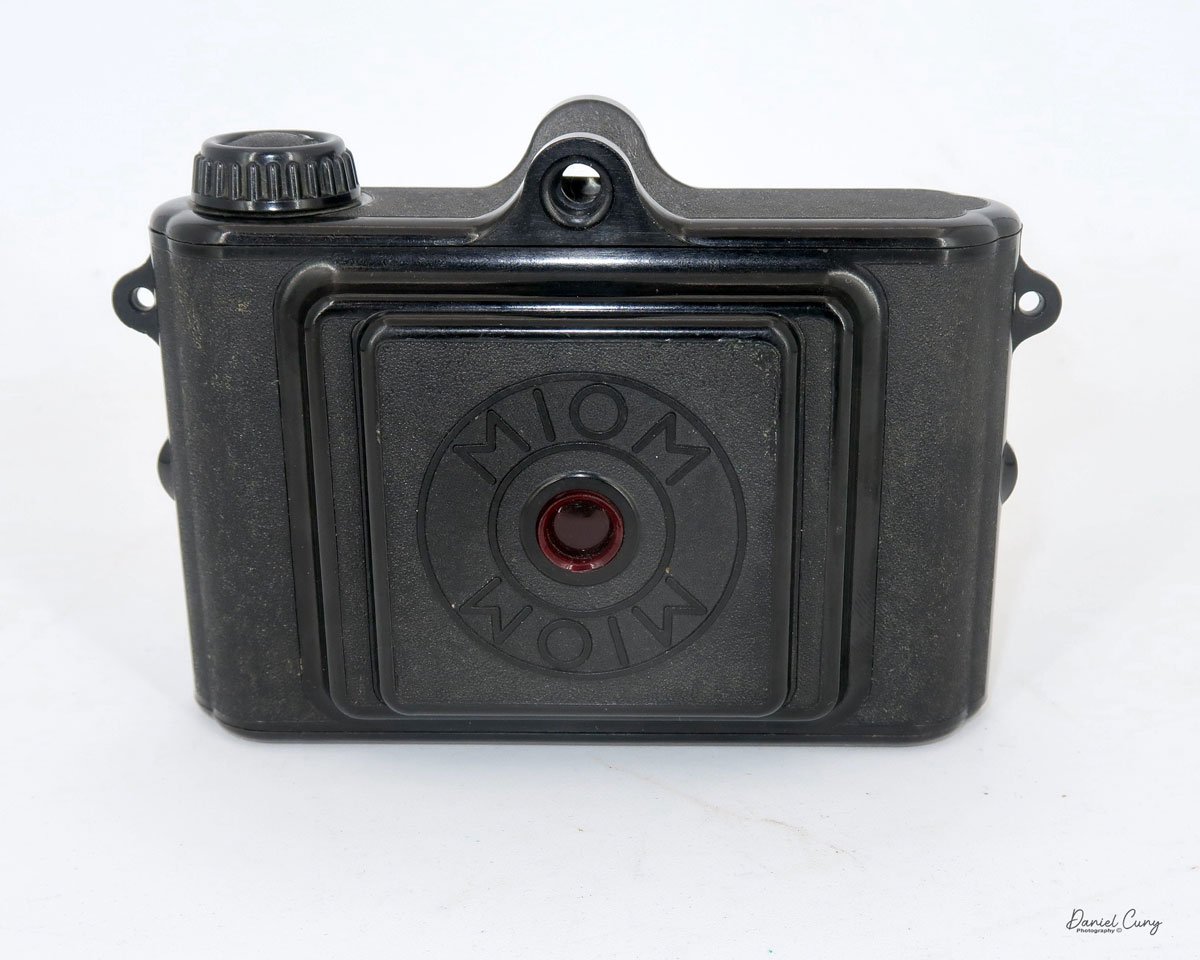
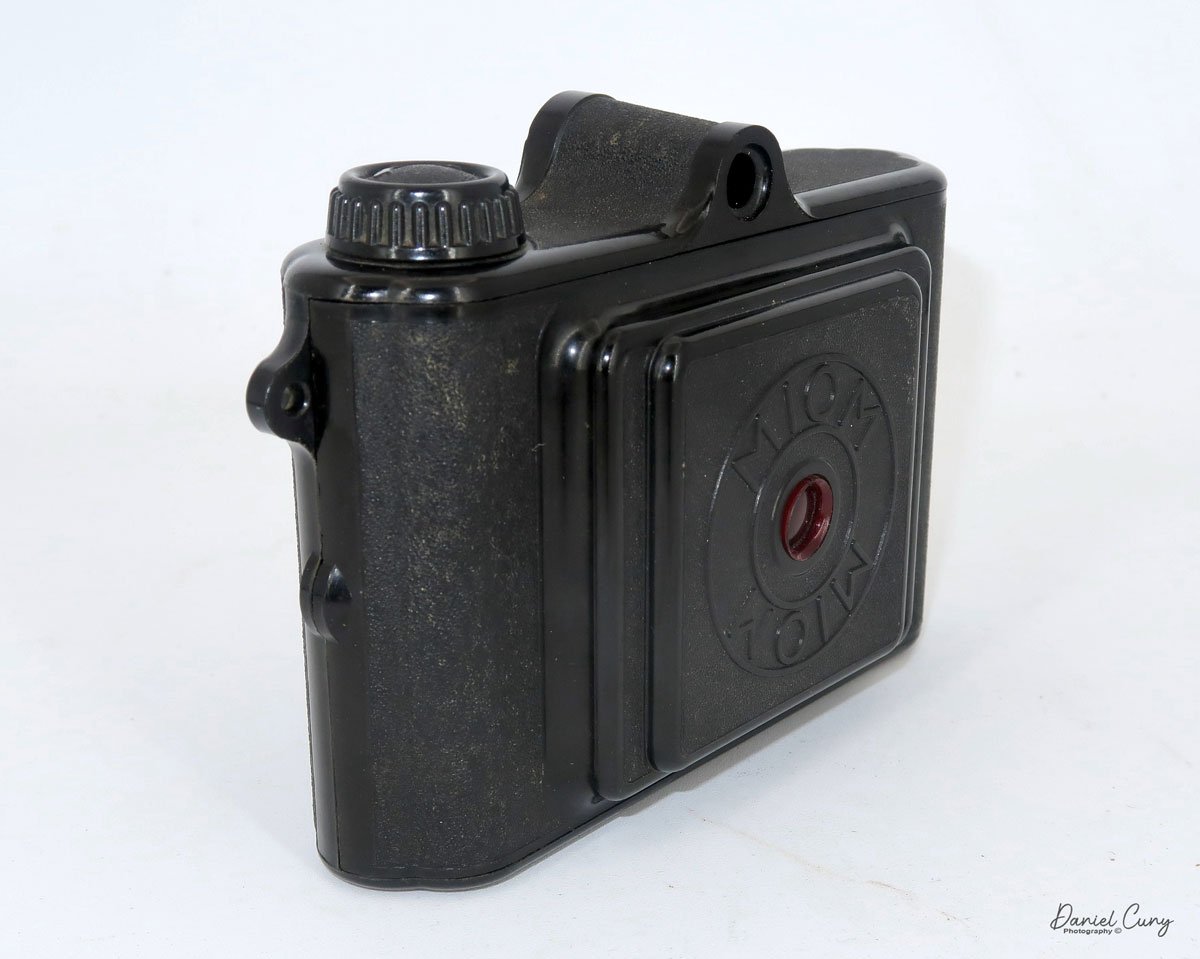
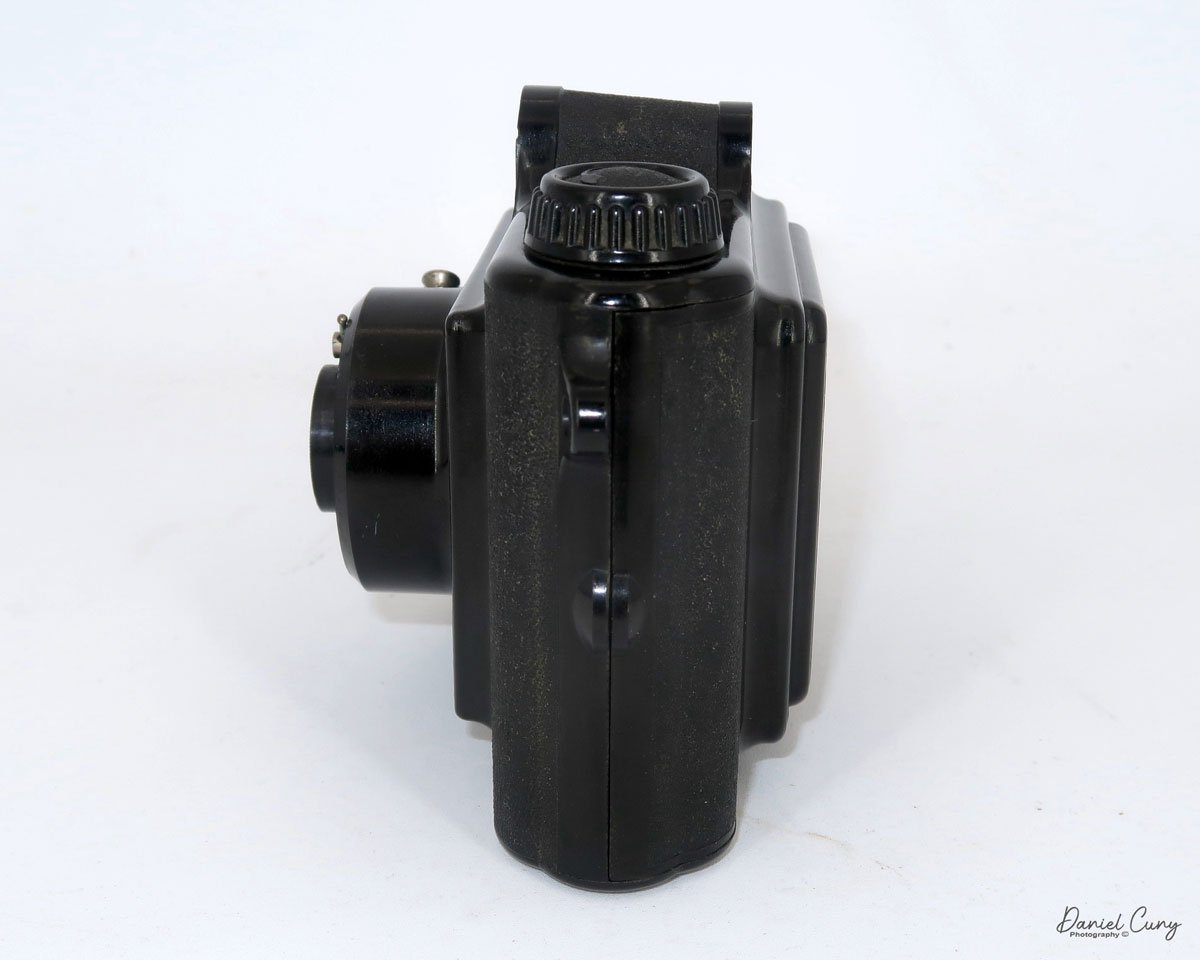
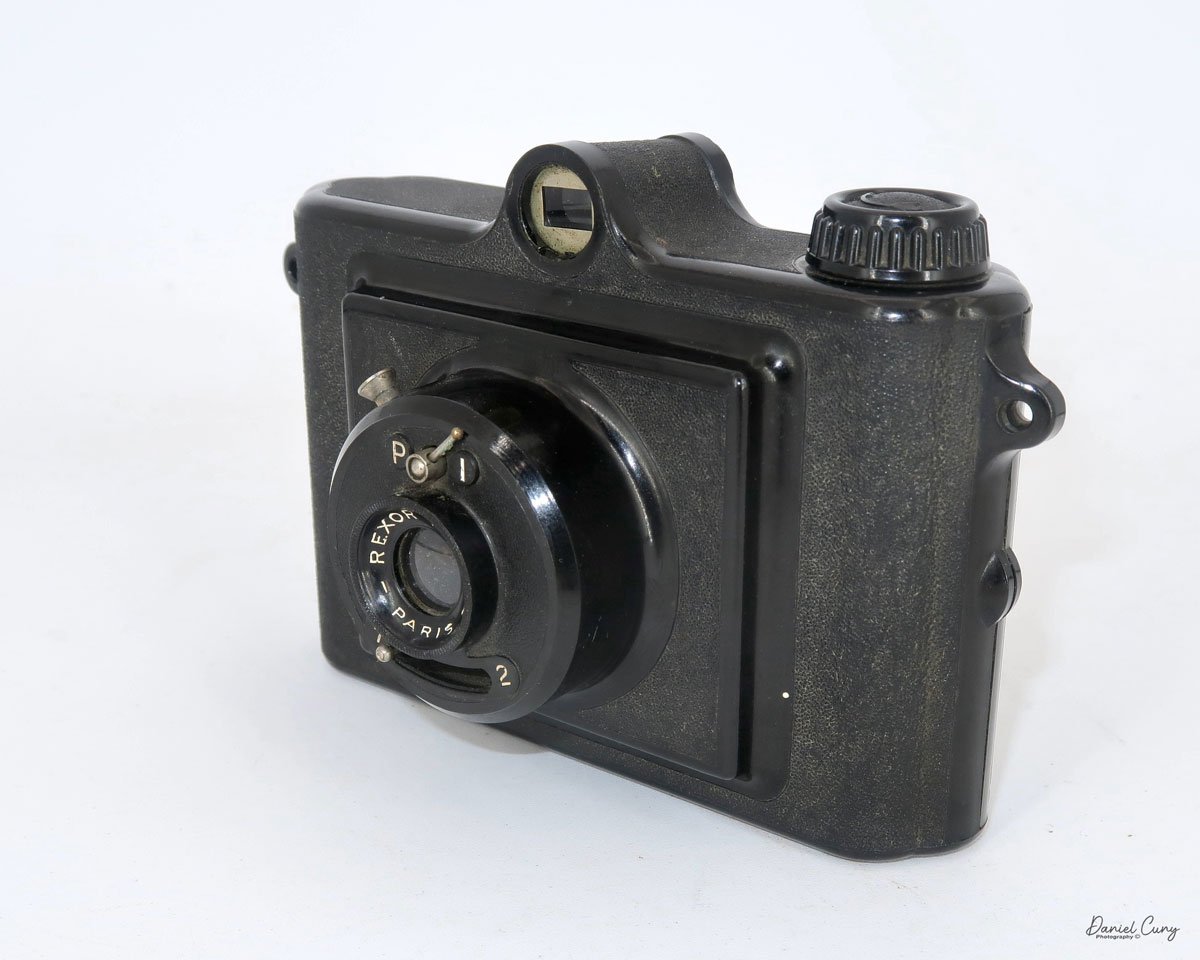
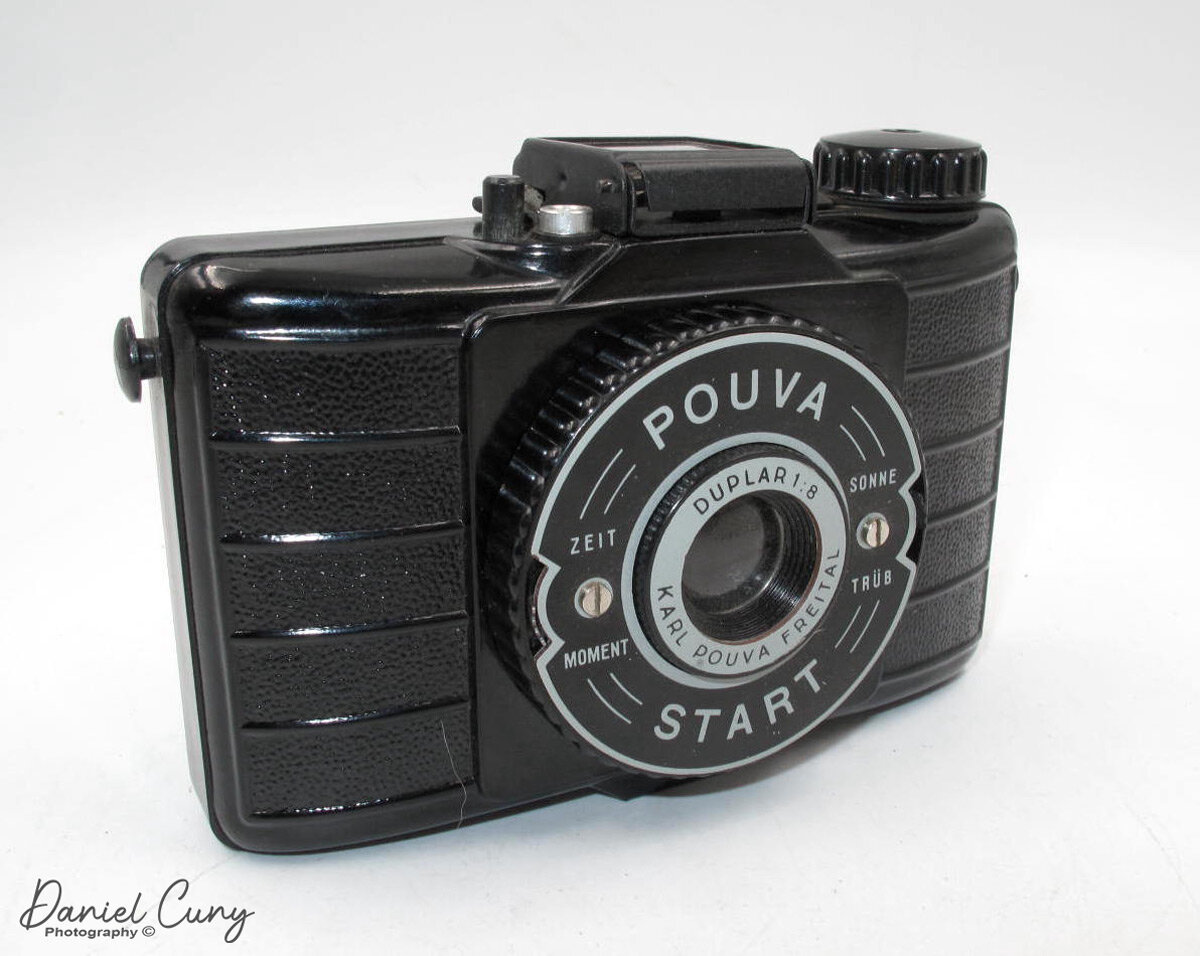
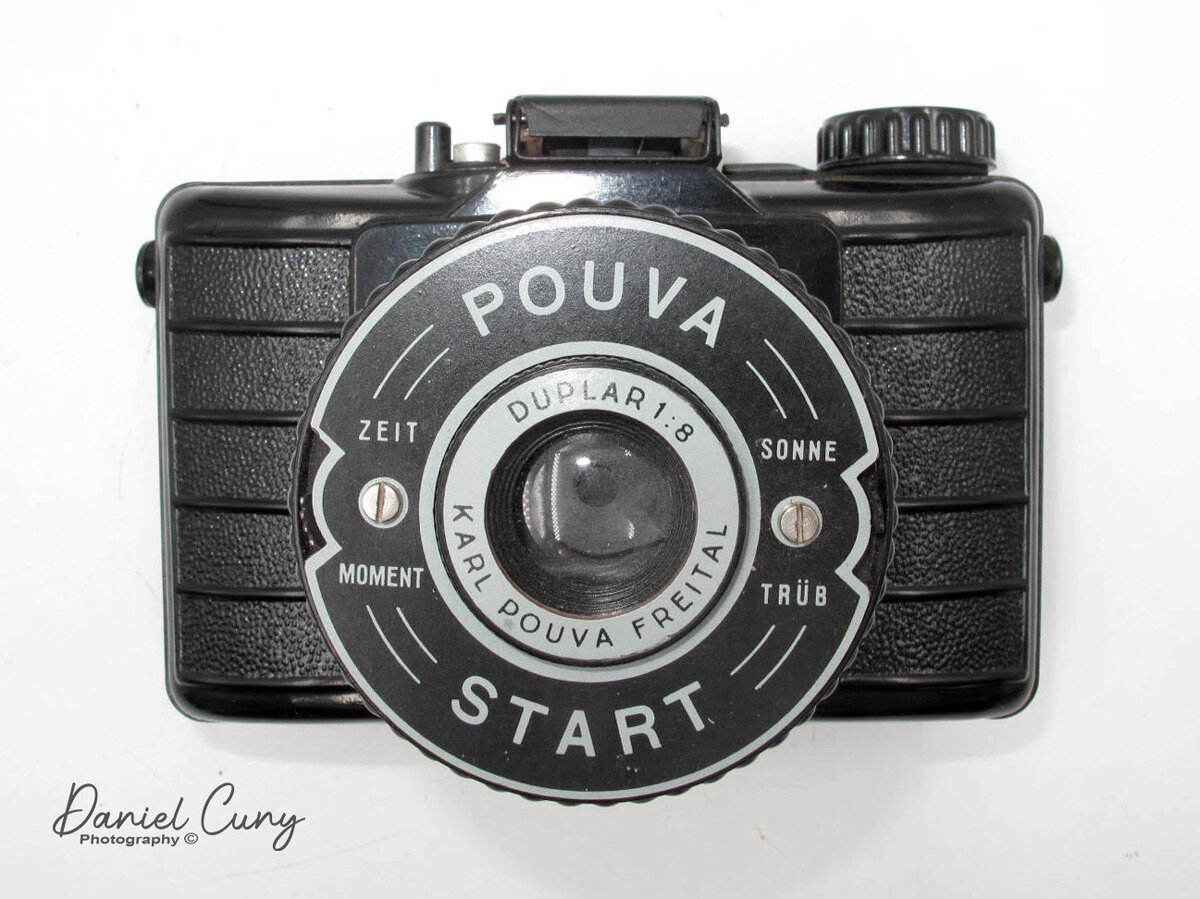
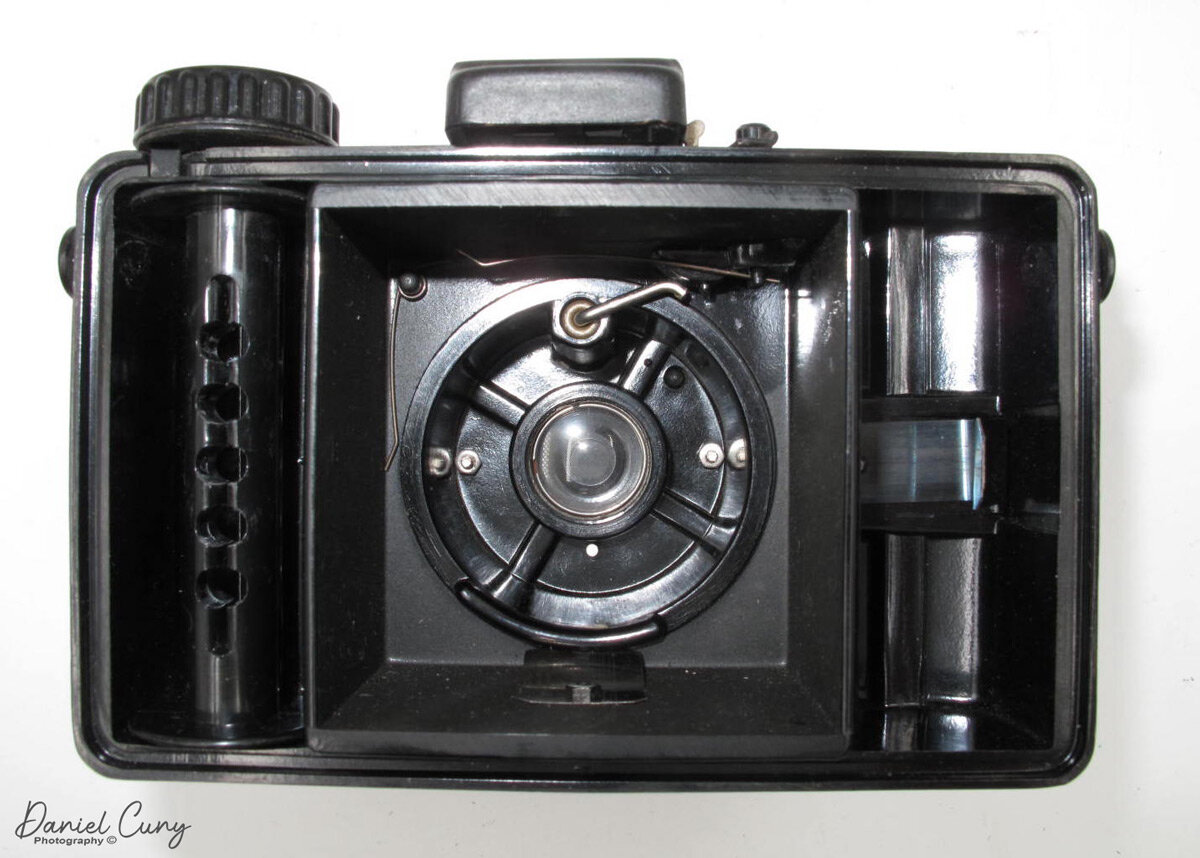
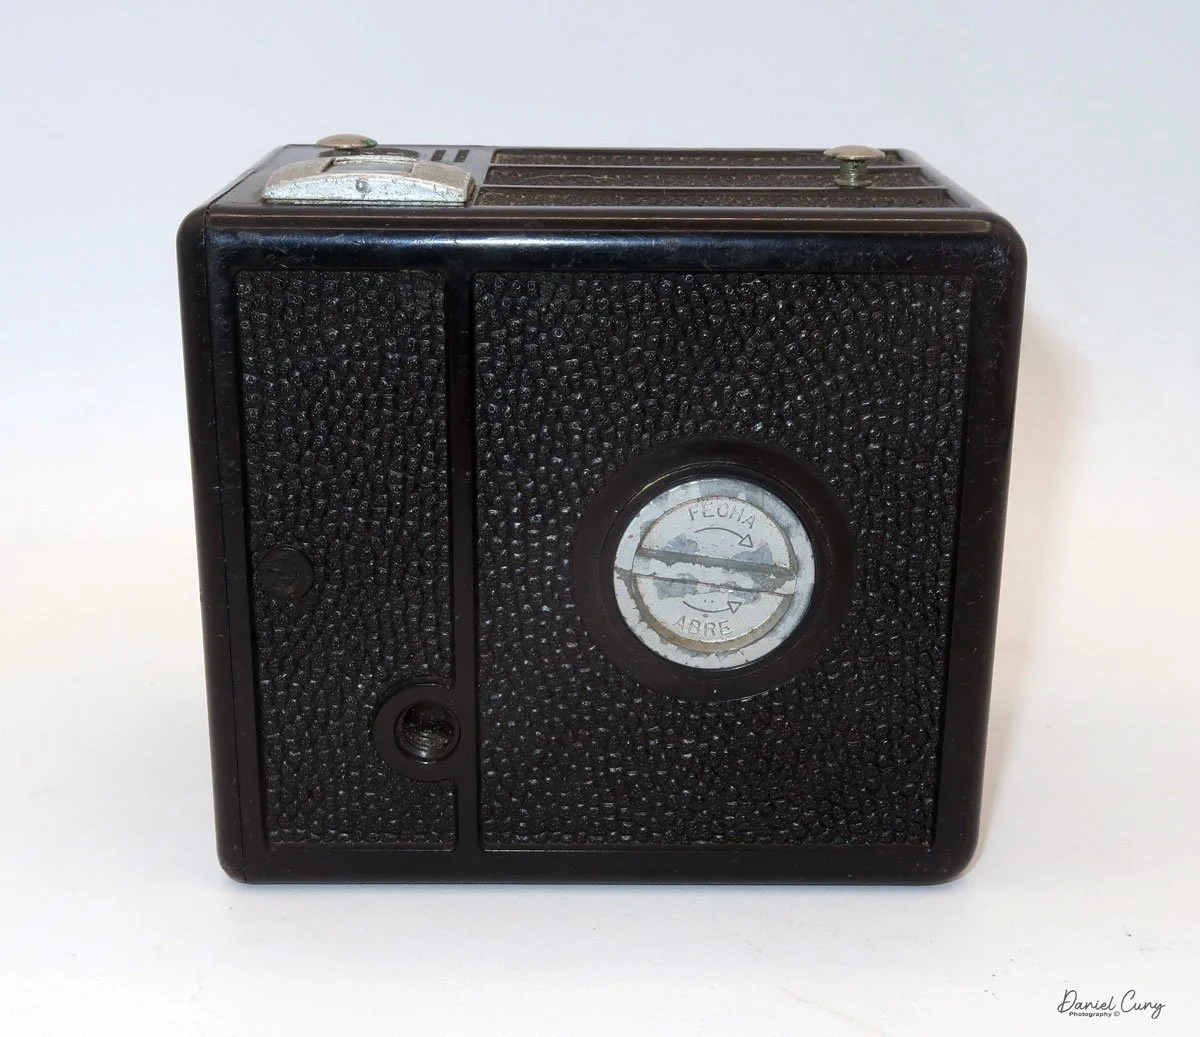
My Kapsa camera is the size of many standard box-style cameras from the 1950s. It's 4.5" tall, including the strap lug, 3.75" wide, including the winding knob, 4.75" deep, and weighs 1lb. 2.6 oz and is made of a thicker Bakelite material with a pebble finish over the camera body. The Kapsa camera has a 110mm F11 Vascromat lens. Similar to many other box-style cameras, there are two viewfinders on the camera. The viewfinder on the top of the camera is for vertical format photos, and the second one on the side of the camera is for horizontal format photos.

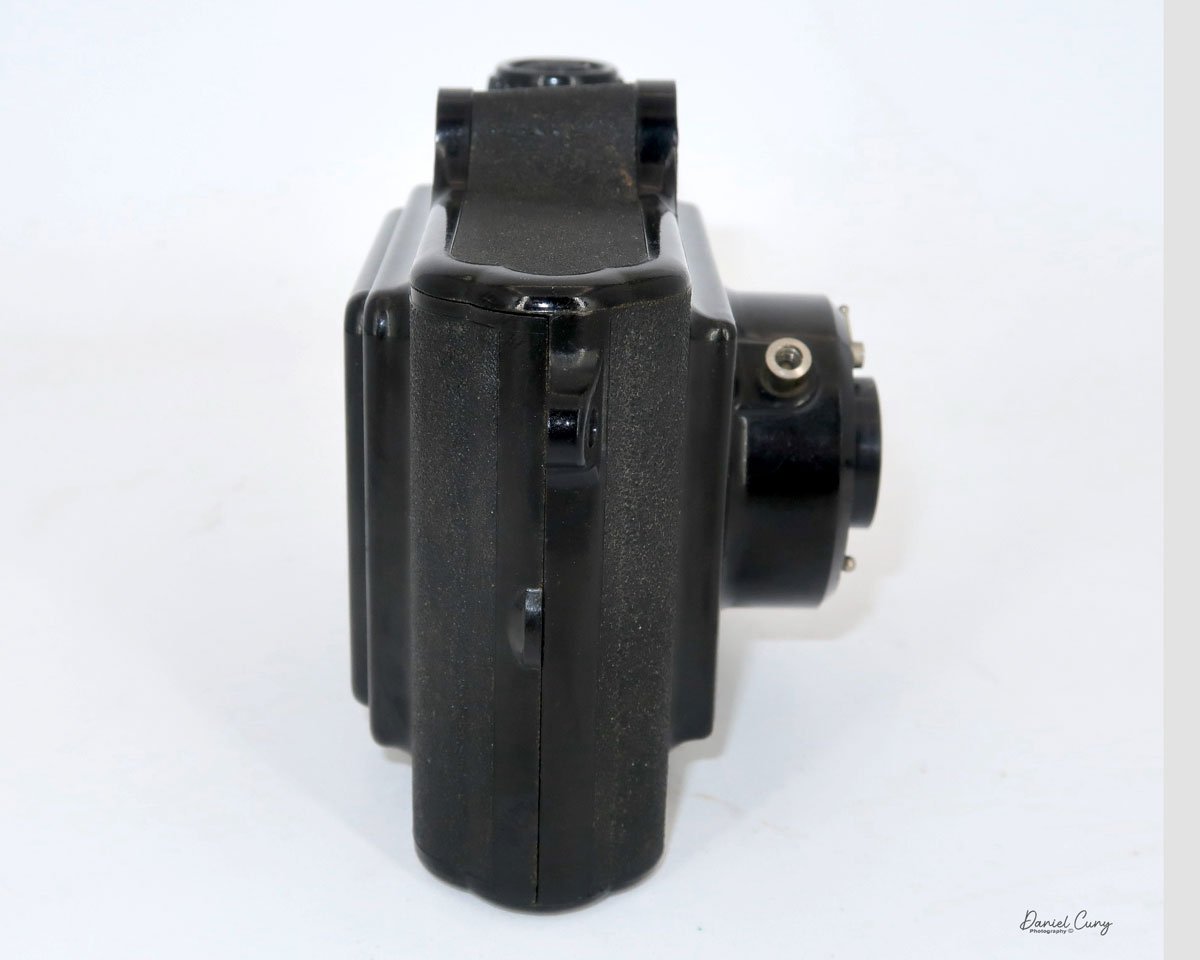
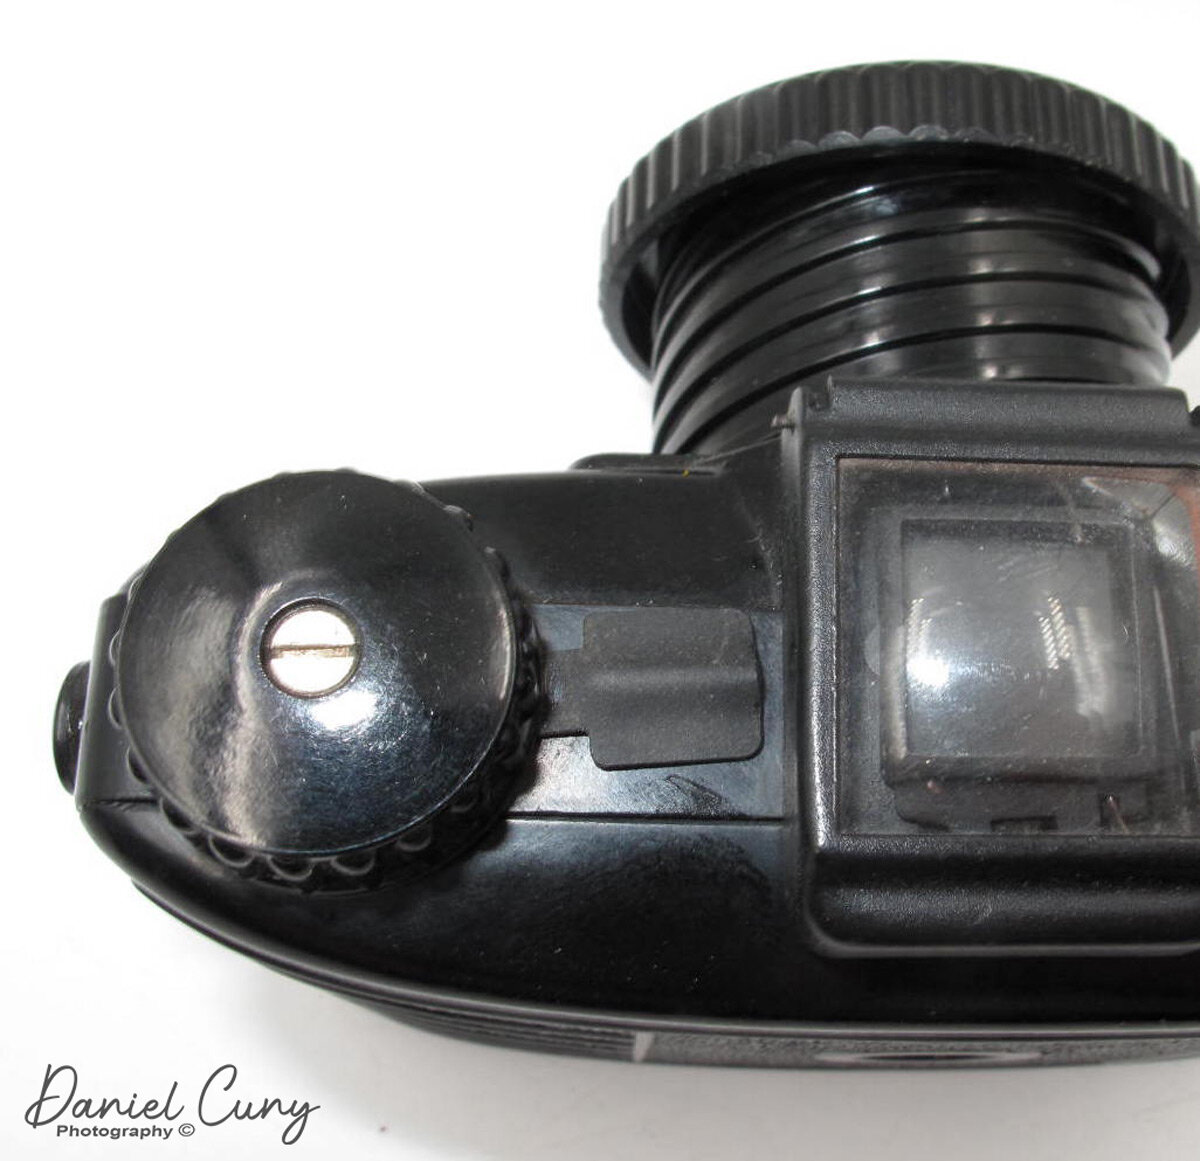
There are a couple of interesting items within this camera. The first is the controls on the right side of the camera as you hold it, which adds a bit of complexity to the camera. On top is the shutter settings for "I," which stands for instant and has a shutter speed of around 1/100 sec. The other setting is "T" for times exposure. Next to the shutter release is "Trava" or Lock, so the shutter doesn't accidentally trigger while transporting the camera. Under that is the ability to set three different apertures, F11, F16, or F22, and along the bottom is the focus control, which is in meters. There are also flash contacts on the camera for their bulb flash gun, which you can see in the posted ads, but something I don't have.

Camera controls on the Kapsa camera

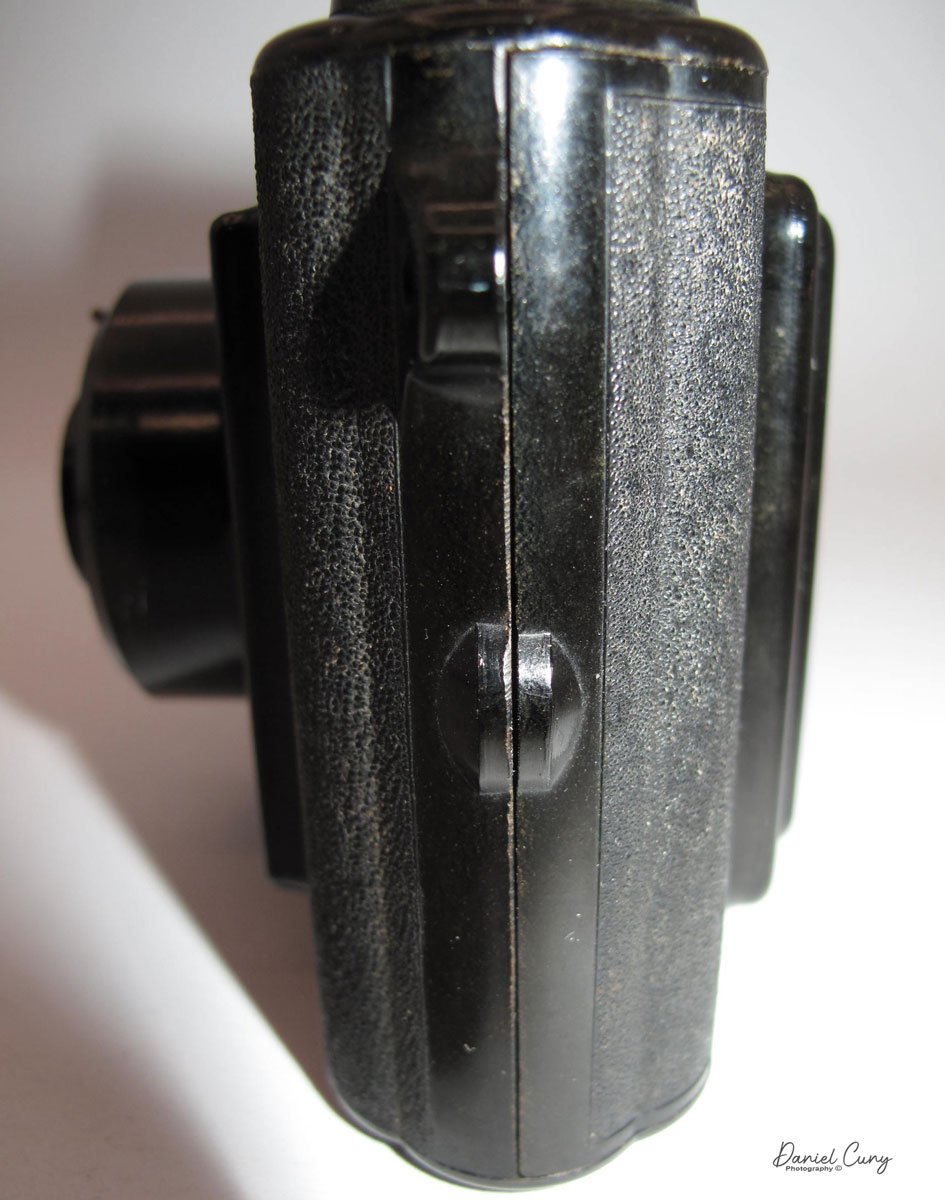
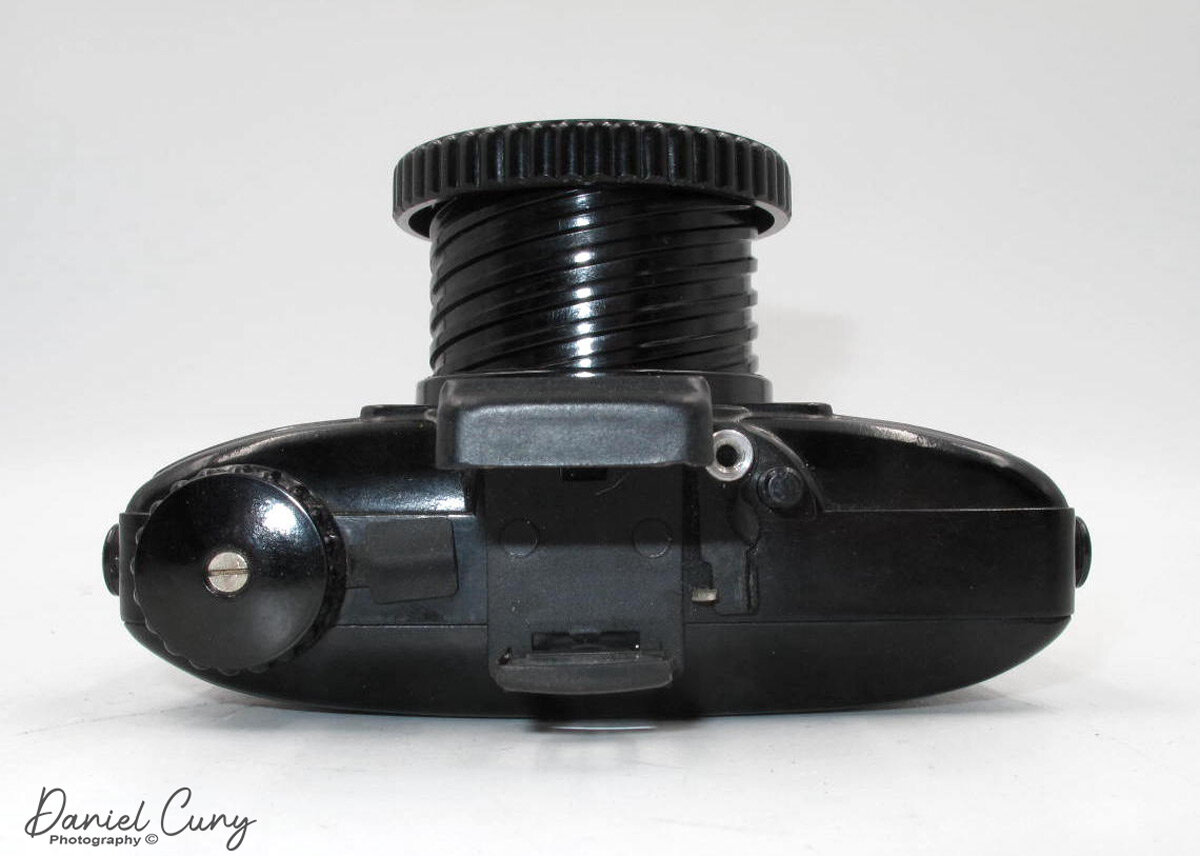
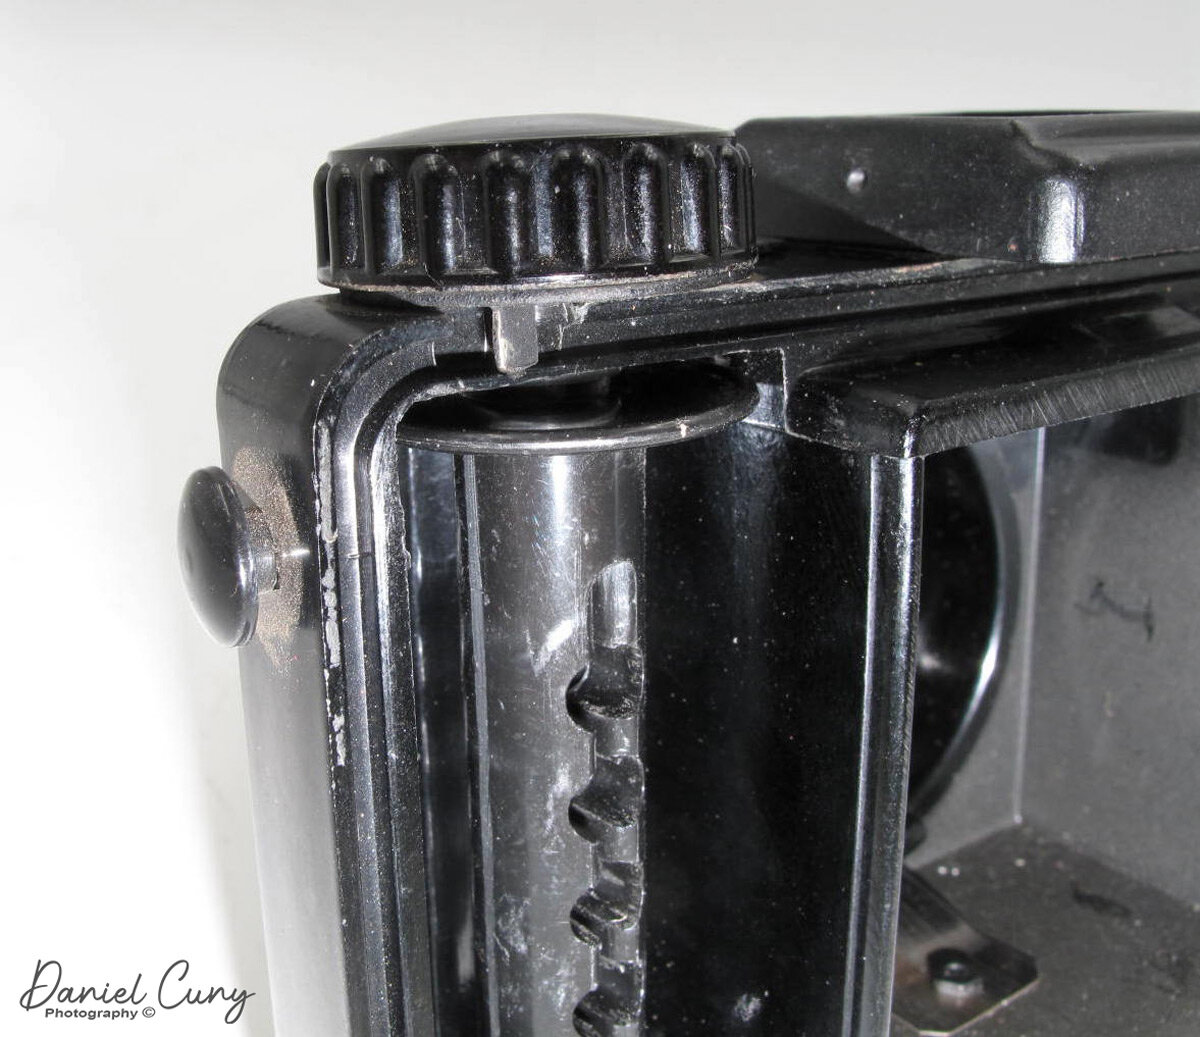
To open the camera, the locking/unlocking lever is on the left side. This lever allows you to open the camera to load/unload the film. You turn the dial to "ABRE" to open the camera or "FECHA" to lock the camera. Once the camera is unlocked, the right side of the camera pulls away from the camera body so you can load or unload the film.

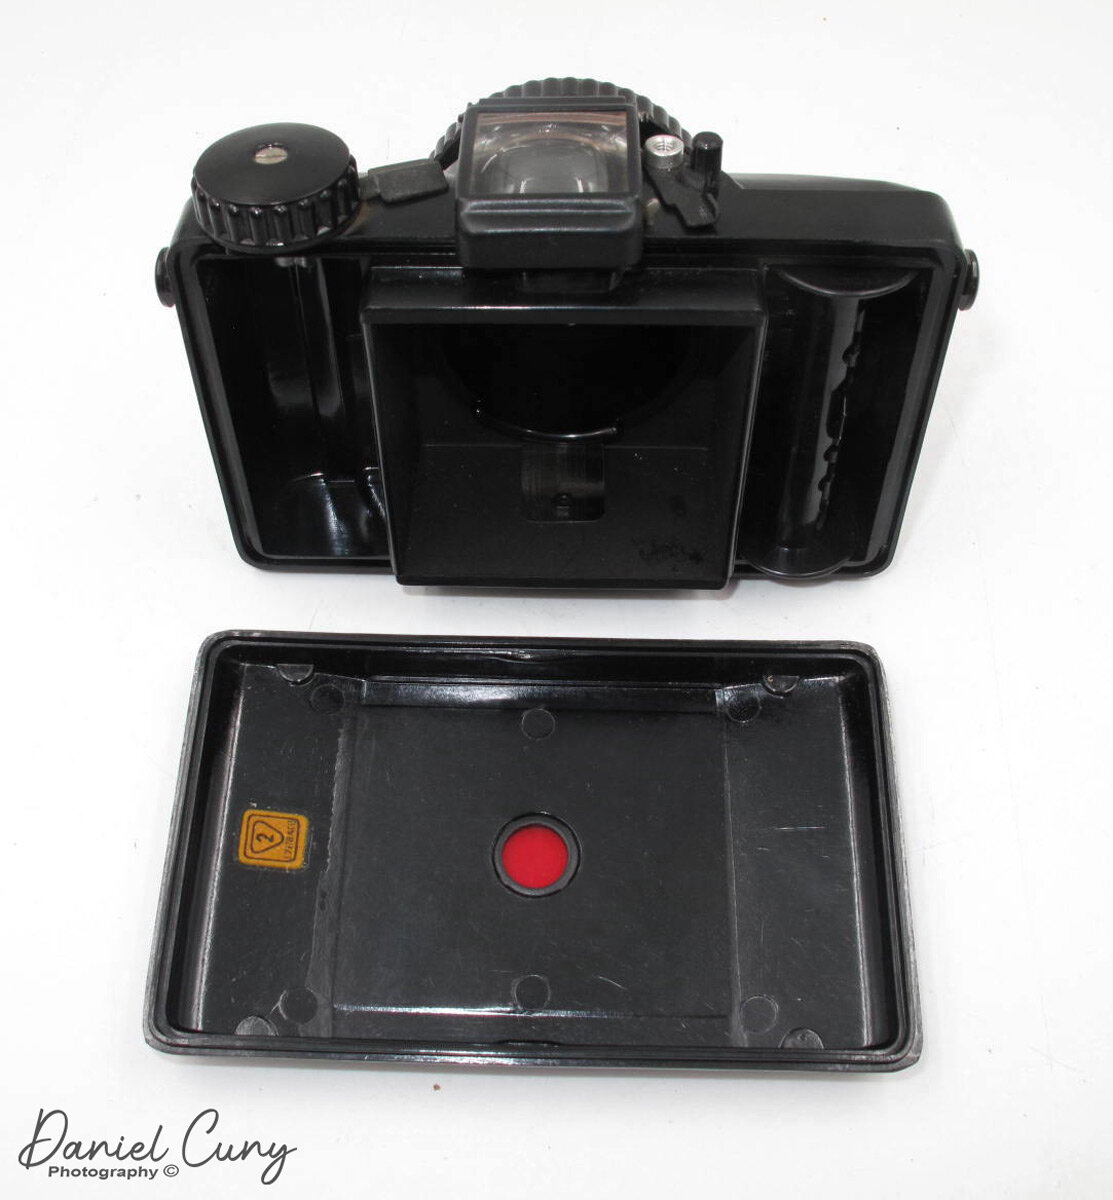
There are two "wings" on the camera that convert the camera from a 6x9 format camera to a 6x4.5 format camera. I liked this feature as it allows the photographer to get twice as many photos from their roll of film. If you're in the 6x9 format with the "wings" retracted, you'll get eight pictures on the roll, but by flipping the "wings" over the film opening, you'll get 16. The one thing that you'll need to remember, and this alludes to me at times when I do this, is it also changes the format of the image. If you're in the 6x9 format, the camera is in the vertical format when holding the camera vertically. Once you change to the 6x45 format, the format of the image is horizontal even though you're holding the camera vertically. It's just something you need to be conscious of when changing formats.

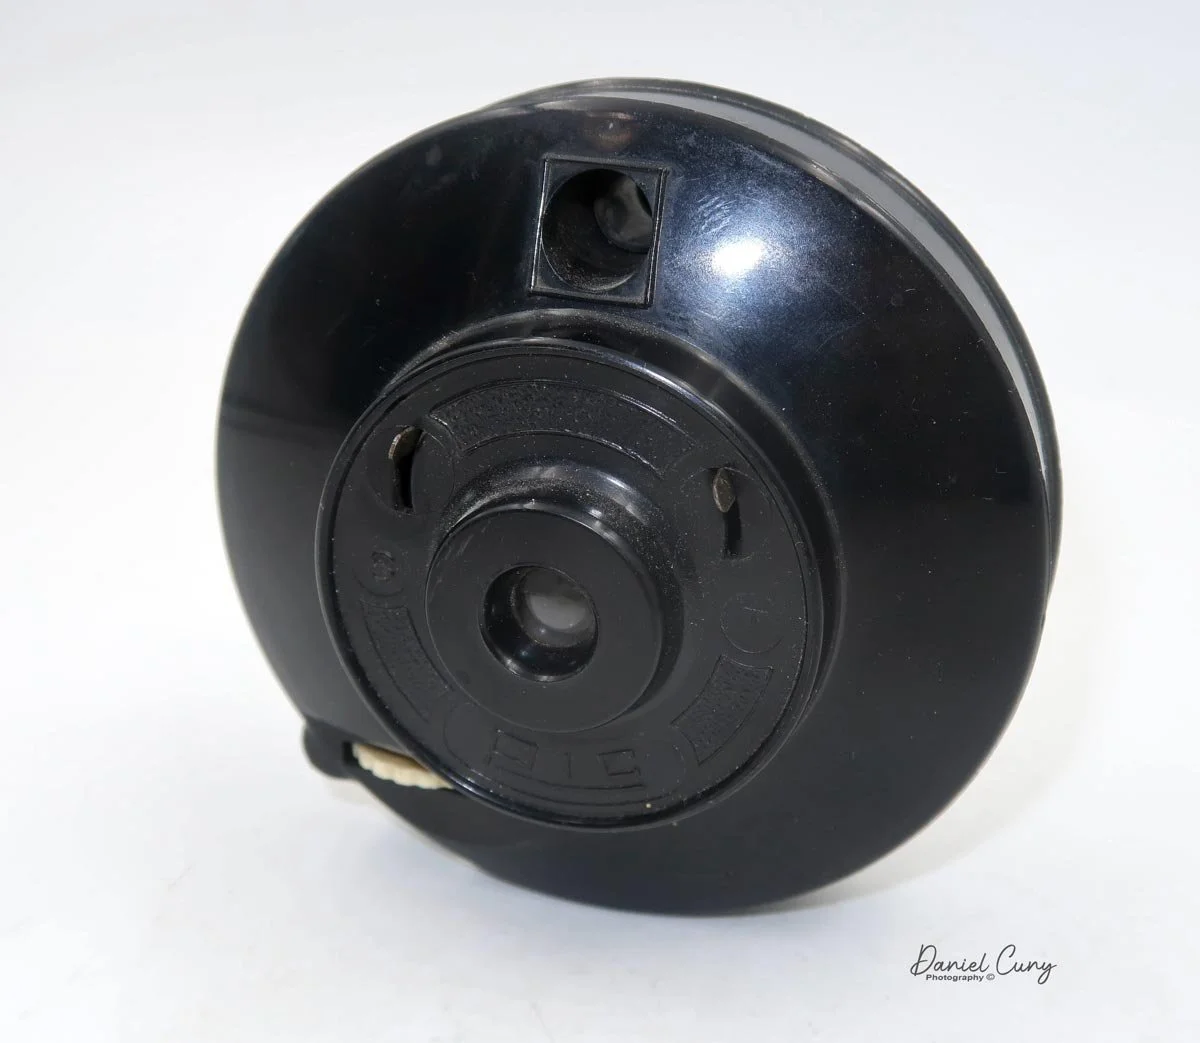
Many of the articles I read about the Kapsa camera state that it can use either 120 or 620 film. However, my camera is only set up for 120-size film, as the film reel holders have larger openings for 120-size film, not the smaller openings for 620-size film reels.

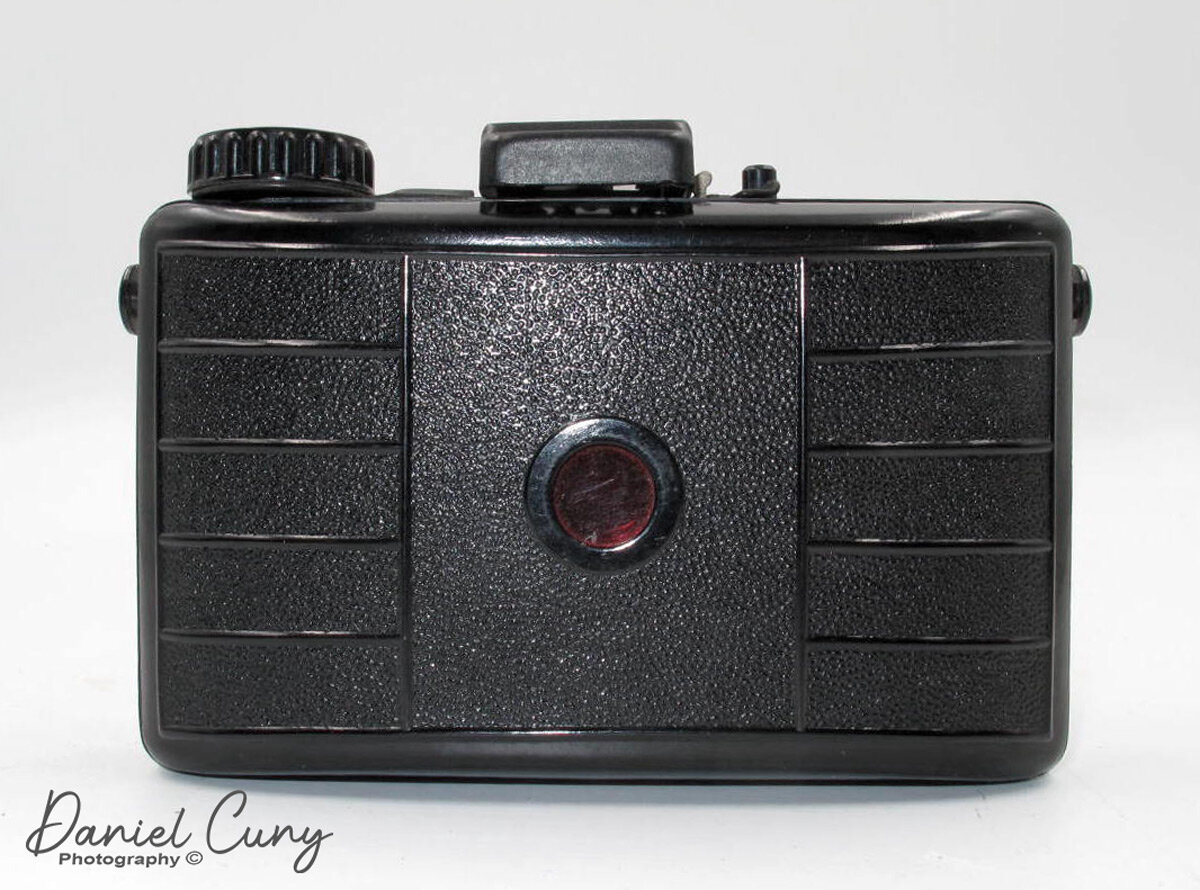
 My Kapsa camera has a couple of issues. On the back of the camera, there should be two red windows for the two formats the camera can use. The first issue is one of the red windows on the back of the camera, which reads the frame number when advancing the film, is missing.  It's the right window that's missing, and it is used for the 6x4.5 format photos. That's not a deal breaker when it comes to using the camera. I just taped a small piece of foil over the window since I didn't have red acrylic to glue into the camera. Also, there is a small ship in the Bakelite close to the seam where the film insert fits into the camera body, so I added a small piece of black tape when shooting. My camera is also missing the strap.


My Results:

Since my camera shoots 120 film, I loaded a roll of Ilford FP4 Plus, 125 ISO film into the camera with the "wings" back so I was shooting 6x9 format images. The plastic winding knob is on the right side of the camera, just behind the horizontal viewfinder. I wound the film in the first frame, walked through the neighborhood, and snapped a few images.

 Once I was done, I got out the dark bag and processing equipment, loaded the reel with the film, and processed it. Here are some of the results. 

Conclusion:

Shooting a box camera brought back some great memories from childhood. I still enjoy holding the camera in a lower position and looking through the waist-level finder to frame the image. Maybe that's why I enjoy medium-format cameras so much; it's the tactile feel of using this mechanical instrument to capture memories that I'm fascinated with.

 The camera was fun to use, and the images are good, especially considering what many people feel is a toy. But the world took millions of images with this style of camera.

 Thank you for taking a few minutes from your busy day to read about this fun and somewhat rare camera from Brazil. Now, I will be on the hunt for the blue model, preferably in better condition than the camera I have.

 Until next week, please be safe.

Early M.I.O.M. Camera

My early MIOM camera

This blog is a journey into the world of a camera I stumbled upon during our European escapade last year. Whenever we venture to a new destination, I make it a point to unearth the local flea markets, a treasure trove of unique cameras and photo items that are often elusive in the US. The thrill of discovering these items, especially being on the West Coast, where European finds are a rarity, is an experience in itself. 

 One of my favorite flea markets was just outside Prague, and my wife and I went to it. It was in an industrial area, and we took the train to get to it, but it wasn't so much the cameras and photo items found as the atmosphere of the place that made it memorable. I did find some great cameras there, too, that are harder to find on the West Coast of the US.

 While in Brussels, my wife and I went to a flea market in a square or small park in town. There were about 40-50 vendors there. Most of the items were in boxes with many other items, so you needed to rummage through a lot of items to find what you were looking for. I didn't have much time to look as my wife was under the weather, and it would start to rain later in the morning. I picked up a few Rollei parts for a reasonable and fair price along with this MIOM compact bakelite camera, for which I paid 1-2 euros.

The Company:

Let's delve into the intriguing history of MIOM, a brand that has left an indelible mark on the world of photography. The journey of MIOM begins in 1887 with architect Félicien César and engineer Fabius Henrion, who founded the local lighting distribution company: 'Fabius Henrion et Cie,' with a capital of 100,000 francs in the Nancy and Lorraine region. Despite facing numerous challenges, the company's legacy was preserved when it was acquired by the CGE, Compagnie Générale d'Électricité (General Electric Company), in 1898.

 MIOM, an acronym for Manufacture d'Isolants et Objets Moulés, (Manufacture of Insulators and Molded Objects) was a subsidiary of the Compagnie Générale d'Électricité (General Electric Company) which started in 1929. As the MIOM name suggests, It was created to produce electrical components for the company. 

 As photography grew during this time, MIOM created a photographic department in 1937 that molded simple cameras in "Cégéite," which was similar to what we now call bakelite. The name derived from the name of the parent company: the Compagnie Générale d'Électricité.

MIOM's early cameras were very similar to the model I have. They were very flat in appearance and used 127 film to produce 6x4.5cm negatives. Some of the other early models were the Rex and Lec Junior. I believe the model I have is only known as the MIOM, which is printed on the back. There is no camera name produced on the camera like the REX or other cameras of that time.

MIOM Ad in the 1930s

Then, in 1938, the cameras took on a different appearance, resembling the Czechoslovakian Pyonyr cameras, designed by Fritz Kaftanski, who had recently moved to France to get away from the war problems taken on within that region during the late 1930s. It's suspected that Fritz Kaftanski was involved in the design of the newer Photax camera.

 The Photax cameras had a larger negative area, used 620-size film, and produced 6x9cm negatives. The Photax design had a lens that rotated out from the body on a helical and included a very simple shutter that only worked when the lens was in the extended position.

This new system was beneficial to amateur photographers at the time. It prevented the camera from accidentally taking a photo if the lens was retracted. The new Photax camera also included lenses from Boyer, a French optical company that produced wonderful optics.

 Photax cameras were the best-selling cameras in France for 20 years and produced cameras well into the 1960s, with the Photax VI released in 1966. However, like many European camera manufacturers of the era, MIOM faced significant challenges in the 1960s with the rise of Japanese brands such as Nikon, Canon, and Minolta.  

 Today, MIOM's legacy lives on in the vintage camera market, where its models are sought after for their distinctive design and the quality of their optical systems. The story of MIOM reminds us of a golden age in photography when craftsmanship and innovation defined the industry.

My Camera:

This description should be straightforward and short, as this camera is simple without many bells or whistles. However, its simplicity and unique design make it a valuable addition to any vintage camera collection.

 My MIOM camera is 3.5" tall, including the viewfinder, by 5.5" wide, including the strap lugs, and 3" deep, weighing 9.4oz. It is very lightweight and compact. On the front of the camera, there are two shutter options. These settings are on the top and bottom of the 60mm Rexor lens, serial number 3147, on the camera. The camera has a crinkle finish within the acrylic, which makes the gripping easy and somewhat drop proof.

Above the lens are your shutter settings: "I" for instant, which has a shutter speed of approximately 1/50 sec., or "P" (B) for timed photos. Below the lens are two options for aperture settings. Looking online at other information on the Photax camera, the settings are 1 (Grand Diaphragme) for f16 or 2 (Petite Diaphragme) for f22. The words in the paratheses are written inside the camera's back door.

There is no latch or lock to hold the back onto the camera to load the MIOM camera with film. The back is held onto the camera's body with friction, and the back fits snuggly onto the camera's body. On either side of the camera are a couple of protrusions. I put my fingernail in between these nubs and pull, and the back will pull away from the body. You must do this on both sides so as not to crack the plastic and render the camera useless.

Once you get the back off the camera, I notice there are two red dots on the protruding nubs, which indicate which side fits together. The camera winds to the left, so you put the empty spool from the previous 127 rolls from the right side to the left and put the fresh roll of 127 films into the right side. Break the tape on the roll and bring the leader to the empty spool. Thread the leader into the spool slots and wind the film a few turns to ensure the film is lining up on the spool or until you see the arrows on the paper backing pointing outwards. Once you reach this point, it's time to put the back onto the camera. Once the back is on the camera, wind the film until you see the number 1 in the red window. Now you're ready to take the first photo.

 Once you take the photo and wind to the next frame, you'll get eight exposures on each roll of 127 film. Now that all the frames are taken, it's time to take the back off the camera and process your film.

My Results:

For total transparency, I had three rolls of older VP 127 film in my drawer. One roll's expiration date was June 1971. That roll went through the camera fine, but when I rolled the film onto the developing reel, something went array, and the film didn't process correctly. I loaded one of the other two rolls I had left, dated Sep.1968. This roll got jammed within the camera, so I'm unsure if I didn't load it properly or, due to the age of the film, it broke, but the film was very crinkled when I went to process it, and none of the images came out.

 It was an operator malfunction, and I didn't load it properly. Five rolls of film are arriving today from one of my favorite camera stores, Glazer’s Camera, in Seattle, WA, so I'd like to take the film, process it, and scan the images today.

I received the film, loaded the camera, walked through the neighborhood, and took images. Luckily, this roll turned out, and you can see the results below.

My Conclusion.

I'm writing this portion of my conclusion before I have images from the camera, so at this point. In contrast, the camera is compact, and an earlier version of the MIOM cameras made, the film issues have made the experience somewhat frustrating. Once I get the images, I'll complete my conclusion and give you an honest assessment of the camera.

The images confirmed my suspicions. The camera was made to put cameras in the masses hands and for them to go and take photos of friends, family, and memorable moments. This camera did a decent job for a camera almost 90 years old. The plastics are rugged and on my camera, I’m missing the rear viewfinder glass so it was a bit more difficult to fame the images, but overall a decent camera.

 Thank you for taking a few minutes from your day to read about this early version of the MIOM cameras.

 Until next week, please be safe.

PIC Camera

The PIC camera was on my list of cameras to review just before I returned to work after the two years lost years of COVID-19. Recently, when I looked up from my desk and saw the odd and unusual camera, I wanted to put a film into the camera, run it through its paces, and do a blog post on it. The main thing that caught my eye was the shape and size of the camera. You don't come across many round cameras with a straightforward design.

 I am trying to remember where the PIC camera came from, as I've owned it for five to six years. Like many of the other cameras I write about, the PIC camera was included in a group or "lot" of cameras purchased. I do remember when I received it; my first thought was that it was a "toy" camera, which I own many of. 

The more I examined the camera, the more I realized it was not a serious camera. It does not have the ability to set shutter speeds, aperture settings, or even focus at a specific distance. It's just a simple point-and-shoot camera made for quick snapshots, a camera you can keep in your pocket for when you travel on holidays or visit friends and family. 

The Company:

From what I can see online, the PIC camera is another camera with very little information regarding the manufacturer. There's conflicting information about the camera and who and when it was made. Some of the information I found states the camera was made in England sometime in the early 1950s by a company named Pressure Sealed Plastics Ltd. and distributed by Pic Distributors Limited.

 When I looked up information about Pressure Sealed Plastics Ltd., it was initially a London-based company. It states that the company existed from 1955 to 1966 when it was purchased. It was transferred from Peckham to Chesterfield in May 1970. Some online information also states that the company was not in London but in Southend on Sea. I'll leave it someplace in England.

In 1986, the organization was divided into two trading operations: Consumer Products and Industrial Products. The former was responsible for waterbeds. The latter took over the remaining operations and manufactured Rompa products, waterbeds, etc.

 From the information I found and posted above, I have no idea where the idea or manufacturing of the PIC camera came from. If you have other information on the camera, who designed it, or the company that made it, please let me know, and I'll change the information in the post.

The Camera:

The PIC camera is a round camera that measures 3 3/4" in diameter, is 1 7/8" deep, and weighs 3.7 oz. with a fixed focus meniscus lens. The camera has a slight convex shape on the back along with the front, but halfway into the convex shape on the front, there are two tiers of flat surface where the shutter and lens are placed. The side view of the camera resembles a spaceship or UFO.

To open the camera to load the film, there is no latch or hinge to open the back of the camera, but you slide the front of the camera from the back of the camera and pull it off. My guess is this is where the "Pressure Sealed Plastic" comes from, as it's held together by a tightly fitting front that fits onto the rear of the camera.

 The rear of the camera has nothing other than two red windows that tell you the frame number you're on when advancing the film. On the outside of the back of the camera is written, Pats. Pend. Reg Dsgn No. 870468, Made in England. On the bottom right of the back of the camera is a slot where the film advance wheel fits.

In front of the camera, you load the film via an insert that fits into that area. The insert is a place to put the take-up spoon on the right and a new roll of film on the left. There's an opening for the negative, which measures 1 3/8" wide by 1 7/16", the exposed image size on the negative. A hinged wire acts as a pressure plate to keep the film flat when loaded into the camera. The insert is removable to make loading and unloading the film more accessible.

Underneath the film insert is a metal disc that covers the shutter assembly. When I received the camera, the shutter wasn't working, and I didn't notice that the metal disc covering the shutter assembly wasn't in its correct place. When I decided to write a post on this camera, I wanted to see if I could get the shutter working. This assembly is elementary and something even the non-mechanical person I am could get working again. I popped off the disc, and the shutter has two different levers corresponding to the levers on the front of the camera. My guess is that there is a shutter lever for "T" or timed exposures and another lever, "S," for snap. Generally the second shutter setting is "I" for instant, but this one is different.

 In the middle, there is a disc on the end of a piece of thin aluminum with a hinged rivet on the bottom that has the shape of an open safety pin, but the pin part is short, so it doesn't fit into the safety part. A spring holds the lens cover assembly in the closed position. Above the lens cover are your shutter levers, which also have hinged rivets, with a more extended metal arm that is bowed in the middle to fit over the lens covering disc, and on the bottom of the arm is a slight bend that allows the arm to interact with the shutter cover assembly. On the left of the shutter cover is a lever for the "T" shutter release for timed, and on the right is "S" for snap. A spring is between these two shutter assemblies to hold the arms away from the lens cover assembly.

Here's how the different shutter levers work. When you pull down the "T" lever, the shutter assembly arm slides over and pushes the lens cover away from the lens. Holding the shutter lever down keeps the lens open for the length of time you hold the lever down. When you pull the "S" lever down, it slides the shutter arm over the  "short pin" arm and grabs the shutter cover assembly. When you release the "S" arm, the shutter arm pulls the lens cover away from the lens, and due to the short pin arm, it slides off, and the lens cover closes, making a short exposure somewhere in the 1/50 sec timeframe.

The viewfinder on the PIC camera

There is a round viewfinder on the top of the camera, which doesn't correspond to the shape or the distance you get within your photos. 


The Results:

I had some expired 127 film from Film for Classics, which I purchased just for these cameras to test out. I fixed the very basic shutter, replaced the metal disc covering the shutter assembly, loaded a roll of film into the camera, walked around my house, and took photos, and here are the results.

My Conclusion:

You can tell from the photos that the lens isn't very sharp. It has a very "Lomo" look to it. I didn't get to photograph something close because I felt the plastic fixed focus lens wouldn't produce tack-sharp images, but it did take pictures. It was easy to use, but I'd take nothing on holiday unless the photos I wanted to create were similar to a Diana or Holga-style camera. Overall, the camera worked, and I discovered it's relatively rare due to the plastic construction and short camera run. People ask for around $500.00 on eBay when you can find them. I'll put it back in my collection and move on to a different camera next week.

 Please comment on your thoughts on this or other cameras I've discussed. I'd love to hear your thoughts on this camera.

 Please be safe until next week's camera post.

Pouva Start

Whenever my wife and I travel, I'm always looking to see if the country we're going to has a flea market or someplace where there might be a possibility to find cameras. It might be in a run-down antique store in Vietnam where I found a few cameras. One of my all-time favorite places was a flea market outside of Prague, Czechoslovakia.

My Pouva Start original model with sport finder opened and lens out.

My Pouva Start original model with sport finder opened and lens out.

The flea market itself was a wild experience. The people-watching and the different items at the vendor's tables was pretty fantastic in itself. I didn't know how many cameras I would find but figured there'd be a good mix of Russian and European cameras. I was correct on both counts, and one of my favorite cameras found there was the Pouva Start. In my opinion, this is a classic 6x6 format Lomography camera. Something compact, well built, and extremely simple to use. Let me tell you a bit about the camera and the company that made it.

Karl Pouva

The Pouva Start camera was built by Karl Pouva AG, who first started his company making simple Bakelite slide projectors in Freitel, a city near Dresden, Germany, in 1939. After the war, that area of Germany was a part of East Germany. In 1951, with his experience with Bakelite, he decided to build a simple camera. Something easy to use, low cost, and a camera to get the youth started to take photos. At the time, the camera cost 16.50 Deutsche Mark (east), which was very affordable for young people.

There have been several different changes in the Pouva Start camera over the years. I am starting with the camera I have, with the pop-up sports finder. Later, in 1956, they updated the design to incorporate an optical viewfinder into the camera and symbols for aperture settings. A sun symbol for smaller aperture settings, and clouds for larger aperture settings. The one thing that stayed constant on the cameras was the screw out lens, which acts as a locking mechanism for the camera.

The Camera

This camera has a very classic design, with a spiral threaded lens system, which is very similar to the Kodak Bullet cameras built in the early 1930s. When the lens is threaded back into the camera body, the shutter mechanism is locked so you cannot take unwanted photos. Once you wind the lens into the taking position, the shutter firing system engages with the shutter button, and the shutter now fires.

On the lens are just four settings, two for the shutter and two for the aperture settings. There is a toggle switch on the shutter side that goes from "Zeit" for timed exposures and "Moment" for a regular shutter speed of 1/30 second. On the aperture side, there is another toggle between "Sonne" Sunny or F16 and "Trub" Cloudy F8. In the later versions, as stated, they used symbols for sunny/cloudy. The camera incorporates a Duplar F8 lens, which has two elements in two groups for simplicity.

On top of the camera is the pop-up sports finder, the shutter release button, a cable release button to thread a cable release into and trigger the shutter: the film transport winding knob, and two metal levers. One of the levers is next to the shutter release button, which you can slide over to lock the shutter for time exposures. The second is by the film winding knob. This lever opens the back of the camera for film loading.

That lever is the one that stumped me for the longest time. I kept wondering how to open the back to load the film. I pulled and twisted several different areas without success. Then I pressed the lever forward, and the back started to come off. The back is held into place by friction and seats tightly onto the camera very well. The lever is attached to a small piece of Bakelite that, when pressed forward, separates the back from the camera, allowing you to take the back off. Ingenious!!!! I love this. So simple.

Photos from the camera:

Lake-Quinault-9-2020_047.jpg
Lake-Quinault-9-2020_001-copy.jpg
Lake-Quinault-9-2020_045.jpg

Conclusion:

The camera is enjoyable to use and doesn't take a horrible photo. I was surprised at how the pictures turned out. They're not the sharpest photos I've taken, but for a simple lens, they're not bad. If you like the Lomography style of cameras, I search out this camera and try it out, as I think you'll enjoy using it and the photos that come from it too.

 Thank you for taking a few minutes out of your day to read this post. I always enjoy it when I hear from you, so please feel free to email me any questions or comments about this or any other camera I've written about. Until next week, please be safe.