Polaroid SX-70 Camera

My Polaroid SX-70 camera.

When I was looking over the cameras in my collection and thinking about which camera to write about this week, the Polaroid SX-70, which I have right over my desk, seemed to jump up and say, "My turn this week." I thought about it for a moment and thought, "It's not that old of a camera, but it is." 

 The Polaroid SX-70 was introduced in 1972, during the era of many "modern" inventions, like the home VCR, floppy discs, and email. It was not too far after the music and pop revolution in the late 1960s, which brought interesting and new designs. Currently, the SX-70 is a 52-year-old camera and, in my opinion, the last camera introduced with a genuinely different and unusual design.

 Being a fan of Polaroid from an early age, I remember getting a Polaroid Swinger for Christmas of 1965, just a few months after the camera was introduced. To focus the Swinger, you'd squeeze the focus dial until a "YES" would show up in the viewfinder, telling the photographer the camera was focused and ready to take a photo. That was tremendous and, to this day, a fun innovation of its time.

 When the SX-70 was introduced, there was much fanfare, magazine covers, and writing about this revolutionary camera from Polaroid. The SX-70 was officially sold in the Miami area in late 1972 and became nationally available in 1973. It was sold for $180.00 for the camera and $6.90 for the film, with ten photos in each pack.

 The interesting thing about the Polaroid SX-70 film was that the batteries that powered the camera were in the film packs, so every time you put a fresh roll of film into the SX-70, you were also putting fresh batteries in the camera. Batteries in the film pack were good unless you tried a pack with depleted batteries or tried out-of-date film where the batteries were dead. At that point, the camera was unusable.

Polaroid Acecssory Kit

 What made this camera unique was its odd and different design and its very slim design. It was an SLR camera with through-the-lens focusing, exposure control, and accessories that would enhance the photo experience, such as a remote shutter cable, tripod mount, close-up lens and diffuser, lens hood, self-timer, and accessory holder. Other companies soon came out with accessory lenses and electronic flash units.

 In 1974, due to the success of the original SX-70, with its chrome and tan-colored leather covering, Polaroid introduced lesser-expensive models and kept introducing other models soon after that. 

 The SX-70 camera was a massive success for Polaroid and gave instant photography a shot in the arm like few I've seen in the photo industry. Kodak would create their version of an instant camera in 1976. Still, Polaroid sued them for patent infringement, which led to Kodak discontinuing production of their line of instant cameras in 1985.

Company History:

The Polaroid Company, founded by Edwin H. Land in 1937, pioneered light-polarizing technology. Originally called the Polaroid Corporation, the company first made waves by producing polarized sunglasses and optical devices. However, its true innovation came in 1947 when Land introduced the first instant camera—an invention that would forever change photography.

Polaroid SX-70 ad from 1970s

 Land unveiled the instant camera at a meeting of the Optical Society of America, demonstrating how it could develop photos within minutes. This breakthrough led to the Polaroid Land Camera Model 95 commercial release in 1948. The camera's unique ability to produce finished photographs quickly became a cultural phenomenon, redefining personal photography for decades.

 Throughout the 1950s and 60s, Polaroid expanded its product line and refined its instant photography technology. It gained popularity among both amateur photographers and professionals. The introduction of color film in 1963 further solidified Polaroid's position as a dominant force in the camera industry.

 Polaroid also became known for its iconic camera designs, such as the SX-70 in 1972—a folding single-lens reflex camera that was both portable and innovative. During this golden era, Polaroid enjoyed tremendous commercial success and was often seen as a symbol of American ingenuity.

Cutaway view of Polaroid SX-70.

 However, the rise of digital photography in the late 1990s and early 2000s caused Polaroid to struggle. Despite attempts to adapt, including digital products and partnerships, the company couldn't maintain its market dominance. In 2001, Polaroid filed for bankruptcy and began selling off assets.

 The brand saw several changes in ownership over the following years. Yet, in a surprising turn, Polaroid experienced a revival in the late 2000s and 2010s, fueled by nostalgia and a renewed interest in analog photography. The Impossible Project, a group of former Polaroid enthusiasts, acquired the brand's last factory and began producing new instant film. Eventually, this effort led to the relaunch of Polaroid as Polaroid Originals in 2017, and later simply Polaroid.

 Today, Polaroid continues to produce instant cameras and film, embracing its vintage roots while appealing to new generations of photographers drawn to the charm and simplicity of instant photography.

My Camera:

My SX-70 camera measures 7" long by 4" wide by 5.5" tall when it is opened and only 1.5" tall when it is collapsed. It weighs only 1 lb. 7.6 oz. and has a 4-element 116mm f8 glass lens. My camera is one of the earlier models because it has the embossed serial number on top of the film chamber. The serial number on my camera is FE3028170DK.

 To open the SX-70 camera, place it in the palm of your hand, grip the top ribbed section of the viewfinder, and pull up. This will open the camera and lock it into place. The locking bar is on the left side of the camera. If the camera isn't locked when you pull up on the viewfinder, you can slide the locking bar forward to lock the camera open. 

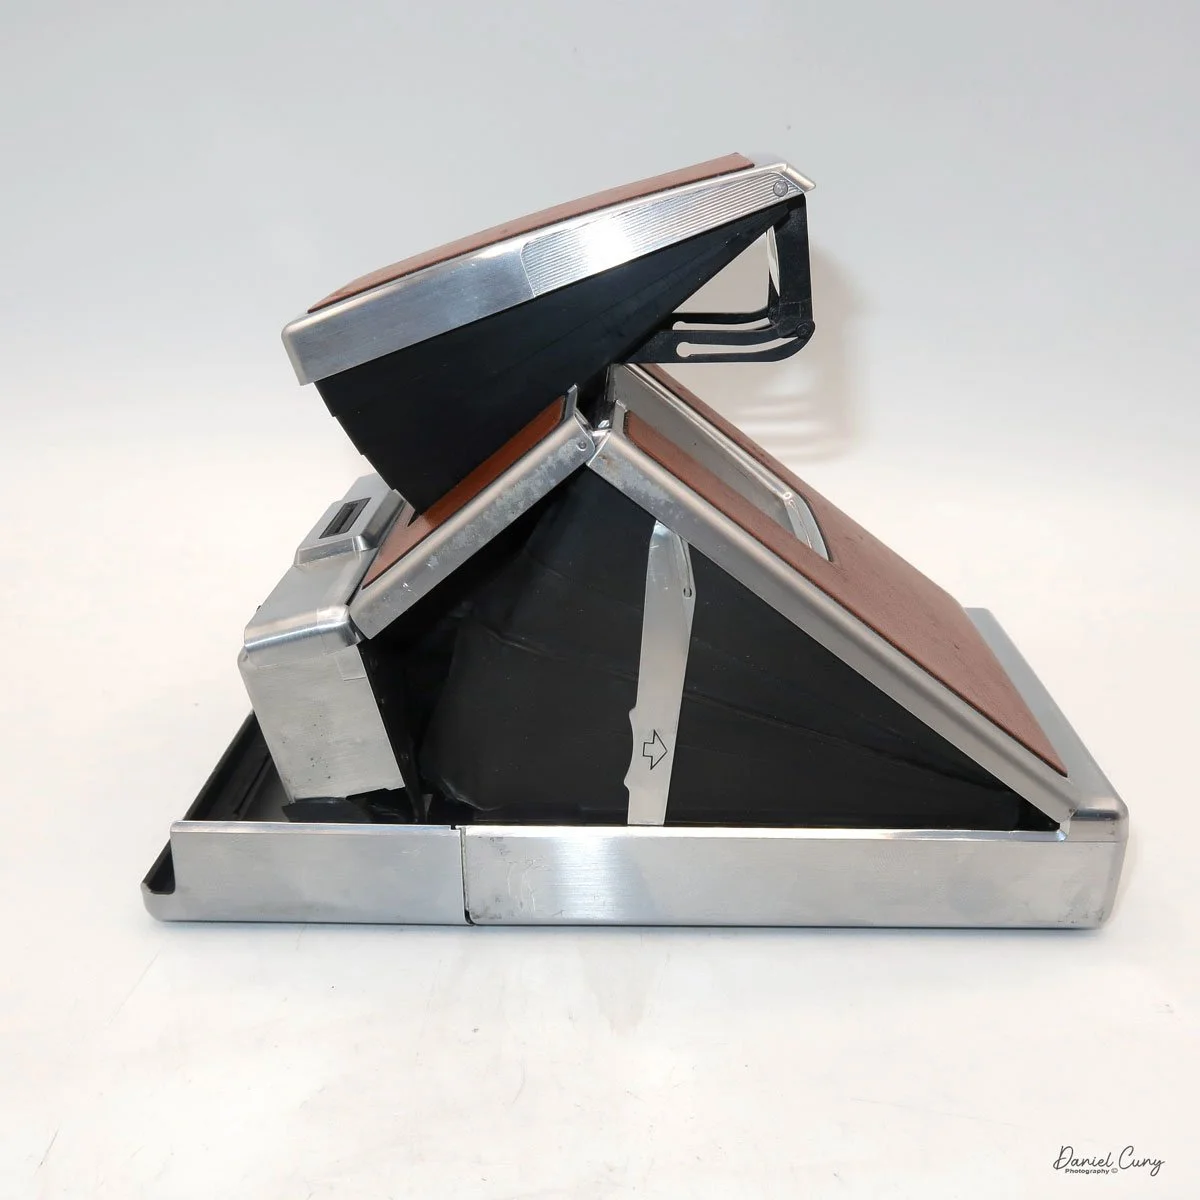
Once the camera is open, it exposes the black rubber bellows built into it. It also exposes the rear viewfinder for focusing, and on the front of the camera, the red shutter release button and the exposure control the camera. I was taught to hold the camera in the palm of my left hand, and with my right hand, I can focus on the camera. 

 Putting the camera up to your eye and looking through the camera, you'll see a split-image focusing screen. A small black wheel controls the camera's focus on the camera's right side. Turn the black wheel back and forth until the subject looks sharp. The split image focusing allows the photographer to find a vertical item, and when out of focus, the line will be split and together in one line when in focus. The camera can focus as close as 10.4" from the subject.

On the other side of the camera is the exposure control wheel. The camera is auto-metering, which is metered by the opening just below the lighten/darken wheel. Generally, you leave this wheel in the center position with half the white or black portion in the middle. 

 If you want the following image to be lighter, move the wheel so more of the white is showing. If you want it darker, turn the wheel so that more black is showing. There is no rule of how much to move the wheel for a lighter or darker image. It's all just a guess. The camera shutter can shoot from 1/175 to longer than 10 seconds.

To open the camera to load the film pack, on the right side of the camera is a button with a yellow sticker, and inside that yellow sticker is a "down arrow." Push that button down, and the front door opens to reveal where the film pack fits. The original film packs were color-coded, so you would line up the yellow, black, and blue sections of the film back to the colors on the film chamber and slide the film pack into the camera. You must press it all the way in so the film door can close. Closing the film door with a fresh film pack in the camera will eject the dark slide from the film pack through a small slot in the film door. The camera is ready to take its first photo when the dark slide or cover is ejected. There is a small window on the back of the camera, the frame counter.

When you take a photo and light hits the film, the camera ejects the film through a pair of rollers on the film chamber door. When the film passes through the rollers, they squeeze the chemicals onto the film, and the photo starts to process.  These need to be cleaned; otherwise, the photo won't be processed correctly after you take a photo. Another issue that dirty rollers can cause is dots on the photo. The dots are caused by dirt on the rollers, and they press into the photo, and the chemicals can't reach that area, causing white dots throughout the photo.

 If you're indoors and there's not enough light to take a photo, a flashbar fits into the slot just above the lens and takes five electronically timed flashes per side of each flashbar. They worked well. All you needed to do was snap the flashbar in the slot, and everything was done for you, except for turning the flashbar after five flash photos.

Flashbar on Polaroid SX-70 camera.

The electronic cable release attaches to two small holes on the camera's right side. The accessory tripod mount would fit on the bottom of the camera, and the accessory holder and close-up lenses would fit into the flashbar holder. 

 To close the camera, slide the locking bar back toward its arrow. The camera will start to close. Press the top down into the body, and the camera will click into the closed position.

A common issue with the SX-70 is the mirror gets locked in the up position, and the camera won't close all the way. You can also tell when this happens when you look through the viewfinder; there is nothing to look at, and the finder is black. The lock-up can be caused by a lack of power from the battery or the film not getting ejected properly, but there's not enough power to cycle the camera. Something you can do to correct this is a bit tricky and not too difficult, but it means taking a small and fragile piece of plastic off the camera to expose the gearing system of the camera. If you're nervous or think you'll break the piece of plastic, DON'T try it.

 On the right side, by the film release button, is a small and thin piece of plastic that you can CAREFULLY pull up at the front of the plastic piece. Some are easy to come off, and some are very tight, so please be careful. Once the piece is off, you can see the gears in the camera's body. The front gear can be turned, which will bring down the mirror system allowing you to view through the camera and cocking the camera. Many videos on YouTube show this process if you are interested. Once the camera's mirror comes down, you can put the piece of plastic back and snap it into place. You'll need a new and fresh film pack to ensure the camera is in good working condition.

My images:

Unfortunately, I didn't buy film before I wanted to write about this camera, and when I looked to purchase some, they were out of stock, so I'm forced to show photos from the late 1970s or early 80s. 

 Here are some of the family photos from the SX-70 camera.


Conclusion:

The SX-70 brings back many fond memories we had with family and co-workers. It's one of the classic cameras made in the 20th century, and I am thrilled to have a good early model in my collection.

 One of the real advantages of the original SX-70 film was the ability to manipulate the images during the processing, which took a minute or so. We'd take different thicknesses of knitting needles and swirl the chemicals around, which would cause a flow in the photo, which was very artistic. The new film doesn't allow for this creativity.

 Thank you for taking a few minutes from your schedule to read about this wonder camera from the 1970s.

 Please feel free to email me if you have questions or concerns. Until next week, please be safe.

 Click on the link to read about the cameras reviewed

Expo Watch Camera

This week's camera blog is about another unusual camera given to me many years ago by one of my sisters' in-laws who passed away. The family members knew I enjoyed cameras, so they gifted the camera to me and asked me to take care of it for the man who passed. 

My Expo Watch Camera

 When I first received the Expo Watch camera, I was utterly surprised and deeply touched by the generosity. Opening the small box to reveal the fantastic camera in good working condition was a moment I'll never forget. It was a revelation that the person who passed knew about my love for cameras. It could have been my wonderful sister who had shared my passion with the family.

 Needless to say, it's in a prominent place in my collection and something I look at almost daily and think about the generosity of the person who gifted it to me.

 To add to the story of this blog and the Expo Watch camera, about three to four years ago, I purchased a "lot" of camera items. Among the other items I bought were accessories from what I thought were for the Expo Watch camera. However, after researching the cameras, I found that they are actually for the slightly later British version made by Houghton, the Ticka camera. They fit and work on both the Expo and Ticka cameras.

The Company:

Patent for Expo Camera

The camera was designed and invented by a Swedish designer, Magnus Niéll, who lived in Sweden and New York. The patent for the Expo Watch camera was approved on September 6, 1904. This camera was a significant innovation in the history of photography, as it was one of the first to feature a daylight-loadable film cassette with 25, 16mm x 22mm, or 5/8" x 7/8" exposures in each cassette.

 The Expo Camera Company, located at 256 West 23rd Street, New York, manufactured the Expo Watch camera. It also produced the Expo Police Camera and developed and enlarged accessories for both cameras. The company offered film processing and printing to its customers. If interested, here's a copy of the full Expo Camera Pricelist and Manual.

In an ad I found published in 1917, the purchase price for the Expo Watch Camera was $2.50. According to the price list above, the processing fee was 10 cents to develop per roll of film. Contact prints (5/8"x7/8") were .10 cents per dozen, .07 cents per 2x3 enlargement, and .10 cents per 3x4 enlargement. I also enjoyed their statement that "Cash should accompany all orders for development, printing, and enlarging."

Ad for Expo Watch Camera

 The Expo Watch camera started in 1905, was taken over in the late 1920s by the dealer G Gennart, who produced several different names on the camera. In 1935, there were red, blue, and black enamel cameras, which were extremely rare. 

 In 1905, or shortly after, Magnus Niéll offered the camera's design to the British camera manufacturer Houghton, who produced the same camera under the Ticka name. The Ticka camera was available in the United Kingdom from 1905 to 1914. Some of the later Ticka models had a replica watch face on the front, with the hand indicating the angle of view the photographer would have when taking a photo.

Magnus Niéll designed other cameras for Houghton, such as the Ensign Midget, Ensignette, and the unusual design folding plate Lopa camera made by Kindermann. 

My Camera:

My Expo Watch camera measures 2 3/8" in diameter across the body of the camera, and if you measure from the front of the lens, including the fob ring, to the rear of the camera is 3" long and 1" deep, including the winding knob and the camera weighs 2.7oz. The camera is made from Nickel and has a highly polished chrome top and bottom.

The camera was designed like a pocket watch so it would be inconspicuous for the people the photographer wanted to photograph. This design feature allowed the user of the Expo Watch camera to easily keep it in one of his vest pockets, making it ideal for candid photography. The photographer could remove the camera from his pocket, take the cap off the lens, point it at his subject, and take a photo.

Beneath the fob ring is a lens cap resembling a pocket camera's winding stem. Under the lens cap is a fixed focus, 25mm lens. The camera has two settings for shutter speeds. There is "I" for an instant, approximately 1/125 speed, and the other setting is "T" for a time exposure. The shutter settings are done on the side of the camera with a lever you pull down. The shutter release butting is a small pin on the underside of the camera set at the one o'clock position. Once the camera's shutter is cocked, you press that pin in, and the shutter releases, making the photo.

The shutter release button on Expo Watch Camera

The shutter is not self-capping, meaning that when you cock the shutter, you're exposing the film to light, so it was recommended to keep the lens cap on until you're ready to make the exposure. 

Shutter cocking Mechanist and settings for Shutter speed.

 The lens cap served as the shutter time if you were doing time exposures. You set it to "T," click the shutter, take the lens cap off for exposure, put the lens cap on to end exposure, and the cock the shutter again for the following exposure. I can almost 100% guarantee that 99.9% of these images are blurry due to the person's hand holding the camera for any period of time, along with the movement of taking off and putting on the lens cap, and the negative being so small.

On the underside of the camera, or the opposite side of the removable plate with the beautifully etched "EXPO," is the winding lever you turn to advance the film. Just to the left of the winding knob is a small window that tells the photographer what frame number they're on. Above the winding knob is another logo for the camera company, which includes EXPO in the center of an oval. Around the oval is Pat throughout the world. On top and under is The Expo Camera New York USA

On the bottom of the camera is a lever you can turn to help pop off the etched plate, which comes off to load the film. I'm too afraid to turn this lever too hard, as I don't want the lever to snap off, so to remove the etched plate, I use my fingernails and pull the plate off to expose where the film goes. Once the plate is removed, the film cassette fits into the bottom portion of the camera.

The Expo Camera did have two different viewfinders available that would fit around the collar of the lens, under the winding stem. A simple model A ground glass viewfinder sold for .50 cents, and a model B brilliant finder sold for .75 cents.

 I also have an item made for the Ticka Camera in the group. There were a few accessories, such as the time exposure lens cap. This item fits over the lens and is held into place by a tension screw. Once in place, you can pull the lever up/down depending on how it is mounted to open the lens, exposing the film to light. Using the time exposure cap is considerably easier than taking the lens cap on and off for time exposures. Another item I have is a separate finder lens which is a larger glass item with a convex lens and attaches onto the camera like the other viewfinders. It has the exact attaching mechanism that fits around the lens collar. From what I'm seeing online, both the time exposure lens cap and the larger window finder were made for the TICKA camera.

Conclusion:

The Expo Watch Camera is a fun and exciting camera to have in my collection. I cherish the way I received it. The more I researched the camera and its different variations, the more I'd like to expand my collection to include the Ticka model with the watch face on it or even some of the colored models I'm always drawn to.


Reference:

Pacific Rim:  https://www.pacificrimcamera.com/rl/01266/01266.pdf

Historic Cameras:  http://www.historiccamera.com/cgi-bin/librarium2/pm.cgi?action=app_display&app=datasheet&app_id=919&

Submini.com:  http://www.submin.com/large/collection/expo/introduction.htm

Vintage photo:  http://www.vintagephoto.tv/expowatch.shtml

Kodak Chevron Camera

A week or so ago, when I was looking for another camera to write about in my weekly camera blog, I looked up on the shelf above my desk, and one camera stood above the rest. Maybe that's because I have it on a small tabletop tripod, and it literally was above many of the other cameras on my shelf. The camera is one of my favorite designs, the Kodak Chevron camera.

My Kodak Chevron camera

 I've owned the Kodak Chevron camera for many years. I remember buying it at a camera show early in my camera collecting years. It caught my eye because the design, along with the look and feel, is just wonderful. The camera is large, striking in design, and a medium-format camera with wonderful optics. 

 The Chevron, produced between 1953 and 1956, mirrors the post-war American era. Its design philosophy echoes the American auto industry of the time, reminiscent of the large, sturdy, and well-crafted automobiles by Chevrolet, Ford, and Cadillac. The Kodak Chevron is a testament to the classic cameras of this era.

The Company:

I don't believe I've ever written about one of my favorite companies. The Eastman Kodak Company, known to many as Kodak, was founded in 1888 by George Eastman, a visionary who revolutionized photography by making it accessible to the general public. Before Kodak, photography was an elaborate and expensive process that required significant expertise. Eastman's innovations in camera design and film processing transformed the photography industry.

A wonderful ad showing the benefits of the Chevron camera

 George Eastman, a former bank clerk in Rochester, New York, initially became interested in photography as a hobby in the late 1870s. Frustrated by the cumbersome process of wet plate photography, which involved heavy equipment and complicated chemical preparations, Eastman sought to simplify the process. In 1880, he patented a dry-plate coating machine, which allowed for the mass production of photographic plates, and soon opened the Eastman Dry Plate Company.

Eastman's breakthrough came when he shifted focus from plates to roll film. In 1884, Eastman and businessman Henry A. Strong, who would later become the company's first president, formed a partnership to expand the business. They developed a flexible roll film, which replaced glass plates that had previously been used. This was a significant innovation because it created simpler, more portable cameras.


In 1888, the company launched its first Kodak camera, a compact box camera preloaded with enough film for 100 exposures. The marketing slogan, "You press the button, we do the rest," succinctly captured Kodak's appeal. After taking pictures, customers would send the entire camera back to Kodak for developing and reloading, eliminating the need for users to handle the film or chemicals themselves. This ease of use democratized photography and made it accessible to amateur photographers for the first time.

 Eastman chose "Kodak" because he wanted a distinctive and memorable trademark that was not associated with any existing words. He believed the letter "K" had a solid and unforgettable sound, so he experimented with various combinations of letters before arriving at Kodak.

 Kodak continued to innovate through the late 19th and early 20th centuries, producing increasingly sophisticated 35mm cameras like the Kodak Ektra and Retina lines, along with many medium—and larger-format cameras used during international conflicts. All the while refining its film development processes.

 Eastman built Kodak into a dominant force in the photography industry by introducing flexible film and creating simple, user-friendly cameras.

My Camera:

The Chevron camera is a rather large, heavy, and, some say, "bulky" camera that measures 6.25" wide, by 4.5" tall, by 4"deep, and weighs in at a whopping 2 lbs. 9.9 oz. without film loaded. I like how the camera feels. It's taller and wider than the Medalist, after which this camera was made. The Kodak Medalist is a marvel for its time, but when I hold the Medalist, the body feels too "fat" in my hands, although I do like the 6x9 format the Medalist has, whereas the Chevron is a proper 6x6 square format camera.

Some people discuss cameras in a much more technical manner, which I genuinely enjoy reading. There are times when I don't understand many of the technical "hows and whys," but that allows me to learn new things, which I enjoy. I prefer to talk about using the camera and my personal experiences.

To load the camera, you can open the back from the left or right side, which I like. You can take the whole back off if you want to. The empty spool will go onto the camera's left side, as the film advance lever is on the left. You put the fresh roll on the right, which is counterintuitive for many photographers, but it didn't bother me when using the camera. Before you load the film into the camera, the frame counter is on top of the camera, which you need to set to "N." The camera is supposed to have an automatic film advance stop when the film reaches the next frame. My auto-stop camera wasn't working, so I just used what was normal to me and looked at the red window on the back of the camera to get to the next frame. Here is the Chevron Camera Instruction manual. Thank you, M. Butkus, for your service in supplying manuals.

Now that I have film in the camera, it's time to take photos. To focus the camera on the subject, the rear viewfinder has two windows. The top window is used to frame your subject, and the bottom is to use the rangefinder, which uses a magnified split image to focus on the subject. Both windows are very close together, and for me, who wears glasses was a bit more challenging to use, but once I got used to it, it wasn't difficult. This is the same rangefinder system used in the Medalist and Ektra cameras.

One of the most delightful aspects of this camera is its exceptionally smooth focus ring. It's not so loose that it slips, like some lenses that feel very sloppy. Instead, it's a perfect balance of smoothness and precision, making the process of focusing a joy. It's a testament to the high-quality design and construction of the Kodak Chevron, and it's a feature that I find truly fabulous to use.

It's time to set the shutter speeds and aperture to create the proper exposure. The shutter speeds are located on the far outside ring around the lens. They go from a fantastic speed of 1/800 sec on the top end to "B", going down by half to get the "B" setting, so 1/400, 1/200, 1/100, etc.

The lens is a Kodak Ektar 78mm f3.5 lens. The aperture settings are set by a bar on the bottom of the lens. Sliding the bar over to the next setting is smooth and easy. The setting also has click stops, so there is no getting it if the aperture is set correctly. A visual setting is on the bottom by the bar and on top of the lens, which you can see with a red arrow. The aperture indication is just behind the arm you cock the shutter.

I've yet to make an image, the film advance was very smooth to move the film to the next frame. I would advance the lever four times to get to the next frame. The red window is on the back of the camera to check where you are advancing the film. The red window has a blackout bar, which you slide up to view the film inside. Being right-handed, it was easy to hold the camera, slide the bar up with my right hand, and advance the film to the next frame with my left hand.

One of the advantages Chevron offered was the ability to shoot 828-size films. The 828 film accessory kit consisted of a film mask for 828 film, 2- 828 film spool holders and an 828 spool. This would have been purchased as an accessory. To use the 828 adapter, the photographer needed to do a couple of things to adapt to the film format. First, a switch from the regular 620 to 828 film is on top of the camera. You take a coin and turn the "finder" settings to 828. Then, a switch at the back of the camera changes the viewfinder from the standard 620 film to the smaller 828 film. By using the 828 film, there is a magnification factor of 1.5x.


My results:

Recently, at a local camera show, I purchased about 50 rolls of Agfa ISS 620 film, which I have for sale on my eBay store. I wanted to test the film to see how usable it was, so I loaded it into the camera and went to the local farmers market to take photos. Here are some of the results from the camera, along with the film I have for sale.

My Conclusion:

WOW!!!! What a fun camera to use. The camera fits very nicely in my hand; the focus is smooth, and I prefer using it over many of the folders and TLR cameras I've used. The Chevron camera outperformed my expectations. It felt similar to what a Mamiya Seven feels like in your hand. While it didn't have the capabilities of interchangeable lenses or TTL viewing of the Mamiya Seven, the camera handled great. 

 The only downside to this camera is the small viewfinder and rangefinder window. There were times when I was walking around the market and just pre-focused, especially when I wanted to be somewhat inconspicuous when shooting. The light was fairly dim, too, so my shutter speed was generally 1/50, and my aperture was wide open.

 I also understand that due to the low number of cameras made, especially compared to the very popular Medalist and Medalist II cameras, they are selling at a premium price on the used market.

 Thank you for taking a few minutes from your day to read my post on this lovely camera. I plan on shooting with it more often, especially since I have many rolls to shoot with.

 Until next week, please be safe.