The Vena Venaret Camera

While the Netherlands is renowned for its windmills, tulips, canals, and bike riding, it's not often associated with camera manufacturing. However, it's home to some unique camera companies, including the popular Cambo. In fact, there were around 20 camera manufacturers in the country, such as Philips, which I've previously featured in a blog post, and other lesser-known companies like Tahbes, Foka, and a few smaller ones.

 My connection to these cameras is quite recent, as I was drawn to them by their vibrant colors. As I've shared in previous posts, I have a fondness for colored cameras, a fascination that still holds true today. Whether it's a blue, green, rose, or any other uniquely colored camera, I'm immediately captivated and feel a strong desire to own it. In this case, I was fortunate to acquire two cameras-a striking green one with a black faceplate, and a brown version with a matching faceplate. 

 After doing a little digging on the camera and company, I found that the two I purchased were also different models. The brown camera is the Vena Venaret due to the accessory shoe on the top of the camera, while the green is the Vena Venaret Jr., the same model but without the accessory shoe. The good news is that the Venaret Jr. I purchased has a leather fitted case that was in excellent condition, and it is the model I shot in the blog post.

The Company:

Vena Optical Devices was founded in Amsterdam in  1940 by Evert Verlegh and Samuel Naarden. The company's name is a mixture of the starting letter from each founder's last name: VE from Verlegh and NA from Naarden. It was a difficult time to start a company due to the war, as Samuel was making optical lenses for Old Delft Company. While many of the company's Jewish employees were deported, it was difficult for them to do anything regarding the cameras made until after WWII ended.

 In 1948, Vena came out with the Venaret camera. According to the instruction manual, the camera was designed by F. Kochman, the former manufacturer of the Reflex-Korelle camera. Mr. Kochman was living in The Netherlands for a few years, was an employee of Vena, and designed the Venaret camera; according to the manual, "His long experience in the field of camera construction is already a guarantee for the good health of the newborn." With this knowledge, the Venaret looks similar to the Reflex-Korelle camera, although a much simpler version.

 The Venaret had a few different versions. The camera was produced with a black faceplate and black covering, a white faceplate with black covering, or a brown faceplate and brown covering, which is the model I recently received.

 The Venaret Jr. camera has a white faceplate with a black covering, a black faceplate with a black covering, and a white faceplate with a green covering, and the model I recently received has a black faceplate with a green covering. 

 In 1949, Vena produced a couple of straightforward box cameras, the Vena Box and Sport Box. It's estimated that Vena produced between 20,000 and 30,000 cameras before it went bankrupt and closed its doors in 1951. This was a very short-lived camera company, but it produced some brightly colored and very simply designed cameras.

My Camera:

My camera is 5.25" wide by 3.5" tall, including the viewfinder, 3 3/8" deep, and weighs 14.9 oz. and has a very cube shape. There are two shutter speeds on the camera, 1/25 and 1/50, along with "T" for timed exposures. The camera has a 75mm f7.7 Meniscus lens with four aperture settings, F7.7, F9, F11, and F16. The shutter speeds are set with a toggle switch above the lens with the "T" setting in the middle. The aperture settings are on the side of the lens. The shutter release is on the right side of the camera. There is no cocking of the shutter. Pressing down the shutter lever to take the photo is very simple.

To open the camera to load the film is easy once you figure it out. On top of the camera is a sliding lever. Slide it to the "O" or open position. Grab the lens protruding area and pull up from the back of the camera. There is a small channel that the front of the camera slides into that allows the front of the camera to slide out of, which exposes the film camera where you can load or unload the film, depending on if all photos are taken. Once the film is loaded or unloaded, put the ridge of the back of the camera into the channel on the front and slide down until the top fits snuggly into the back, then slide the lever on the top to the right to lock the camera while taking photos.

There is no lens focusing, and the minimum focus is approx. 3 meters, about 10'. I found this out when I processed the negatives after taking the camera out and shot with it on a sometimes sunny afternoon, which was rare in the Portland area in November. Looking at the photos, I initially thought 3' was the minimum focus, but those images are blurry while the background is sharp. After I thought about it, I realized that many cameras that don't have focus ability have a "close up" filter or lens when you want to take photos from 1-3 meters, so that mistake was on me.


Note the shutter speed and aperture settings.

This is a very simple camera without many bells or whistles, but I wanted to shoot with it to see how it performed. In today's cameras, this would be considered a "point and shoot" style, with minimal settings and no focus ability.

My Results:

After putting in a roll of film, walking through the neighborhood, and taking simple, composed images, I went to my darkroom to process the negatives and see the results. 

 Here are a few of the images I took with this colorful gem of a camera:

Conclusion:

Except for my thinking the camera would focus closer than 10', the images are relatively sharp and clean. I didn't purchase these cameras, but I wanted to see how sharp they could produce, and they were pretty decent.

 Thank you for taking the time to delve into the history of this short-lived camera company from a country not typically associated with camera manufacturing. Despite its brief existence, Vena Optical Devices managed to create a truly beautiful and functional camera.

 Until next week, please be safe.

Hasselblad 1600F Camera

Looking through my collection, I had a couple of different cameras in mind, but they use 127-size film, which I ordered a few days before the intended day to take photos. Unfortunately, the film hasn't arrived in time for me to shoot photographs when the weather is nice and sunny, so I'll put them off for the next blog. 

 As I gazed at the items in my collection, the Hasselblad 1600F caught my eye. I had purchased it many years ago, and the last time I had the pleasure of using it was a couple of years ago. The thought of loading a roll and exercising the focal plane shutter in this early version of the Hasselblad camera filled me with anticipation. 

 I generally use the Zeiss 80mm f2.8 lens on the camera, but looking through some of the lenses I have for this and the 1000F, I do have the Kodak Ektar 80mm f2.8 lens, which was the lens initially sold with the 1600F here in the US, and later the Zeiss 80mm f2.8 was available. For this shoot, I got out a roll of Ilford FP4 125 film, which I loaded into the film back, and I put on the Ektar lens to see how it would work. I was pleasantly surprised.

The Company:

When I think of cameras that have made an indelible mark on the field of photography, Hasselblad undoubtedly comes to mind. They are known for capturing iconic moments on Earth and beyond. Hasselblad cameras are synonymous with precision, durability, and unmatched image quality. At the heart of this remarkable brand is the story of its founder, Victor Hasselblad, and his relentless pursuit of excellence.

Original Swedish Ad for Hasselblad 1600f

 Victor Hasselblad was born in Gothenburg, Sweden, in 1906 into a family with a photography and photographic supplies background. While Victor initially followed in his family's footsteps, he soon developed a desire to innovate and improve upon existing camera technology. At 18, he traveled to Dresden, Germany, to work with the best optical manufacturers of the time, gaining invaluable experience in the technical aspects of cameras and photography. This laid the foundation for his future endeavors and innovations.

 During World War II, Victor's knowledge of cameras caught the attention of the Swedish Air Force. They approached him with a German aerial surveillance camera they wanted to replicate. Victor accepted the challenge and famously responded, "I don't want to make a copy of it—I want to make a better one." This led to the development of the first Hasselblad camera, the HK7, designed explicitly for military aerial photography. Victor's ingenuity soon proved invaluable, and his cameras became crucial tools for aerial reconnaissance.

 After the war, Victor focused on developing cameras for the consumer market. In 1948, the first consumer-oriented Hasselblad, the 1600F, was introduced. This camera was revolutionary for its time, featuring a modular design that allowed photographers to change lenses, viewfinders, and film magazines, making it highly versatile. The 1600F also used medium-format film, which produced images of superior quality compared to 35mm film cameras available at the time. However, the early models faced technical issues, particularly durability, and required further refinement.

Ad for the Hasselblad 1600F

Despite the initial technical issues, Hasselblad was committed to improving its designs. By the 1950s, Hasselblad cameras had developed a reputation for being highly reliable, and photographers worldwide began to take notice. In 1952, Hasselblad introduced the 1000F with an improved shutter and slower maximum speed of 1/1000. The camera also came with a Zeiss 80mm f2.8 lens, marking a significant improvement in the brand's offerings.


The subsequent 500C model, released in 1957, solidified Hasselblad's place in the professional photography world. With its leaf-shutter system and modular components, the 500C became a workhorse for studio photographers, renowned for its reliability and image quality. This camera design remained in production, with upgrades, for decades and became the foundation of Hasselblad's success.


Hasselblad cameras are most famous for their role in space exploration. In 1962, NASA astronaut Walter Schirra brought a Hasselblad 500C on the Mercury-Atlas 8 mission, sparking a long-standing relationship between Hasselblad and NASA. The camera's build quality, high resolution, and adaptability made it an ideal choice for capturing images in the challenging conditions of space.

Walter Schirra and the Hasselblad 500C

 Hasselblad worked closely with NASA to modify the cameras for space use. The resulting 500EL model was specially adapted for the Apollo missions, where it would ultimately capture some of the most iconic images in history, including the first steps on the moon by Neil Armstrong in 1969. The modifications included [specific modifications], which allowed the camera to function effectively in the challenging conditions of space. To this day, the image of Earth from space, known as the 'Blue Marble,' remains one of the most famous photographs ever taken, and it was captured with a Hasselblad. The brand's involvement in the space program elevated its reputation further and established Hasselblad as a premium name in photography.

 With the arrival of digital photography, Hasselblad continued to innovate, embracing the transition while retaining the high standards that defined its analog cameras. In the early 2000s, Hasselblad launched the H-System, a line of digital medium-format cameras that maintained the quality associated with the brand while integrating advanced digital features. This line set new benchmarks in the industry, offering extremely high-resolution sensors, modular components, and sophisticated imaging capabilities that appealed to professional photographers and high-end studios alike.

 More recently, Hasselblad has also embraced the mirrorless trend, launching the X1D, a compact digital medium-format camera that balances portability with the image quality of medium format. This new direction has helped the brand stay relevant, catering to a new generation of photographers who demand portability without sacrificing image quality.

 Today, Hasselblad remains a symbol of excellence in photography. Known for its attention to detail, superior image quality, and dedication to craftsmanship, Hasselblad has cultivated a loyal following of professional photographers, collectors, and photography enthusiasts. While the digital age has transformed the landscape of photography, Hasselblad continues to adapt and push the boundaries of what is possible, ensuring that its legacy endures.

Victor Hasselblad's legacy is a testament to the power of innovation, and his vision inspires photographers worldwide. From capturing wartime reconnaissance to the moon's surface and beyond, Hasselblad has not only documented history but has become a part of it.

My Camera:

My Hasselblad with the Kodak Ektar 80mm f2.8 lens is 6.5" long by 4.5" wide, including the winding knob, and is 4" tall with the waist level finder closed. The camera weighs in at 2 lbs. 15.9oz. This camera is in excellent condition for being around 75 years old. Hasselblad made this camera with a maximum shutter speed of 1/1600, which was very ambitious for a medium-format camera. There is some minor tarnish on some chrome, a small dent in one of the shutter curtains,  and the leatherette is starting to come loose around the waist level finder, but that seems to be it. It's also important to know that the 1600F and the 1000F use focal plane shutters. After these models, the 500c and model moving forward have leaf shutters in the lenses, not the camera body. The exception was the 2000FC model.

Having owned several different Hasselblad models, the camera operations are similar to mine. The film back on my camera is the older C12 film back. To load the film, you need to take the film back off the camera. Well, you don't need to, but I've always done it. You have to have the dark slide in the slot on the left to remove the film back from the camera. The dark slide in the holder presses a pin within the film back that allows the back to come off. If the dark slide isn't in the film back, you cannot take the back off the camera. To remove the film, on the top of it is a sliding circle with a Hasselblad "V" logo that you slide to the right and pull back down to remove it from the body.

 On the left side of the film back is the lock. Pull up the tab on the lock and turn it counterclockwise until it stops, then pull it away from the film back, and the insert will pull out. The film insert is what you load the film into. With the lock on the left, take the empty film spool from the bottom holder by pulling out the roll holder on a hinge to quickly load and unload the rolls of film. Put the empty spool onto the top. The top has a knurled grip on the hinged holder to wind the film before loading it back into the film back to shoot. Put your fresh roll of film into the lower holding area, pull the paper over the black pressure plate and slide the leader into the empty spool and turn the knurled knob to load the film onto the reel. Keep turning the knob until you see the "start" word on the paper backing. 

 Slide the film into the body portion and lock the back securely into the body. On the right side of the film back is a winding knob. Lift one of the handles and wind. On my film back, which is a C12 back, there is a hinged door where you can see the frame numbers as you turn the winding handle. Open the backdoor, watch for "1" to appear, and stop winding. At this point, turn the winding lever in a counterclockwise motion, and the frame counter under the winding knob will reset to number 1. Put the back onto the camera and prepare for the first photo. As you take photos, the film will advance back in, and you can check the frame counter on the film back to see what frame you're on.

Now that the film is loaded into the camera let's go out and shoot a few frames. Remove the front lens cap to focus the camera and pop up the waist level finder. A smaller "V" Hasselblad logo slider is on top of the waist level finder to open the finder. Slide that to the right, and the waist-level finder will pop open, showing an image you're pointing the camera toward. Turn the focus ring on the lens to get a sharp image. If you want a more critical focus, you can slide the slider to the right again, and a magnifying lens will pop up. You can put your eye closer to the magnifying lens to see an enlarged area of the focusing screen to fine focus on your subject. To close the waist level finder, one by one, flip down the side panels over the focusing screen, then the back panel, and close the top, which will click when closed.

 Before you press the shutter button on the front of the camera in the lower right corner, as you're holding the camera, you need to take out the dark slide from the film's back. The camera will not fire if the dark slide is engaged in the film's back. Be sure the shutter is cocked and ready to shoot. To cock the shutter, there is a large knob on the right side of the camera. Pull out the dark slide and turn that knob in a clockwise motion, or so the knob is going forward. This cocks the shutter. Set the shutter speed, which is on the right side of the camera, on the knob that cocks the shutter. 

 Because this model and the 1000F cameras use a focal plane shutter, it's VERY IMPORTANT: DO NOT SET THE SHUTTER SPEED WITHOUT COCKING THE SHUTTER FIRST. If you do, the camera can jam, and with this and the 1000F models, it's extremely expensive to service and, due to the age, possibly not able to be serviced due to lack of parts.

On my Eastman Kodak Ektar lens, the aperture is entirely manual, meaning you need to open the aperture for focus and then stop down to take the photo. Being used to "automatic" apertures where the aperture closes during exposure and opens after the exposure, it's easy not to remember to stop the lens down before taking the photo. Being one that uses a myriad of different cameras, I'm getting used to checking before, but every once in a while, I forget and need to retake the photo.

 If you want to change the lens on your camera, as you hold the camera, there is a button on the front of the camera in the lower left corner, opposite the shutter release. Press the button and turn the lens in a counterclockwise motion to release the lens and put on a new one. To put on a different lens, line up the red dot on the lens and the red dot on the camera body and turn the lens clockwise until the lens "clicks" into place and is secure on the body.

 Now that you've shot the 12 frames on the roll of film, it's time to take the film out, get it processed, and see how you did. To do so, take the dark slide out of the film back, remove the film back from the camera, open the film chamber, unload the film, and put in a fresh roll to shoot some more.

My Results:

After walking around my block taking photos on a sunny afternoon, I wanted to see how the lens would handle and the image quality it would produce. The lens focuses close, down to 20" from the film plane, so I was able to get in close for detail. Here are the results from the Eastman Kodak Ektar 80mm f2.8 lens.


 Conclusion:

I'm a photo nerd. I love using cameras, especially the older mechanical versions. There's something gratifying and calming about having a mechanical camera in my hands. Whether looking through an eye-level or waist-level finder, taking photos is an absolute joy.

 The Ektar 80mm f2.8 lens is terrific. I liked how the focus was fluid and easy to turn, the ease of opening and closing the aperture, and the picture quality was better than expected. The older Ektar lenses are superb, like those on the Ektar 35mm camera.

 Thank you for taking a few minutes out of your day to read about this early Hasselblad camera. I plan to use it for more shoots in the upcoming months.

 Until next week, please be safe.

Reference:

Hasselblad Website: https://www.hasselblad.com/about/history/first-consumer-camera/

Kodak Chevron Camera

A week or so ago, when I was looking for another camera to write about in my weekly camera blog, I looked up on the shelf above my desk, and one camera stood above the rest. Maybe that's because I have it on a small tabletop tripod, and it literally was above many of the other cameras on my shelf. The camera is one of my favorite designs, the Kodak Chevron camera.

My Kodak Chevron camera

 I've owned the Kodak Chevron camera for many years. I remember buying it at a camera show early in my camera collecting years. It caught my eye because the design, along with the look and feel, is just wonderful. The camera is large, striking in design, and a medium-format camera with wonderful optics. 

 The Chevron, produced between 1953 and 1956, mirrors the post-war American era. Its design philosophy echoes the American auto industry of the time, reminiscent of the large, sturdy, and well-crafted automobiles by Chevrolet, Ford, and Cadillac. The Kodak Chevron is a testament to the classic cameras of this era.

The Company:

I don't believe I've ever written about one of my favorite companies. The Eastman Kodak Company, known to many as Kodak, was founded in 1888 by George Eastman, a visionary who revolutionized photography by making it accessible to the general public. Before Kodak, photography was an elaborate and expensive process that required significant expertise. Eastman's innovations in camera design and film processing transformed the photography industry.

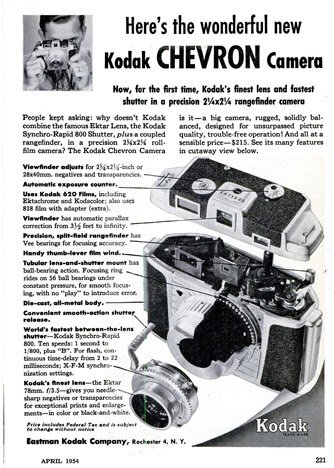
A wonderful ad showing the benefits of the Chevron camera

 George Eastman, a former bank clerk in Rochester, New York, initially became interested in photography as a hobby in the late 1870s. Frustrated by the cumbersome process of wet plate photography, which involved heavy equipment and complicated chemical preparations, Eastman sought to simplify the process. In 1880, he patented a dry-plate coating machine, which allowed for the mass production of photographic plates, and soon opened the Eastman Dry Plate Company.

Eastman's breakthrough came when he shifted focus from plates to roll film. In 1884, Eastman and businessman Henry A. Strong, who would later become the company's first president, formed a partnership to expand the business. They developed a flexible roll film, which replaced glass plates that had previously been used. This was a significant innovation because it created simpler, more portable cameras.


In 1888, the company launched its first Kodak camera, a compact box camera preloaded with enough film for 100 exposures. The marketing slogan, "You press the button, we do the rest," succinctly captured Kodak's appeal. After taking pictures, customers would send the entire camera back to Kodak for developing and reloading, eliminating the need for users to handle the film or chemicals themselves. This ease of use democratized photography and made it accessible to amateur photographers for the first time.

 Eastman chose "Kodak" because he wanted a distinctive and memorable trademark that was not associated with any existing words. He believed the letter "K" had a solid and unforgettable sound, so he experimented with various combinations of letters before arriving at Kodak.

 Kodak continued to innovate through the late 19th and early 20th centuries, producing increasingly sophisticated 35mm cameras like the Kodak Ektra and Retina lines, along with many medium—and larger-format cameras used during international conflicts. All the while refining its film development processes.

 Eastman built Kodak into a dominant force in the photography industry by introducing flexible film and creating simple, user-friendly cameras.

My Camera:

The Chevron camera is a rather large, heavy, and, some say, "bulky" camera that measures 6.25" wide, by 4.5" tall, by 4"deep, and weighs in at a whopping 2 lbs. 9.9 oz. without film loaded. I like how the camera feels. It's taller and wider than the Medalist, after which this camera was made. The Kodak Medalist is a marvel for its time, but when I hold the Medalist, the body feels too "fat" in my hands, although I do like the 6x9 format the Medalist has, whereas the Chevron is a proper 6x6 square format camera.

Some people discuss cameras in a much more technical manner, which I genuinely enjoy reading. There are times when I don't understand many of the technical "hows and whys," but that allows me to learn new things, which I enjoy. I prefer to talk about using the camera and my personal experiences.

To load the camera, you can open the back from the left or right side, which I like. You can take the whole back off if you want to. The empty spool will go onto the camera's left side, as the film advance lever is on the left. You put the fresh roll on the right, which is counterintuitive for many photographers, but it didn't bother me when using the camera. Before you load the film into the camera, the frame counter is on top of the camera, which you need to set to "N." The camera is supposed to have an automatic film advance stop when the film reaches the next frame. My auto-stop camera wasn't working, so I just used what was normal to me and looked at the red window on the back of the camera to get to the next frame. Here is the Chevron Camera Instruction manual. Thank you, M. Butkus, for your service in supplying manuals.

Now that I have film in the camera, it's time to take photos. To focus the camera on the subject, the rear viewfinder has two windows. The top window is used to frame your subject, and the bottom is to use the rangefinder, which uses a magnified split image to focus on the subject. Both windows are very close together, and for me, who wears glasses was a bit more challenging to use, but once I got used to it, it wasn't difficult. This is the same rangefinder system used in the Medalist and Ektra cameras.

One of the most delightful aspects of this camera is its exceptionally smooth focus ring. It's not so loose that it slips, like some lenses that feel very sloppy. Instead, it's a perfect balance of smoothness and precision, making the process of focusing a joy. It's a testament to the high-quality design and construction of the Kodak Chevron, and it's a feature that I find truly fabulous to use.

It's time to set the shutter speeds and aperture to create the proper exposure. The shutter speeds are located on the far outside ring around the lens. They go from a fantastic speed of 1/800 sec on the top end to "B", going down by half to get the "B" setting, so 1/400, 1/200, 1/100, etc.

The lens is a Kodak Ektar 78mm f3.5 lens. The aperture settings are set by a bar on the bottom of the lens. Sliding the bar over to the next setting is smooth and easy. The setting also has click stops, so there is no getting it if the aperture is set correctly. A visual setting is on the bottom by the bar and on top of the lens, which you can see with a red arrow. The aperture indication is just behind the arm you cock the shutter.

I've yet to make an image, the film advance was very smooth to move the film to the next frame. I would advance the lever four times to get to the next frame. The red window is on the back of the camera to check where you are advancing the film. The red window has a blackout bar, which you slide up to view the film inside. Being right-handed, it was easy to hold the camera, slide the bar up with my right hand, and advance the film to the next frame with my left hand.

One of the advantages Chevron offered was the ability to shoot 828-size films. The 828 film accessory kit consisted of a film mask for 828 film, 2- 828 film spool holders and an 828 spool. This would have been purchased as an accessory. To use the 828 adapter, the photographer needed to do a couple of things to adapt to the film format. First, a switch from the regular 620 to 828 film is on top of the camera. You take a coin and turn the "finder" settings to 828. Then, a switch at the back of the camera changes the viewfinder from the standard 620 film to the smaller 828 film. By using the 828 film, there is a magnification factor of 1.5x.


My results:

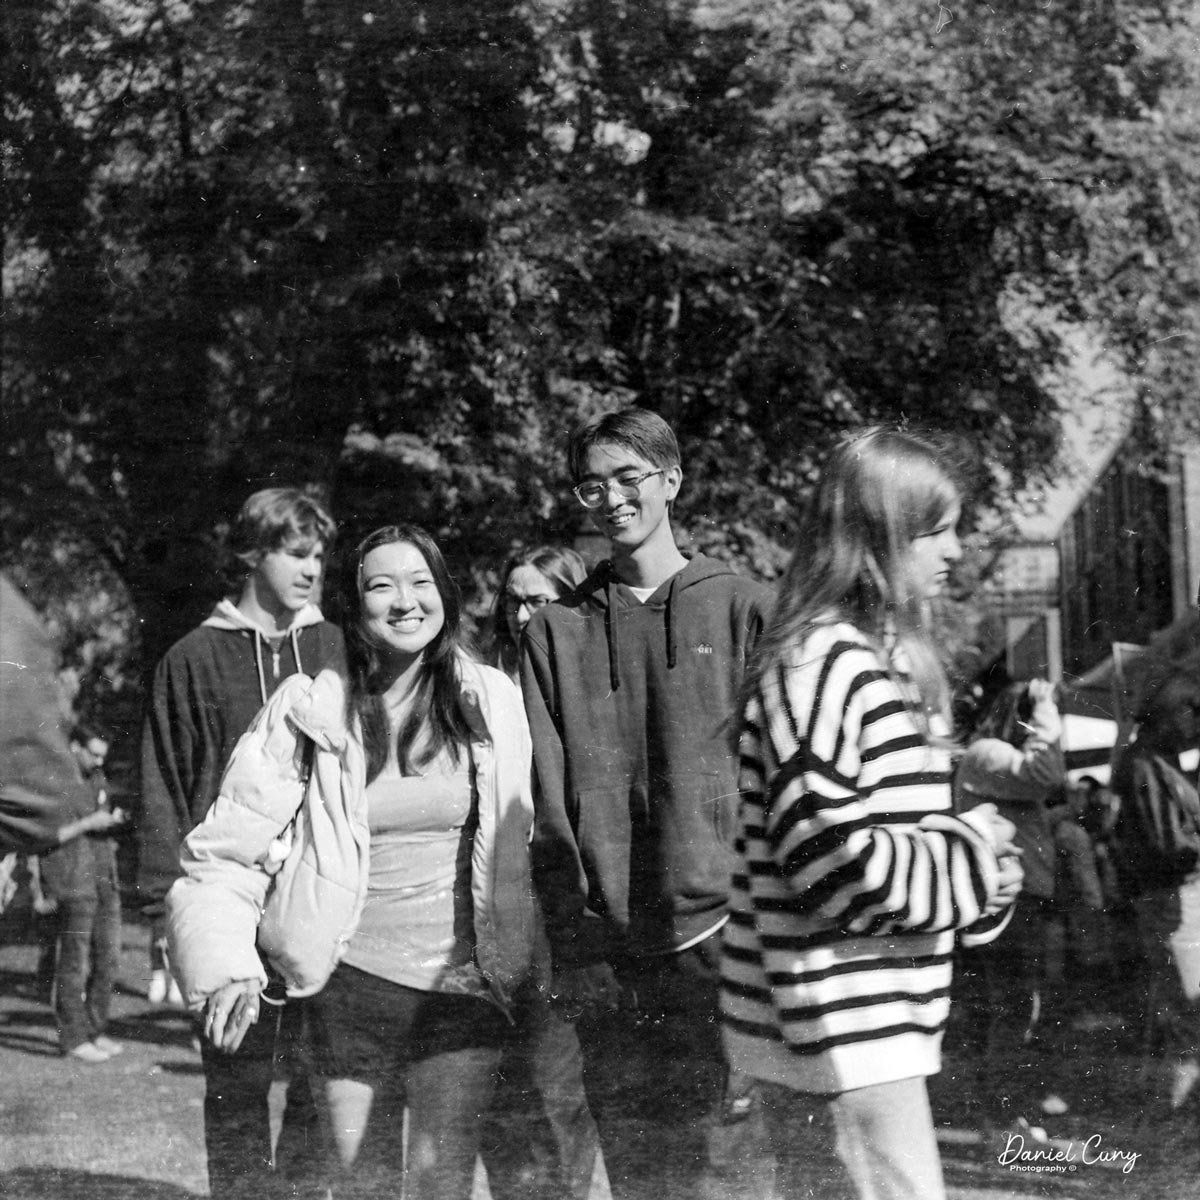
Recently, at a local camera show, I purchased about 50 rolls of Agfa ISS 620 film, which I have for sale on my eBay store. I wanted to test the film to see how usable it was, so I loaded it into the camera and went to the local farmers market to take photos. Here are some of the results from the camera, along with the film I have for sale.

My Conclusion:

WOW!!!! What a fun camera to use. The camera fits very nicely in my hand; the focus is smooth, and I prefer using it over many of the folders and TLR cameras I've used. The Chevron camera outperformed my expectations. It felt similar to what a Mamiya Seven feels like in your hand. While it didn't have the capabilities of interchangeable lenses or TTL viewing of the Mamiya Seven, the camera handled great. 

 The only downside to this camera is the small viewfinder and rangefinder window. There were times when I was walking around the market and just pre-focused, especially when I wanted to be somewhat inconspicuous when shooting. The light was fairly dim, too, so my shutter speed was generally 1/50, and my aperture was wide open.

 I also understand that due to the low number of cameras made, especially compared to the very popular Medalist and Medalist II cameras, they are selling at a premium price on the used market.

 Thank you for taking a few minutes from your day to read my post on this lovely camera. I plan on shooting with it more often, especially since I have many rolls to shoot with.

 Until next week, please be safe.