Inoca Six Stereo Camera

This week's camera is the Inoca Six Stereo Camera. I'm perplexed by it and wanted to see if others have it or have any information besides the very sparse information I can find online. I'm particularly interested in learning more about its history and the context of its production. If you have any insights, I'd love to hear from you.  

My Inoca Six Stereo Camera

 Four to five years ago, I stumbled upon a unique find on an online app I frequent for camera and photo items. The Inoca Six Stereo Camera, a seemingly familiar yet rare gem, caught my eye. The seller's claim of its extreme rarity, with only three known to exist, further fueled my interest.

 At that time, I did the average online search and couldn't find much on the camera or its manufacturer, Morita Trading Co., so I decided to take a chance on it. The camera wasn't cheap, but it wasn't overly expensive, so I couldn't take a chance on it, especially if it was so rare. There were only three cameras left.

The Company:

Morita Shōkai, or from what I can find online, was Morita Trading Company, a camera manufacturer and distributor in Japan during the 1950s. Their most prominent and most well-known cameras were subminiature cameras that had a resemblance to the Leica rangefinder cameras. I've seen many, like the Gem 16, Kiku 16, and Saica, which took 10-14x14mm images on miniature 17.5m film. They also made Bolta Film cameras like the Kikuflex camera in 1957 and the Inoca Stereo camera in 1956.

 There is a Japanese book, Japanese Camera History, as seen in advertisements, 1935–1965. The book was written by the publishers of Asahi Camera, which was a Japanese Camera magazine from 1926 until June 2020, where some of the Morita cameras are advertised.

My assumption was that the camera/distributor was very short-lived with the subminiature market's rapid rise and quick fall. In that specific timeframe, from 1955 to 1957, when these cameras were made, Morita tried to expand into Bolta film cameras like the Kikuflex, which is more common than the Inoca Stereo camera I have.

My Camera:

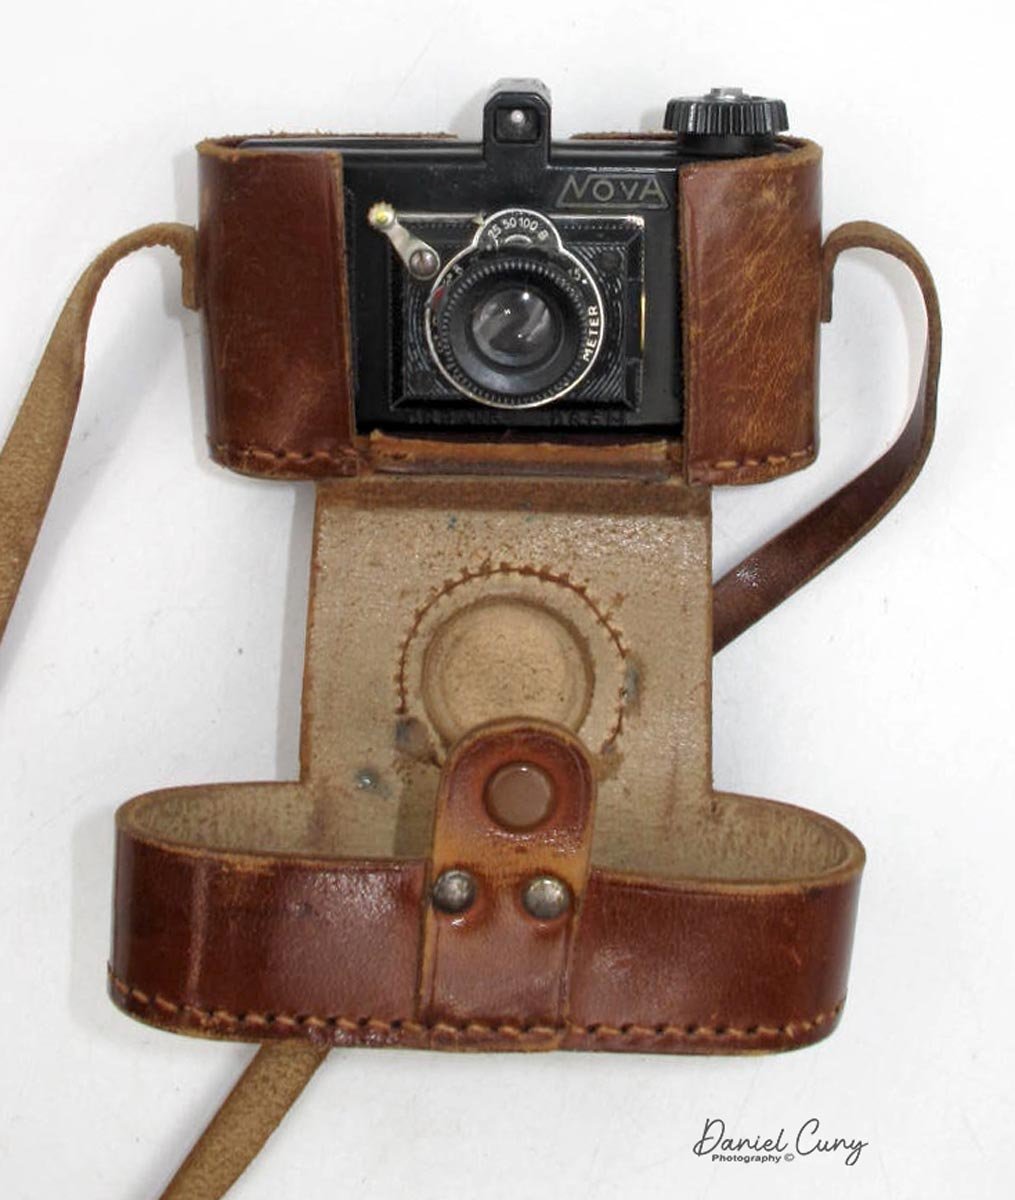
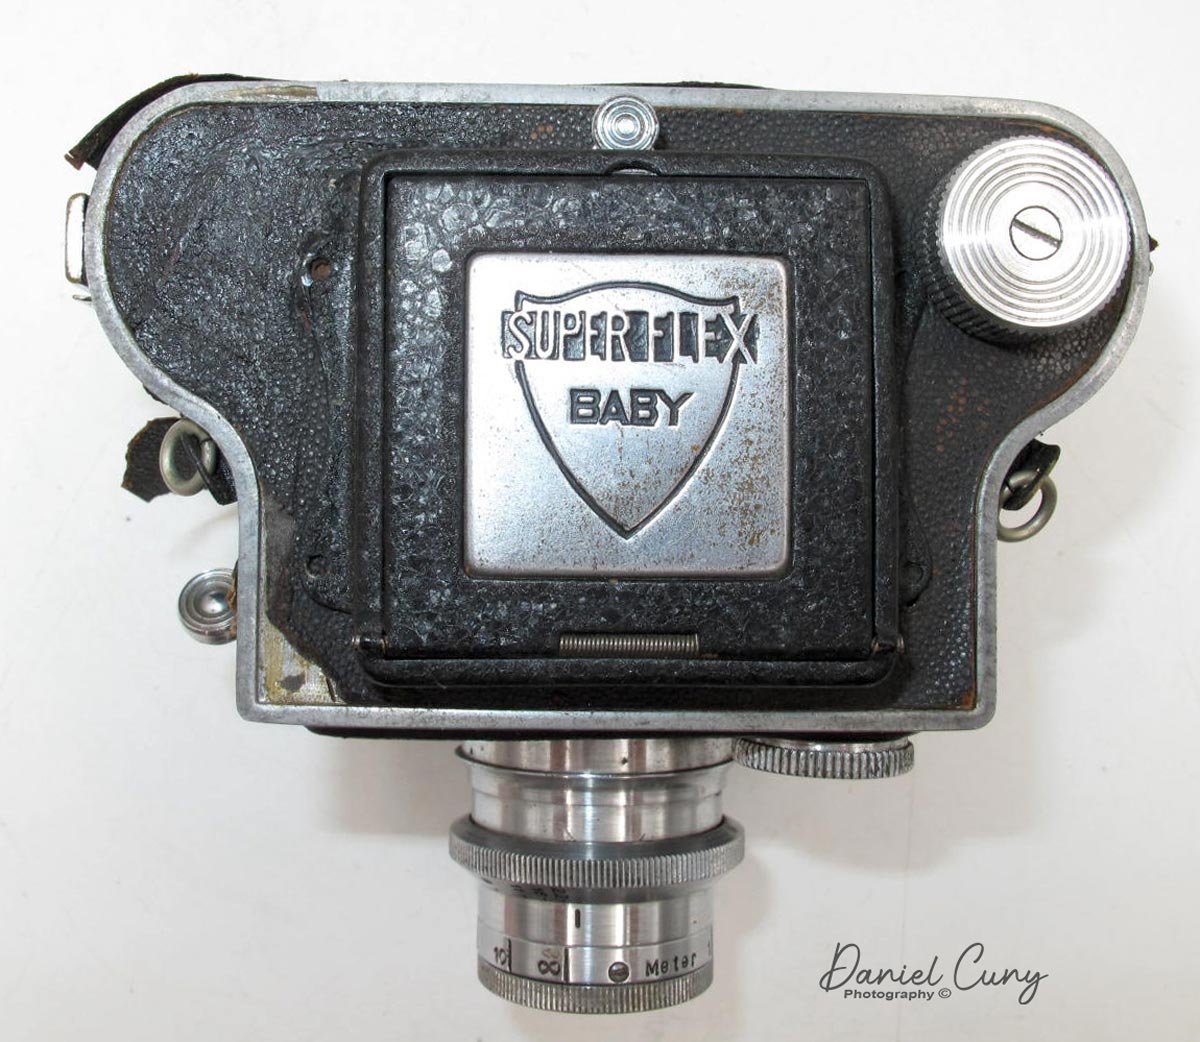
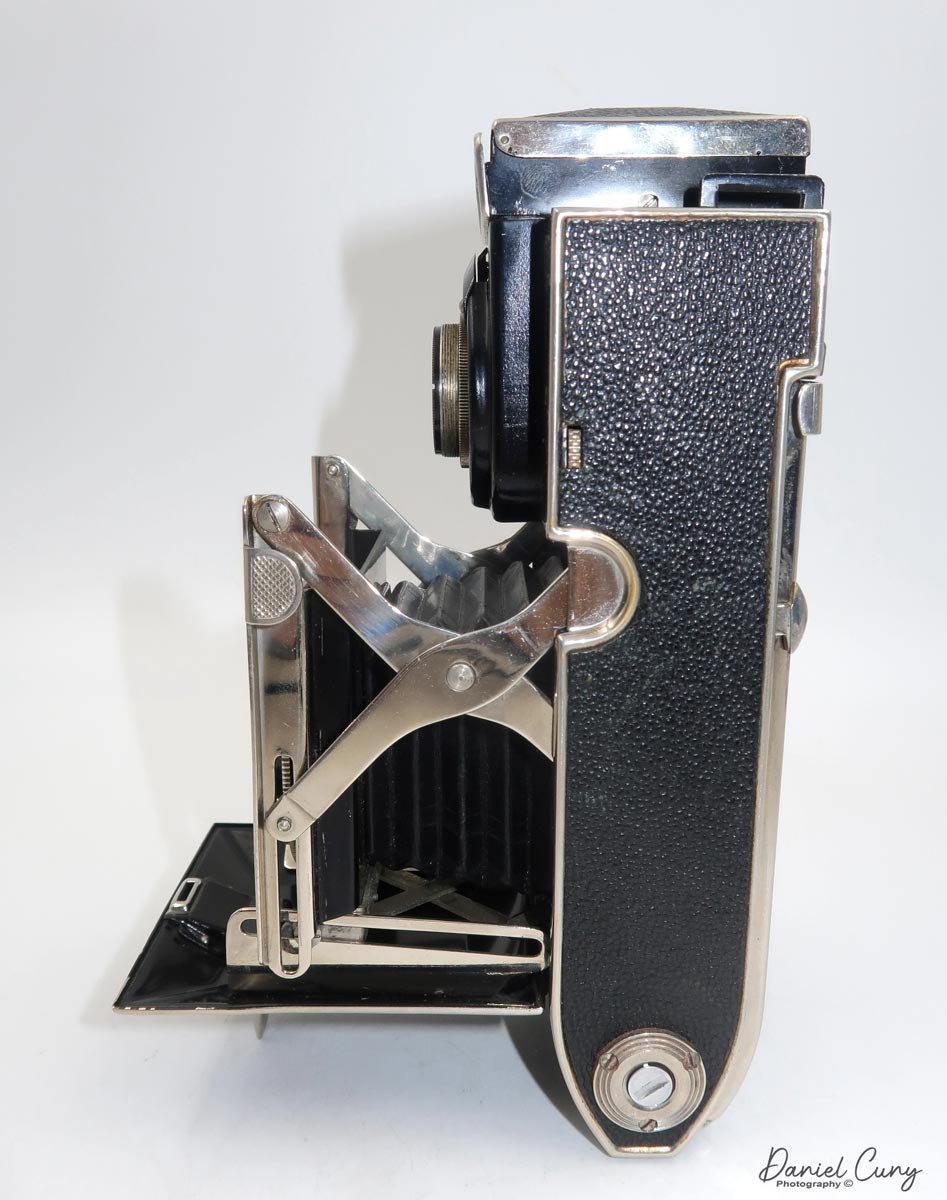
According to the case, I own an Inoca Six Stereo Camera. The camera is a straightforward bakelite stereo camera. All I see online is the Inoca Stereo camera. None of the cameras I see online have or show the fitted leather case; honestly, I have only seen three examples of this camera. One is on Camera-Wiki, and this is the camera I own. The eBay seller isn’t available on eBay so that I couldn’t contact them for more information. The second example I've seen is a camera sold at auction by Auction-team.de, and Leitz Photographica Auction sold the third example of the camera. The camera sold for quite a bit on the Leitz site many years ago.

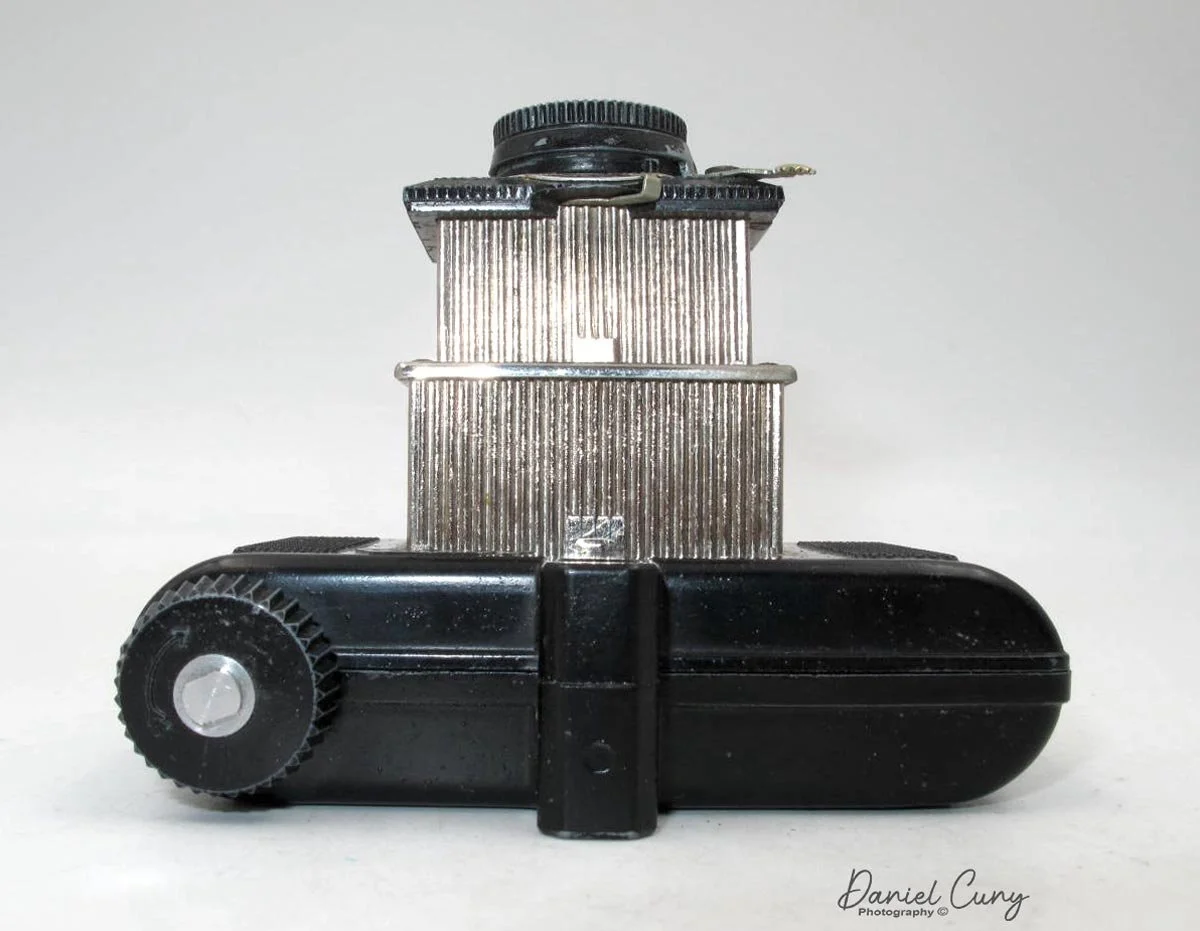
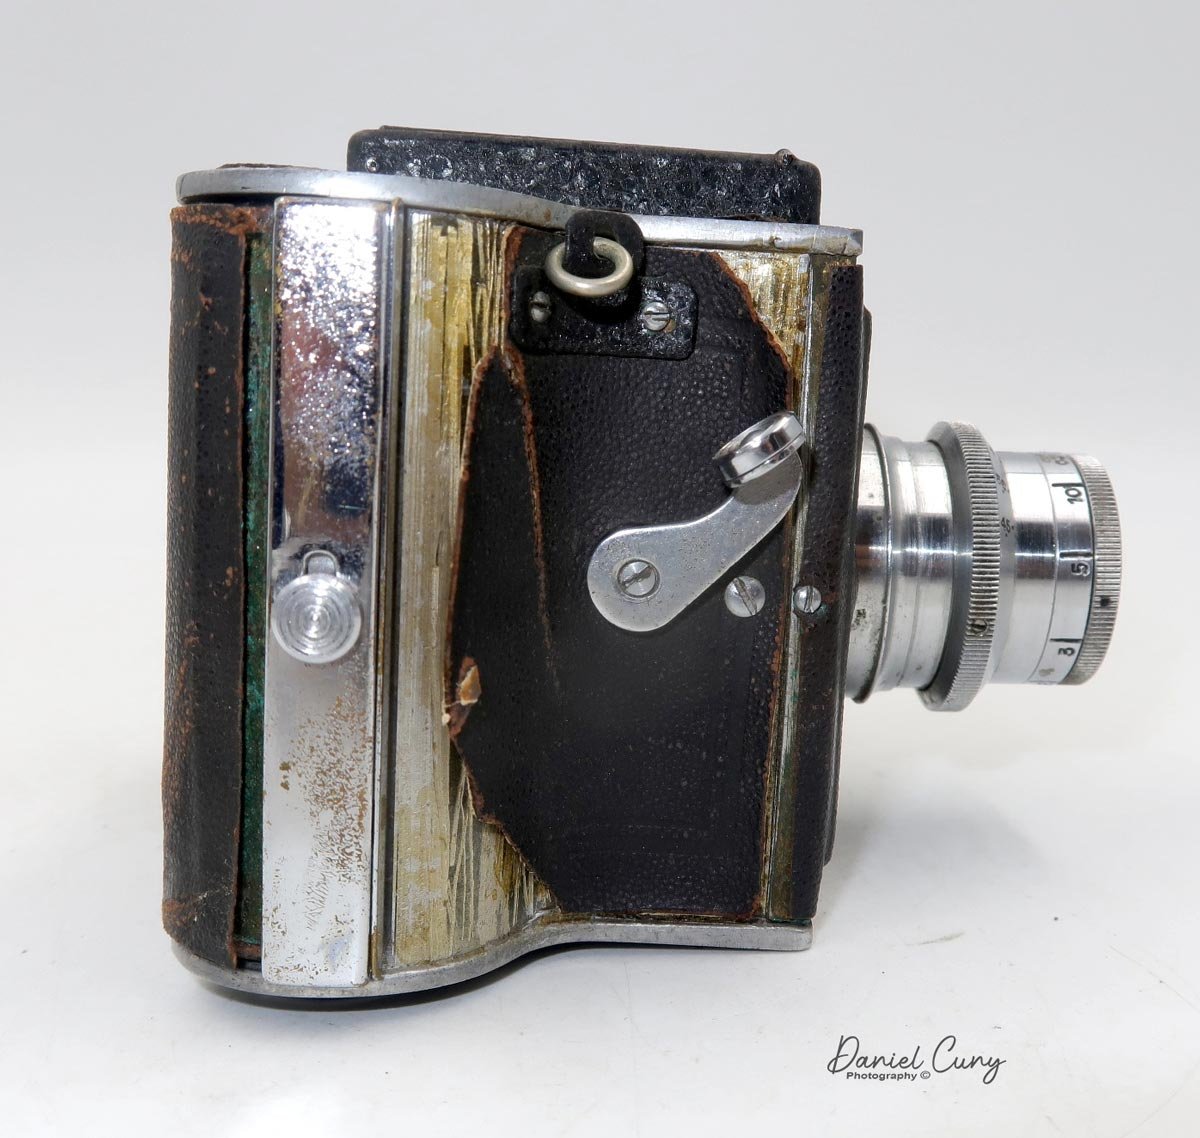
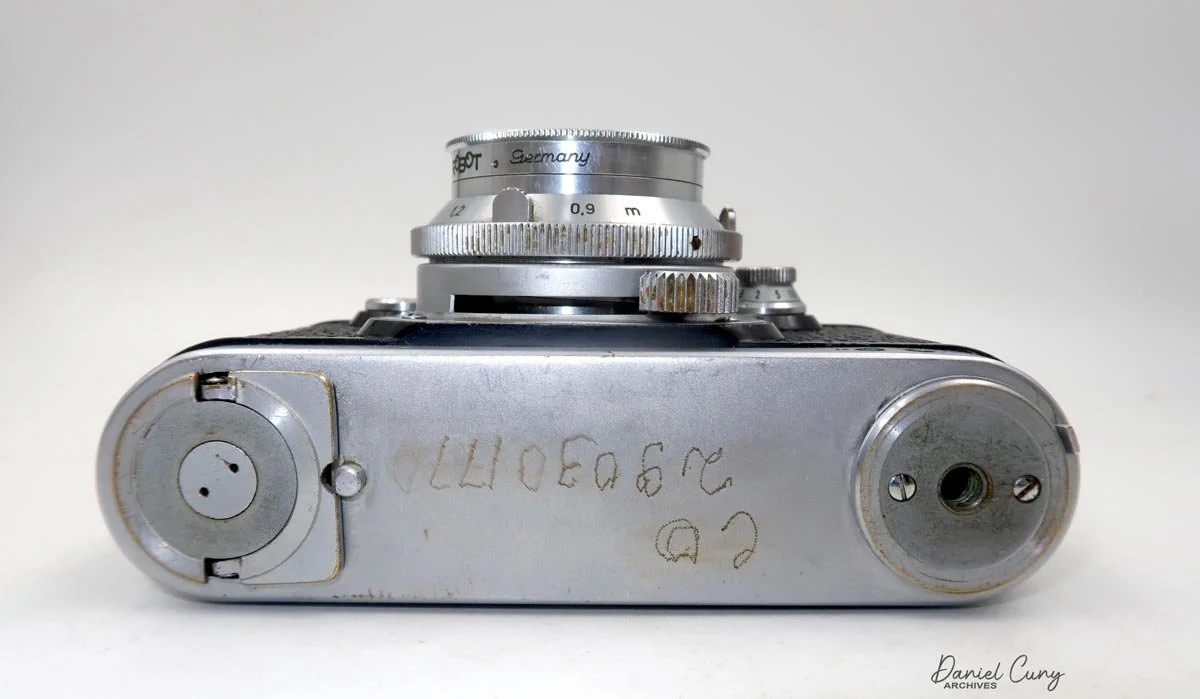
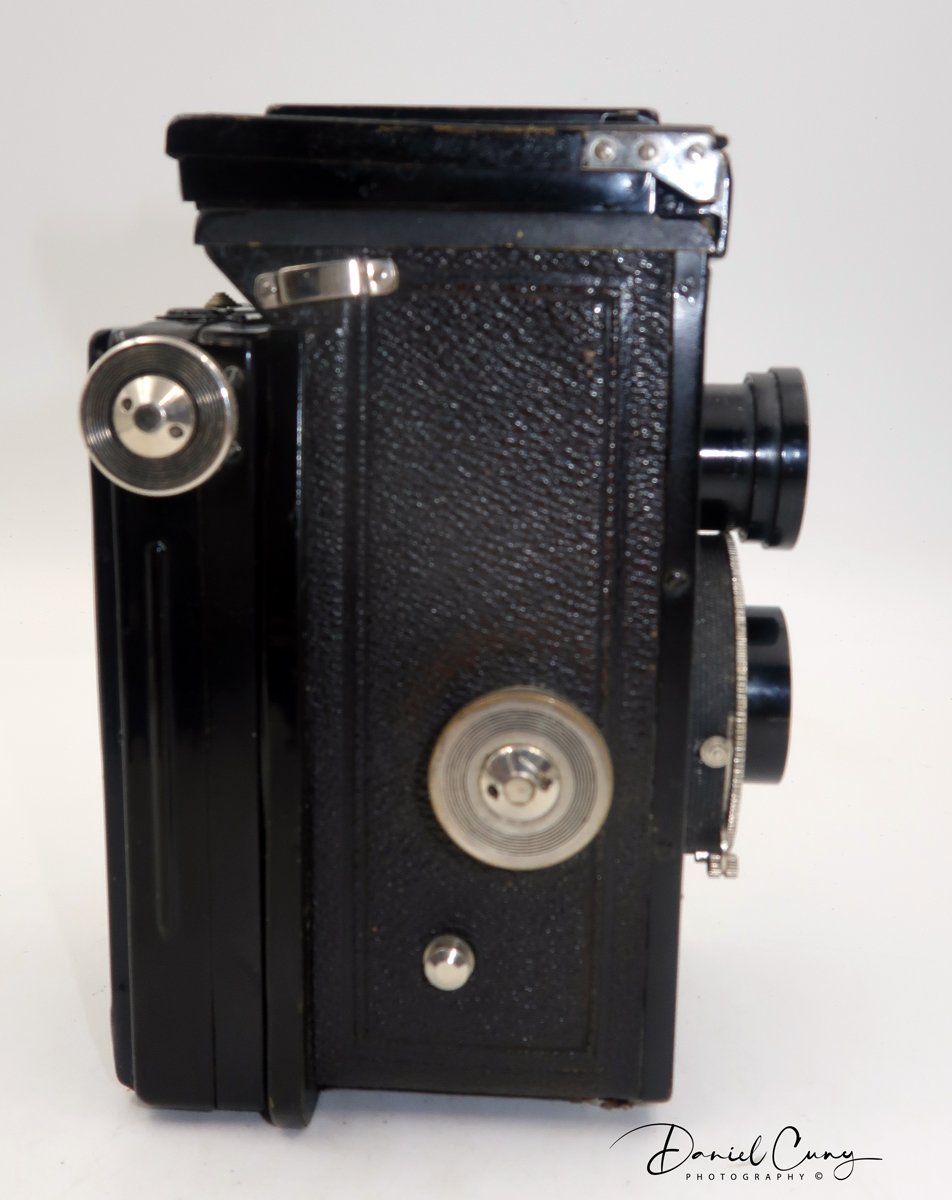
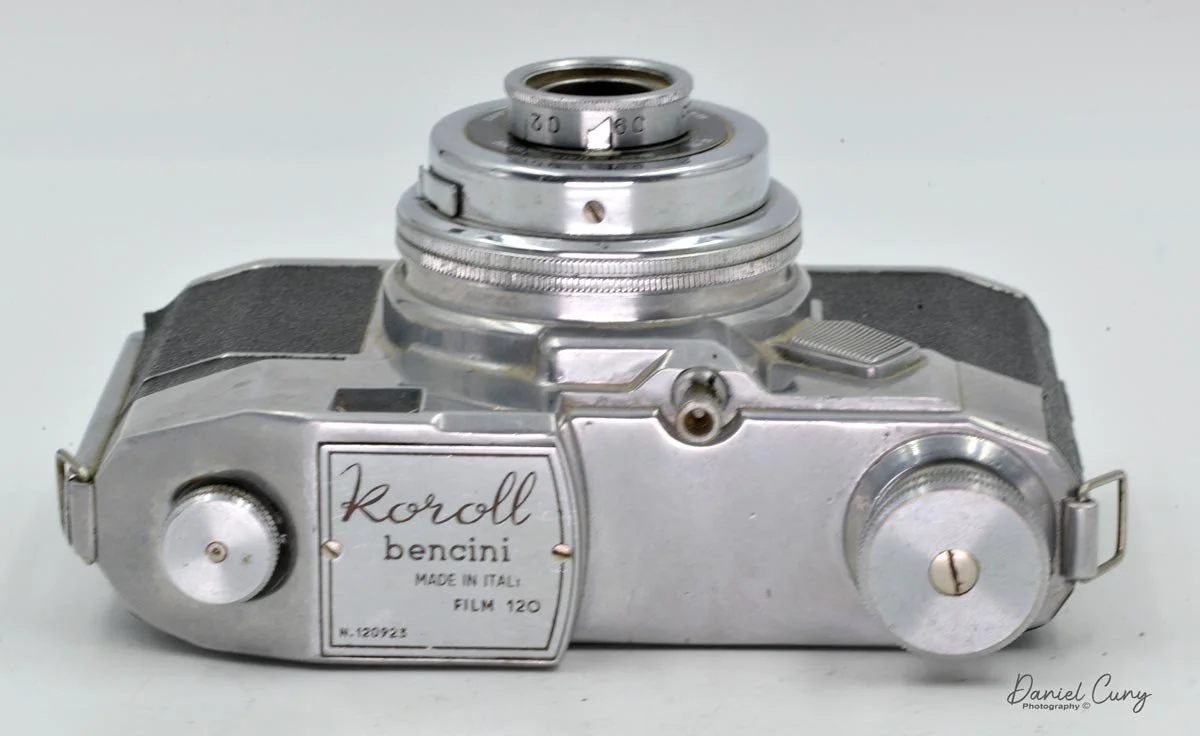
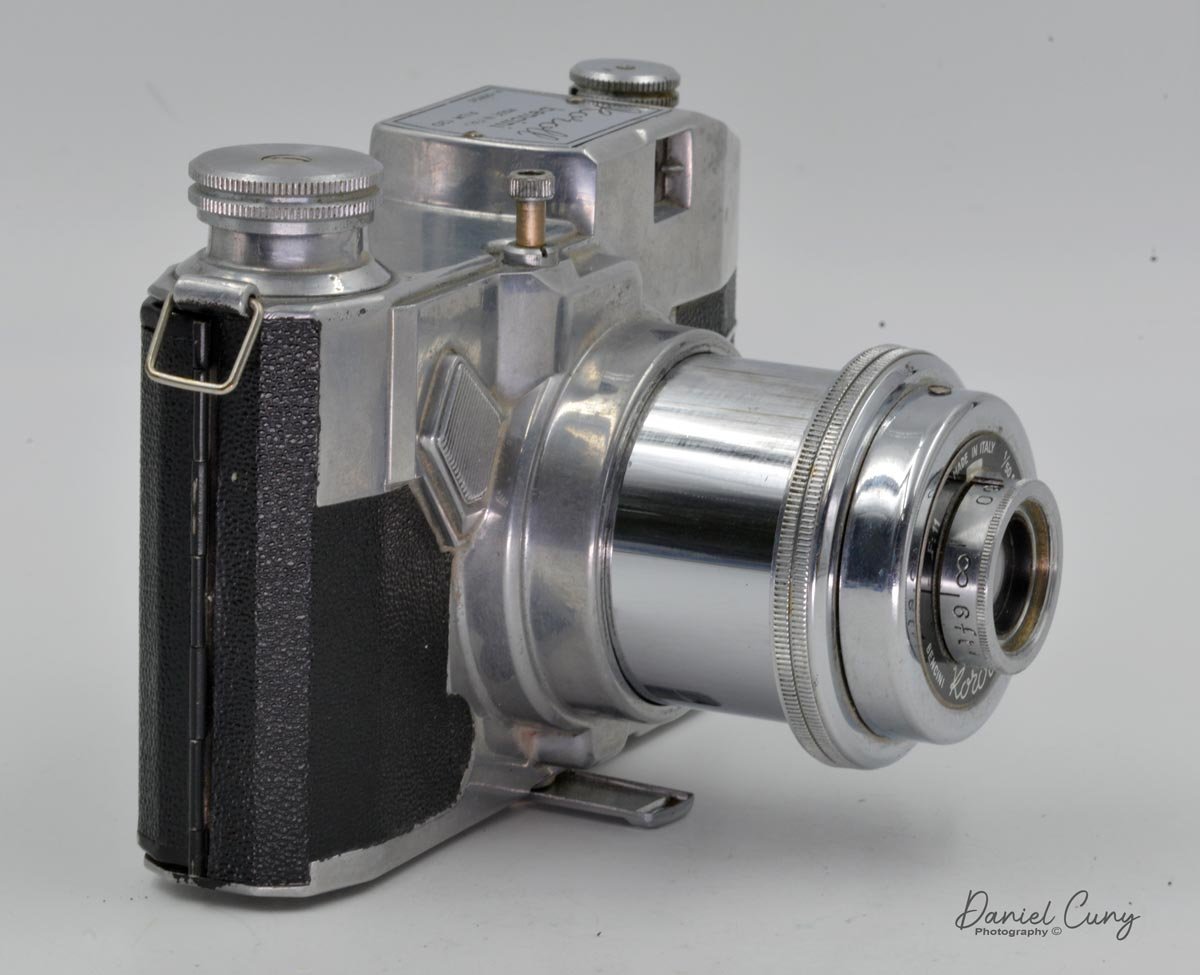
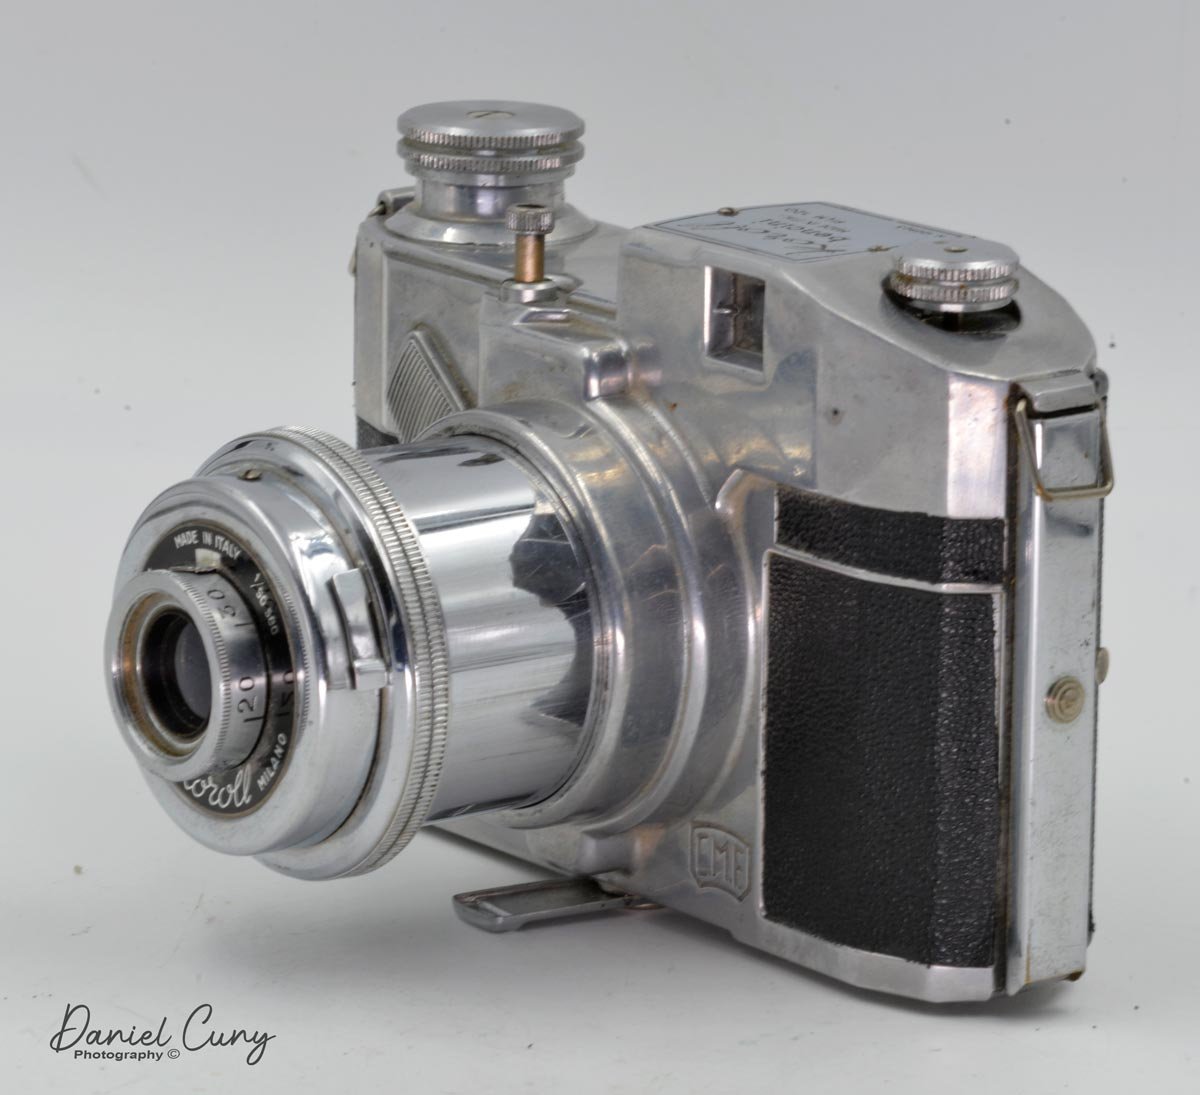
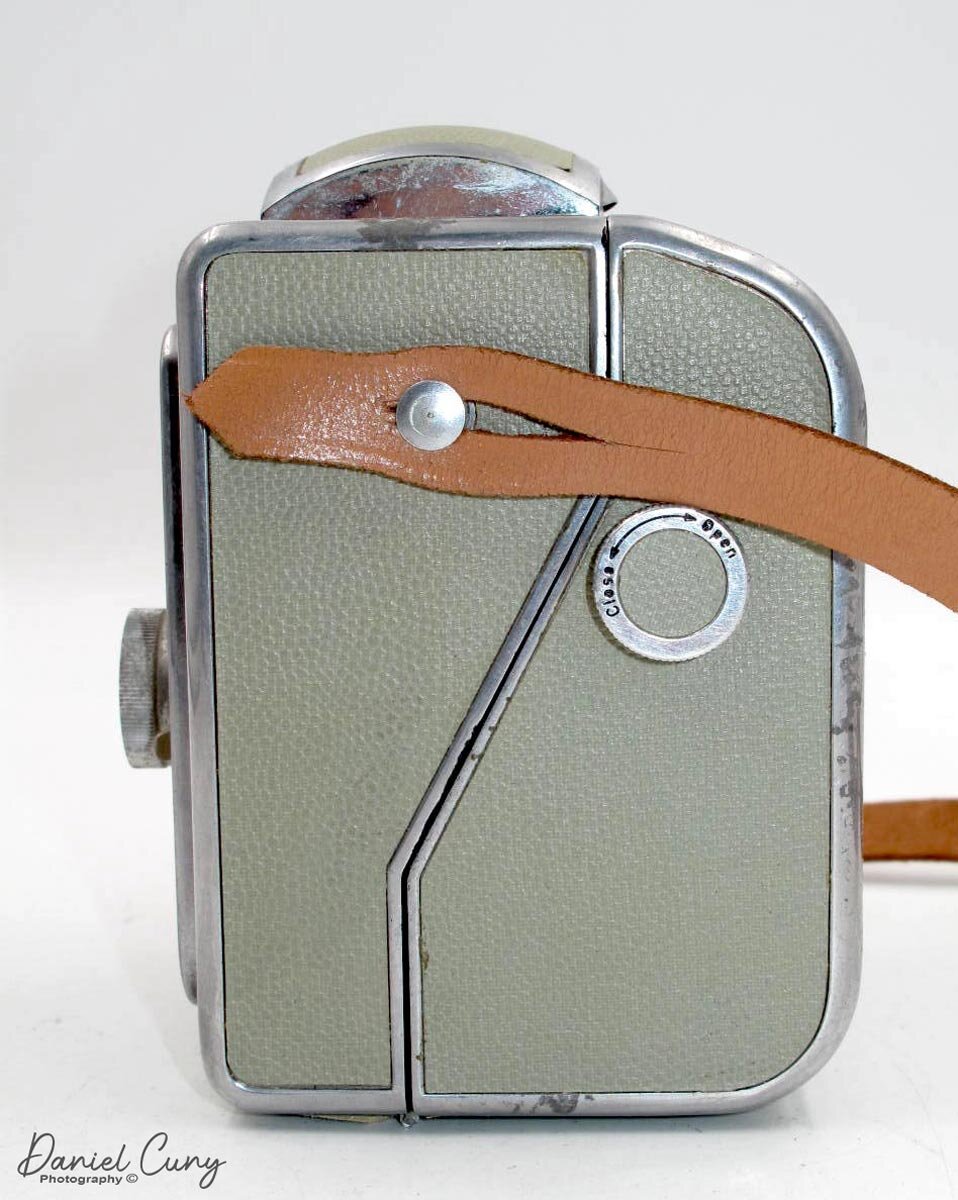
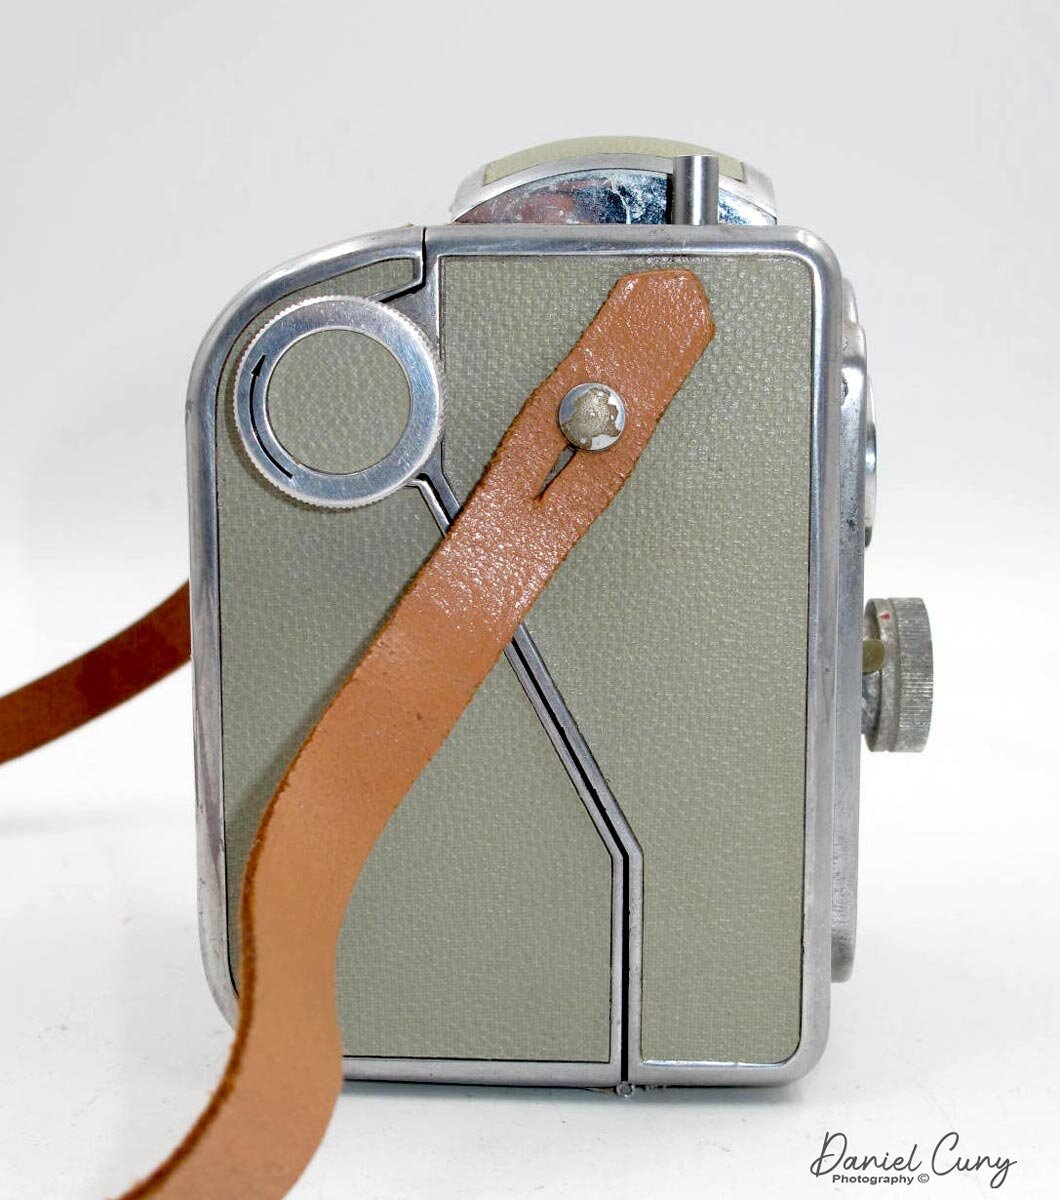
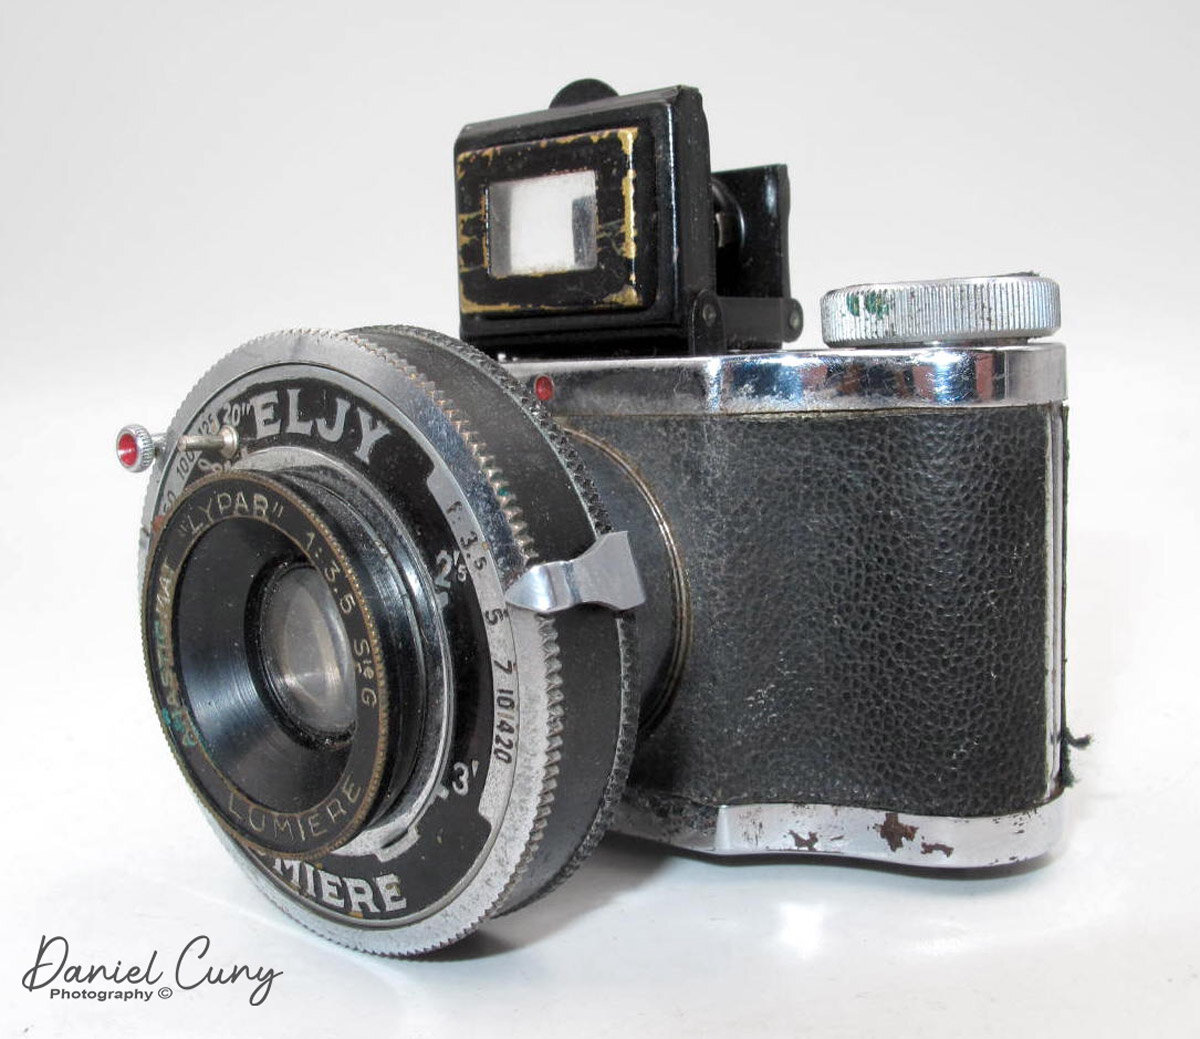
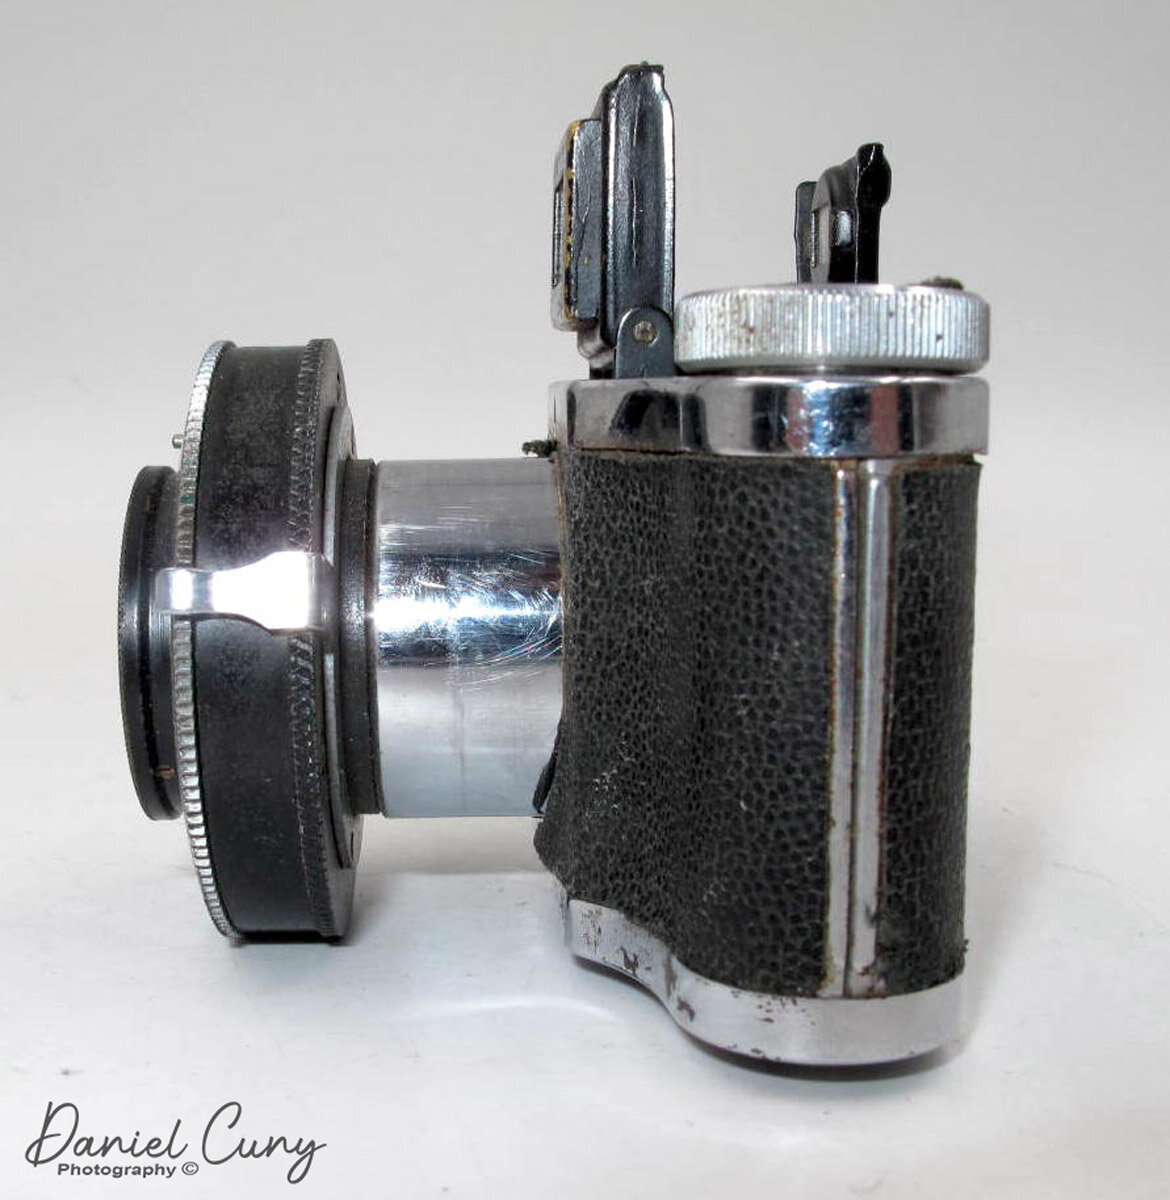
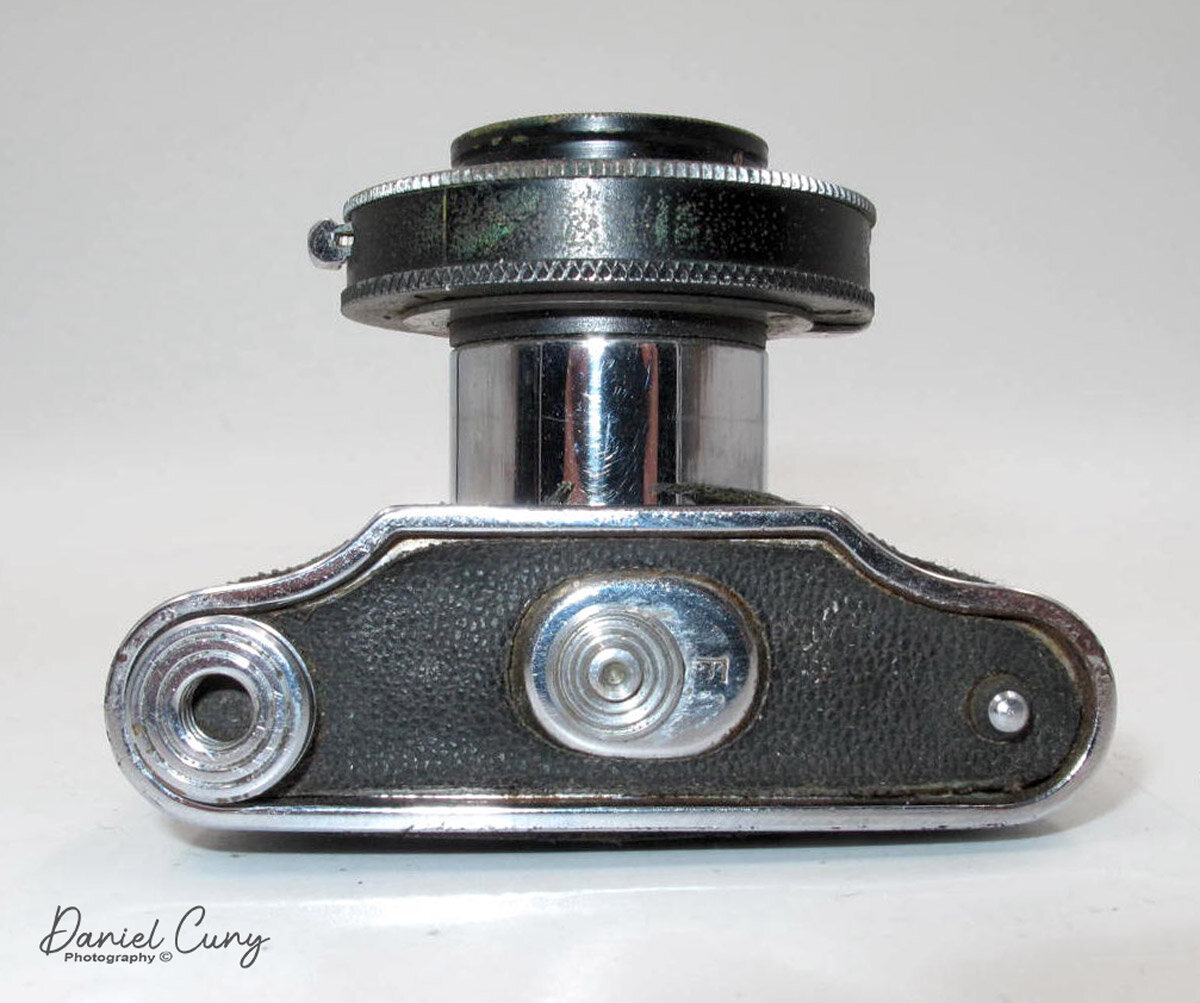
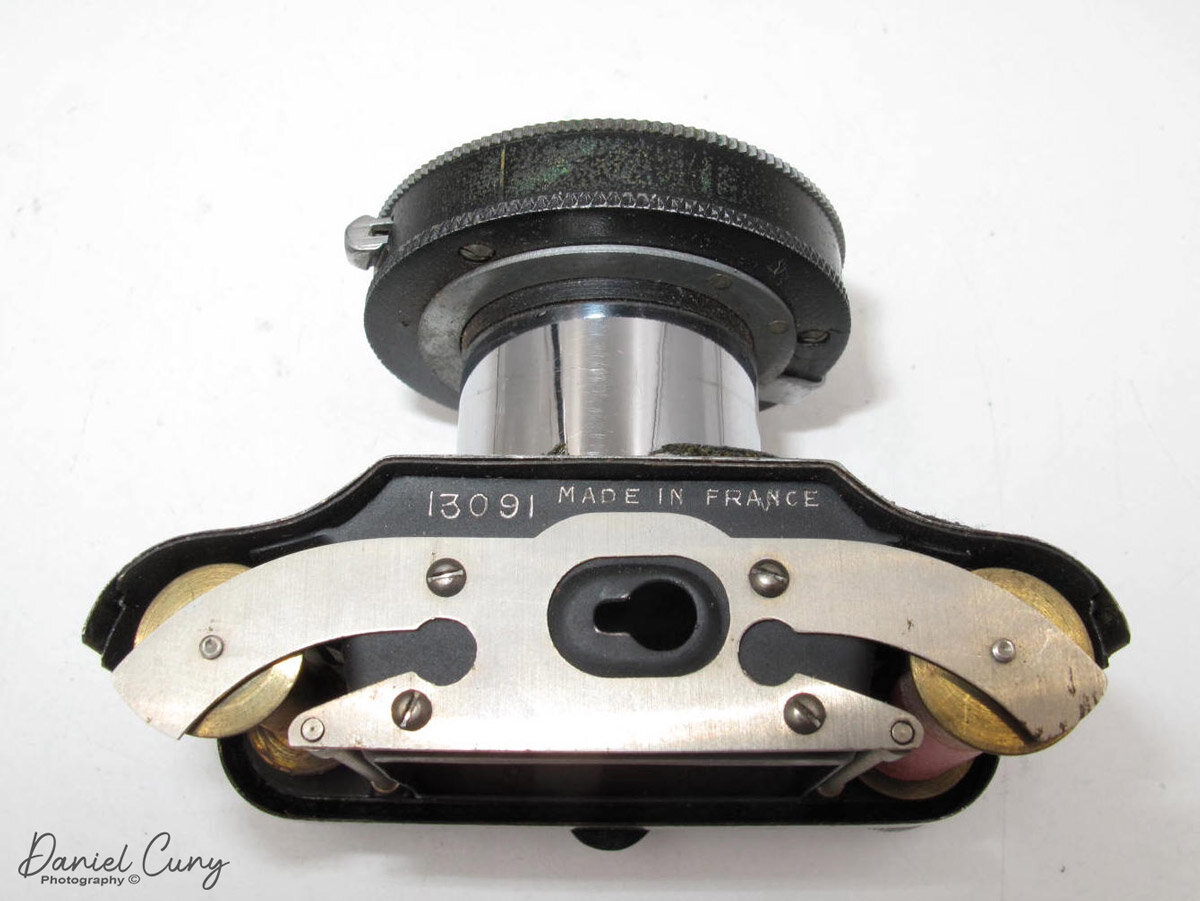
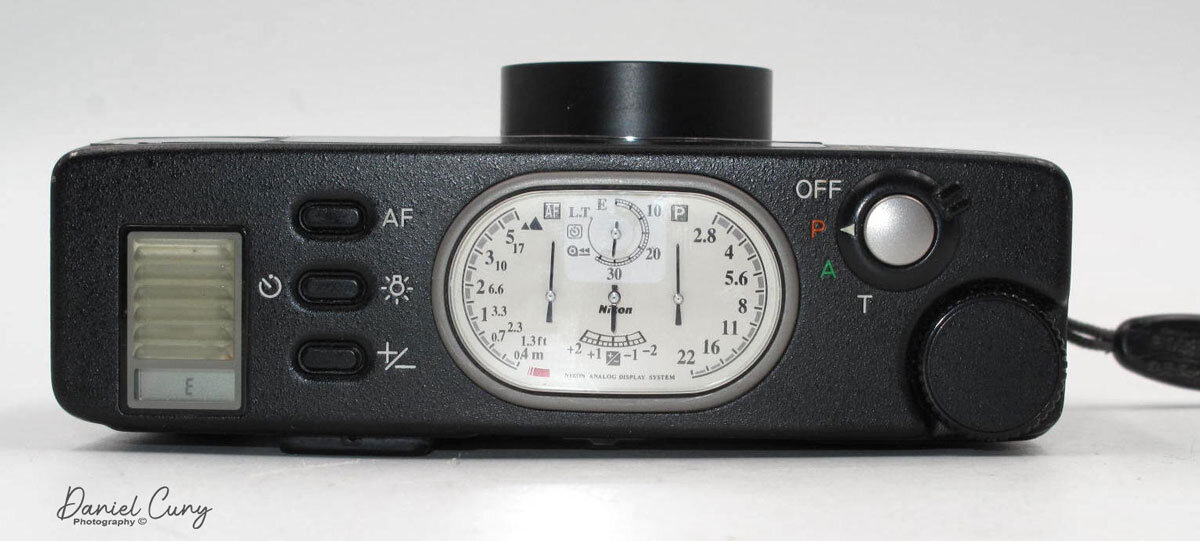
My camera measures 4.5" wide by 3" tall by 2.25" deep and weighs 7.6 oz without the case, but the roll of film was in the camera. My camera has two chrome lens caps attached to the lenses. Looking on top of the camera, the winding knob is on the far left, and on my camera, the winding knob has three rings around the top of the knob. Looking at the camera from the Auction Team website, the winding knob is flat and looks to have leatherette or paint on top. Right next to the winding knob is where "Morita" should be printed, but someone took a hot implement and erased "Morita," but below where it's erased, & Company can be seen. On the other side is "patent" written.

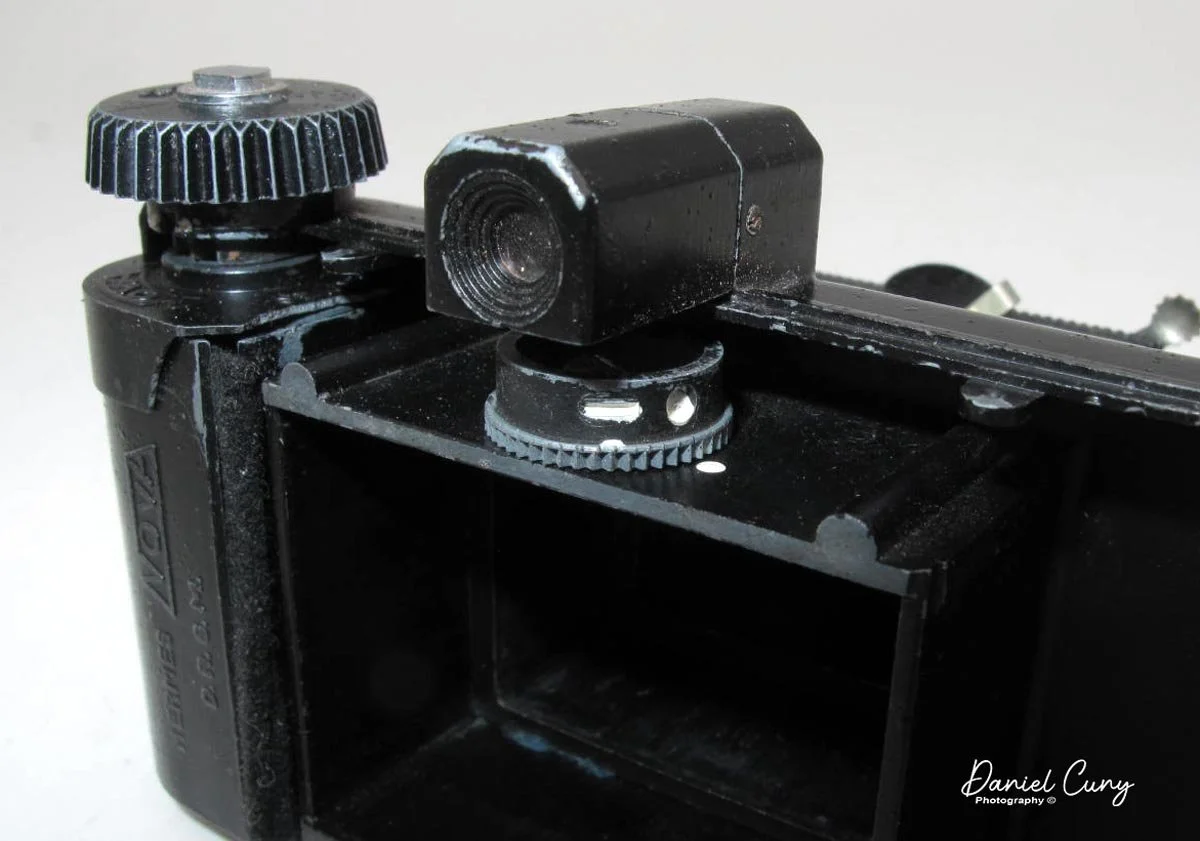
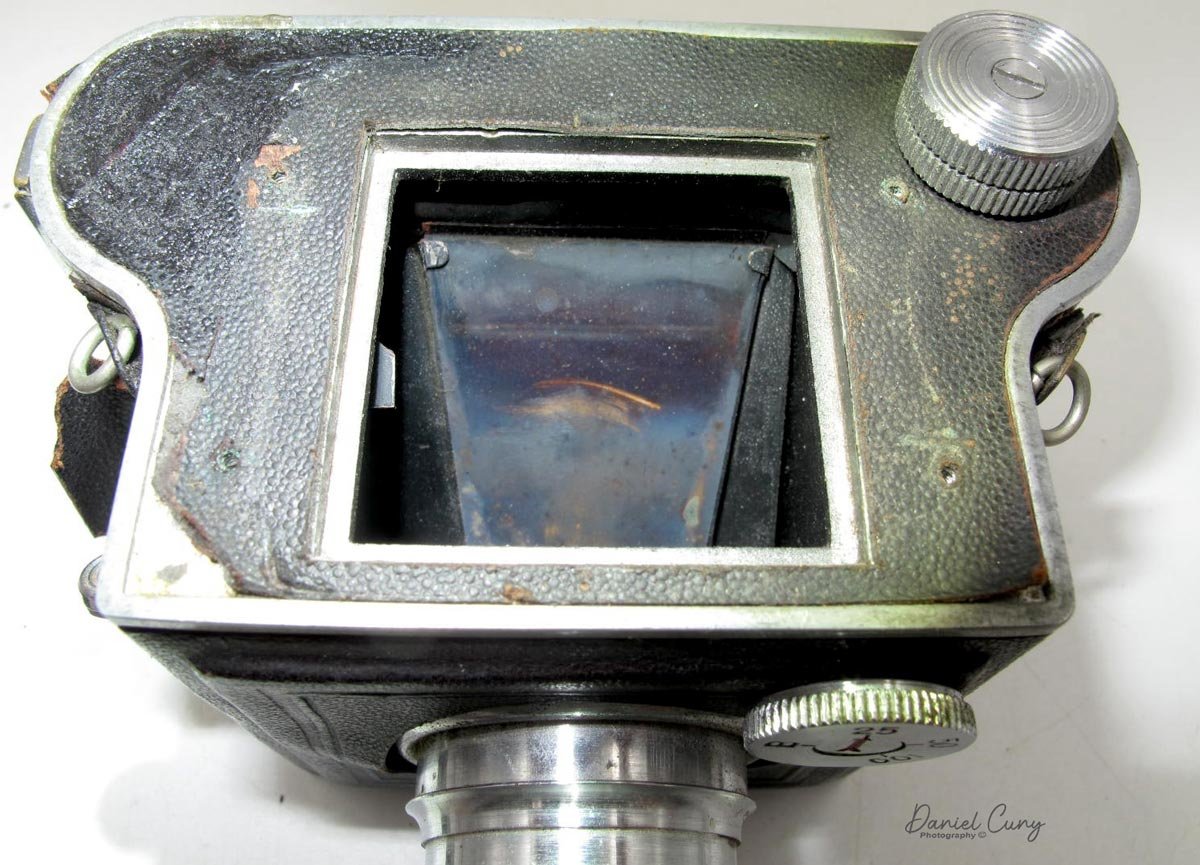
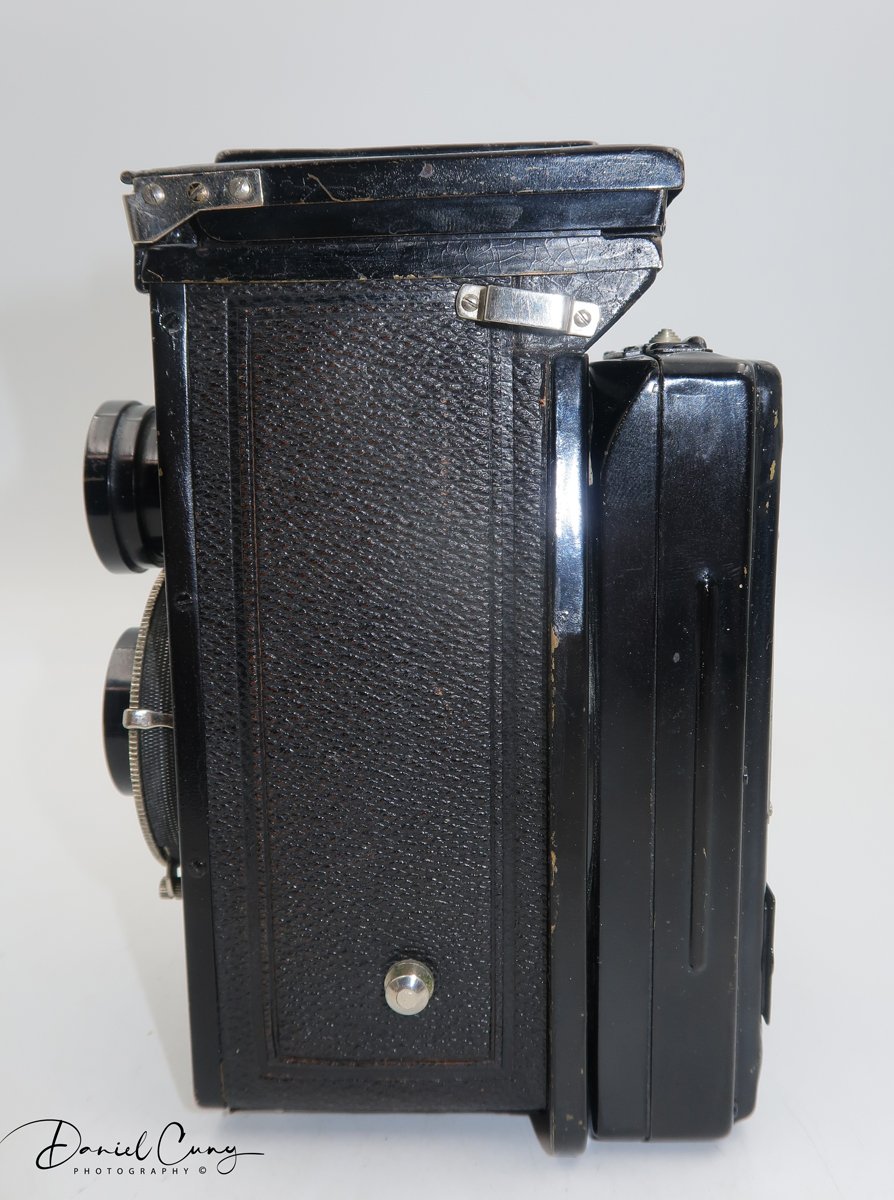
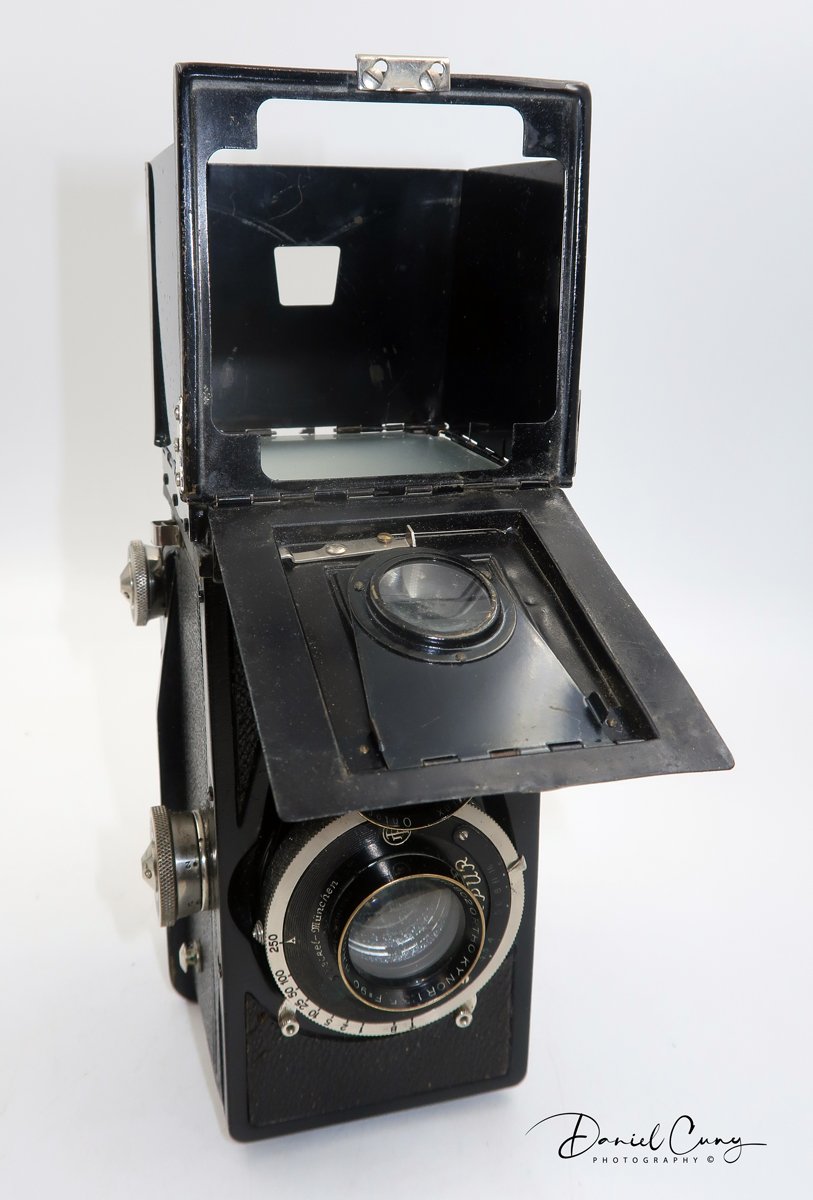
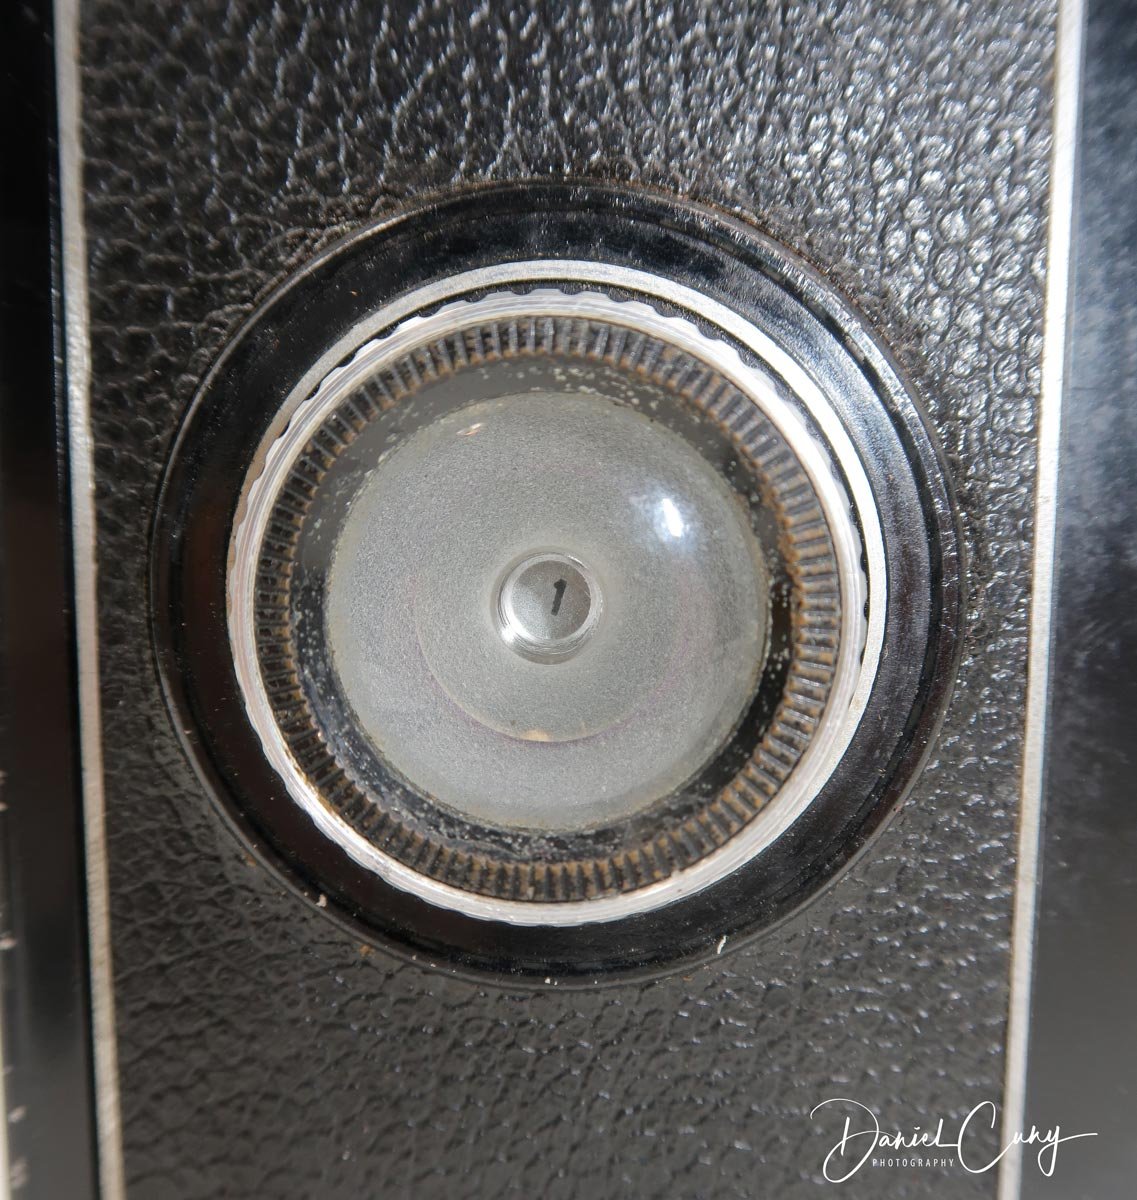
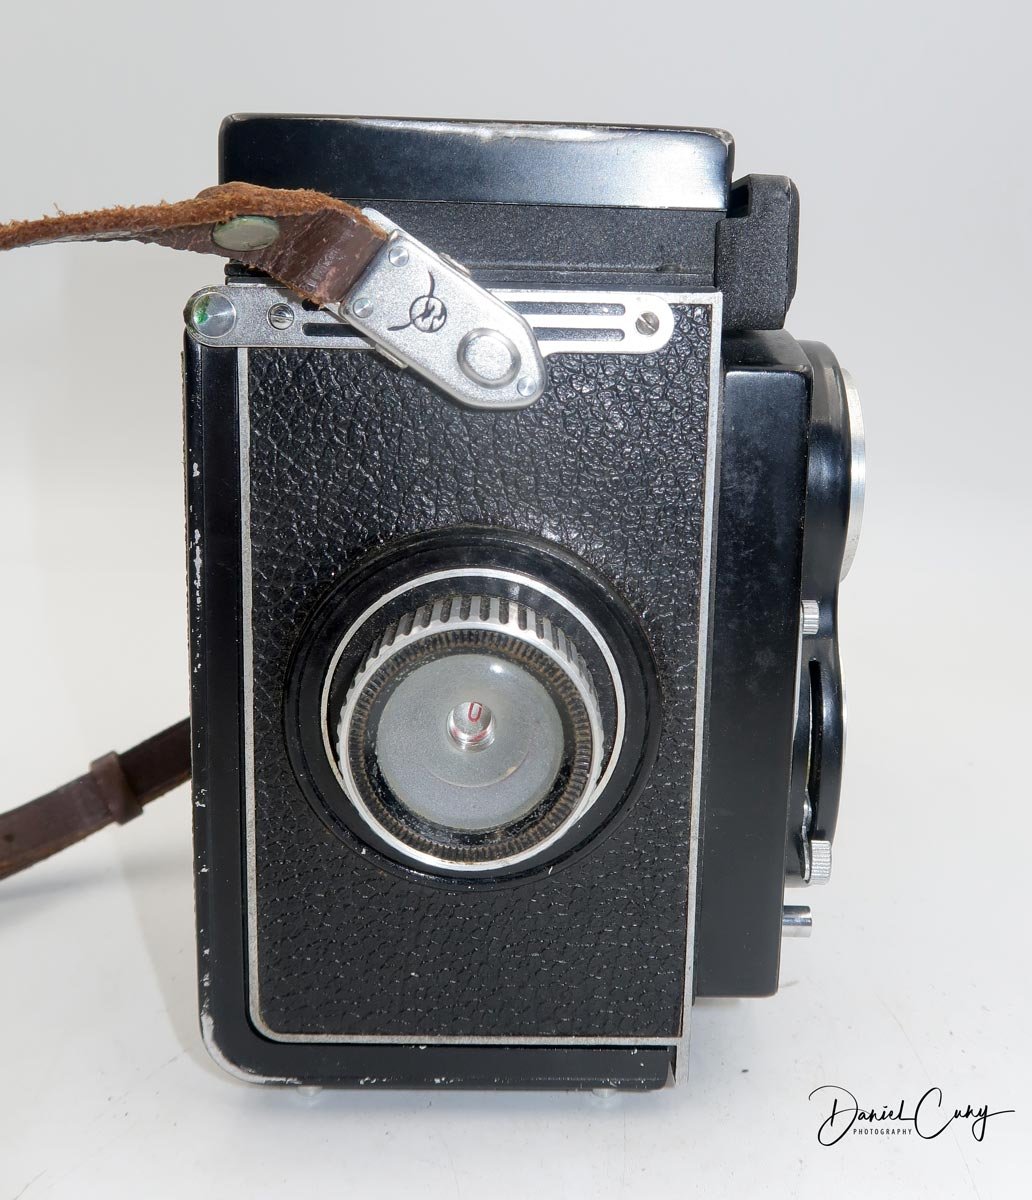
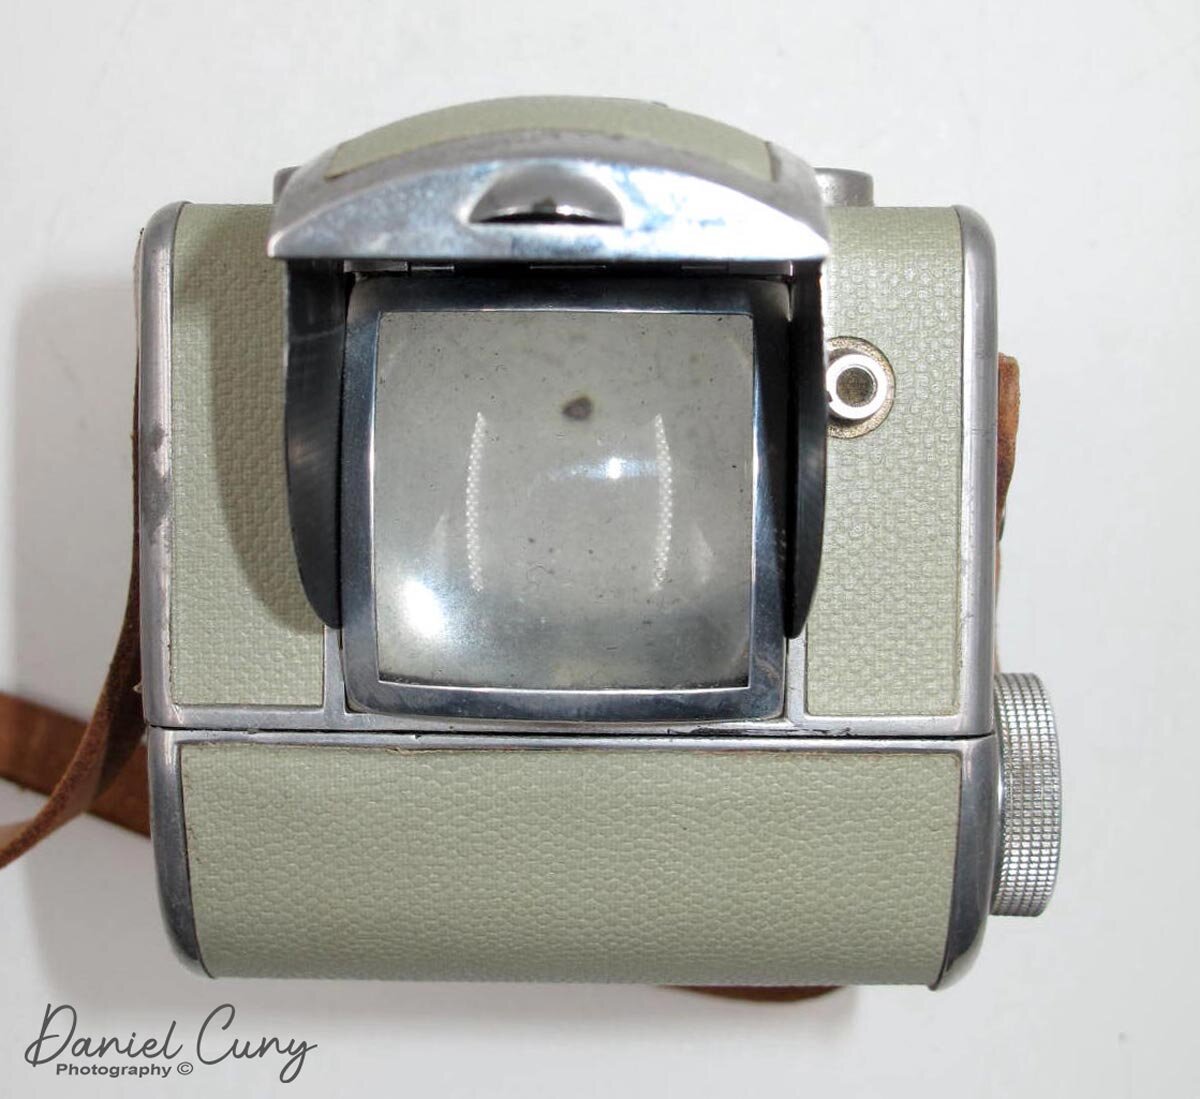
On either side of the "Inoca" script, on top of the viewfinder, are two small sockets, which I'm guessing were for a flash, but that's just my guess. The shutter release is next to one of the small sockets, and the film holder is on the far right side of the camera. On the film holder is a knurled ring with an indent in the center with black paint.

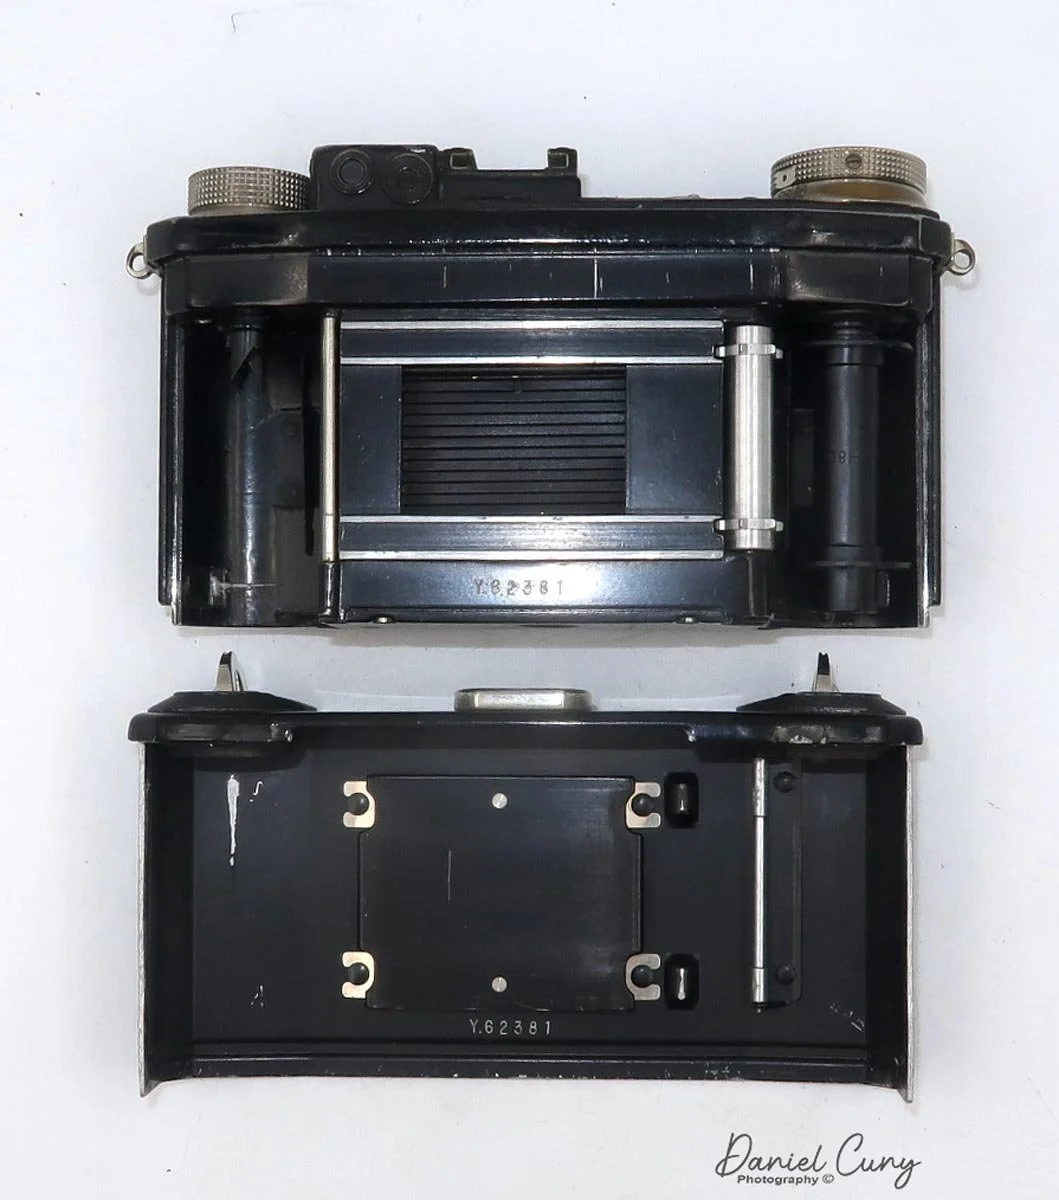
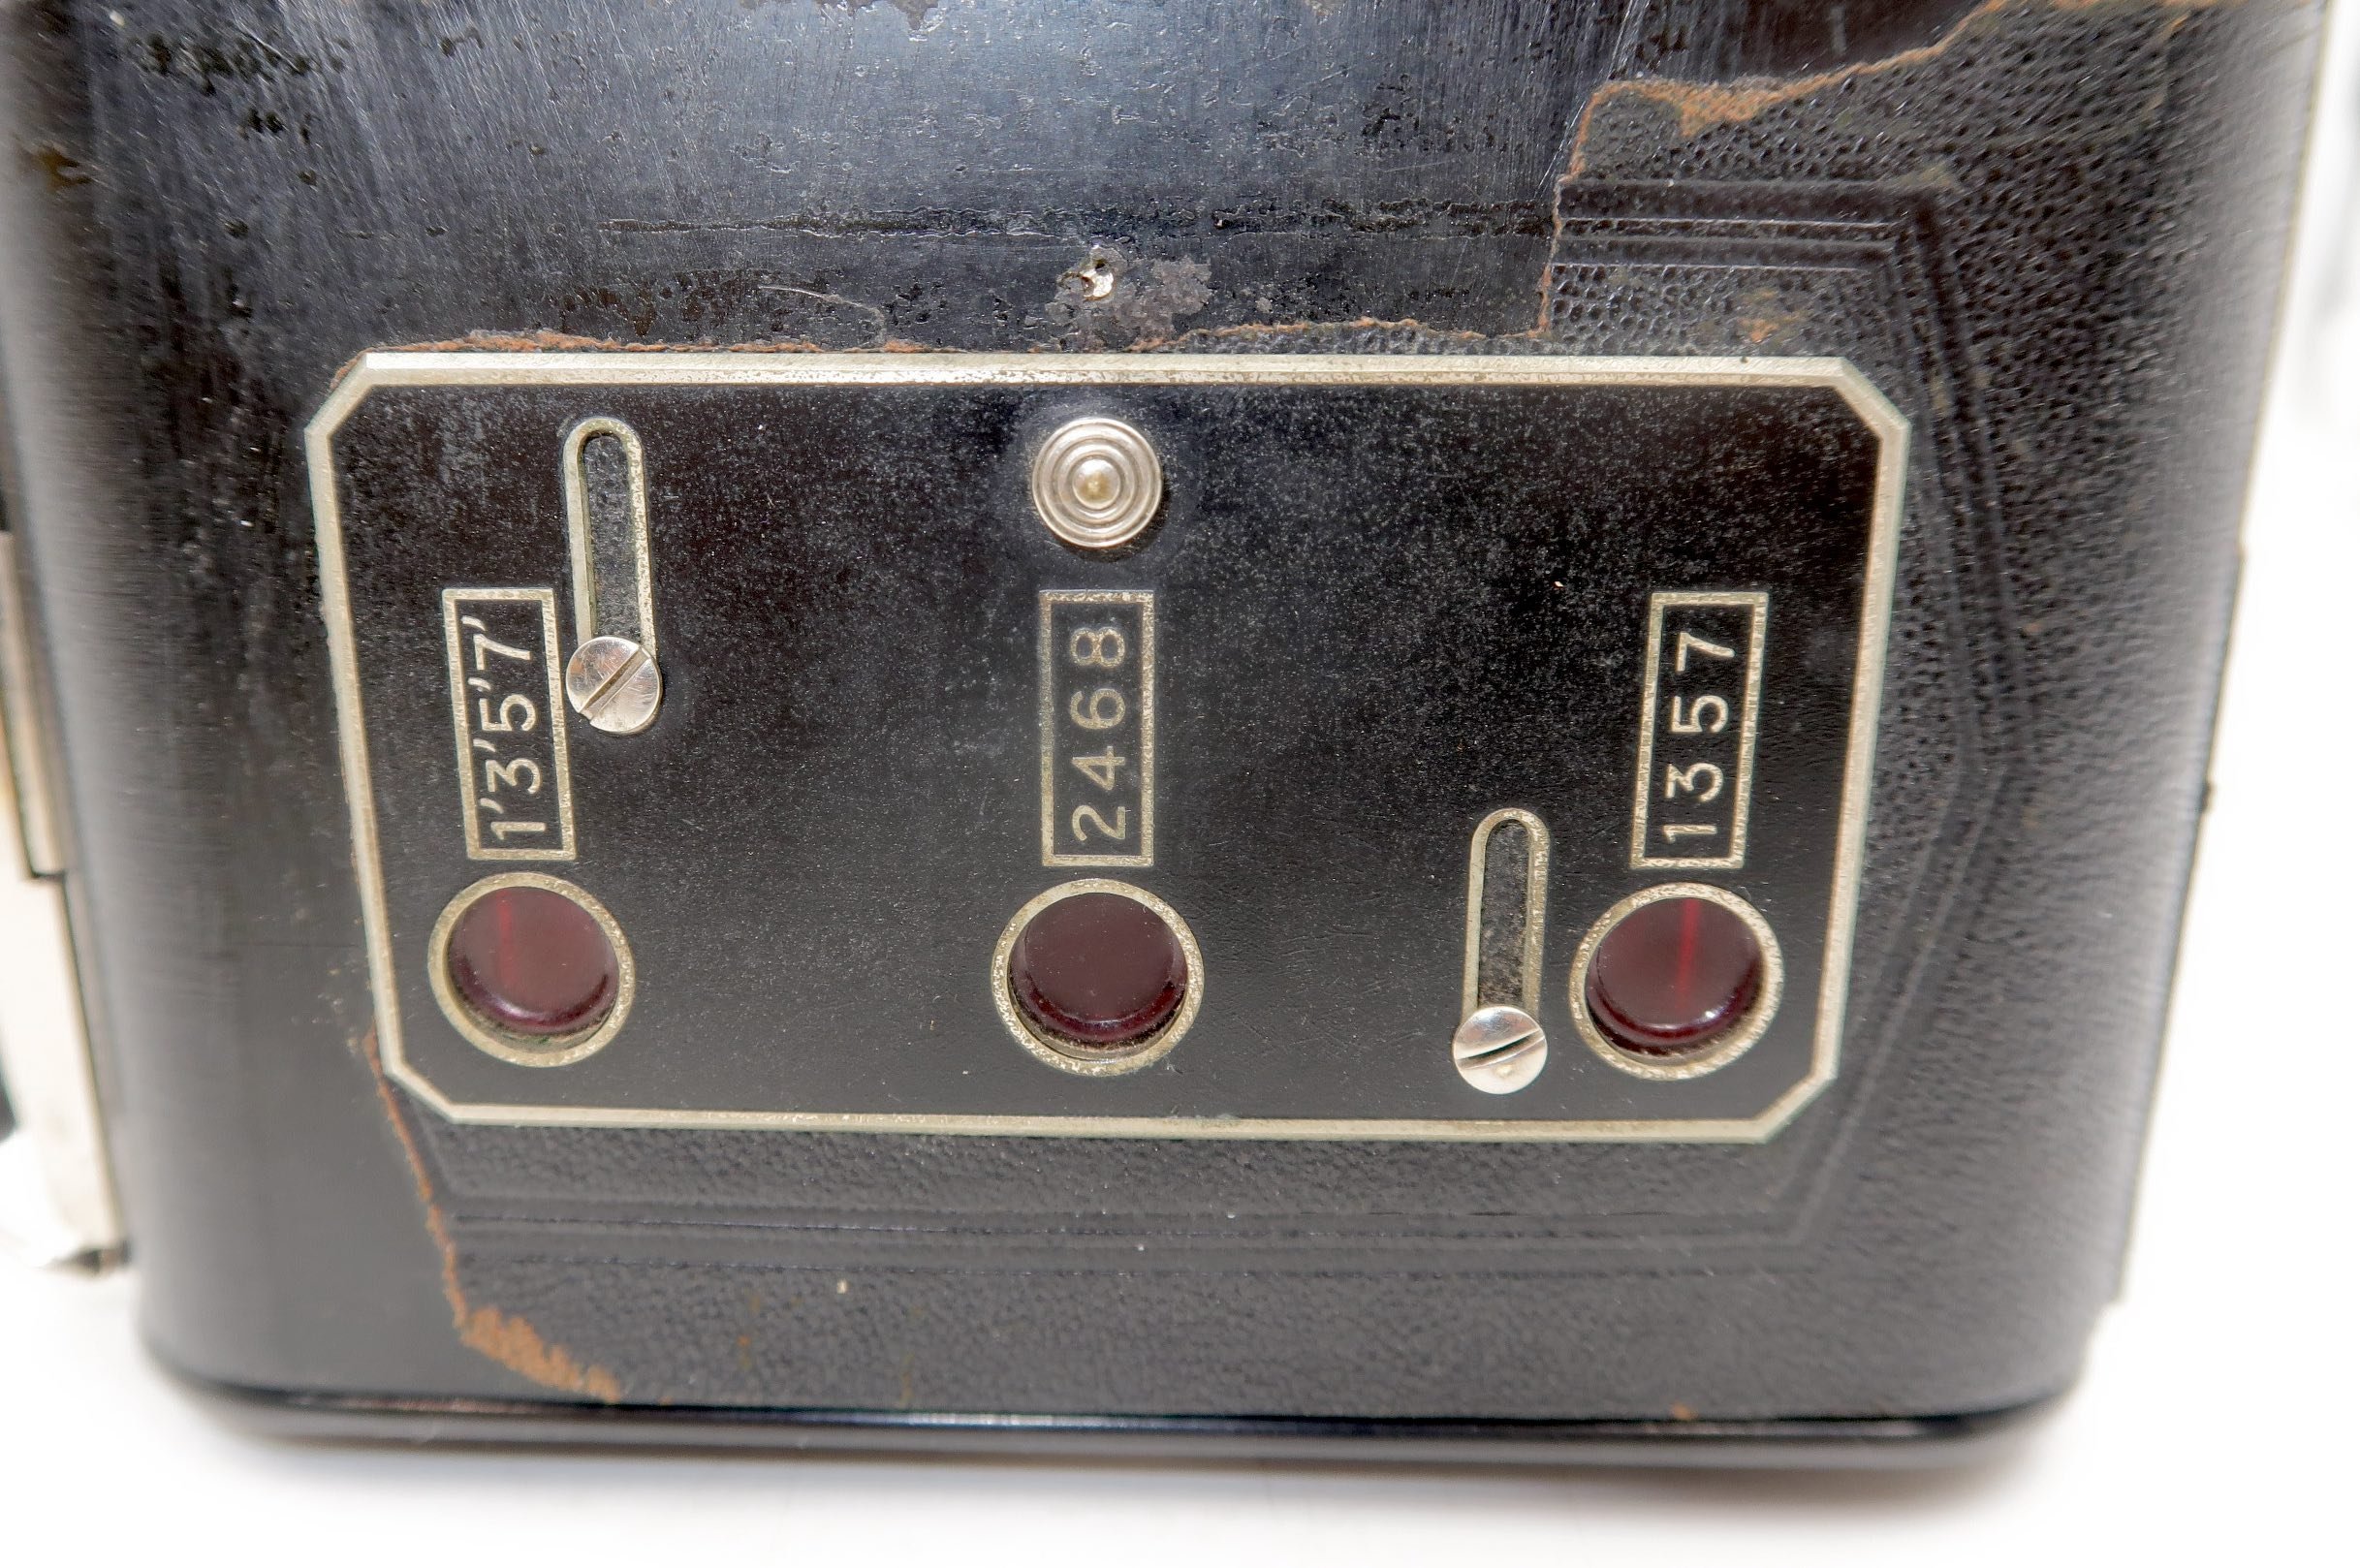
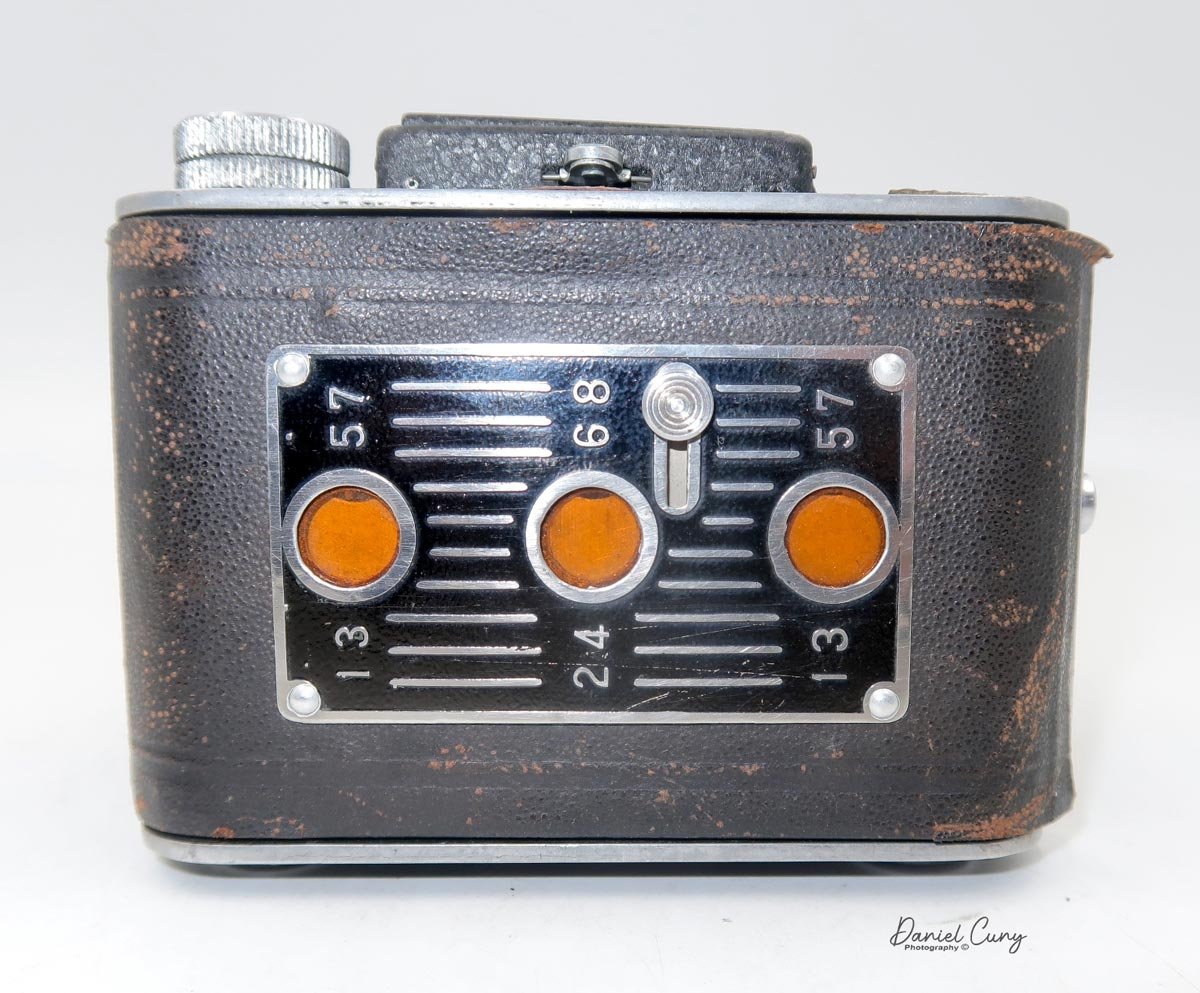
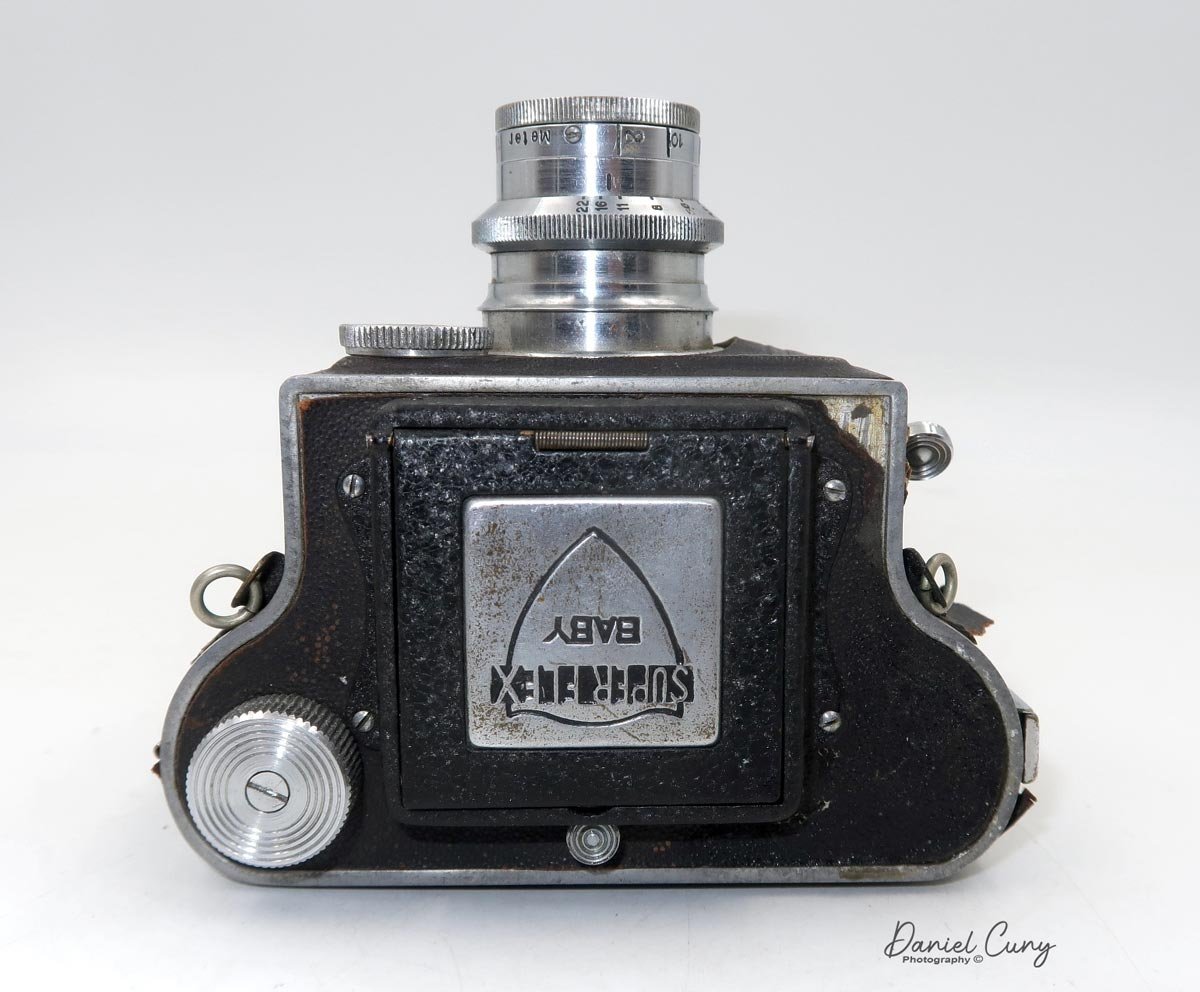
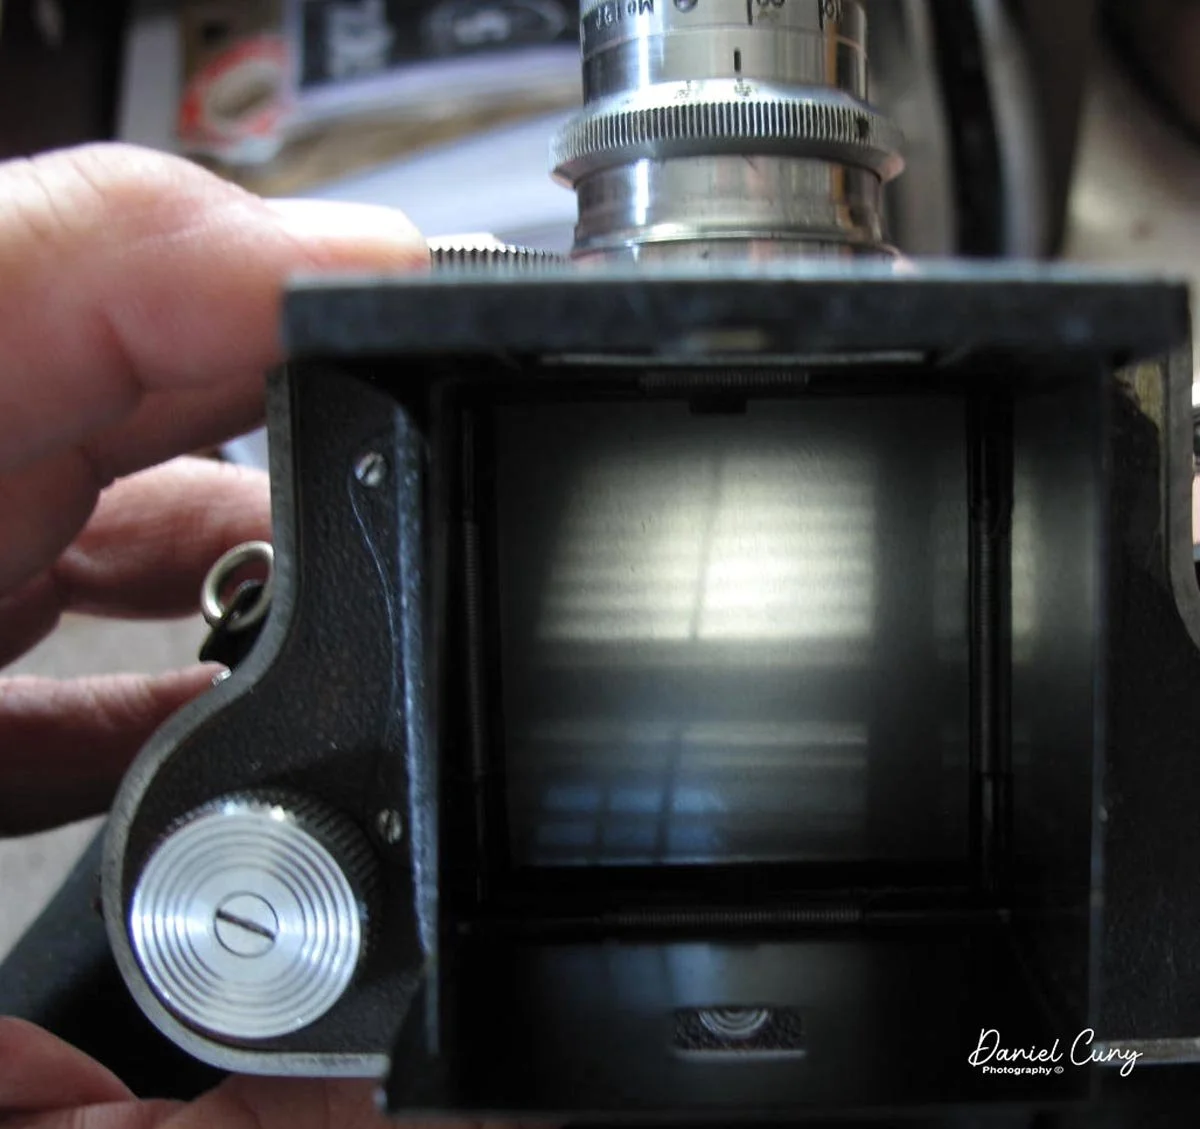
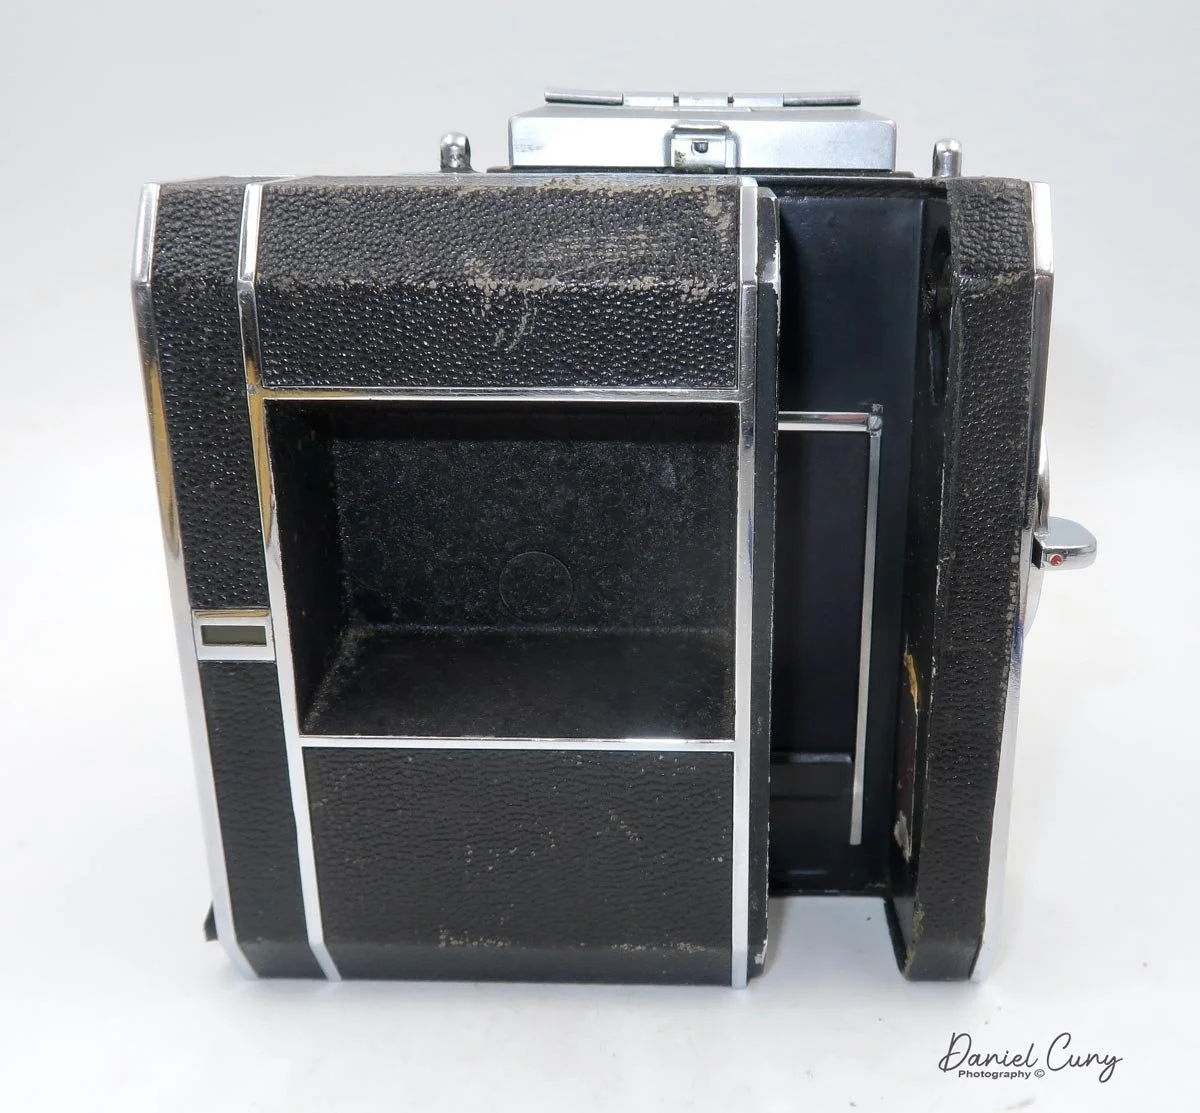
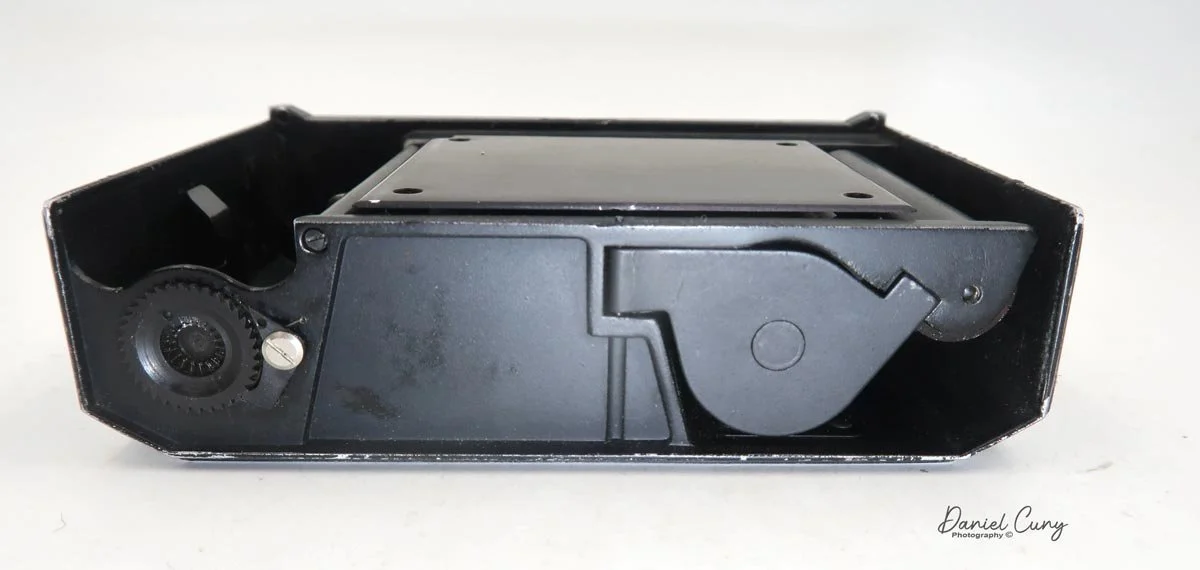
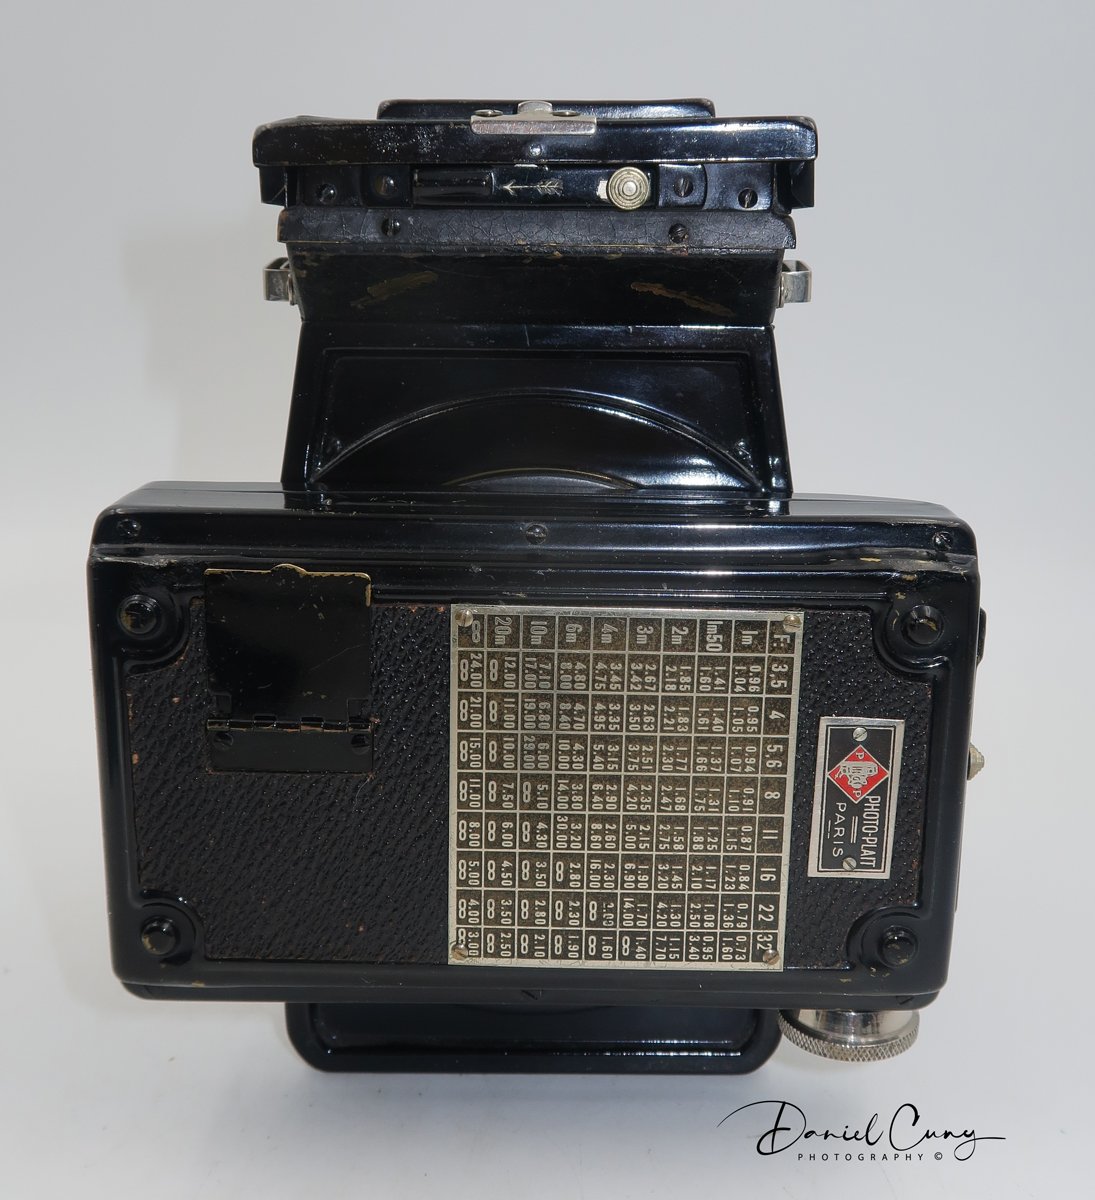
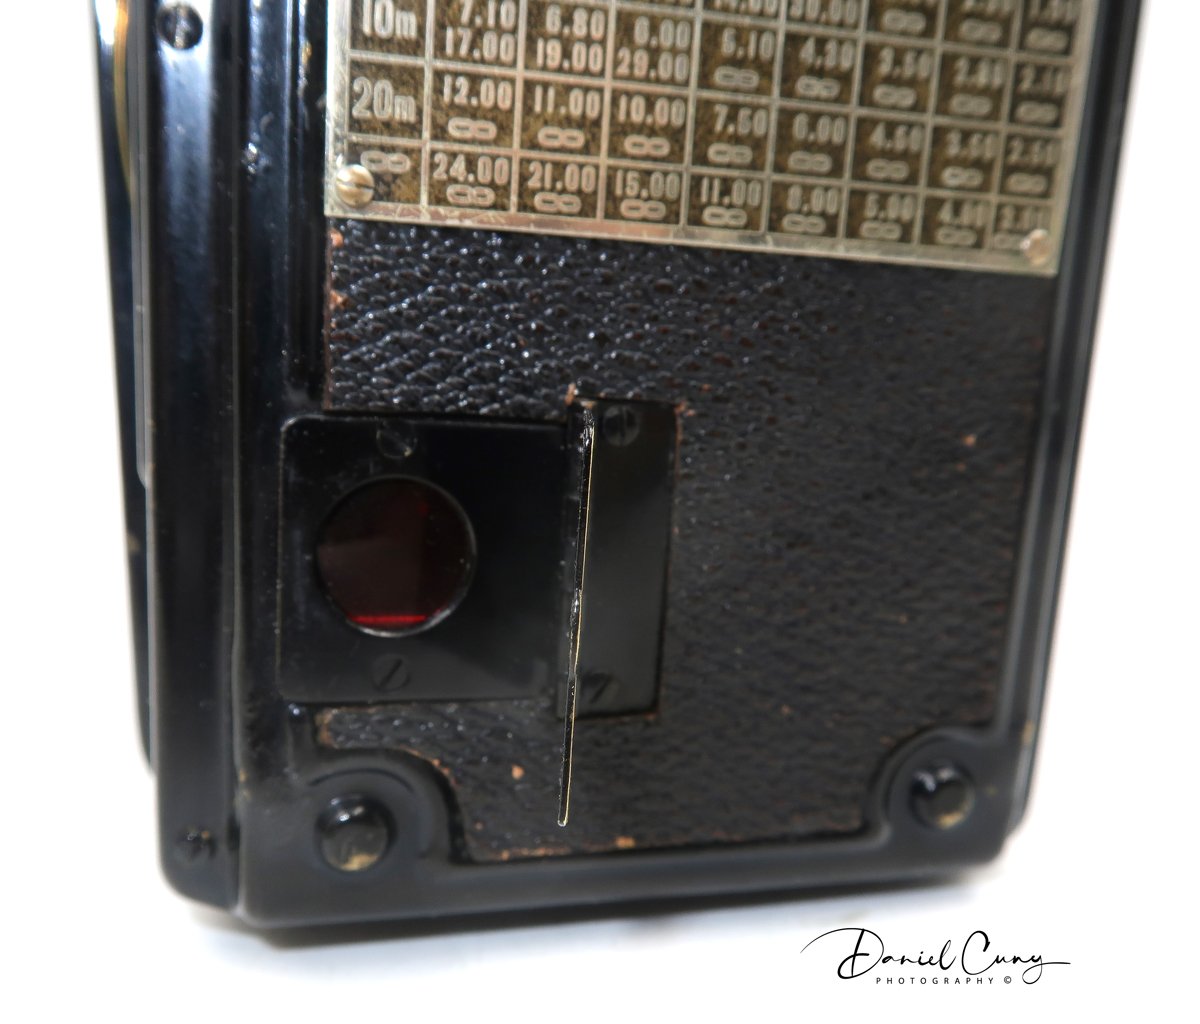
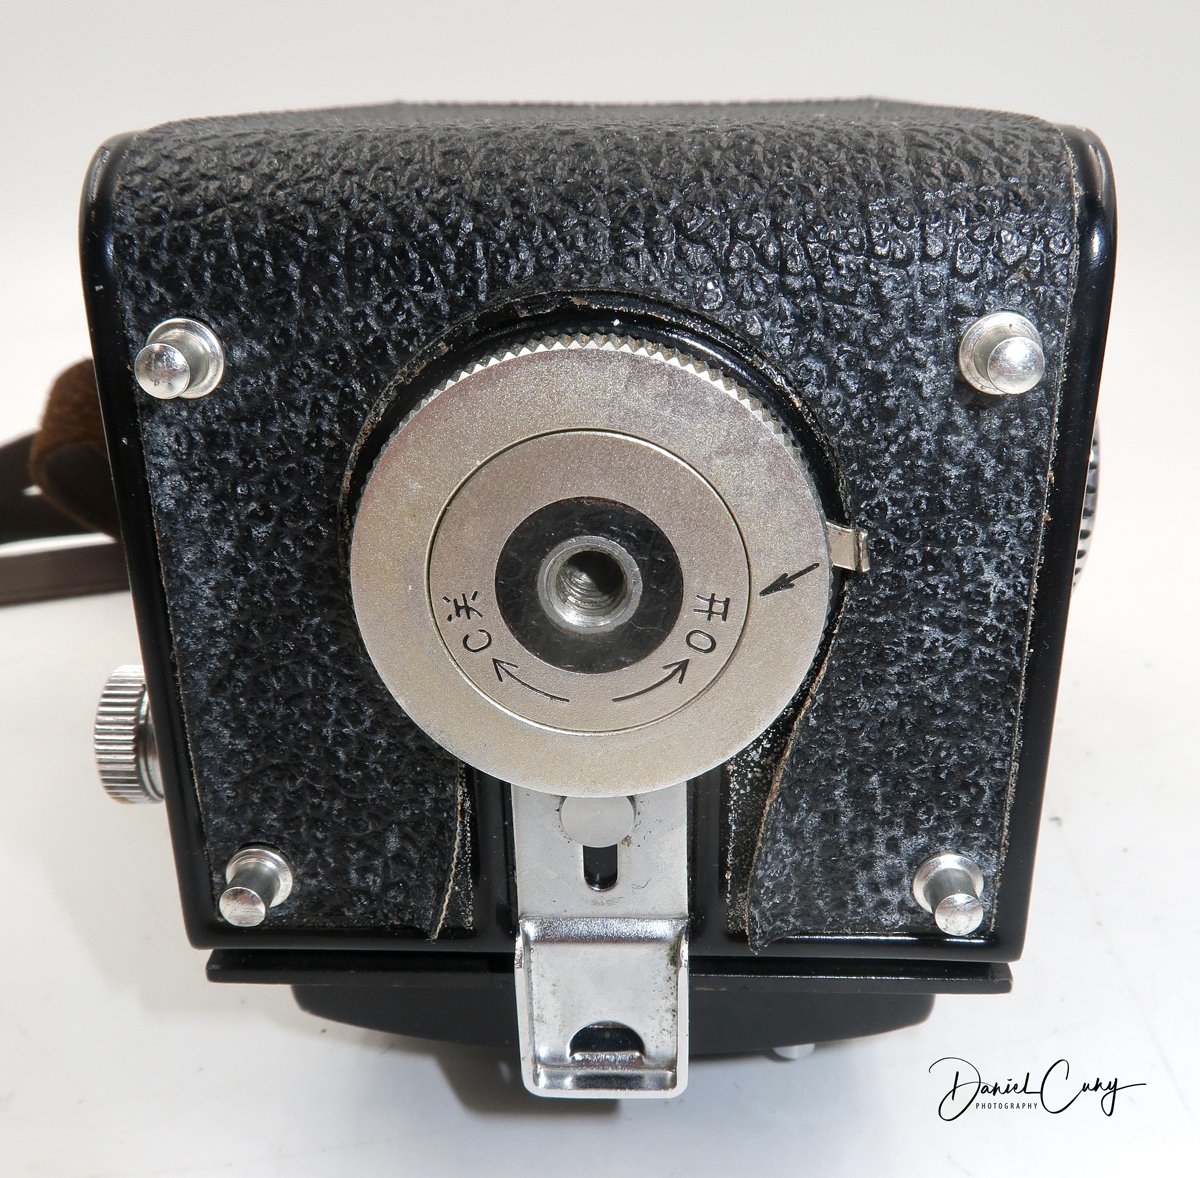
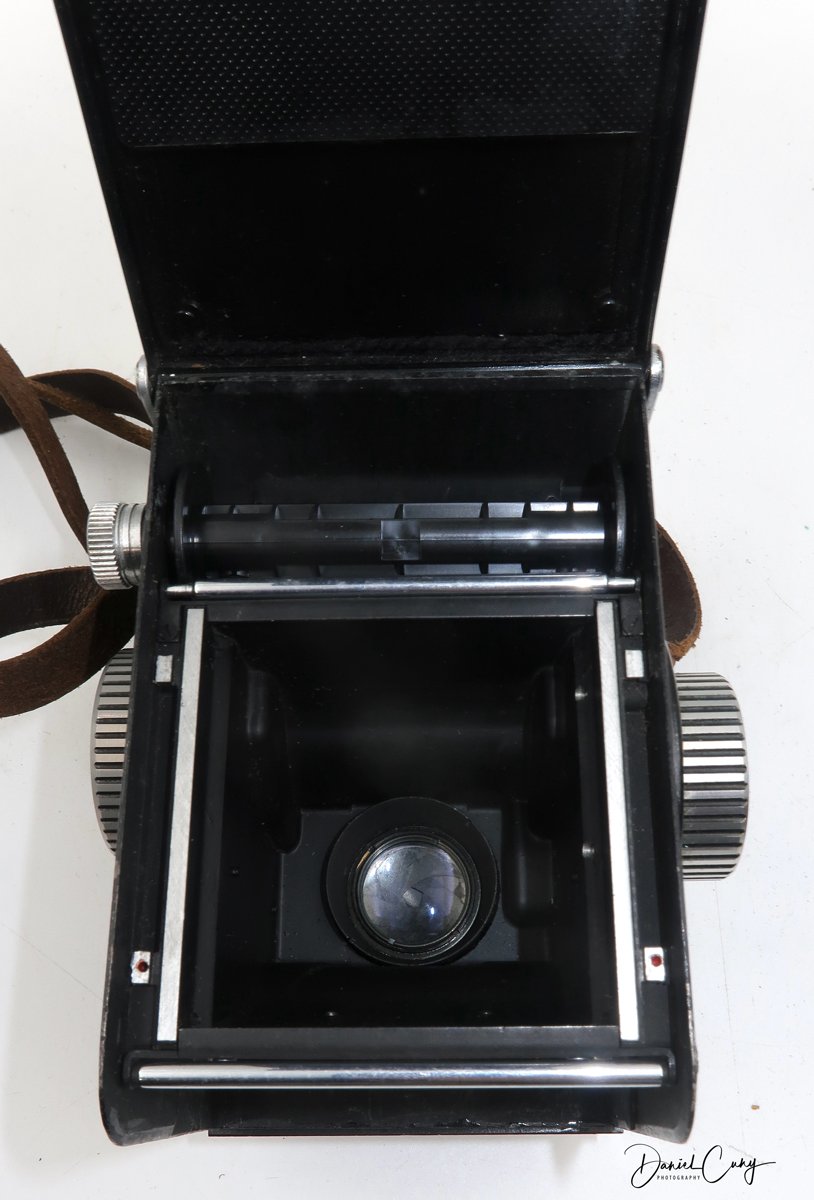
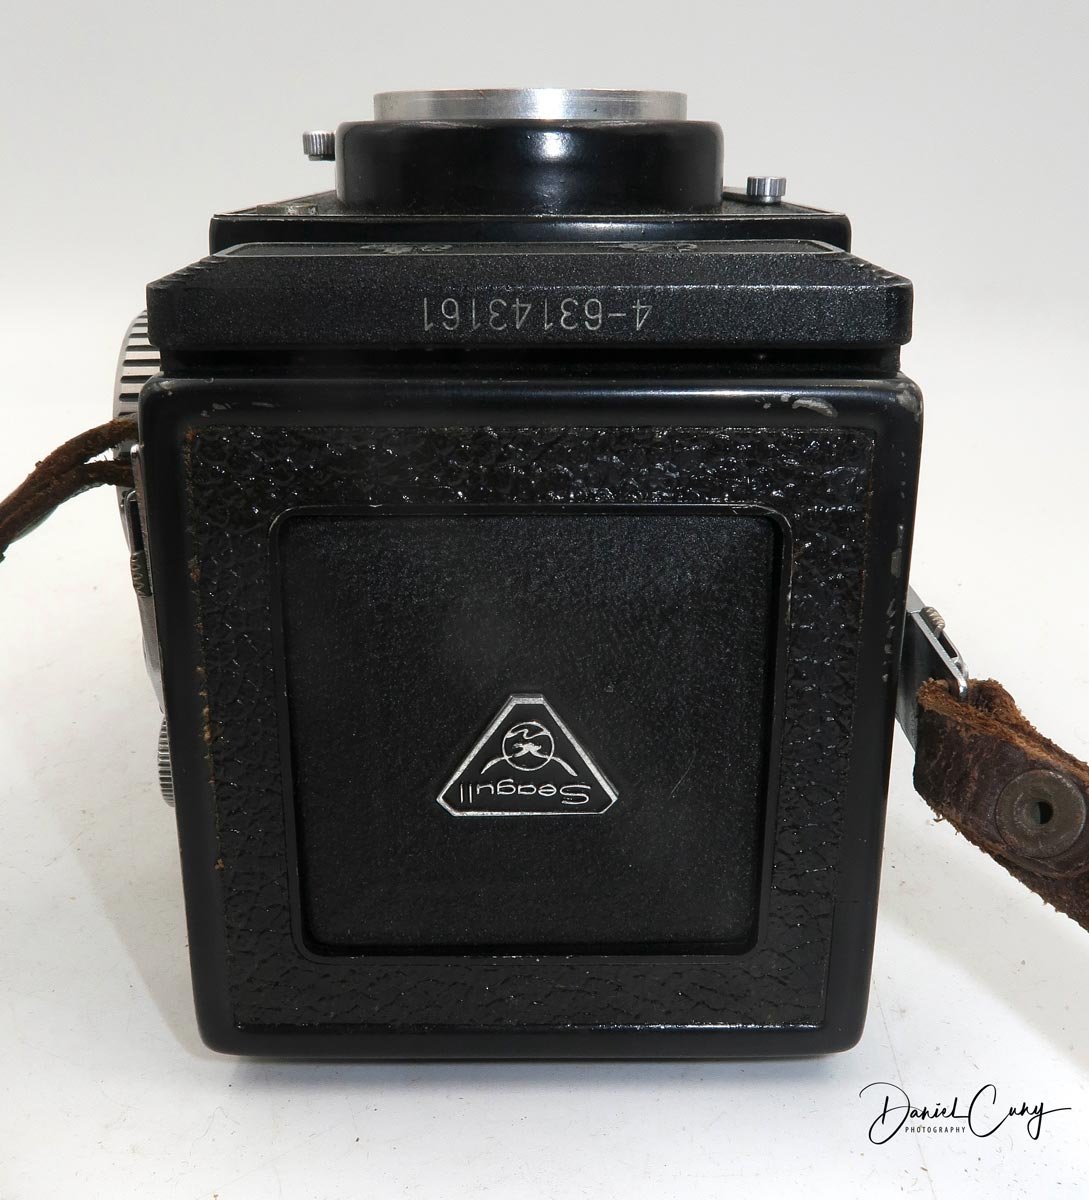
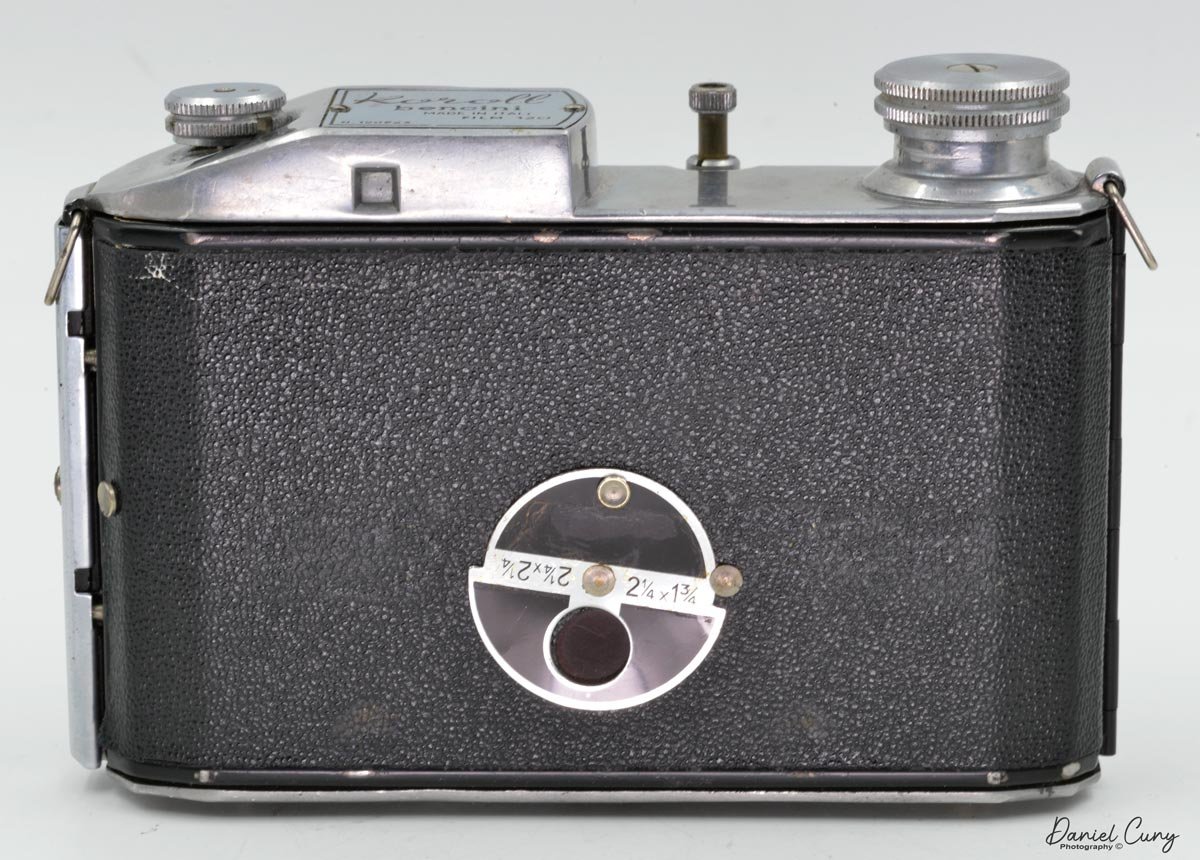
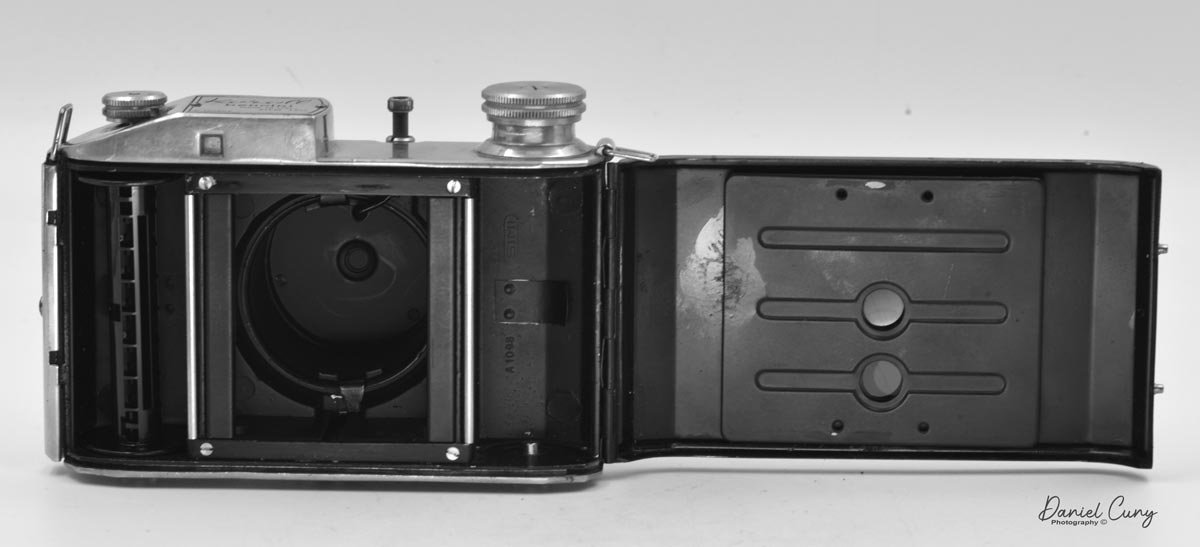
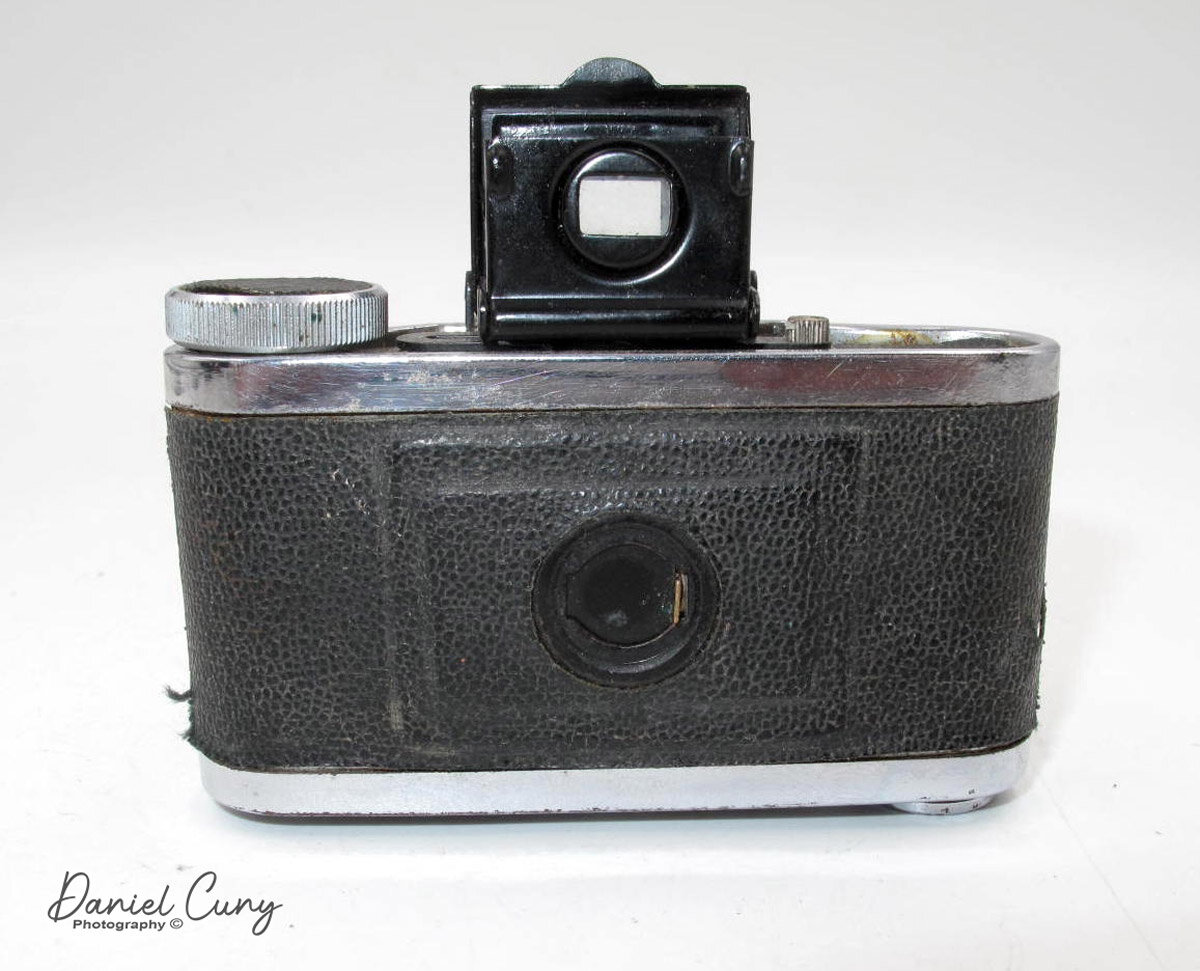
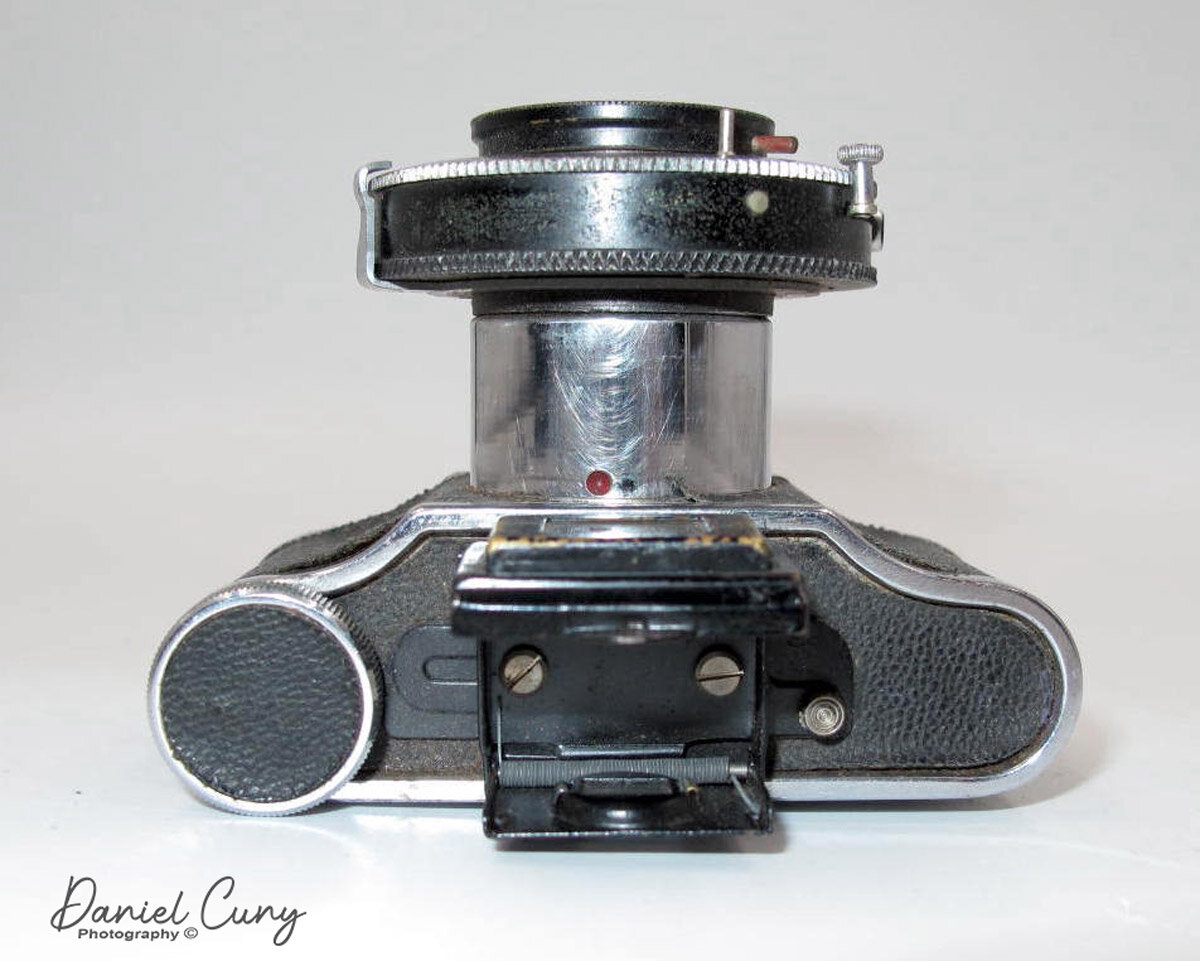
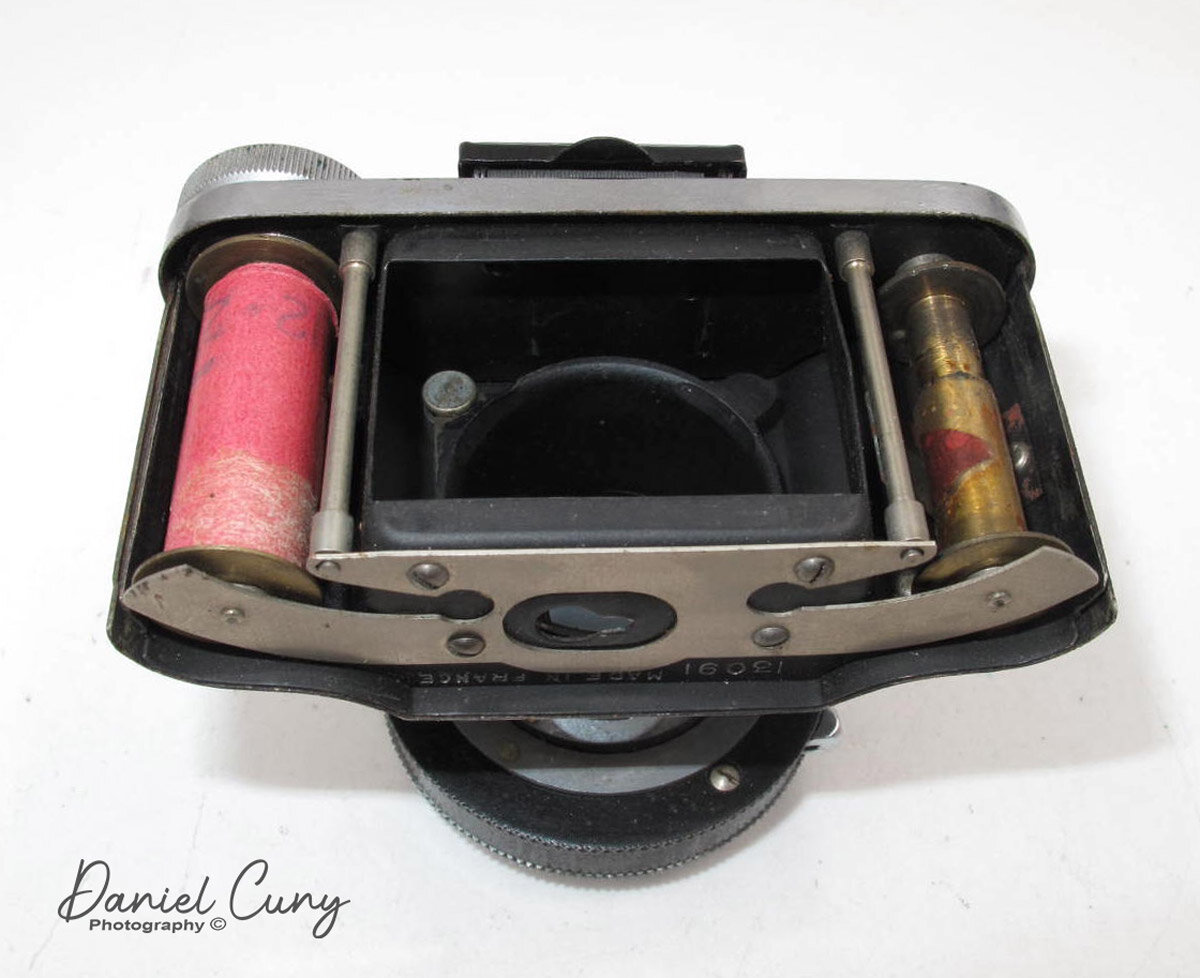
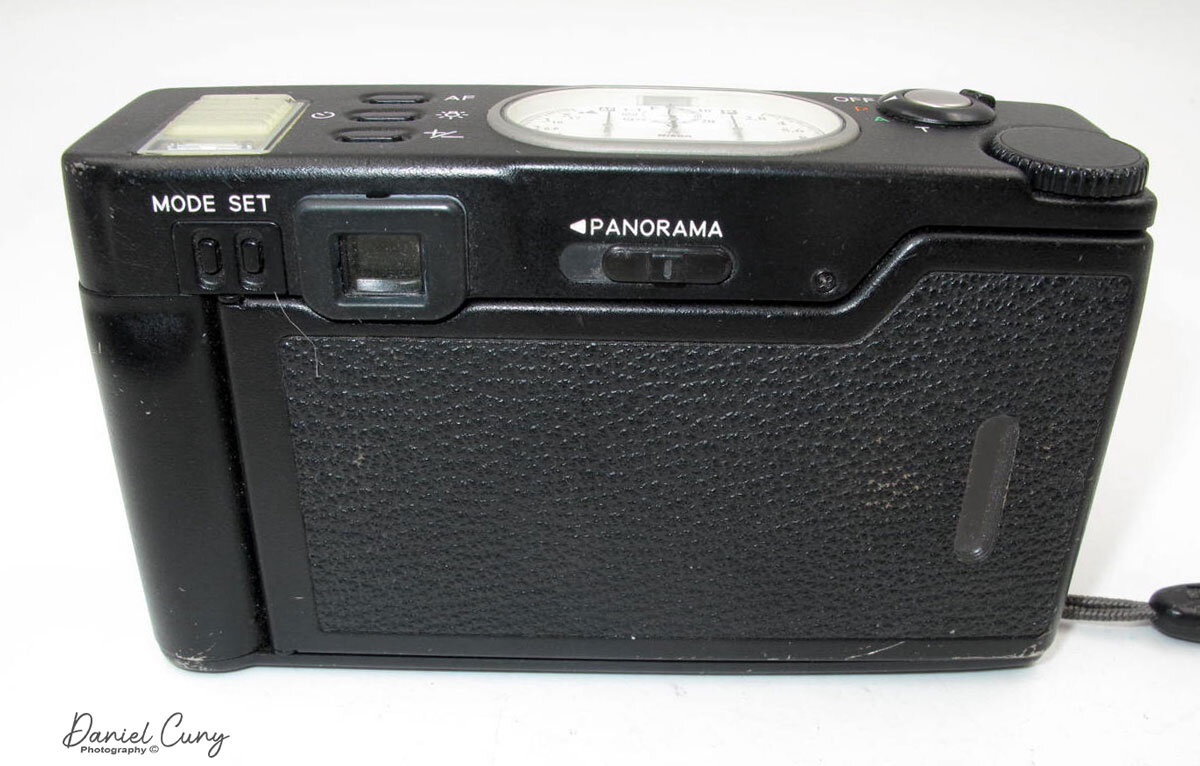
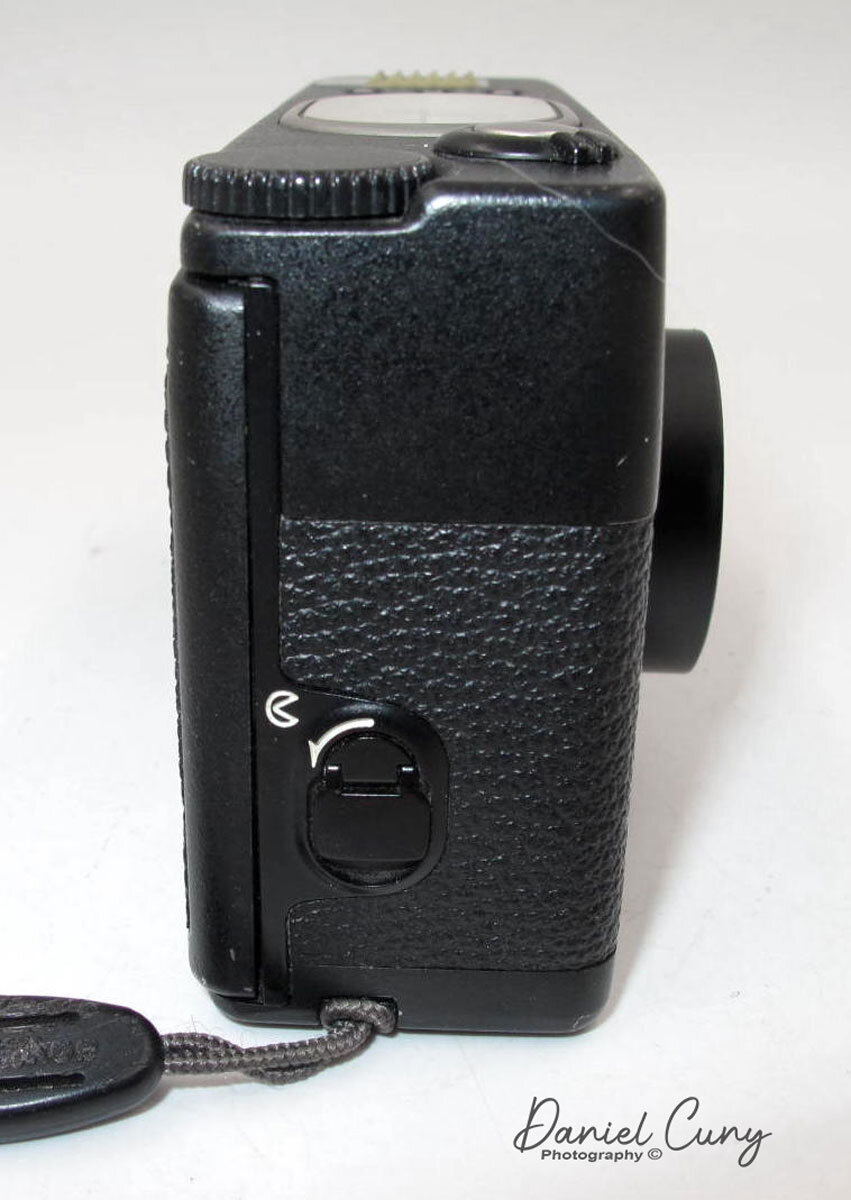
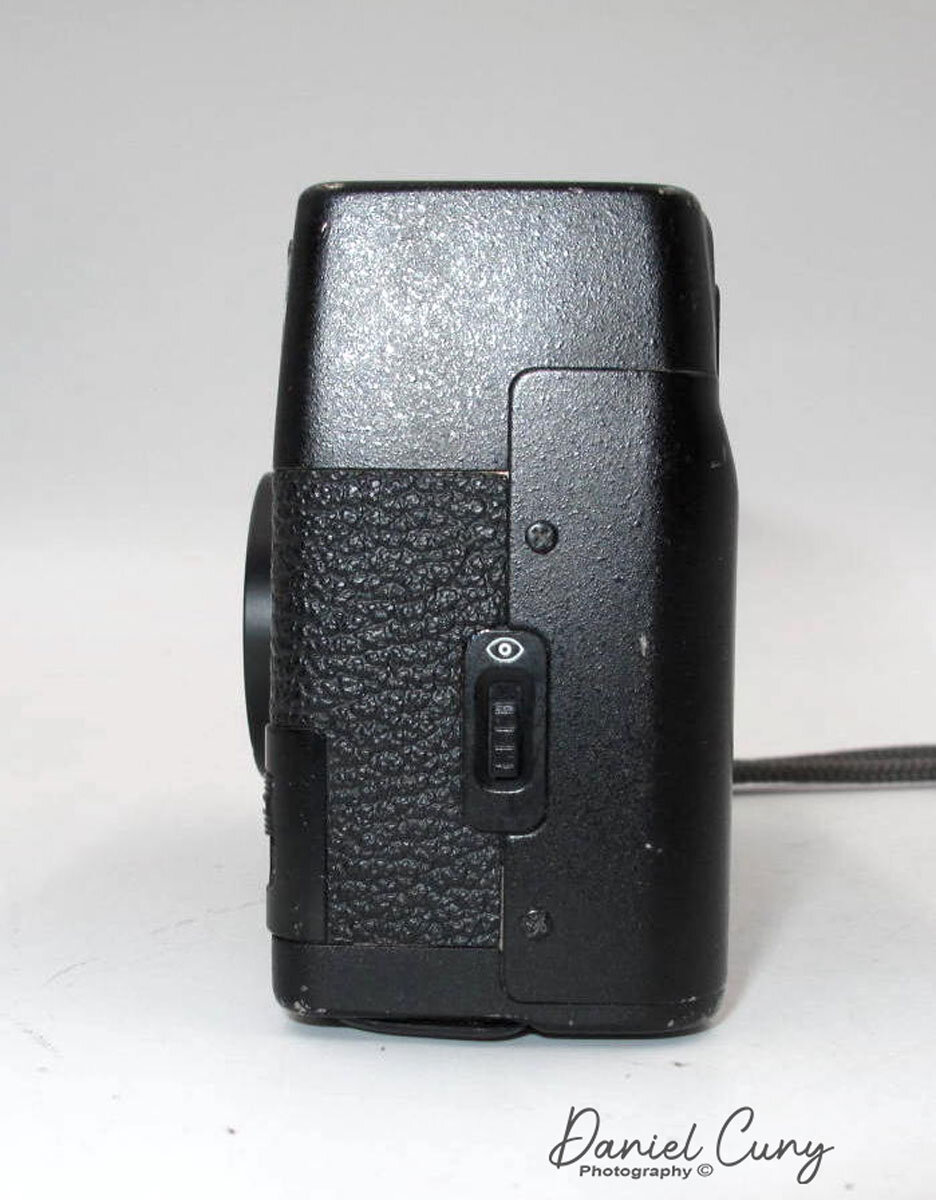
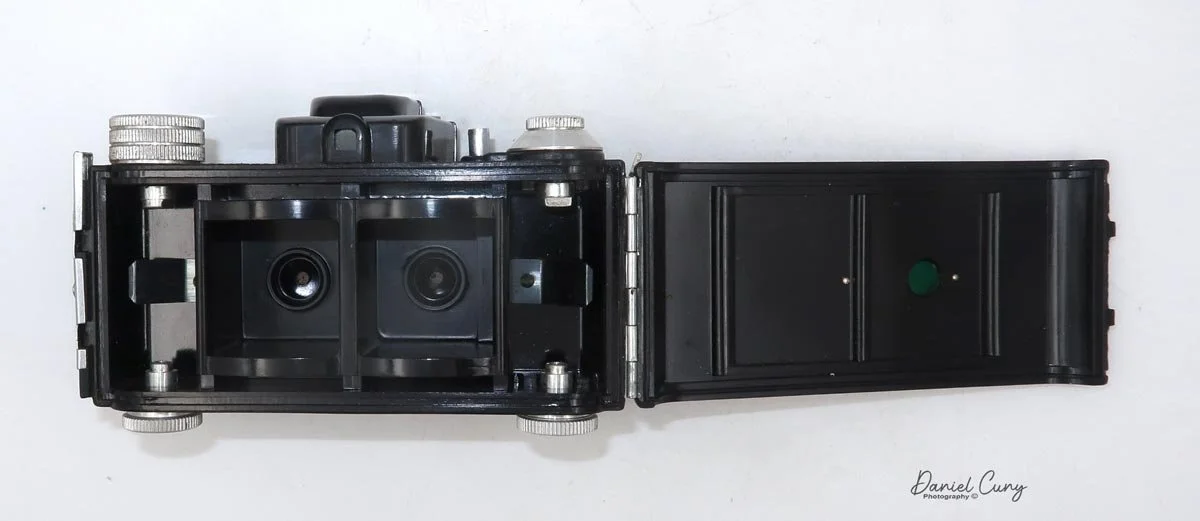
 Upon inspecting the back of the camera, I discovered a film counting window with a side cover and a green window to view the frame numbers. To my surprise, a roll of film was still in the camera, held closed by white replacement tape. With 'MINORI' printed on the ends, the film spool added to the intrigue.

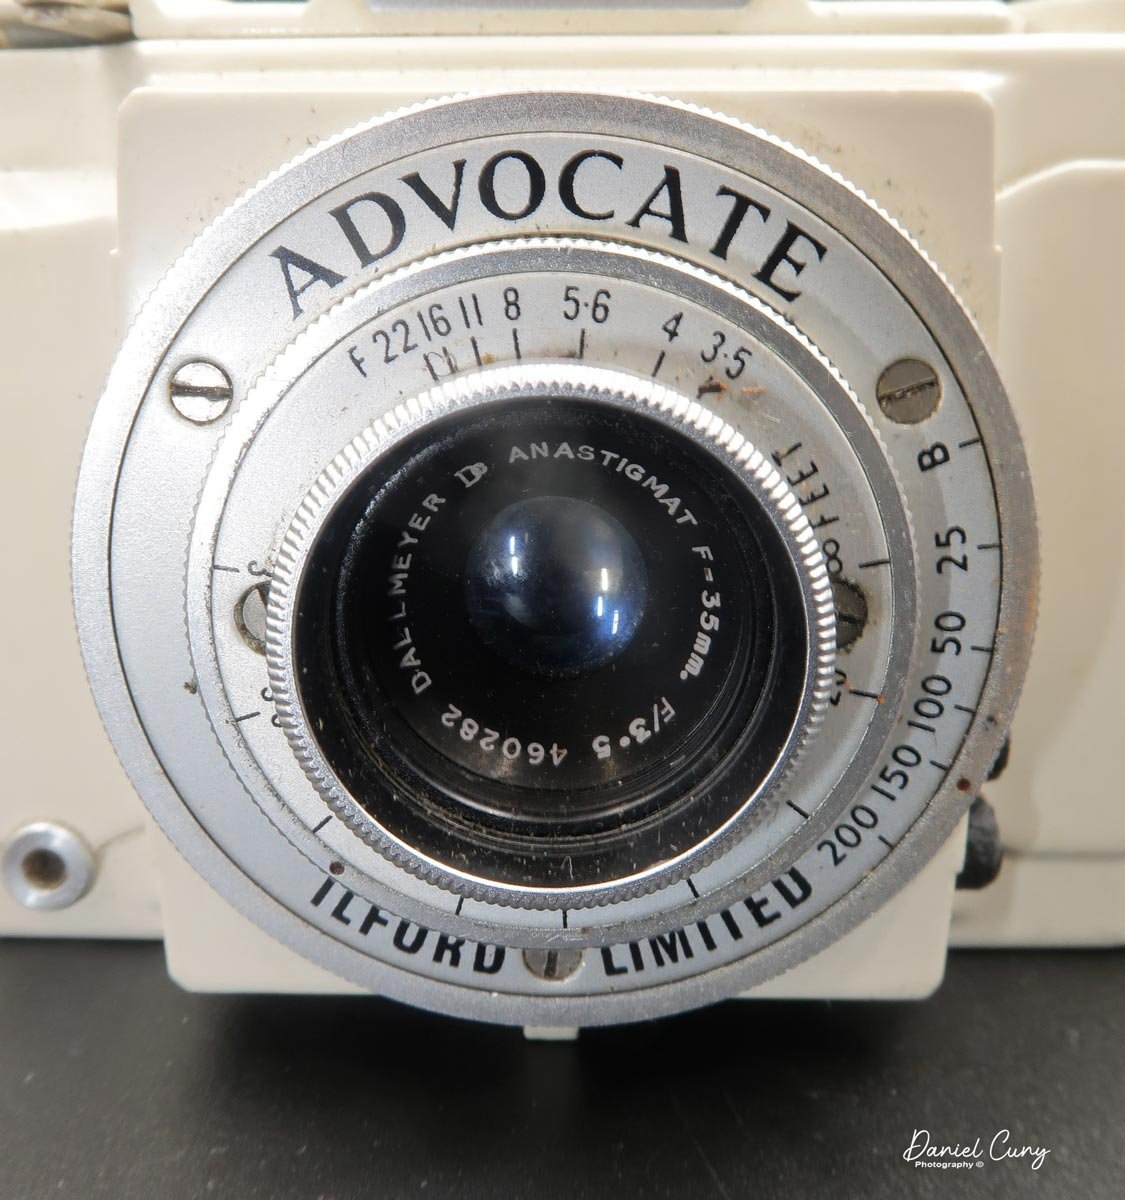
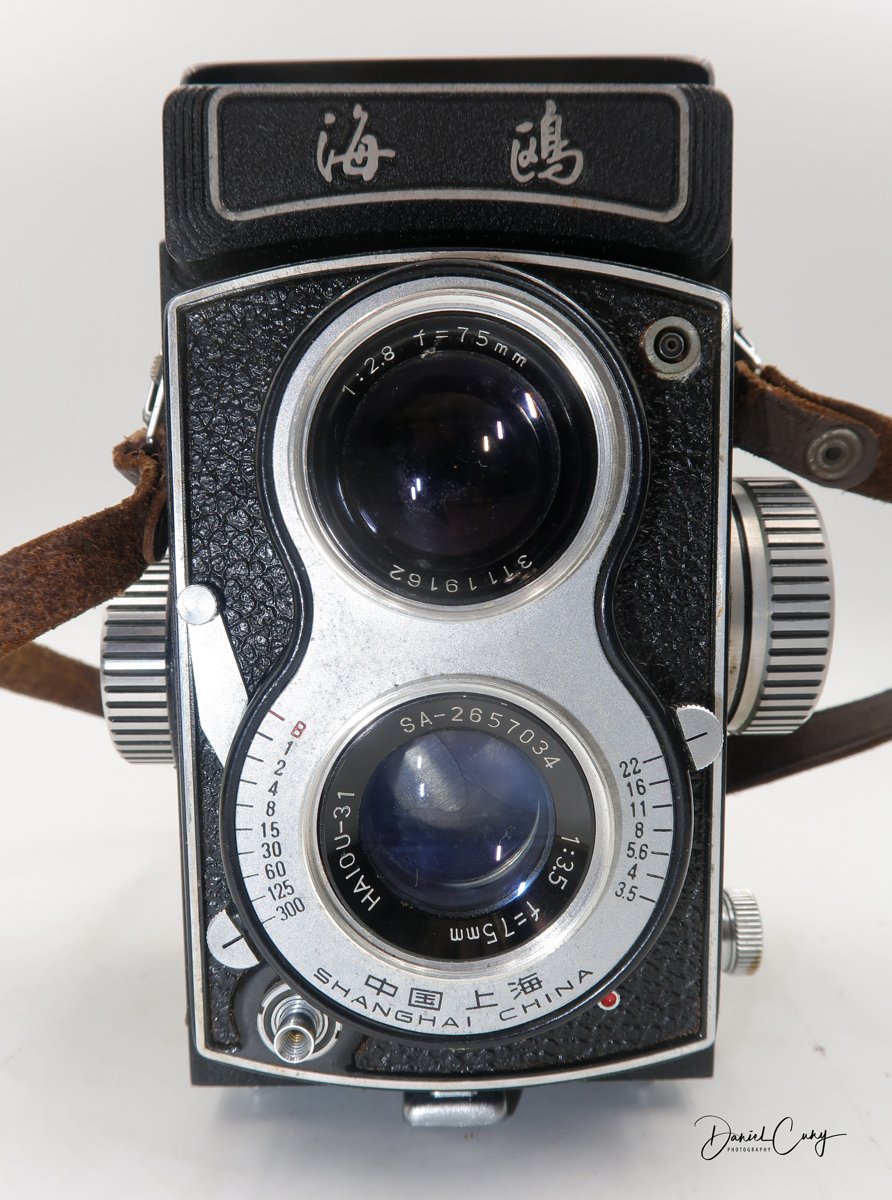
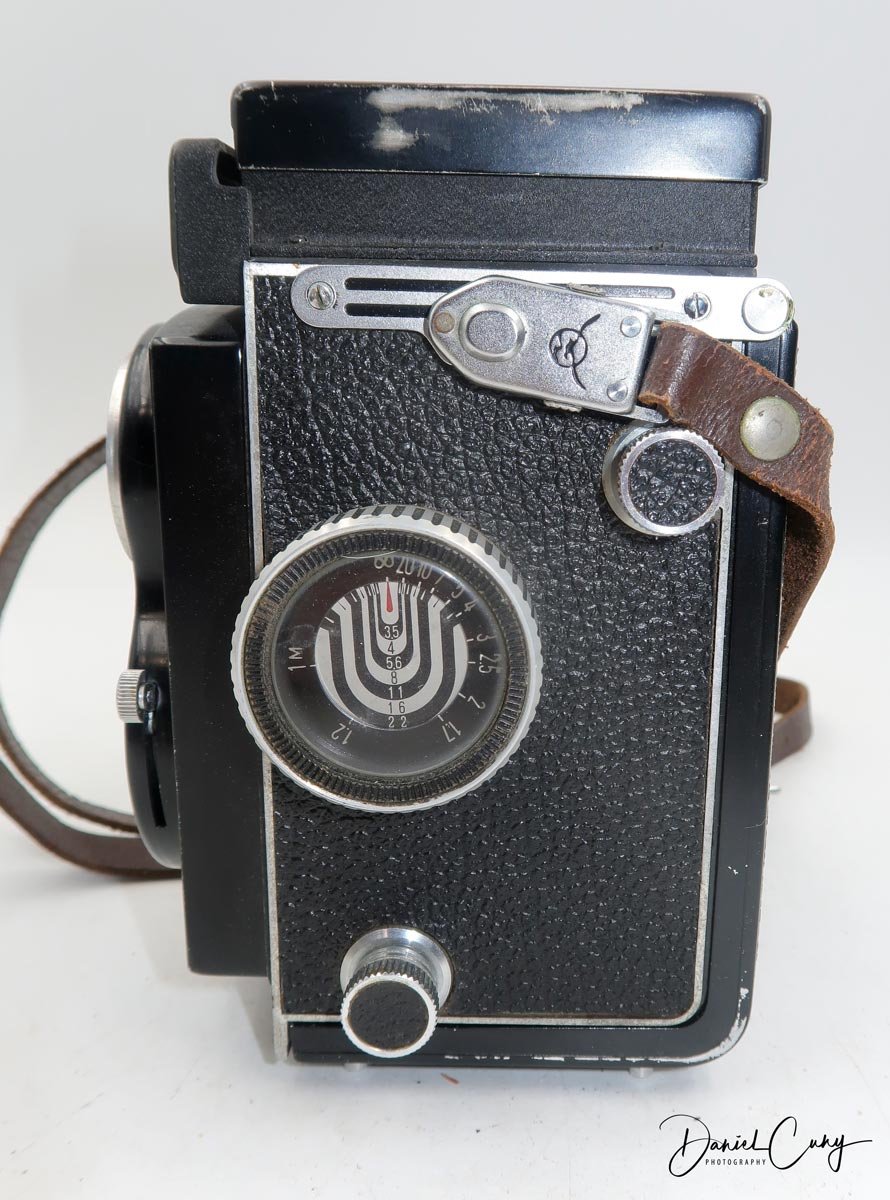
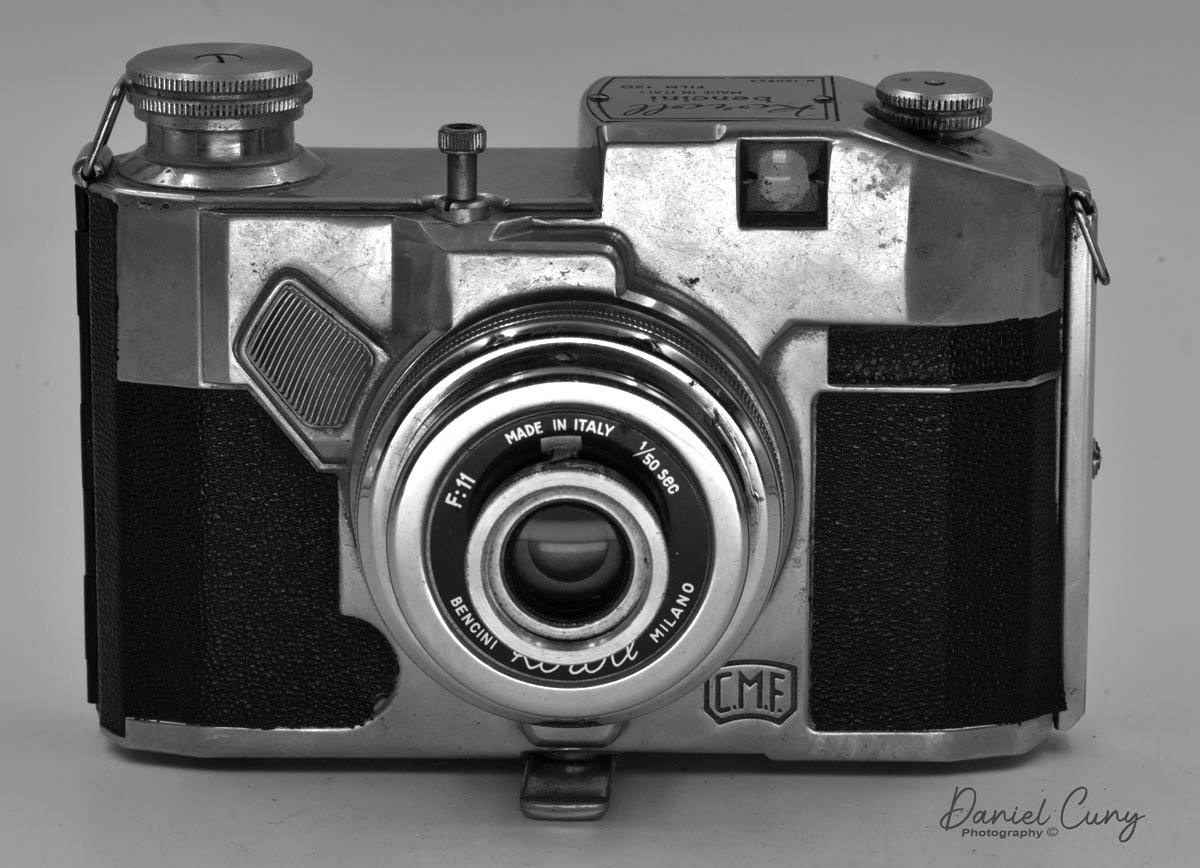
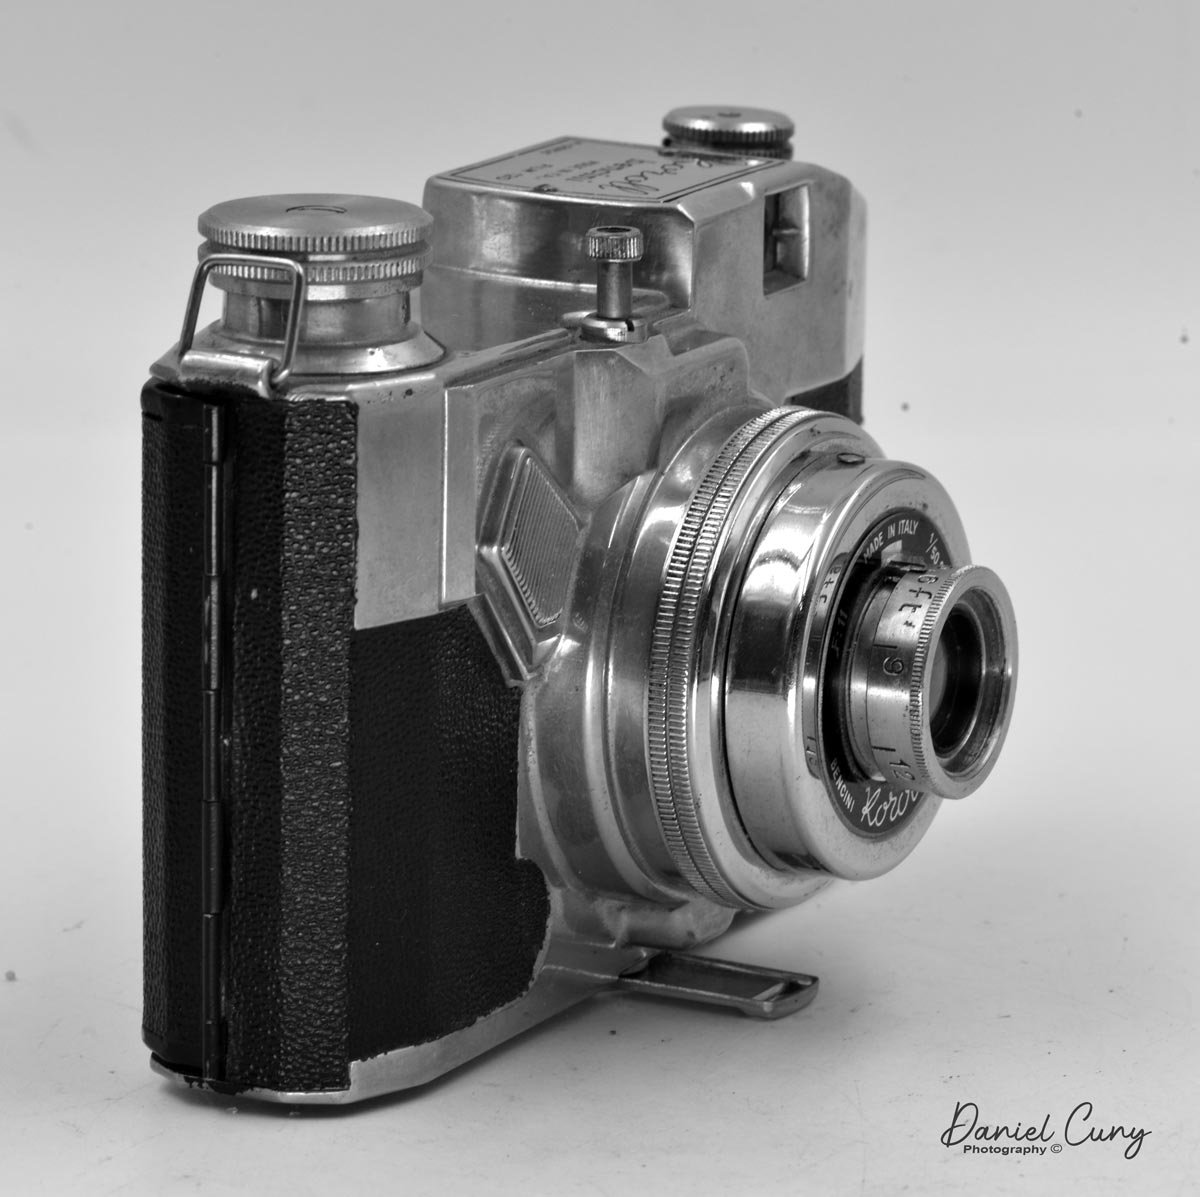
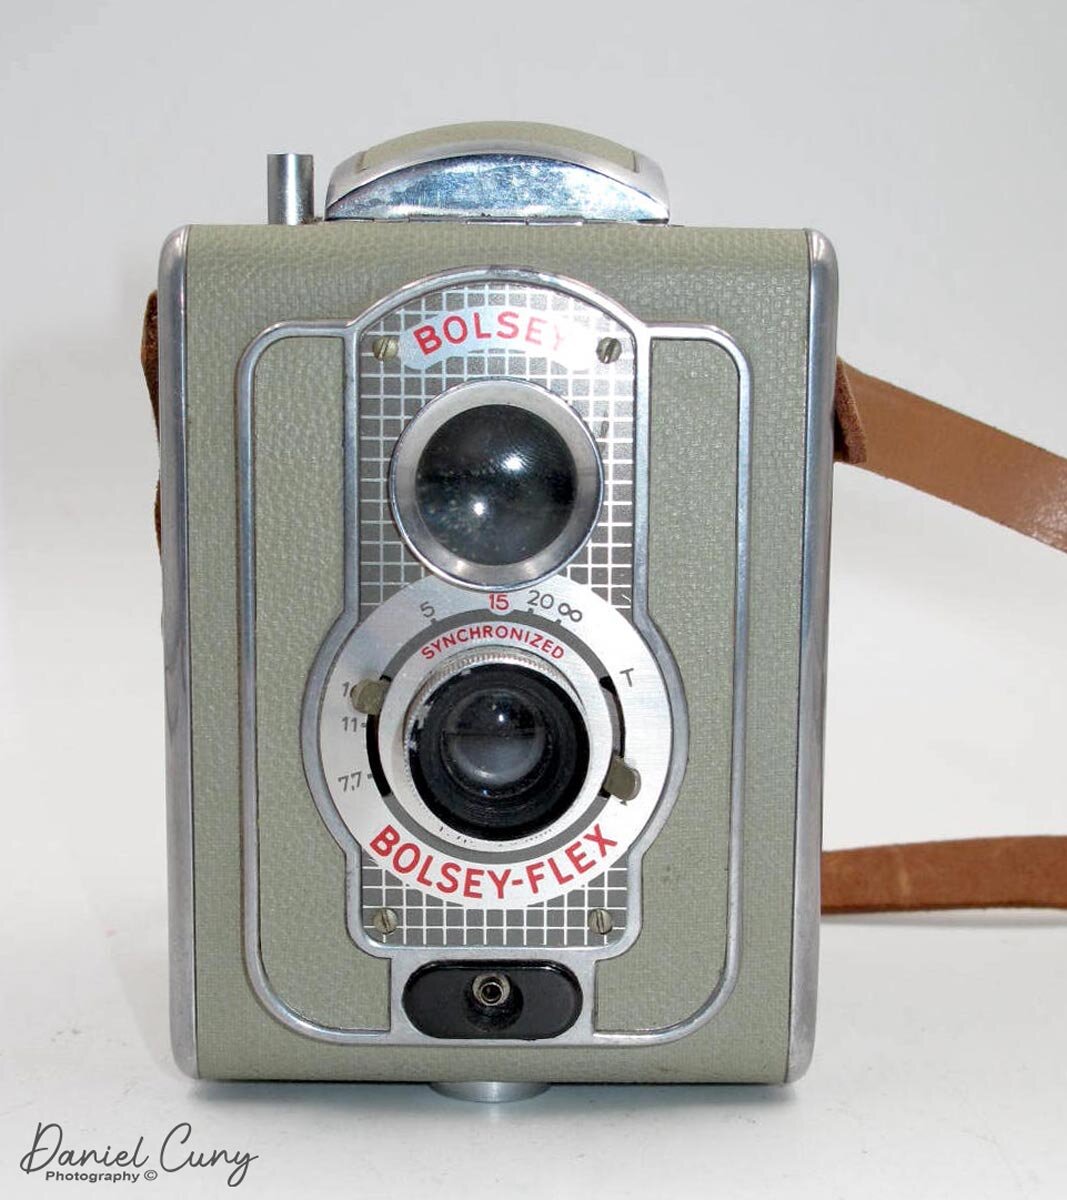
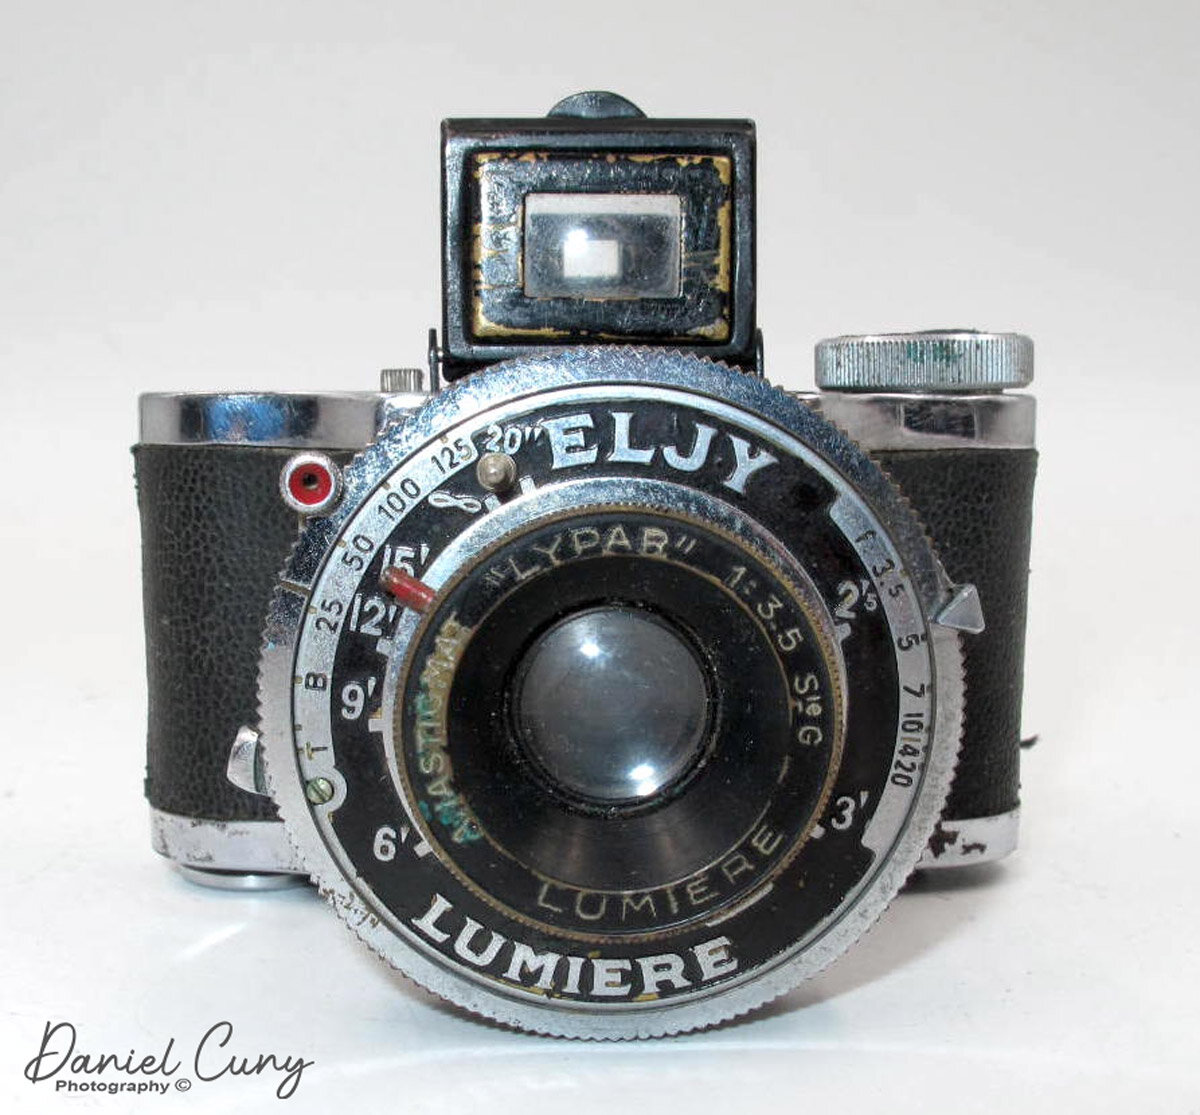
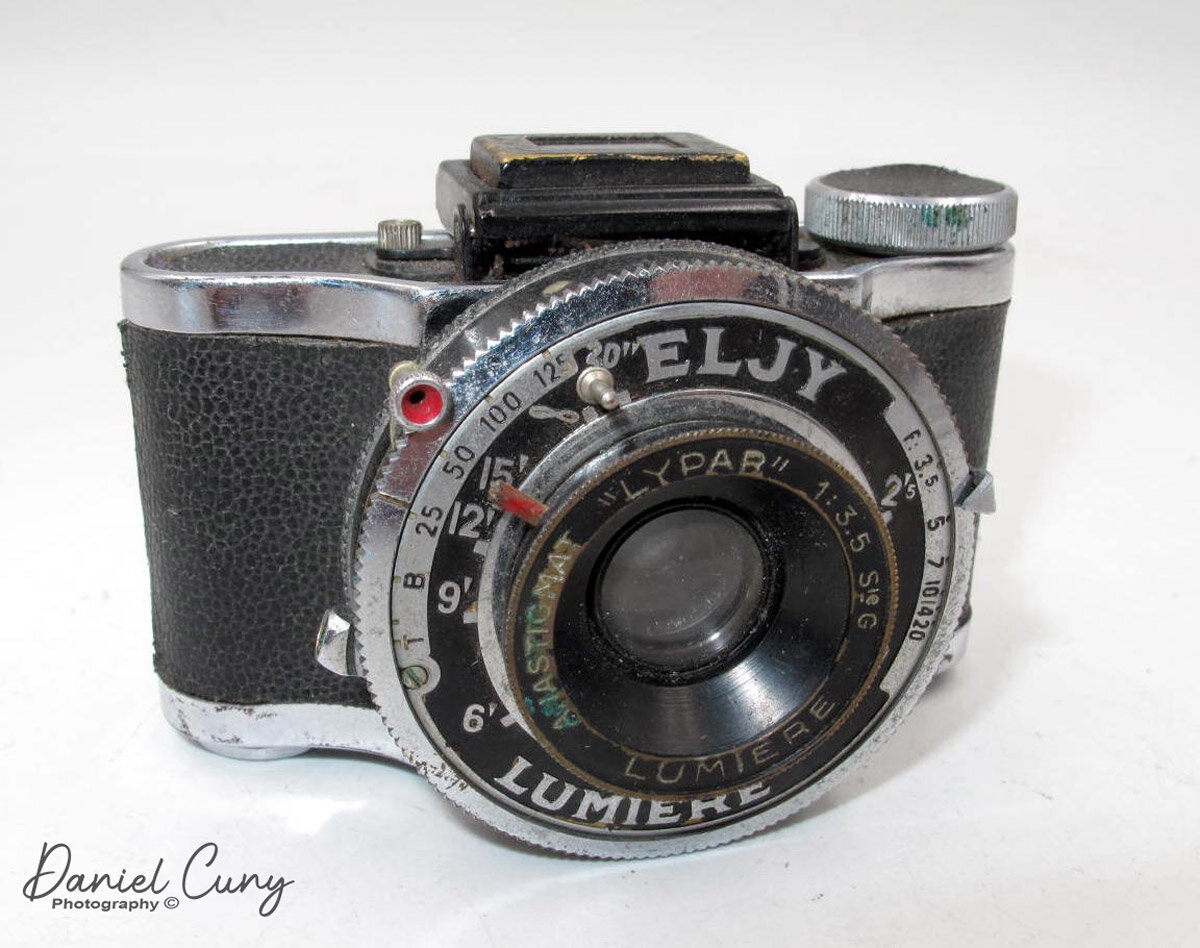
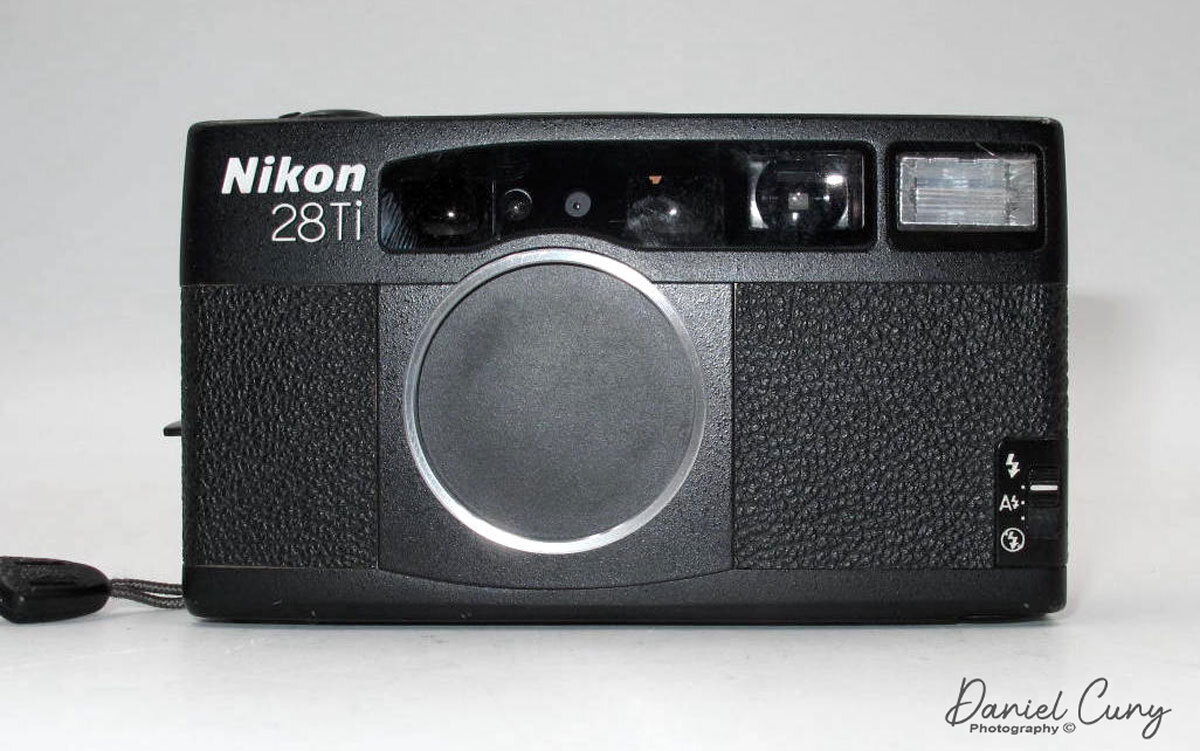
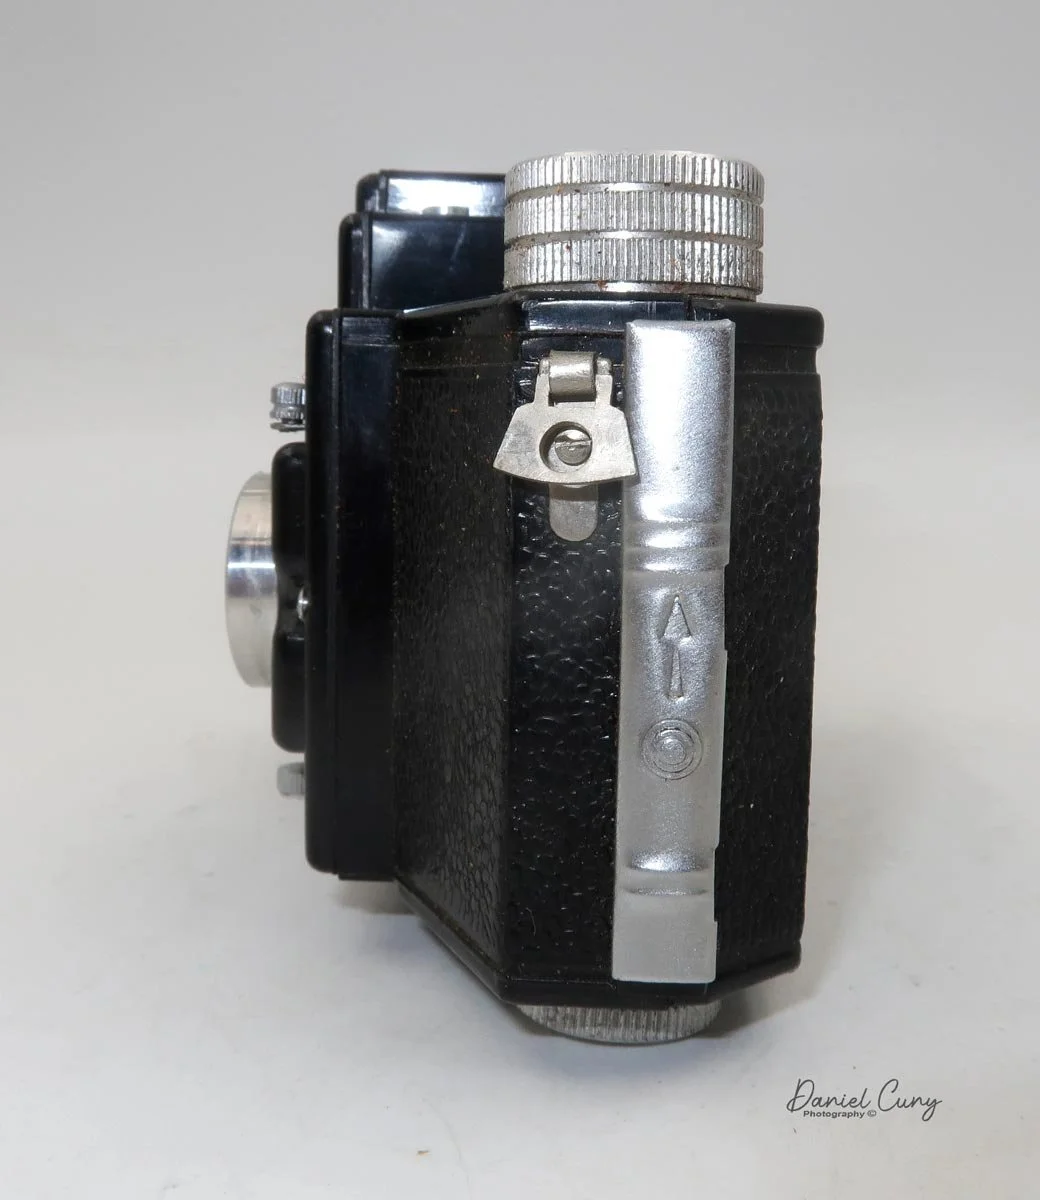
On the front of the camera is the word "STEREO" italicized and just under the front viewfinder glass. To the right of the word "stereo" is the shutter cocking lever. When the camera has already shot, and the shutter is not cocked, you see a red arrow pointing towards the left, and the cocking knob is to the far right position. Sliding the knob to the left, you've cocked the shutter(s) for both lenses, and the word "set" written in red is visible. Pressing the shutter release resets the knob to the right side position, and the arrow is visible again. On the outside of either lens is a screw which I've seen a chain with a lens cap attached to it, but unsure if that's really what they are for. My guess is to remove the front with the lenses, shutter, and aperture.

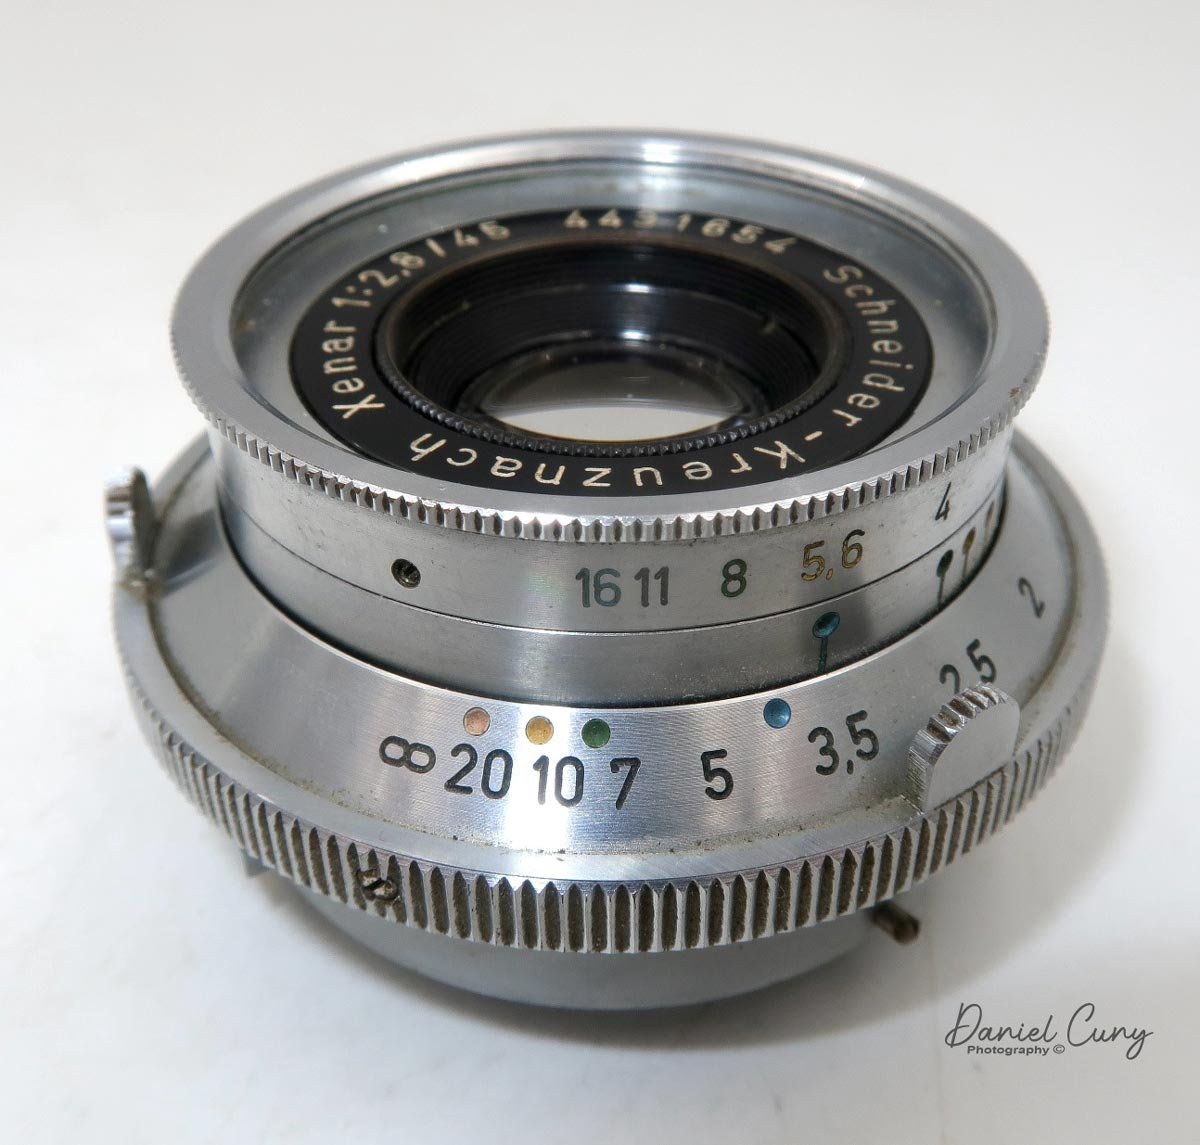
 Below the left lens is where you set the shutter speeds. The camera can only shoot at 1/25, 1/50, and 1/100 sec, along with "B" for exposure times. Below the right lens are the aperture settings with your choice of F8 or F11. Both the shutter speeds and aperture setting are controlled by a simple knob similar to the knob used to cock the shutter. 

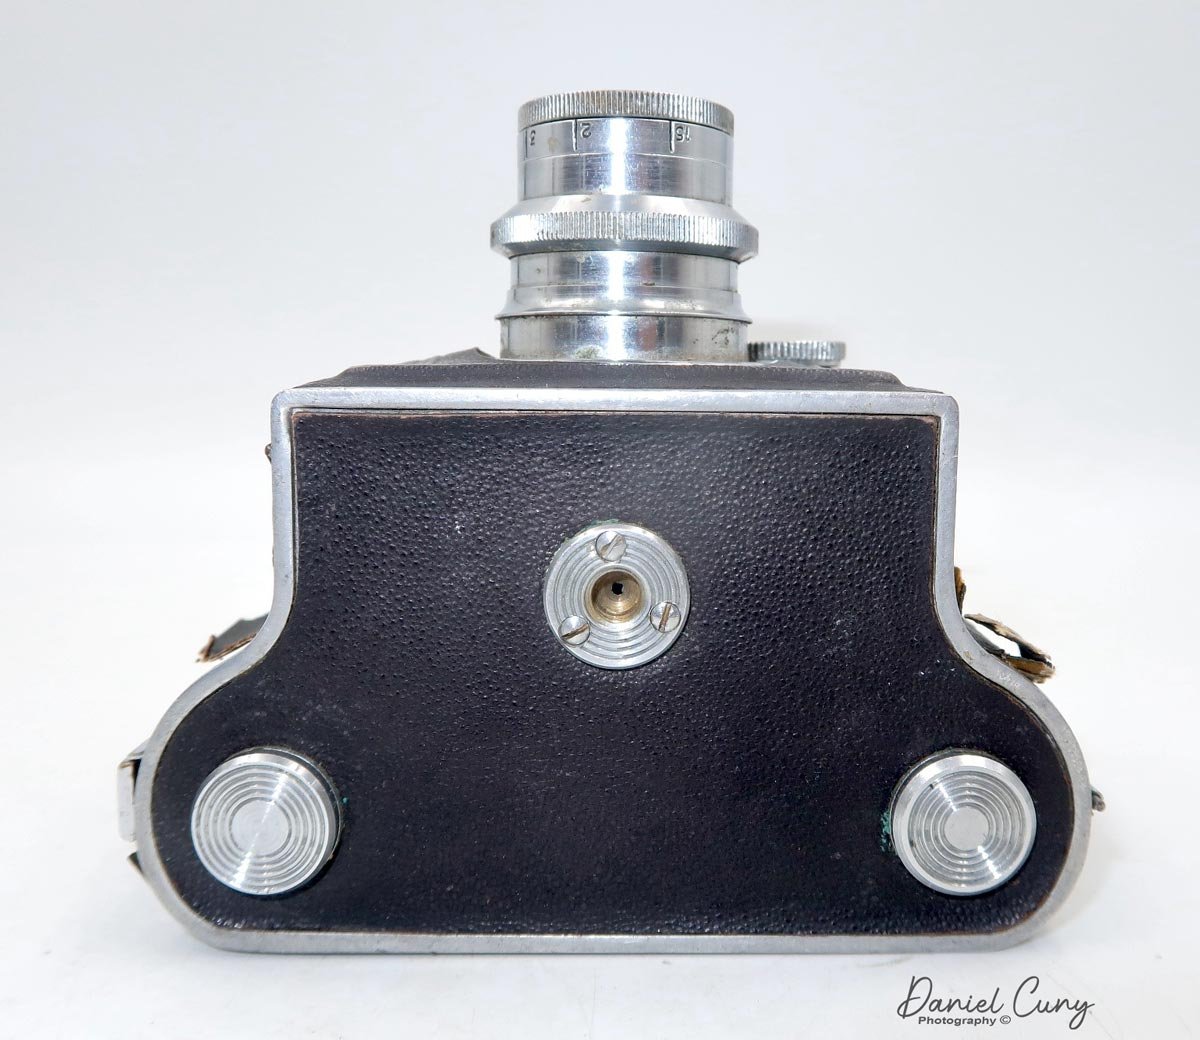
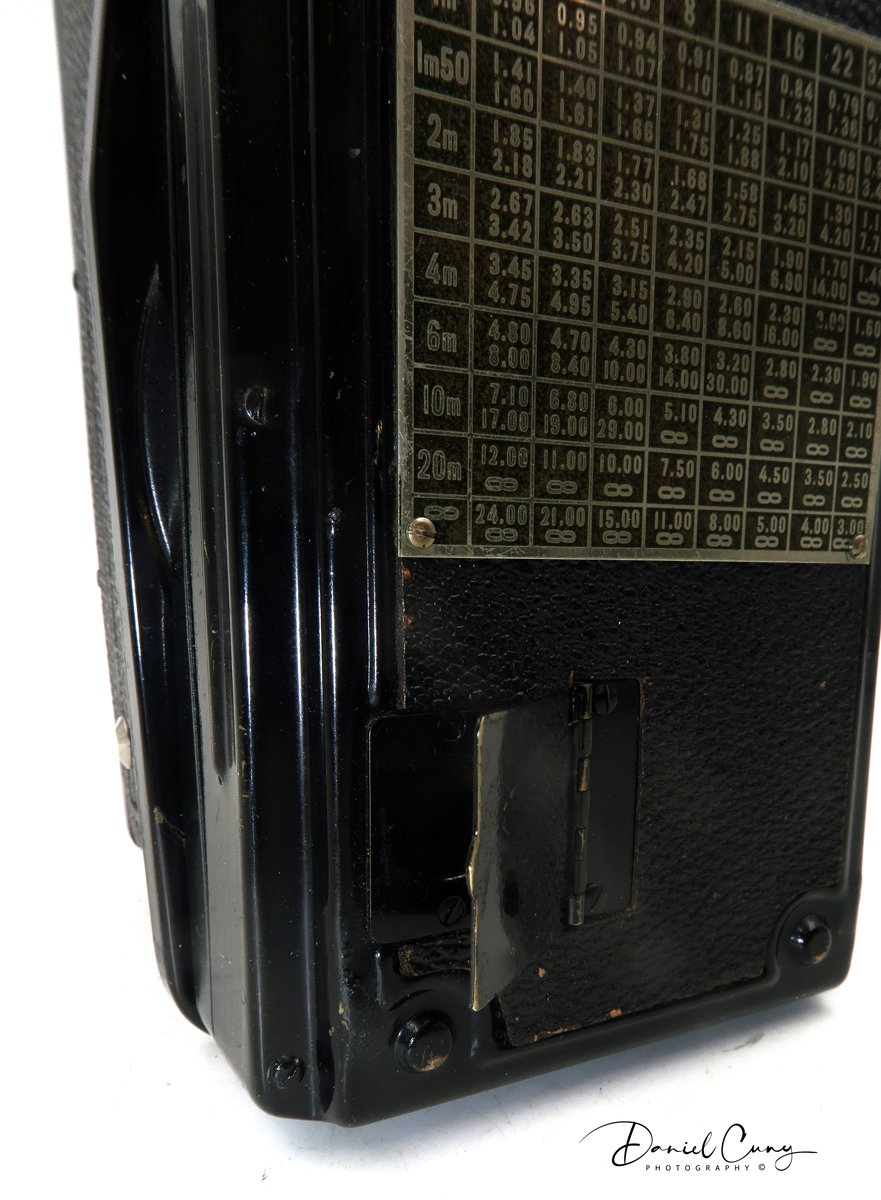
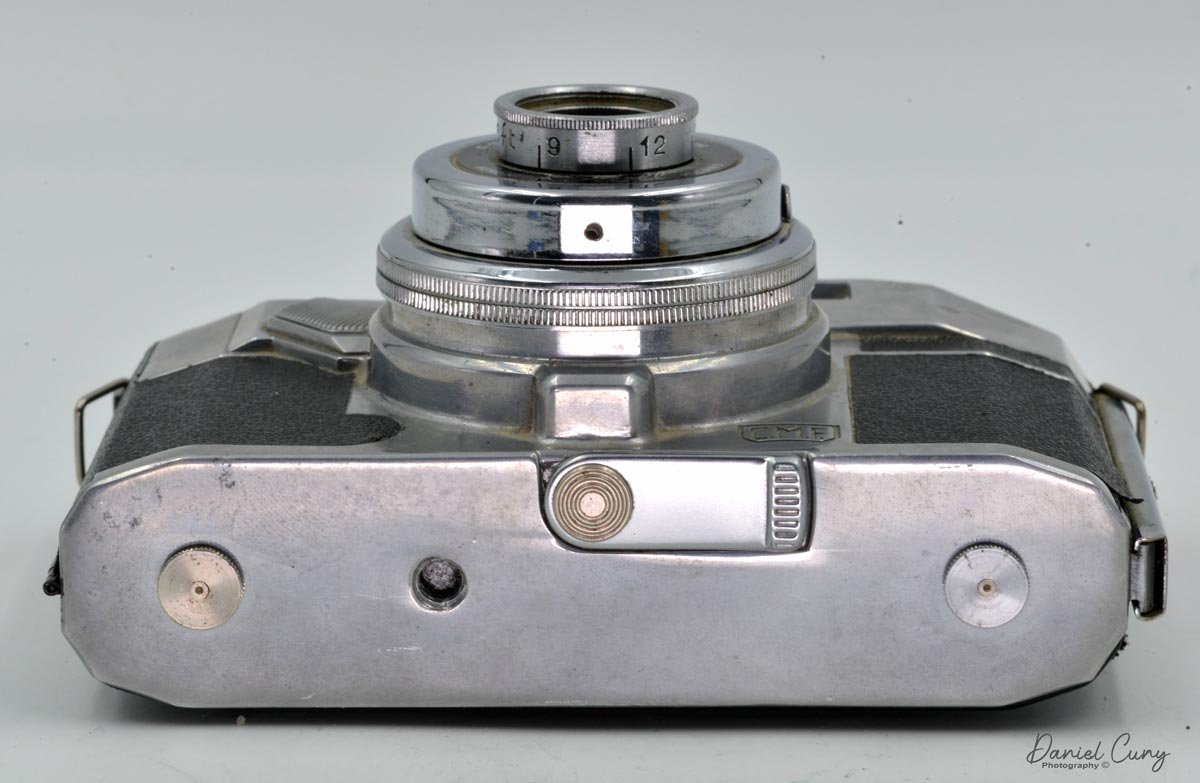
Lastly, the bottom of the camera is printed "Made in Japan," along with a tripod mount for timed exposures if needed. There is no cable release capability if you want to do a time exposure. Another interesting item on the camera is a triangle pointing upwards between the two lenses with the letters M.W.T, and along the bottom line is a curved line, which generally represents a lens symbol. I'm wondering what M.W.T means, Morita, something?

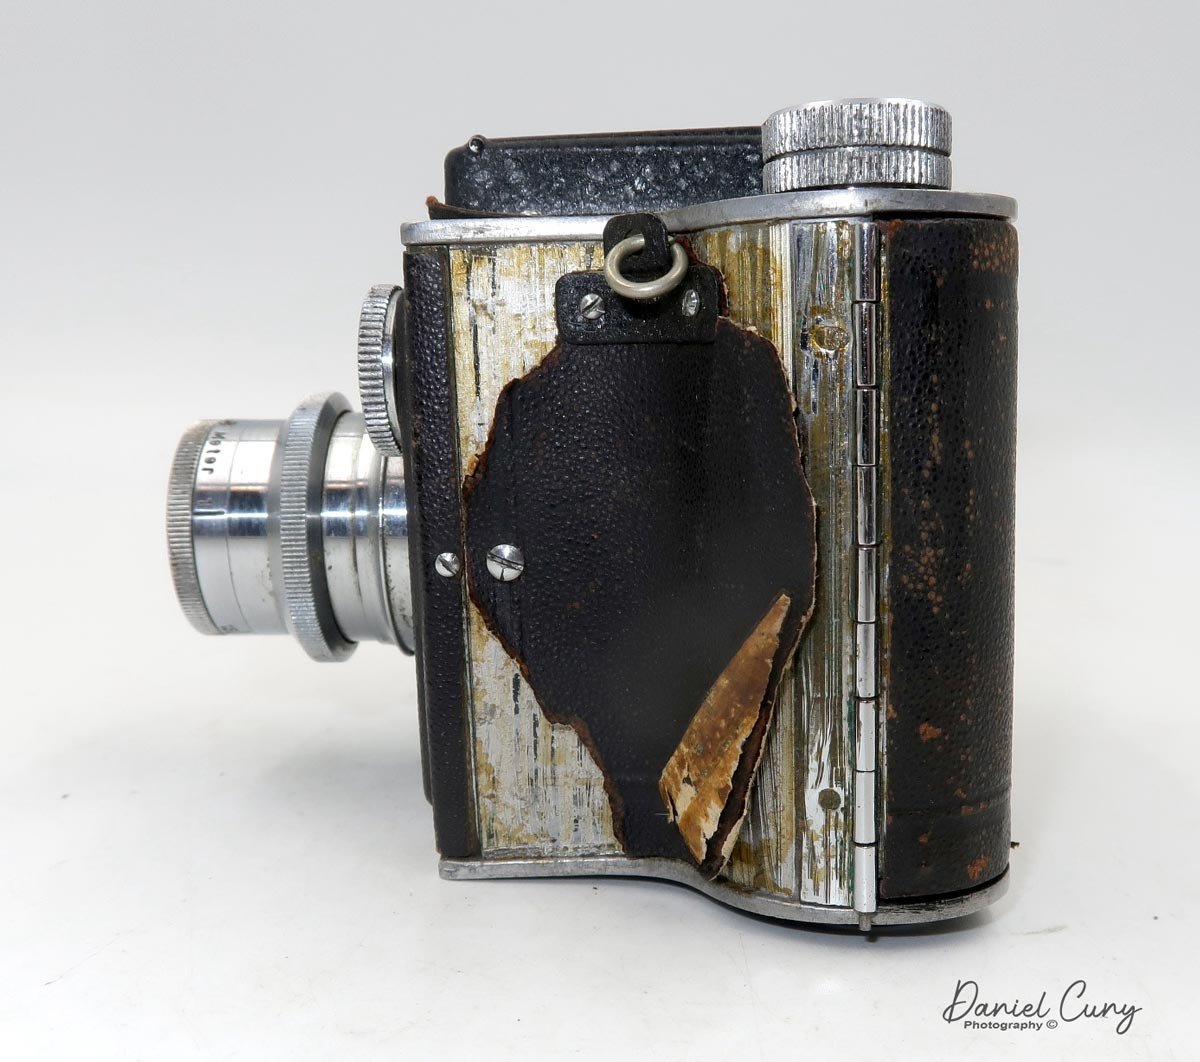
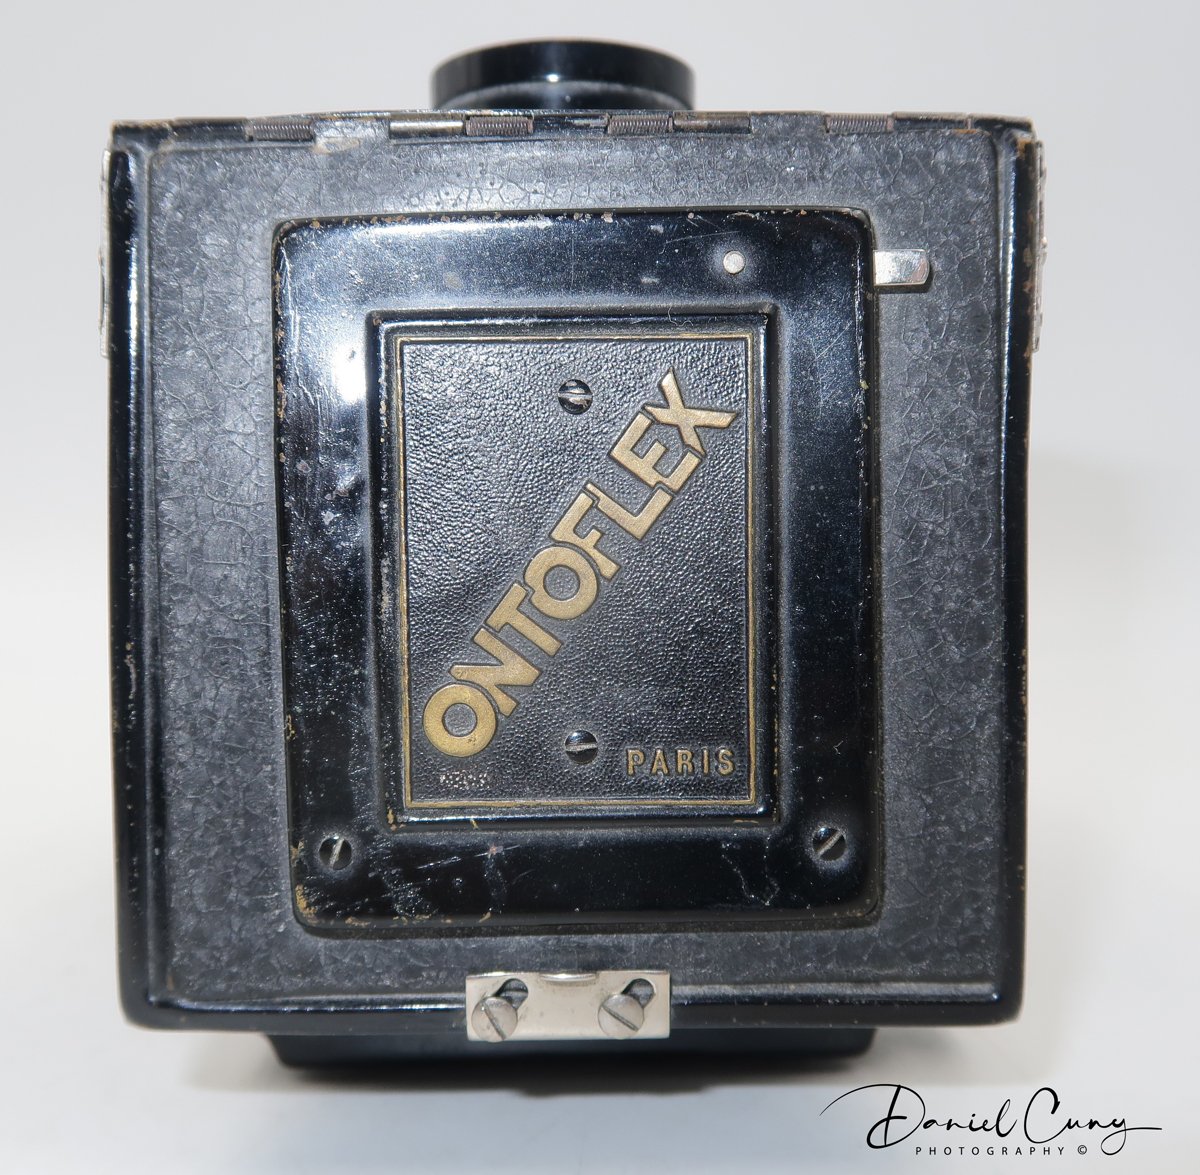
 My camera also has a leather-fitted case, which is pretty tattered but still comes with the camera. You can see Inoca Six embossed on the front, so that's my guess at the official name, but I've only seen the Inoca Stereo camera.

Conclusion:

I realize this is a short post, but I could have developed the film found in the camera. Unfortunately, I didn't have a film ready to fit the size of the film, so I left it until I got something I could do. The camera is fundamental, and I like its design. It reminds me of the Start 35 K-II camera, another Bolta film camera made in Japan during the same timeframe.

 Thank you for taking the time to look over this post. If you have more information on this camera, please let me know. Otherwise, I think I have one of three cameras I know of and have seen online.

 Until next week, please be safe and well.

Ilford Advocate Camera

It's been a year since I first laid eyes on the Ilford Advocate camera, and I've been eager to share my experience with it. The journey began in England, where my wife and I stumbled upon a charming camera and photo reseller, Juliano of Cameras London, on Portabello Road. Little did I know that this encounter would lead to the acquisition of a unique piece of photographic history.

My Ilford Advocate camera and case.

 My wife and I went to Portabello Rd in London on Friday to look at the antiques there and for me to look for photo items, which there were few of, but I was told that Juliano would be there the next day and he was the person to see. While there wasn't much time to return the next day, I took the bus early and arrived while Juliano set up. My intention wasn't to purchase an Advocate, but as we talked and I mentioned I had one before, he said he had a couple and was willing to part with one. He didn't have it with him, so we arranged to have it shipped to my home in the US.

When the camera arrived and a couple of other items I was buying from him, it was in excellent working condition. I was delighted, as the camera isn't typical but more of an oddity. While I collect "colored" cameras, the white color of this camera makes it stand out in the crowd of mainly back cameras. I was happy to have the Ilford Advocate back in the collection, in excellent working condition, and the full-fitted leather case, too.

The Company:

Front view of Ilford Advocate camera

Ilford is known less for its cameras than for its film, photo paper, and now inkjet printing paper, at least within the photo community. The company has had a long history with many name changes. Still, it's always been a significant name in the photo industry before companies like Leica, Rollei, or even Kodak.

 The original company name was Britannia Works, which was started by Alfred Harman in 1879 by making Gelatine Dry Plates in his basement on Cranbrook Rd, in Ilford, Essex. Harman initially started printing services in 1863, and in 1878, he patented "producing enlarged photographs with artistic finish." By 1880, Harman moved to Roden St. and started trading as Brittania Works Company. By 1883, the company was expanding with the popularity of photography, and Harman opened a new factory to produce plates.

Ilford Ad from 1890s

By 1890, Harman produced a popular book, "The Manual of Photography," and the book, "The Ilford Manual of Photography," was created under that name until 1958, when it was in its 5th edition. In 1891, Kodak started producing plates in Harlow, Middlesex, as a competitor to Britannia Works. In 1897 and again in 1903, Eastman Kodak attempted to purchase Britannia Works Company, but both times were unsuccessful. In 1898, Alfred Harman retired at age 50 but did consulting work for many years. In 1900, the company changed its name to Ilford, Ltd. The town council was happy and objected, but with persistence, the name was changed.

 In the 1960s, the company was owned by Ciba, and they merged with the French company Lumiere and Swiss company Tellko and became the Ilford Group. In 1989, the Ilford Group was purchased by the US-based International Paper Company, and together, they merged to become Ilford Anitec. From 1990 to now, the company has gone through a few other acquisitions and receiverships, and the current time is when the parent company is Harman Technology. Through it all, they still produce tremendous film, photo paper, film, and paper chemistry.

 To my knowledge, only one camera manufacturer was under the Ilford umbrella in this long-winded explanation of the Ilford company. That is Kennedy Instruments Ltd., which designed and built the Advocate starting in 1947 and updated it in 1952. The rarely-seen Monobar cameras were produced from 1958 to 1967. All the other cameras with the Ilford name were created by companies like Dacora, AGI, or Kershaw-Soho.

My Camera:

The first thing I noticed about the camera, other than the apparent white color, is the weight of the camera. Or the camera's lack of weight as it's a very light camera. The camera is made from a die-cast aluminum body with an enameled white finish. The camera body is smooth to the touch and lacks any leather or leatherette, which is uncommon for cameras. My camera measures 5 3/8" wide by 3" tall by 2.5" deep and weighs 1lb 1.5oz without the fitted leather case.

 The camera is straightforward and doesn't have a lot of extra knobs or buttons to do different things on a camera which is what makes this one so unique. To open the back to load the film, you only need to pull open the aluminum bar on the right side of the camera, which releases the lock holding the back closed. Once you open the, I noted chrome gear by the advancing cogs and onto the film advance spool. My first thought was, That's unusual. Then when I tried to put in the film, the rewind knob didn't pull up like the majority of 35mm cameras to load the film. As I poked around, I noticed that the rewind knob is actually hinged, and it pulls away from the body, which allows the photographer to put the film into the camera body.

It's always my inclination to put the film cassette into the camera first, then bring the leader to the take-up spool to load. But looking at the instruction manual, they suggest putting the film leader into the take-up spool first, then putting the cassette after. Having the rewind knob on a hinge makes perfect sense to do it that way. Once I put in the film, I always take the slack of the film with the rewind knob, so when I go to advance the film, I know the film is transporting when I see the rewind knob turn ad I advance to the next frame.

 The only other settings needed to take photos are all around the Dallmeyer Anastigmat 35mm f3.5 lens on my camera. There are three different rings around the lens. On the outer or the largest ring, which has "Advocate" printed on the top, is the shutter speed dial, with speeds of 1/200, 1/150, 1/100, 1/50, 1/25, and "B," which are set according to a red dot on the out portion of the ring. The next ring from the shutter speeds is the focus distance, which has the closest focus distance of 3 feet to Infinity. The inner ring has aperture settings, which go from f3.5 to f22. My first inclination was that the inner ring, which is actually on the lens itself, would have the focus ability, but it's the aperture settings. I had to get used to that when shooting.

To take the photos, the shutter release is a pulling action as you pull the shutter release back towards the camera body as opposed to the most common pressing the shutter release down. It's more similar to an Exakta or Topcon Super D. You get used to it when shooting. The feel of the shutter is firm, and you can hear the rotary shutter releasing and firing, so there is no missing if the camera took the photo. There is an auxiliary remote shutter socket on the front of the camera if you choose to put the camera on a tripod and shoot with a more prolonged exposure.

 The viewfinder on the camera is bright and easy to compose images. My camera is the second version made, as the original Advocate cameras didn't have the flash sync capability, which is located at about five O'clock on the lens and is a double-prong sync cable. The original model also has a chrome pressure plate to hold the film flat.

Viewfinder and shutter release on Ilford Advocate camera

 Here's the fun and one of the more exciting things I like about this camera. Once you've shot all the photos and want to rewind the film, there is no button to disengage the winding sprocket. All you need to do is press down the winding knob down, which presses the gearing system down, and the winding gear is free moving, and the film can easily rewind into the canister. I really enjoyed the simplicity of this system.

My Results:

I took the camera to a local farmers market and used a real "shoot from the hip" method. I tried to be somewhat discrete, which may be difficult with a bright white camera around your neck, but here are some of the results.

Conclusion:

I really enjoyed shooting with this camera. The biggest obstacle I had was remembering which ring did which function. I kept going back to the inner ring, which was closest to the lens and was the focus, but it was an aperture, so I needed to keep this in mind during shooting. If I were to use it more often, it wouldn't be that big of an issue; I also liked that the case was in excellent condition, which is only sometimes the case for older cameras.

 Thank you for taking time from your schedule to look over this post.

 Until next week, please be safe.

Nova Subminiature Camera

This is my Nova Camera

My camera collection is very eclectic, and I am drawn to odd and unusual cameras and photo items. I did a blog posting on the Minolta Six camera a couple of weeks ago. What drew me to that particular camera was that it didn't have the standard cloth bellows system but rather a series of metal cubes that pulled out and retracted back into the camera to form the bellows. These were very similar to a camping cup, where the larger rings pull away from the smaller ones on the bottom, creating a cone-shaped cup. 

 A year or so ago, there was a pretty major auction of cameras in the United States, with hundreds, if not thousands, of cameras and other photo items sold. There were many "lots" that had several cameras, maybe as many as 25-30 grouped into similar lots. I won one of these "lots" that had several smaller and subminiature cameras, many in their cases and several in the original box. The Nova Subminiature camera was in that particular lot.

I can still remember unwrapping the camera and opening the case to a camera I had seen in McKeown's Camera price guides many times. When I pulled the bellows out to find that they had a cubed bellows system, I immediately put the camera on my display shelf because I was drawn to its look.

The Company:

Here's where it gets odd. The only thing I can find about this camera or who made it was that it was created by Erwin Adloff Apparatebau, Berlin-Wilmersdorf, in 1938. Even that is suspect, according to McKeown's guide, as they have the Nova listed separately. There is a camera called the Adloff Tex camera, which has a body similar to the telescoping box bellows but with a more elaborate shutter. 

Nova Camera closed. It’s very compact.

Another oddity about this camera was that it was designed by Fritz Kaftanski, who was born in Essen, Germany, in 1899. According to the information found online, Kaftanski started designing Fotofex Kameras in Berlin in 1927. In 1932, Fotofex showed the Visorflex camera at the Leipzig fair and introduced other cameras a few months later.

 In 1934, the Sida and Extra Sida were tiny cameras produced in Germany, then later in Poland and Czechoslovakia under license in Italy. In 1937, Kaftanski moved to Czechoslovakia with the Sida patent, where production continued. Then, according to all I can find, Kaftanski moved to Paris in 1939, so sometime before moving to Czechoslovakia, he either designed the Nova for Erwin Adloff or someone else who remains unknown designed the camera.

Since little is written about this company, my best guess is that Erwin Adloff Apparatebau, Berlin-Wilmersdorf, was a small manufacturer producing one or two cameras just before World War II broke out. Many records either went missing or were possibly destroyed during the war. Fritz Kaftanski designed the Nova sometime before 1938, when it was produced. However, from what I can find online, I don't see any definitive proof or acknowledgment of Kaftanski designing the Nova, although he did create many other cameras during this timeframe.

 My Camera:

My camera is pretty small, measuring 3 5/8" wide by 2" tall by 1.5" deep with the lens retracted and 2 5/8" deep with the lens extended. The camera without the case weighs 7.1 oz, and with the case 9.9 oz. It uses paper-backed unperforated 35mm film, known as Bolta film, which was very popular during this timeframe and something I discussed in my last post.

When you first look at the camera, it looks extremely plain, yet it has some Art Deco features, like the lines around the lens and the text used for the name. Pulling the lens away from the body reveals the double box bellows, which are very ribbed silver. When the camera is flat on its back with the bellows extended, they almost give the camera a wedding cake look.

On either side of the camera is a textured finish to the metal design to help with gripping. I don't know how much gripping is needed for such a small and lightweight camera. On the back of the camera are two more grips on the sides of an exposure table explaining the shutter speed depending on the distance to the subject, shutter speed, and aperture set on the camera. There is no mention of different film speeds. Just above the exposure table is a green window, and another green window is the camera's viewfinder. Just below the exposure table is the word "FOREIGN," and on the front, below the lens, is D.R.P. ANG D.R.G.M, meaning this was made for domestic or international sales.

 The camera has three shutter speeds: 1/25, 1/50, and 1/100 sec, along with "B" for timed exposures. On the side of the lens is a lever that can be pulled out to change the aperture from wide open at f4.5 to f6.8. This is very similar to what box camera employed to change the aperture. At the 10:00 o'clock position, around the lens is the shutter release, and around the lens is the focus adjustment in meters, with the closest focus being 2 meters.

To take the back off the camera, there are two knobs you pull apart to get to loading and unloading the camera. Two films should be holding cassettes in the back of the camera, but mine only came with one. Interestingly, the film holding cassettes is Hermes Nova. Did the French company Hermes design the film holders, and how was a French company involved in this? This could be where the involvement of Fritz Kaftanski comes into play, as he did move to France in 1939, the year after the camera came out. Were there discussions between Kaftanski and Hermes during the mid-1930s?

Hermes Nova film cassette.

On the top of the film holder are four bumps or knobs that need to align with the slots on the camera film advance knob, otherwise, the film cassette won't fit in or out of the camera. Once the slots and the knobs are aligned, the film hold comes out quickly, and you can take it apart to load the film into the cassette. 

Once the film is in the camera, the film moves over a geared wheel above the film chamber, rotating a wheel with a white dot and white dash. As the film transports across this wheel, you can view this movement through the green window on the back of the camera, just above the exposure table, so you can tell when your following exposure will be as there is no frame counter on the camera, nor are there numbers on the Bolta film, so this was the only way to tell when you got to the next frame.

Conclusion:

I couldn't use this camera since I didn't have Bolta film to shoot with or a second film cassette, even if I did have the film. The Nova is a beautiful little camera, and I enjoy having it in my collection. Since the camera was only made for a year, how many cameras were made is unknown. Looking at the back door, there is 1114, which may be the serial number, but not 100% positive. Due to the lack of production and not seeing many for sale, I guess it's a reasonably rare camera.

My Nova camera in the fitted leather case

Thank you for taking time out of your busy day to review my film blog. I have another great camera picked for next week's blog, and I hope you'll look out for it.

 Until next week, please be safe.

Dan 35 I Camera

My Dan 35 Model I camera

I need to start this post back in time. I first started collecting cameras and other photo items in the late 1970s or early 1980s. I can remember purchasing one of McKeown's Camera Price Guides and spending hours combing through each camera manufacturer, looking at the cameras they had made in the past. There were so many odd and unusual like very rare original Leica; the very first bullet-shaped brass Voigtlander camera, the Compass camera or Photosphere that I could only dream of owning, and many were so far from the price budget that I knew there were only a pipedream.

 Many large companies, like Eastman Kodak, Polaroid, and Zeiss, made hundreds of different model cameras, which were abundant. Then, there were the smaller camera companies that produced unique cameras, like Univex, which was the first camera I owned. It was a Uniflex that was given to me by my uncle Bud, who, to this day, along with my brother Tim, I owe my love of photography.

 Then, I can remember thumbing through the price guide and finding a tiny company that produced a camera near and dear to me, the Dan camera. I immediately thought I needed to find one of these to put into my collection. My initial search was hopeless, as many of the local flea markets and antique stores I'd frequent only had the very common Kodak, Polaroid, Zeiss, and other companies like Herbert George and other American brands.

Online Auctions:

It would help to remember that this was before eBay, which didn't exist before the mid-1990s. I was an early adopter of buying and selling on eBay in 1997. At that time, there were no photos, and it was mainly just a buy/sell board with an auction element so you could post a camera or item for sale, but you only had the description from the seller to go by. When I first joined eBay, there was no name to have but a number. My original number was 1034; you had to do everything through DOS.

 EBay made a massive difference as it gained popularity. It changed how people bought and sold items. Adding photos gave the buyer more confidence in their purchase, and rarer items could hit higher pricing due to the inability to find them.

 For many years, the Dan Camera was very elusive, and since the camera was from a smaller company, the scarcity and pricing made the purchase of it next to impossible up until a couple of years ago when I was looking through a different online auction website, and I found a grouping of cameras which piqued my interest. As I zoomed in to look at this lot, there was a portion of a lens I could see.   I could barely read "Dan" on the ring around the lens as I looked closer. Here was my chance to finally own the elusive Dan 35 camera.

Name embossed on the back of the camera.

 The auction happened, and there was minimal interest in this group of cameras as many of them were very common items. However, these are the groups that I really enjoy because tucked away in the corner "could" have a gem hidden, and in this case, there was. I won the camera lot, got the items shipped to me, and there it was as I unwrapped it: the Dan 35 camera. To my amazement, it was the first model.

History:

The Dan 35 is a simple Bolta film camera made in Japan after WWII. Bolta film was invented by Johann Bolten, who founded Bolta-Werks in Nuremberg, Germany, in 1936. The film was to go into his smaller, more compact cameras named the Boltavit. Bolta Werk later produced the Photovit line of cameras from 1936 to the 1950s. Bolta film was incorporated into many different cameras during this period and was a nonperforated 35mm film with a paper backing loaded into special cassettes. Later models of film were spooled similar to films like 828 and 127.

Stetch of Dan 35 Camera by Hagimoto Danji.

 The Dan 35 camera was made by Hagimoto Danji. He built a small plant in Suwa to manufacture the Dan 35 camera, which he sold in his camera shop in Ginza after WWII in 1945. After the moderate success of the Dan 35, there were three different distributors for the camera between 1945 and 1950, when the camera company went bankrupt. The logo on the camera coincides with the company's name, which is H for Hagimoto above Dan for Danji on the far right of the camera.

 Here's where it gets a bit fuzzy. Yamato Koki Seisakusho was a camera company that started in Tokyo in 1943. It made shutters for Japanese camera companies like Gelto and Leotax. The first cameras produced by Yamato were the Minon 35, Minon Six, and Pax 35.

 Yamato, known to produce the Minon 35, a copy of the Dan 35 III and later the Pax 35, is a camera that is a copy of the Super Dan 35. Some sources say Yamato made the Dan 35 and Dan 35 II, but others say they took over producing the Dan 35 after Hagimoto went bankrupt in 1950. Yamato produced the Pax line in the 1960s.

My Camera:

The Dan 35 is a very simple camera with a torpedo-shaped viewfinder on top. It measures 3.25" wide by 2.25" tall from the base to the top of the finder and is 2" deep from the front of the lens to the back of the camera. The camera weighs a whopping 5.2oz and is considered a miniature camera. The Dan 35 has a Dan Anastigmat 40mm f4.5 lens with a Silver-B shutter.

Around the lens is the focus ring, a helicoid focus measuring from 1 meter to infinity. Just behind the aperture numbers on the lens is a knurled ring that sets the aperture. In front of the aperture numbers is another knurled ring that sets the shutter speeds on the camera. There are only shutter speeds, 1/25, 1/50, and 1/100 sec, along with B. On the left of the knurled ring is a cocking lever to cock the shutter, and the shutter release is on the right side to expose the film.

Logo and Torpedo viewfinder

 To load the film, on the top of the camera is a locking lever with "L" for lock and "O" for open. Switch the lever to "O," and the top comes off to load the film. The base comes off to load in later models like the Dan 35 Model II. My camera has no spools to load the film, and the shutter doesn't work. On the back of the camera is a red window with an open/close lever to see the numbers on the paper backing of the film so you know where to stop for your next exposure. Also, Dan 35 is embossed on the back of the camera.

Conclusion:

Unfortunately, I don't have film, and the camera's shutter doesn't work, so I couldn't take photos with this camera to share.

 I mainly have this camera for a couple of reasons. One is its rarity; the more important reason is that it has the same name as me, so I get a kick out of that. I have another miniature camera set aside for next week's blog post, which I also find fascinating.

 Thank you for taking a few minutes to review my blog post about the cameras in my collection. Please be safe until next week.


Zeiss Ikon Super Nettel

Upon my first encounter with the Super Nettel camera, I was immediately drawn to its understated elegance and subtle Art Deco influence. This is my second Super Nettel, having previously owned the Super Nettel II, a similar model with a few distinct modifications.

My Zeiss Ikon Super Nettel Camera from 1934

 When my wife and I were in Paris earlier this year, I always enjoyed visiting local flea markets to look for anything photographic, whether it's cameras, lenses, old negatives to digitize, daguerreotypes, or just photo nickknacks or accessories. I made my way to their larger flea market area on a Saturday morning, and in one of the stalls, a lovely gentleman had some Leicas and other rarer cameras. I would have liked to purchase more than I did, but I'd pick up this very nice looking and working Super Nettel camera. In the back of my mind, I always pictured myself doing a blog post on it, especially since the camera was in good working condition, especially for a camera built 90 years ago.

 The Company:

Zeiss Ikon, a company formed in 1929 through the merger of four prominent camera companies in Germany, including Ernemann, Goerz, Ica, and Contessa-Nettel, was a significant investment by the Carl Zeiss Foundation. The company had two main divisions: the camera and the optical. 

 With the new company's formation, almost all of the cameras had Carl Zeiss lenses, and the other companies that had optical manufacturing, like Goerz, had to shut down their optical divisions. With the formation of the new company, almost all of the cameras were using Compur shutters, and like the optical companies, the majority of the shutter companies were also absorbed within the new company.

This group was one of the biggest manufacturers of cameras and lenses in the world, producing many top-quality 35mm cameras like Contax and several high-quality folding cameras like Super Ikonta, which to this day are highly desirable due to their workmanship and quality optics. Until WWII, Zeiss was also a major manufacturer of movie cameras and medical optics.

The cover of the instruction manual. Thank you Pacific Rim Camera.

 After WWII, Zeiss was split into East and West German companies. The company was in Stuttgart in the West, and there were disputes with East Germany about the trademark. The West German ceased production of cameras in 1972. In East Germany, many of the factories were dismantled and sent to the Soviet Union. The Soviet camera manufacturer Kiev received much of the equipment, and in 1948, the Zeiss company became government-owned

 In 1948, the company introduced the new Contax S model, which had a different look from their earlier line of rangefinder cameras, but due to the split between different countries, there were trademark and naming disputes with West Germany, so in 1958, the company changed the name to VEB Kinowerke Dresden and later was rolled into Pentacon.

 After Germany's unification, Carl Zeiss reintroduced the Zeiss Ikon name and produced a rangefinder camera that was introduced at Photokina in 2004. The camera was built by Cosina in Japan and had the Leica M mount for lenses. Like the Contax G and G2, there were lenses made in both Japan and Germany for the camera.

My Camera:

For me, the reason I enjoy shooting with a Rangefinder 35mm camera is due to a few different reasons. The cameras are smaller and more compact to carry. They are less noisy to photograph due to the shutter system and not having the noise of the clunking mirror flopping up and down. Granted, the rangefinder focus is more challenging to use. It takes some time to get used to, or the ability to see what you're getting when you put on different lenses, so there is a trade-off between an SLR and a Rangefinder-style camera.

 The Super Nettel camera was made in 1934 as a "less expensive" camera to their Contax line. To open the front door to expose the lens system, there is a button on the top center of the top plate you press in, and the lens, which is attached to the bellows, pops out. My camera has the less expensive Carl Zeiss Jena 5cm (50mm) f3.5 Triotar lens. The camera had a more expensive Zeiss Tessar 5cm f2.8  or 5cm f3.5 lens. Around the lens are three screws in the 2 O'clock, 5 O'clock, and 8 O'clock positions, which are for holding on an accessory filter or the lens hood.

When closed, my camera measures 5.5" wide by 3" tall by 1.5" deep. When the lens is exposed, it is 4" deep, including the front door, which folds down. The camera weighs 1 lb, 6.3oz. 

 Around the lens is the aperture control, which goes from F3.5 to f22. The Super Nettle incorporates the same or a very similar rangefinder system as the Super Ikonta cameras. Around the outer rangefinder window is a knurled ring that you turn to focus the rangefinder system, bringing the two images together to get a focused image. On the outside of the knurled ring is the focus distance in meters, along with a small depth of field scale.

Note the three screws aaround the lens to hold the accessory filters and hood.

 To retract the lens and close the front door for travel, there are two knobs on the outside of the door that you press in, and at that point, you can press the lens back into the camera body, which will also close the front door, which will lock once pushed in.

 On the back of the camera are two windows. The window on the left is the viewfinder for composing the photo, and the window on the right is the rangefinder window for focus. They are both pretty small windows, but they do an adequate job.

The left window is the viewfinder, and the right is the rangefinder.

On top of the camera is an accessory show for putting on an accessory viewfinder, which has a few different options according to the instruction manual. Next to the accessory show is the frame counter, and next to the frame counter is the advancing knob which also incorporates the shutter speed settings and cocks the shutter. Inside the winding knob is the shutter release. On the far left side is the camera's rewind knob to retract the film when you're finished shooting the entire roll of film. In between the frame counter and the winding knob is a small button. This button unlocks the winding sprocket, so when you rewind the film into the canister, you don't rip off the sprockets of the film.

From left to right are Rewind knob, Viewfinder window, Accessory Shoe with Opening button in front of AS, Frame Counter, Rewind unlock, Winding knob with Shutter Speeds.

To take the back off to load the film, you'll need to look at the bottom of the camera, where there are two handles on either end of the camera. Flip up the handle and turn the handle 90 degrees. One knob will go clockwise and the other counterclockwise. The back will slide off the camera, exposing the incredible metal rolling curtain-style shutter system, the same as the Contax and other Zeiss cameras have incorporated into them.

 You load the camera like you would any other 35mm camera with the film canister going on the left, pulling the leader to the take-up spool, and making sure the sprockets are engaged with the "advancing" sprocket, which is advancing the film across the shutter. Once on the take-up spool, I always take up the slack on the rewind knob, so when I put the back on and advance the film, I watch for the knob to turn when the film pulls out of the canister s. I know the camera is loaded correctly. To put the back on, slide the back into the camera and turn the locking handles the opposite way, and the back is locked into position.

My results:

I need to practice what I teach. I only got a few good photos from this roll of film, as after the sixth frame, the film sprockets tore, and the film didn't advance through the camera. However, the frames I did get were well-exposed and very sharp.

Conclusion:

What another fun camera to shoot with! I enjoyed the camera's ability to focus and handle when out and about shooting. Since I had a mishap with the film tearing, I wanted to get the blog out. I will add more photos down the road when I take the camera for a trip some weekend, and I want a great-quality camera with a very sharp lens to be creative.

 I already have the camera picked for my post next week, which I hope you'll come back to look at at your leisure. 

 Until next week's post, please be well and safe.


Minolta Six Camera

It seems like I purchase items from camera auctions in "lots," and there is always a treasure hidden in the background that you either didn't notice at first, is hidden within all the photos of the items, or, in this case, the camera wasn't taken out of the case, and the case was obscured, so there was no visual evidence that the camera was.

 As I unwrapped the cameras won from the auction, one brown case caught my eye. It bore a striking resemblance to the Mamiya Six in my collection. But upon closer inspection, the name 'Minolta Six' was revealed. I initially thought it might be similar to the Mamiya Six, but the truth was far more exciting, as I'll reveal when I introduce the camera.

History:

In an earlier post, I did on the Minoltaflex CDS, I did a brief history of the company, which read, 

Kazuo Tashima founded Minolta in Osaka, Japan, in 1928 as Nichi-Doku Shashinki Shōten, which means Japanese-German Camera Shop. In 1931, the company updated its name to Minolta, which stands for Mechanism, Instruments, Optics, and Lenses by Tashima. In 1937, the company was reorganized as Chiyoda Kogaku Seikō, K.K. They are now introducing their first Twin Lens Reflex (TLR) camera, the MinoltaFlex, based on the German Rolleiflex cameras. The MinoltaFlex was only the second TLR introduced from Japan after the Prince Flex by Neumann & Heilemann. In 1947, Minolta introduced rangefinder cameras like the Minolta-35, and in 1959, the Single Lens Reflex (SLR) SR-1 camera. In later years, they signed agreements with Leica and came out with the first autofocus SLR, The Minolta Maxxum 7000, which carried on to several in their autofocus system.

 To expand slightly from the above text, in the early years, there was a big German influence on the Minolta company, which was known as Nichidoku Shashinki Shōten, which means Japanese, German camera shop. In the early years, the company received help from camera technicians Billy Neumann and Willy Heilemann, and the shutters and lenses were supplied from Germany. Their first camera was the Nicarette, which was released in 1929.

In 1931, the company was transformed into a stock corporation named Molta Gōshi-gaisha. Molta is an abbreviation of Mechanism, Optics, and Lenses by Tashima. Neumann and Heilemann left the company in 1932, returning to Germany to start their own company, and the German influence left with them. In 1933, the name Minolta was adopted. In 1937, the company became Chiyoda Kōgaku Seikō K.K anexpanded the production of cameras into TLR and press cameras similar to the Plaubel Makina. 

Minolta Six in the July 1938 catalogue and price list by Asanuma Shōkai. Scan by A. Apra. (Image rights)

 In 1940, the famous Minolta Rokkor lens was produced, but it was only used for the military. Consumer camera production ended in 1943 to concentrate on the war effort. Three of its four plants were destroyed by Allied forces during WWII. Soon after the war, Minolta released the Semi Minolta III, and throughout the 1950s, Minolta expanded its line of cameras to include folding cameras, TLRs, SLRs, and rangefinder cameras.

 In 1958, the SR-2 was released, and it was Minolta's first system camera. This reign of SLR system cameras included partnerships with Leitz in the 1970s, which helped produce CLE cameras. Minolta had a full line of autofocus cameras, the Maxxum line of bodies and lenses, and Minoltas final SLR camera ended in 1995 with their X-370.

 Minolta produced many different 35mm, APS, and DISC cameras and partnered with Konica in 2003, but by 2006, the camera company had discontinued camera production and relied heavily on the copier business.

My Camera:

Opening the case and looking at the camera for the first time, I was surprised by the Minolta logo and text on top. Since it was made in 1936, it has a genuine Art Deco design in the look and feel of the camera. My biggest surprise was when I initially pulled the lens out from the body and found the camera didn't have a cloth bellows. Instead, it has a series of stacking cubes that pull away from the camera body, AND these boxes are reinforced with another Art Deco element, metal brackets that resemble an "M" when the camera is laid on its back with the lens pointing up. WOW, Just a fantastic design.

The Minolta Six camera measures 6 inches in width, 4.75 inches in height with the finder up, 3.75 inches with the finder closed, and 4 inches in depth with the lens out, or 2.25 inches with the lens closed. It weighs 1 lb. 5.7oz. without the case or loaded with film. The camera's body is made from a bakelite or plastic material, covered in a high-quality leatherette.

 To pull the lens out to take photos, there are two grips, one on either side of the lens, that you grab onto to pull the lens out and away from the body. You need to expose three stacking cubes before the camera is ready to take the photos. Under the lens are two curved chrome bars you can slide down to prop the camera up so that when the lens is out, it doesn't tip forward and keeps the lens level.

Around the top of the lens is Patents-Nippon, and below is Crown, which is the shutter on the camera. The actual lens is an 80mm f5.6 Coronar Anastigmat Nippon lens. Around the lens is a manual focus ring that focuses from under 1 meter to infinity. The focus line to judge distance is a protruding tab with a line at approximately 10 O'Clock on the lens face. The lens also has a stopping screw that prevents the lens from rotating past the infinity mark on the tab.


My camera has only four shutter speeds: 1/150, 1/100, 1/50, and 1/25, along with "b" and "T" for timed exposures. On the top of the camera is a pop-up viewfinder with etched or lined crosshairs to line up horizontal or vertical subjects as needed. The back of my camera sports three red windows with different numbers, which are used to line up with the number on the paper backing to get to the proper frame number. In later cameras, they went to a single window system, which is more common with current 6x6 format cameras using 120 film.


To open the back of the camera, there is a latch behind the strap on the left side with an arrow pointing down. Slide the button down, and the camera's back opens. The chrome winding lever was used on the older models. Later they went to a plastic or bakelite knob in the later models. My first thought when I looked at the back of the camera was that it was not a full-frame 6x6 camera, but that was because I was looking at the retracted plastic cubes from the bellows. It is indeed a full 6x6 format camera. Load the film on the right side and bring the leader to the left to take up the spool. The knobs on the bottom of the camera pull out so you can put in the film and take up the reel easily.

 The case for my camera is in great condition. There's a pretty cool instruction tab on the inside of the case, which was made for the three window cameras.

 The crown shutter doesn't have a cocking mechanism. There's just the shutter release to take the photos. I loaded the film. I pulled out the cube below and started to take pictures of the neighborhood with my trusty light meter. Once I reached the end, I unloaded the film and processed the negatives.

My Results:

Here are some of the photos taken with the Minolta Six camera. The photos were a bit flat in exposure and contrast.

Conclusion:

I enjoyed shooting with the camera, but I am still primarily impressed with the innovative and beautiful bellows system in the camera. Not only is it functional, but it is very light and tight and only wears out slowly compared to the style bellows. The flip side is, if something happens to this bellows, the replacement is hard to replace due to the material. I wished there were faster shutter speeds, but I was using 125 iso film, and with the aperture range of the lens, I didn't have an issue.

 I have a great and fun camera for next week's blog post, so I hope you'll stick around to read that one, too. Thank you for your time, and please be safe until then.

Update:

According to Andrea Apra, who corrected and let me know initially, a small cardstock table was provided with this camera. This table was used to calculate the Depth of Field. The card I have in the case with the wrong translation is just instructions for using this table provided with the camera, which I don’t have.

The table has a horizontal scale at the top with the various distances on the focus ring: 7, 5, 3, 2, 1.5, 1 Mtr.

Then, on the vertical column, the diaphragm has various apertures: F 5.6, 6.3, 9, 12.5, 18, 25.

Two pairs of values, the minimum and maximum distance of the DoF, are intersecting at the table's intersection.

This explains how to read the table.

This is the text translated in its original graphic structure of the text.

Super Flex Baby II Camera

When I first got this camera, I initially thought it was from somewhere in Europe, possibly Germany or Eastern Europe, due to its design and feel placement and shutter release, which resembles the Karma-Flex camera from Germany. 

 After doing some research on the camera, I found out that it was made in Japan. It was the first medium-format single-lens reflex (SLR) camera with a leaf shutter.

 The Super Flex II camera is odd and relatively small, too. When I took the camera out of the case, my hands are average size, but the camera seemed lost, and it was only a minute before I held it. It's not a miniature camera, but everything seems much smaller than I'm used to. The light tube or waist level finder, the lens and focus control, and even the winding knob appear to be smaller than what I'm used to. In the back of my mind, this will be a fun camera to test and write a blog post on.

History:

Umemoto Seisakusho manufactured the Super Flex camera between 1938 and 1942. It was started by Umemoto Kinzaburō, who started a small manufacturing plant in Yokokawa in 1931. In 1932, he was asked to open a new camera manufacturing plant in Toyko, which was completed in 1935. Their first cameras were the Super Makinet Six in 1936 and Neure Six in 1937, both 6x6 strut-folding cameras.

 As mentioned above, they took inspiration from the Karma-Flex camera in 1938. They developed the first Japanese medium-format, single-reflex camera, the Super Flex camera, built around the popular 127 film 4x4cm format camera.

In 1939, they modified the camera's design to what's known as the Super Flex Baby II. The modifications included a fully chrome shutter speed dial as opposed to the chrome and black of the original design. They also came out with a new lens with a full chrome barrel and a focal length of 70mm instead of 7cm on the original lens. They also lost the black and chrome on the viewfinder logo and went all chrome, like the shutter speed dial and lens.

Advertisement of the Super Flex Baby camera from 1942.

 During the tumultuous years of WWII, the company shifted its focus from camera manufacturing to supporting the war effort. Despite the challenges, they produced the Semi-Makinet camera, a 6x4.5 folding camera, between 1941 and 1943. The factory was tragically destroyed during the Allied bombing of Tokyo in 1945. However, the company's spirit remained unbroken. They relocated the plant to Yamagata in 1945 and rebuilt the plant in Tokyo in 1948, which was a remarkable display of resilience.

 After the war, the company briefly took the name Umemoto Kōki Seisakusho and produced the Rocky Semi in 1953. This camera didn't do well, and in 1962, it became Y.K. Umemoto Seisakusho, which still produces photo-related parts for Kenko today.

 Here is a wonderful Japanese website with a lot of insight on the company Umemoto . I used Google Translate so I hope it comes through properly.

My Camera:

My camera, with its serial number 3401, is a fascinating blend of the original Super Flex Baby and the model II version. It features the original chrome and black viewfinder, a Model II shutter speed dial and lens, both in chrome, and a lens measured in 'mm' rather than 'cm.' This unique combination, a result of the transition period, added an element of surprise and excitement to my discovery of the camera.

 The serial number on my camera is 3401, which you can find on the inside of the latch that holds the back of the camera. My camera measures 4" from the back to the front of the lens and 2.75" from the back to the lens mount on the camera. It measures 4.25" wide and 3.25" tall if the viewfinder is closed and 4.75" tall with the light hood opened. My camera weighs 1 lb. 3.2oz without the case.

Using the camera is pretty straightforward. There is a latch on the camera's right side, and you slide up to open the back door. You take the empty spool from the right of the camera and put it on the left side where the winding knob is. To take out the spool and put in the roll of film, you'll need to pull out the knob that holds the film into place. Once you have loaded the empty spool and film, pull the leader to the empty reel and thread the leader into the spool and wind. Once it's securely on the take-up reel, close the back.

 Here's where it gets exciting, something I learned and did when I looked at the company's website. I have the link to the above in the "history" section. Here's an excerpt from the company history explaining the film numbering sequence and the camera's winding instructions.

 "There are three red windows on the back cover for taking 12 4x4 cm shots. ( It seems that 4x6 cm numbers were used because 127 film did not have numbers for 4x4 cm. ) The left and right windows only accept odd numbers, and the center window only accepts even numbers and is read as follows (ignore the ○ parts). 1st photo) 1○○ 2nd photo) ○○1 3rd photo) ○ 2○ 4th photo) 3○○ 5th photo) ○○3 6th photo) ○4○ ... 11th photo) ○○7 12th photo) ○8○ I think this operation was quite difficult."


Looking at the numbers by the window openings, the text above now makes sense.

I didn't use this method and only got eight photos on my roll.

 The mirror in my camera was so bad that I couldn't use it and didn't notice before putting in the roll of film, so I was forced to use the sports finder to frame the photos I took. It worked out OK, so I wasn't too upset.

 I used my trusty light meter to get the needed exposures. I also needed to find a roll of 100 ISO film, as anything faster would have run into issues since the fastest shutter speed on the camera is 1/100, and the lens stopped down to f22. Luckily, I noticed that the lens focusing was in meters instead of feet, which I'm used to with most cameras I use. I needed to keep that in mind when composing my photos.


The camera case I have is in moderately good condition. The strap is intact, and it covers the camera well. The only thing missing is the snap that holds the front and back together but stays closed and protects the camera well.

 The film was used up quickly; now it was time to process it. 


Results:

The film I had was some pretty old and out-of-date 127 film, so I had yet to learn what I would get. It was not as good as I anticipated after I pulled the film from the processing tank. While I'll call the "art" prints, the negatives were very mottled, and I'm unsure what caused it, but the images are somewhat sharp.

 Here are some of the results from the camera.

Conclusion:

The camera was interesting, but the mirror and the focusing, or lack thereof, could have sat better with me. I decided to remove the finder and clean up the mirror to bring the camera back to life and make it more usable.

 Thank you for taking a few minutes to look over this camera blog. I'll have another exciting camera for next week's post, so please be safe until then.

Camera Update:

There were only four screws to hold the light hood on, so I proceeded to take them out. The hood came off quickly enough. Under the hood was a mask on top of the focus screen. I turned the camera upside down slowly, and the focus screen came right out, exposing the dingy mirror.

 They always say to test a small part when cleaning first to see if it's OK to proceed. I didn't hear that little voice say that this time, so I cleaned the mirror, thinking the silver paint was on the backside of the glass, which is normal. I took two swipes with my Q-Tip, and the finish came right off. YIKES!!!!


So, I ordered some silver markers to see if that would suffice to bring back the mirror effect to my new piece of glass. The mirror, or glass, now was easy enough to get out as it was held in the bracket with corner clips, which I slowly bent back to take out the mirror.

I received the silver or what’s called Chrome markers late last night. Early the next morning, I applied a generous amount to the glass I removed and let it dry. The markers produced more of a ripple effect as opposed to a clean glass mirror. It was certainly shiny enough, so I reassembled the focus screen and light hood back onto the camera, and the camera actually did a good job of focusing on a subject when viewing through the camera. It’s considerably better than before I disassembled it and when I took photos so I’m happy with how it turned out.

Here are the results.

Thank you again for reading about this interesting camera. Until next time, please be well and safe.

Zeh Zeca-Flex Camera

This camera combines the compactness of a folding camera with the quality and handling of a twin-lens reflex camera. The Zeh Zeca-Flex is just the camera mentioned above, and I've had my eye on it for many years. However, the rareness and price have always eluded me until I went into a great used camera store in Salt Lake City, UT, Acme Camera.

 The first time I went into Acme Camera, they were in their older location, and the store was filled with photo knickknacks. I struck up a conversation with the people there who were selling used gear, servicing cameras, and renting for the local photo community. On my second visit, back in one of the cases was the Zeca-Flex I currently have. The camera was in excellent condition, with clean optics and a working shutter. I offered a trade for the camera, and they accepted. I was elated to have the camera so I could do a blog article on my Zeca-Flex.

History:

In the early 1900s, around 1901-1902, Paul Zeh produced camera parts like shutters in his workshop in Dresden for some of the other local camera companies in Germany. In 1913, he started producing cameras, and by 1922, the company Paul Zeh Kamerawerk was started. In the early years, the company mainly produced folding plate cameras or cameras that took images on glass plates, which was very common at that time period.

During the 1920s, the company did very well. At this time in photo history, roll film was starting to become more popular. The photographer or photo enthusiast didn't need to carry bulky film holders. All the photographer needed to do was put in a roll of film and get 8, 10, 12, or 16 different photos on the same roll of film without the hassle or inconvenience of loading and carrying the film holders. 

The Pilot Reflex camera, produced in 1931 by Kamera-Werkstätten Guthe & Thorsch in Dresden, has a very similar style and appearance to the Perfekta and the Super Perfekta; you can see a review by Mike Eckman of the Pilot.

 During the late 1920s and 1930s, the company expanded production into folding roll film cameras. These cameras were more compact and allowed the photographer to travel with less equipment, so their popularity grew.

 By 1937, Zeh produced the Zeca-Flex, a folding, twin-lens reflex camera. Its design is very similar to that of the Welta Perfekta, which was produced in the 1933-34 timeframe, and the more robust Super Perfekta introduced in 1935. The Perfekta and Super Perfekta were made by Welta Kamera Werk, which was in Freital, a very close town to Dresden. 

I'm confident Zeh wanted to compete with Welta on this camera style. Unfortunately, this camera style didn't catch on with consumers. Hence, with all three cameras, the Perfekta, Super Perfekta, and Zeca-Flex were the only cameras made and are rare and somewhat expensive.

 WWII took a toll on Dresden as the Allies leveled the city due to its large manufacturing capabilities. By 1948, the Zeh plant closed, and the company went out of business. My guess is that some of the Russian companies took some of the camera manufacturing machines to produce some of the after-war cameras. This is just my guess, though.


My Camera: 

The condition of my Zeca-Flex is unusually excellent for a camera that is almost 90 years old. The metal is still shiny, and all the functions move like when the camera was first purchased in the late 1930s.

 The camera measures 7.5" long without the light hood open. When the light hood is open, it measures 9.25" tall. The Zeca-Flex is 3.75" wide and closed; it's 2.5" from the front of the viewing lens to the rear of the camera. When the camera is open, it measures 4.75". The Zeca-Flex weighs 2lb—5.2 oz.

The lens on my Zeca-Flex is a Schneider Xenar 7.5cm (75mm) f 3.5 in an F. Deckel Compur Rapid shutter. The shutter speeds go from 1/400 to 1 sec with both "T" and "B" settings. Since I don't have a proper shutter tester, all the shutter speeds sound accurate to my trained ear. The viewing lens is a Sucher Anistigmat f2.9 lens.

To open the camera, there is a small button on the left side as you hold it to take a photo. Press that small button in, and the lens door unlocks. On my camera, you need to pull out the lens to put it into the taking position. There are knurled grips on the sides of the lens door to pull the lens out. Also on the lens door is a flip-out stand that allows you to stand the camera up, which is very common in folding cameras.

Note the small button on the side of the camera used to open the lens.

To close the lens, there are two buttons on either side of the backdoor. You press in towards the camera body, then slide the lens back into it and close it until you hear the locking "click" sound, which means the lens is back and locked in the camera body.

 On the back of the light hood, there is a sliding bar you slide over to open the light hood for viewing purposes, and on the side of the light hood is a switch you can flip up or down the magnifying glass for critical focusing.

There is a latch at the top of the back door, which you slide up to open the film door to load and unload film. In my camera, there is a roll film holder you put the roll of film into before putting it into the camera. The film holder is something I've never seen before, and on the first roll, I needed to figure out which way the film rolled across the shutter, but it was easy to figure out. Now that I've done it, it makes sense, and I won't have difficulty in the future.

 The frame counter resets to number 1 when I close the back of my camera, or at least it was there when I put film in it. There is a button on top of the frame counter. When I slide that button over, the frame counter goes to number 5, so my guess is that isn't correct. I can't find an instruction manual for this camera online, so I'm not 100% sure of the correct way to get maximum frames from the camera. 

There is a red window on the back, which I'll use in the future, as I did miss a few frames at the beginning of the roll when I shot with it. The film advance is on the bottom of the camera and is directly tied into the frame counter, whether you have film in it or not. The frame spacing on my camera was good once I got to the first frame and used the frame counter to find the next frame.

 To focus the lens, as you hold the camera to take photos, there is a wheel next to the viewing lens. I rolled my finger across it one way or the other to achieve proper focus, which was the easiest and made the most sense to me.

This is the focusing wheel. I used my finger to slide back and forth to focus.

Results:

Now that I had a roll of film in the camera, I took it out and walked around the neighborhood to get some photos.  Here are some pictures I took on my walk with the stunning Zeca-Flex camera.


Conclusion:

The viewfinder wasn't the brightest, and achieving good focus was difficult even with the magnifying glass up. Another negative about using the camera is where the shutter release is placed. There is no shutter release button, so you need to cock the shutter and then release it with the shutter release button, which is in an awkward place and thought my finger would be in the photo, but it wasn't.

Besides these two items, the camera was a joy to shoot with, and I feel lucky that my camera is in such good condition. I will use it again, but I'm putting it back on the shelf and trying something different for next week's blog post.

 Thank you for taking a few minutes to review some of the cameras in my collection.

 Please be safe, and I hope to hear from you soon.

Robot Royal 36 Camera

Being a big fan of The Robot cameras and having done an earlier blog post on the Robot Luftwaffen Eigentum camera, I wanted to get a camera I could use when we went on vacation or just out for the weekend. Years ago, I came across an excellent and working condition Robot Royal 36 camera. It was from an online auction, so I made a relatively low offer and won it.

 When I received it, I was surprised by the weight and heft of this particular camera. I put it through routine tests to see if the shutter was indeed opening and closing, which it was. The lens was clean, another positive, and the transport was active and in good working condition.

 When COVID hit, I was laid off from one of my favorite jobs. I started writing my camera blog. After being off work for ten months, I got hired for a better position and loved the job, company, and boss, but I put the camera on my shelf for the next four years until I recently retired and started writing my camera blog again.

History:

Otto Berning & Co. started in Dusseldorf, Germany, in 1933. Otto Berning and Co. began to manufacture amateur cameras in 1934 when a young watchmaker in his 30s, Heinz Kilfitt, designed the first compact camera for what Robot would be so well known for. The design had a spring-loaded motor winder, a unique item brought to the camera industry due to his watchmaking skills. Heinz Kilfitt also designed the camera to have a 24x24mm film format. He offered the format size to both Kodak and Agfa, who rejected it, so he sold the design to a young Hans Berning, who was only 23 and worked for his father's company. 

 Robot cameras provide a film format of 24x24mm on most of their cameras. An advantage of the 24x24mm frame size was that the photographer could get 50 images on a roll of film instead of the standard 36 in the traditional 24x36mm format. Another advantage was that there was no need to turn the camera for vertical shots.

Some unique features of the Robot cameras are that they use a rotary shutter and sprocket film drive system, which are more common in the cine cameras of the time. Robot cameras also have a 90-degree switchable viewfinder, allowing the photographer to point the camera in a different direction while looking through the viewfinder and taking photos. All the cameras have a winding motor of film advance system that allows the photographer to wind the motor and shoot rapidly up to 5-6 frames on a single wind, depending on the camera.

 Robot also provided either Carl Zeiss or Schneider-designed lenses on their cameras, which gave the photographer unparalleled sharpness in their images. The cameras were die-cast zinc and stamped stainless steel bodies chalked full of clockwork inside, and they are very sturdy and extremely well made, a testament to the high-quality materials used in their construction. 

During WWII, Robot produced cameras for the German Luftwaffe to put on their Stuka dive bombers. After the war, Robot continued producing high-end cameras like the Robot Star and Junior cameras. Robot produced the Robot Royal in three formats, with a few feature and film format variations. 

My Camera:

My model is the Robot Royal 36, model III, and it has the film format of 24x36, the most common film format for 35mm cameras. My camera has a Schneider Xenar 45 mm f2.8 lens. My camera has a Schneider Xenar 45mm f2.8 lens. It measures 5.5" wide x 3" tall x 2.75" deep from the front of the lens to the back of the camera and weighs a whopping 2 lbs. 0.4 oz. That's the first thing I noticed when I unwrapped the camera. This is a very solid and well-built camera with unique features that set it apart from other cameras. 

To open the camera, as you hold the camera there is a chrome tab with etching on it on the left side. With your thumb, you lift that and the latch and open the back of the camera. Unlike most 35mm cameras, this camera has a take-up spool you need to load the leader into as opposed to just putting the film leader into the take-up slot, and the camera takes up the film. You need to take the take-up spool apart and thread the film leader into the spool, then put the cassette back together and load the film and take-up cassette into the camera. Then fire two frames, and you're ready to go.

My camera has shutter speeds from 1/2 sec to 1/500 sec, along with B for timed exposures. The bottom of the camera has a winding mechanism that allows me to fire 12 photos at full wind, which takes me about ten and a half cranks to wind fully.

Yellow, Green and Blue dots on lens and Aperture number for Zone Focus.

 The rangefinder on my camera is very bright and easy to focus. The other significant item about the Robot camera and lens system is they allow the photographer to shoot with zone focusing, which is fantastic for street photography. The lenses have yellow, green, and blue dots, which correspond to the colored apertures on the lens. The lens's apertures 2.8 and 5.6 are in yellow, F8 is in green, and f16 is blue. All you need to do is match up the color dot on the focus dial and the aperture used, and the lens shows you your depth of field. This procedure is similar to all other lenses, but the color coding makes the system more "user-friendly."

Removing and reattaching the lens of the Robot Royal 36 is simple. A tabbed collar at the bottom of the lens, when moved to the left, allows the lens to be detached. To reattach the lens, align the two red dots and slide the collar counterclockwise. This careful procedure ensures the lens is securely in place.

Switch for “Green Dot” normal film advance, “Red Dot” Close viewfinder and “R” Rewind film back into canister.

Once I shot the film, One the back of the camera and to the right of the viewfinder is a switch with a green dot for regular forward film transport, there is a red dot which closed the viewfinder half way and "R" for film rewind. I put the camera in the "R" position and reminded the film as a regular 35mm camera procedure. On the bottom front of the camera are the flash sync ports for "X" (electric flash) or "M" (bulb flash) settings.

Results:

 I took a roll of film, put it through my camera, and walked around my backyard to see how the camera performed. This is the first time I got to shoot with the camera since I bought it 4-5 years ago, and there were a few anomalies in the camera. There seems to be a slight light leak, but to be 100% transparent, the film I used was old, and one I had shot just a few frames with and rewound the film with the leader exposed more than ten years ago, so I can't 100% blame it on this camera.

Conclusion:

While Leica has the prestige, Robot and Alpa are probably the best-built cameras in terms of craftsmanship and overall quality. The camera is excellent, the lenses are fantastic, and it offers things built into the system, like motor advancement and an excellent feel. I had a great time shooting with it, and I need to run a fresh roll of film through this beauty more often.

Thank you for taking time from your busy day to review this blog.

Until next time, please be safe.

Argus Model K Camera

I was looking through a group of cameras purchased a while ago, and when I opened the case to look inside, I remembered thinking that I’d never heard of an Argus Model K camera. 

My Argus Model K Camera

 I was familiar with the camera company Argus and have owned hundreds of their very familiar models, like the grand old dad of cameras, the Argus C3. I’ve had Argus C4, C33 and lenses, C44, Argoflex, many of the different A series, and even projectors.

 At this point, I figured it was an interesting camera to do a blog post on, as it had some real oddities, and I’d never done a post on Argus, so here it goes.

The Company:

The company Argus started as International Radio Corp., was started in Ann Arbor, Michigan, in 19931 by a group of local businessmen and produced radios during this time. Some of these prominent business people were William E. Brown Jr., who became the mayor of Ann Arbor; George Burke, a prominent judge at the Nuremberg Trial after WWII and who later became director of the Argus; and Charles Albert Vershoor, the company’s president.

 International Radio Corp. employed around 75 people, producing radios made from molded plastic rather than wood, which was popular at the time. Producing the radios from molded plastic was also less expensive, which made them popular during the Depression era. These radios were sold under the “Kadette” brand and are still collectible today.

Radios were a seasonal business that did well in the fall and winter seasons. To keep the company busy in the slower spring and summer periods, the company produced a low-priced 35mm camera, the Model A, made from molded plastic and sold for the ridiculously low price of $12.50 in May 1936.

 The camera became wildly popular due to its low cost and the rising popularity of Kodachrome film. Because of the camera’s popularity, the company decided to sell its radio patents and change its name to International Research Corp., where it concentrated on the photographic portion.

In 1940, Argus produced optics and radios for the war effort. In 1942, all domestic production was halted to concentrate their effort on military optics and radios for the US and allied forces. With Government loans, Argus expanded, and in 1944, the company changed its name to Argus, Inc. and won several awards for its war effort in producing products.

 After the war, Argus, Inc. revamped production for its consumer line, and by the 1950s, Argus Cameras was the second largest camera producer in the US, second to Eastman Kodak. Later, in 1957, Argus was purchased by Sylvania, the flash bulb company. In 1962, Sylvania sold Argus to Mansfield, a Chicago company, where they started to move out of Ann Arbor. There were several different transactions, and in 1969, all domestic camera production ended.

 An interesting note is that Argus’s most popular camera, the Argus C3, started production in 1939. It was a departure from their molded plastic A series with a metal body. The ever-popular camera, fondly known as “The Brick,” sold for $25.00, and by 1962, 2 million cameras had been produced. The Argus C3 was known for its robust build, simple controls, and excellent image quality, making it a favorite among photographers.

A tremendous website is dedicated to The Argus Reference Site. It includes links to the Argus Museum, a treasure trove of information and artifacts related to the company's history, and a book on the company, Argus - Fine American Cameras -- a book by Bob Kelly, Ron Norwood, Mike Reitsma, and Phil Sterritt. The book provides a comprehensive overview of Argus's journey from a radio manufacturer to a camera producer, along with many other great links.

My Camera:

First, my camera isn’t by any means in perfect condition. But all the shutter speeds sounded accurate, and the aperture opens and closes, so that’s a good first step. Now for the not-so-good things about my camera. The front viewfinder glass is missing, and the extinction meter window is completely black, which means I’ll need to use my handheld meter.

The transport was in good condition, so I opened the back of the camera and wanted to put a roll of 35mm film to see how this camera performed. Not having the instruction manual didn’t help, especially when loading the film. I kept looking at the film chamber and thinking, “There’s no way a 35mm cartridge will fit into that area”. So I started to pull, prod, and push different things until the film plug popped off the bottom of the camera, exposing where to put the film to load the camera. That’s an interesting thing to do to load the camera. For demonstration purposes, I had a roll of color for the photos, but below, I shot B&W.

The camera loads like any 35mm camera, but similar to cameras like the Kodak Pony 35, to advance the film to the next frame, you need to “unlock” the advance gear. This button is also the button you need to release the advanced gear so you can rewind the film into the film canister.

 Now that I have film loaded in the camera, and my viewfinder didn’t effectively work due to the missing front glass, I needed to guess on composition. Around the lens is the focus ring, which moves pretty smoothly on my camera. I walked around my front yard, focusing on my subjects and composing in my mind what the photo would look like. Using my trusty handheld meter, I set the shutter speed at 1/200 and my aperture to what the meter told me. The aperture settings are on the bottom of the camera and are right next to the shutter speeds, which are coupled to the extinction meter. There is a second shutter speed dial around the lens, too. My camera has an Argus Anistigimat f4.5 lens. There is no focal length on the lens.

The camera has an odd design as the viewfinder and aperture controls are on the bottom of the camera. I kept wanting to hold the camera upside down to take images, but without a working viewfinder, it didn’t matter. The camera shape is slightly different for a 35mm, and more resembles a smaller medium format camera or one that shoots 127 or 828 film, as opposed to 35mm. The camera measures 4.75” wide x 3” from the front of the lens to the back of the camera x 3.25” tall, measured from the top of the film plug to the bottom of the winding knobs. The camera weighs in at 1 lb. 3.2oz without film.

Now that I had shot the film and wound it back into the cassette, it was time to take it to my darkroom, process it, digitize the negs, and show you what I had done.

 The Results:

Here are some of the images I took with the Model K camera. Overall, the lens did a good job; the photos are relatively clear and sharp. The film I used was some older B&W T-Max 400, so it was a bit grainy, but I was surprised by the results.

Conclusion:

Besides the flaws I mentioned above, the camera was surprisingly fun to shoot and produced very nice images. My case is very stiff, as the leather is very dry, and the front is coming off. I didn’t realize this camera is rare, as they only produced about 2000 before they ended production. I would be inclined to sell it at some point, but I’m thrilled I put film in it and shot with it.

 Thank you for taking a few minutes from your day to look through this blog post. I have a few other gems to review, so I hope you’ll watch for the next post.

 Until then, please be safe and well.

Primarflex II by Bentzin

I have been excited to do a blog post on this camera since I acquired it a couple of years ago as part of a group of cameras from an auction. The camera came as a kit with the case, extension tubes, lens hood, and film holders. When it arrived in excellent condition with a working shutter and clean lens, I was anxious to put some film in it and take a walk around my yard snapping photos.

History:

Bentzin has always been known as an innovator and a company that excelled in quality cameras like Primar, Primarette, and Primarflex. Carl Bentzin was born in Görlitz on February 8, 1862, died on May 23, 1932, and is buried in grave number 260, Old Görlitz Cemetery. He opened his first factory in 1989, located at Rauschwalder Strasse 28 in Görlitz, Saxony. He changed it in 1893.


In 1899, Bentzin entered into negotiations with Carl Zeiss regarding a collaboration with Dr. Paul Rudolph, who had developed their anastigmats: Planar, Protar, and Ulnar lenses. Zeiss was looking to build cameras so they could put these lenses on them, and Bentzin had the expertise of the time to do so.

 The "Aktiengesellschaft Camerawerk Palmos" was founded in 1900. They produced cameras at the Zeiss factory in Jena and the Bentzin factory in Görlitz. In late 1900, the "Film-Palmos 6x9" camera was produced at the factory. In 1901, the bank ran into financial difficulties, and Zeiss took over production in Jena. Bentzin ran their own company, run by Carl Bentzin, in Görlitz.

 In the following years, the Carl Bentzin Company produced many high-caliber SLR cameras and even cameras for companies like Voigtlander, Emil Busch, and other German camera companies.

Soon after WWI, Carl started having his son Ludwig take over more of the day-to-day operations of the company, where he honed his manufacturing and business skills. In 1928, Carl turned the company over to his son Ludwig, his daughter Helene, and Helene's husband.

 Carl Bentzin died in 1932 at the age of 70. From 1928, Helene and Ludwig ran the company together until Ludwig's death in 1945. After Ludwig's death, the company went through several different reorganizations as part of the state-owned system, ending as VEB Feinoptisches Werk Görlitz.

The Camera:

Upon my first encounter with the camera, I was immediately drawn to its unique layout. All the controls and settings are conveniently located on the right side, including the film advance, shutter speed control, shutter release, frame counter, self-timer, and flash sync terminals. This thoughtful design, detailed in the manual, makes it easy to navigate the camera's functions.

The camera exudes a sense of robustness and reliability. It's more compact than a Hasselblad and larger than a Twin Lens reflex, striking a perfect balance. As an SLR camera, it offers the unique experience of focusing and observing the depth of field through the lens, a feature I particularly appreciate.

To open the back, just behind the viewfinder is a knob that has duo functions. To open the finder, you slide the knob back towards the rear of the camera. Then, open the back to load the film. While the knob is back, you press it down, and the back door opens, revealing the film cassette, which is removable to load the film. To remove the film cassette, you'll need to pull out the winding lever just a bit like you would any film advancing knob to release the gear from the body and the film cassette is easily removable by holding the center handle and pulling it away from the body of the camera.

Loading the film onto the cassette is straightforward for any medium-format camera. Put the empty spool onto the top area where the gear for the film advance is located. Load the new film onto the other area and bring the leader over the pressure plate so the black paper backing is facing out or towards the shutter when you put the film cassette back into the camera body. Put the end tab into the spool slot and wind it a bit until you know the film won't pop off the spool and is starting to take up on the take-up spool. I like to advance the film until I see the arrows of the paper backing, and then I put the film cassette back into the camera. The manual says to reset the frame counter, turn the counterclockwise until it stops, and lift it. DO NOT FORCE IT. A red "zero" appears in the window, then advance the film until the number one appears, then you're ready to go. Unfortunately, my camera reset on the frame counter didn't work, so I advanced until I thought I was at number 1 and started shooting.

Now that I have the film loaded, the viewfinder or light hood, as they call it in the manuals, has a couple of different variations. You can remove it for cleaning. It does have a magnifying glass folded down on the rear of the hood if needed for fine focus. Just lift the magnifying lens into position and focus. It also has a "sports" type finder, which many medium format cameras have, where you can lift a portion on the hood and look through the rear opening through the front opening to get a general sense of composition for quick action photos. If you're going to use this, be sure to pre-focus the camera and use a smaller aperture to allow the depth of focus to compensate for any missed focus.

Focusing the lens and setting the aperture is straightforward. The lens doesn't have an automatic aperture, so you need to open the lens to focus and then manually stop the lens down to the desired and needed setting for proper exposure. A "locking" mechanism for the aperture is used to help with this. You pull back the collar with the red dot and turn it to the desired aperture setting. Releasing the collar "locks" the lens into that setting, which means you cannot go past that setting when you turn the collar back and forth. This lock allows the photographer to open the aperture for brighter focusing, then quickly turn the dial back to the "locked" aperture setting to take your photo. It's easy, and the benefit is that when the lens stops down, you'll see the actual depth of field you'll get in your photograph. When I turned the advance lever, the mirror returned as it should, and to cock the shutter; there was a little extra turn needed to get the shutter cocked again. Having the additional amount to turn is standard, as It did the same function every time I advanced to the next frame.

When I received the "camera lot," it included a set of 4 extension tubes for the camera and three separate cut film holders. I'm very familiar with extension tubes and love shooting with them, but what would you ever use 6x6 film holders for when using this camera? I've never heard of a 6x6 cut film ever produced, so I'm curious how you'd even use them. Doing a bit of fussing around with the camera, the only mention I found was the availability of the cut film holders, but nowhere in the manual does it say how to load them. 

You'll need to open the back of the camera to use the film holders and take out the cassette. A silver clip is at the back of the light hood (Viewfinder). When you slide that clip back towards the back of the camera, you can slide up an insert with a couple of tabs on the top and a couple of small rollers within the insert. At that point, you can slide the film holders into that slot and take out the dark slide, exposing the film to the shutter and, eventually, the light when the shutter opens/closes. After using the film holders, you can put the roller insert back and slide the silver tab towards the lens, locking the insert into place so the film cassette works as it should within the camera.

The lens is a Carl Zeiss Jena 105mm T f3.5 lens, and it has threads on the back, which you use when using the extension tubes, but to put the lens onto the body, there is a red dot on the front of the camera at the 10 o'clock position. All you need to do is line up the red dot on the lens and turn it to the right or clockwise, and the lens locks into place by pressure. To remove, grab the lens and turn counterclockwise; the lens comes off after about a quarter of a turn.

The fitted case is exceptionally well-built. When you open it, the right side of the case folds down so you can access the different operation dials, which is very handy. While my strap is broken, I do see where it's attachable in several places to hold and distribute the weight evenly. The case can be held tightly in the case by a hook on the front and looping into the rear of the case.

Results:

I walked around my front and back yards using my light meter to get the proper exposure for each shot. The shutter works great, and as mentioned above, the aperture and focus move smoothly, so taking the photos was relatively easy.

 Here are the results from the camera.

Overview:

WOW, what a fun camera to shoot with. When I looked through the finder, the images were bright and clear. The focus was sharp, and using the "locking" mechanism on the lens was intuitive and straightforward. I didn't use the extension tubes on this shoot, but I plan on trying them out on an upcoming post for my blog, so keep tuned for that experience.

 Thank you for taking a few minutes to review this posting on a wonderful, well-built camera that should rival any medium-format SLR camera. 

 Until next time, please be safe and well.

Exakta 66 Vertical Camera

I've been holding onto this camera for a few years now and wanted to do a blog post on it a few years ago when I was asked to come back to work and run a couple of photo companies for a former boss. At the time, the opportunity was too good to pass up, so I put my camera blog on the back burner and dove into my work promoting and selling some top-of-the-line photo equipment.

My Exakta 66 Vertical camera and lens.

Now that I'm formally retiring after spending 52 years in the photo industry, I pulled the Exakta 66 vertical off the shelf, which I had serviced a couple of years ago, shortly after returning to work. I put 120 black-and-white films into it and gave it a whirl to see what a medium-format camera from the early 1950s would feel like.

History:

I previously wrote about the company's history when I posted on the Exakta Vest Pocket Model B camera in December 2020. If you're interested in what I wrote about Ihagee History, click the link.

Early horizontal Exakta 66 model.

 In this area, I'd like to talk about the history of the Exakta 66. Exakta made an earlier version of the 66, a horizontal version developed just before WWII. Since this model is known as the "Vertical" version, it concerns the film transport on the camera. In this version, the film transports vertically, unlike the previous model, which went horizontally.

The original Exakta 66 was designed in 1938. Ihagee, the manufacturer of Exakta, had even set aside a series of serial numbers for the Exakta 66, which was a first for Ihagee. Until now, the camera model would have consecutive serial numbers when the cameras left the factory, but  552,000 to 556,999 had been reserved for the 6x6.

Due to technical issues with the film transport, Ihagee only produced about 2,000 cameras in the first year. The issues were somewhat common for other Exakta cameras from this time period. Production for the Exakta 66 was stopped after one year. It could have been due to technical issues or the outbreak of WWII. 

In 1951, Ihagee decided to start production on the camera again. They reserved the serial numbers 600,000 to 607,999 for the new Exakta 66. Unfortunately, production was halted due to lackluster interest and low sales numbers. Many of the cameras produced were from old stock produced before WWII, and the cameras again had very poor film transport issues. 

 Introduced in the fall of 1952 with production was the new Vertical Exakta 66 with vertical film transport, which was to compete with Hasselblad for medium format camera. With the Vertical Exakta 66, Ihagee introduced interchangeable light shafts, focusing screens, film cassettes, and a prism finder, which were planned but never introduced. It also had flash synchronization and shutter speeds similar to their 35mm cameras from 12 sec. to 1/1000

Again, the vertical Exakta 66 ran into the same film transport and other issues during production. The problem was so bad that Ihagee recalled cameras delivered to stores to destroy the camera. It's estimated that there are only a few hundred cameras due to poor production and lack of sales.


In 1985, Ihagee's West German company reintroduced the Exakta 66. The camera was very similar to the Pentacon and even had Pentacon mount lenses. It had a current design with a black body and other accessories like finders, focus screens, lenses, etc. This version lasted into the early 1990s.

My Camera:

 The Exakta 66 is a clunky and somewhat awkward camera, especially without a shoulder strap. While I got the camera serviced a few years ago, I'll discuss some issues with the body and film back. 

 My camera has a Carl Zeiss Jena Tessar T 80mm f2.8 lens. It measures 5.5" tall by 4.5" wide by 6" deep, measuring from the back of the film plane to the front of the lens focused at infinity or back into the body. If the light chamber is opened, the camera is just under 8" tall and weighs 3 lbs 7.4 oz without film or a strap.  

The vertical shape made the camera very similar to shooting with a twin-lens reflex camera, just bigger and heavier. As I have fairly large hands, using it wasn't that bad. 

To take the back off, on the camera's left side, as you hold it to take a photo, is a long lever next to the horizontal tripod socket. Slide that lever up to release the lock of the film back, and slide the cack off to the left to load the film. Loading the film is pretty straightforward. Take the empty film spool from behind the hinged door and put it into the top chamber inside where the gears are. Put the new film in the chamber with the hinged door and slide the leader around the wheel and over the pressure plate to the empty spool. Slide the end into the spool and wind it up just a bit so it's not coming loose from the take-up spool.

That's the easy part. I went online to look at the instruction manual on the proper procedure to load the camera, and now I understand the complexity of the camera. Well, the instructions that I read didn't make sense. One of the reasons is that the film back I have isn't 100% functional. The frame counter isn't working on my film back and doesn't go to the "Red F" as stated in the manual (show manual). Here's what I did. I put the back on the camera, advanced the film 5-6 frames, and started to shoot photos. The film advance lever is on the right side of the camera and has a large "wing nut" appearance right in the center of the camera.

The shutter speed dial is in two sections, similar to other cameras. From 1/1000 to 1/25 sec, it is on the top dial along with "T" and "B," closest to the light chamber. A second shutter speed wheel on the bottom of the camera has a dual function. It's the low end of the shutter speeds, from 1/10 sec to 12-second exposure; yep, 12-second exposure is built into the camera. It also serves as the camera's self-timer. The cameras' self-timer numbers are red, and the long exposure numbers are black.

The right side of the Exakta 66 vertical camera shows the shutter speed control dials on top and bottom.

To make a more prolonged exposure with the built-in shutter speeds, you set the SS dial to either T or B, then turn the bottom dial to the desired length of exposure in black. Press the shutter, and the shutter stays open until the end of the exposure, and the focal shutter closes. To use it as a self timer, set the shutter speed at anywhere on the top dial from 1/1000-1/25, then on the bottom dial set the length of self timer to the desired RED number and press the shutter button. This will delay the shutter from open/close function for the desired seconds picked from the red number picked.

You open the light hood, press down on the rear tab on the back of the hood. Mine pops up and is ready for action. Like many other medium format cameras, there is also a magnifying glass that allows for fine focusing. When you press the front of the chamber, the glass pops up. You can also remove the hood to get to the focus screen by pressing the lever between the two 6s on the front of the camera and just below the Exakta nameplate. When the light hood is removed, you can remove the focusing screen by sliding the bar on the right side but not back where the film advance and shutter speed dial is. It's the rod right next to "Ihagee". Slide that lever up, and the focus screen can be removed. To close the light hood, the four pieces that make up the light hood are numbered, 1,2, and 3, so you know which order to close them. If not in that order, the cover doesn't close.

There is a second rod on the right side of the camera between the two shutter buttons and the lock for the shutter button just above the shutter release. In the down position, it'll let you trip the shutter. When the bar is up, the shutter release is locked, and you cannot release the shutter.

 On the left side of the camera is the back release rod. Slide it up to release the lock to take the film back off and down to lock the film back onto the camera. There is a horizontal tripod socket. Also, there is a flash delay wheel that delays the flash sync depending on the flash and bulb used and the lens release button. Sliding the button back will release the bayonet mount lens.

The camera body, film back, light hood, Focus screen, and lens are separated.

The lens has a manual aperture, which doesn't stop the aperture down automatically when you press the shutter button. Focus wide open for the brightest viewing, then stop down the desired aperture. By doing this it also allows the photographer to see the depth of field in the finder before releasing the shutter. There is a red dot that you can move to the desired aperture. This allows the photographer to open and close the aperture quicker, and you cannot go further than the ring with the red dot will allow.

My results:

 Once I loaded the film, put the back onto the camera, and shot photos, here's the result. As you can see from some of the first images, I, too, had issues with the film transport. The technician told me he did his best to fine-tune the back, but the first few images had spacing issues, as seen in these images. After that, the images had spacing between them that grew to more and more spacing between the images.

Thing get better for the rest of the roll.

From the front yard.

Looking down our street.

Conclusion:

 After I played with the camera and finally got past the mumbo jumbo of the loading procedure, the camera was fun to shoot. I really didn't mind the manual aperture, and while I didn't use the self-timer or longer exposures as I was shooting ISO 400 on a somewhat sunny day, setting the shutter speeds and aperture was straightforward.

 Having the large indent on the film back provided extra area to hold the camera, especially when I was carrying the camera without a strap. I think the images turned out pretty good, and I'm looking forward to shooting it again—maybe at dusk with longer exposures this time.

 Thank you for taking the time to read through this post and until my next post, please be well and stay safe.

Marchand Fischer Baby Camera

Whenever my wife and I visit a foreign city, I check to see if the town or a surrounding city has a Flea Market to check out the local market of used and collectible cameras. This spring, my wife and I returned to Paris, which has a robust and large Flea Market area that thrives on the weekends. 


The Flea Market, which comprises smallish stalls selling goods from carpets to antiques and almost anything imaginable, was a used camera store. It was not in the flea market but on one of the main roads surrounding the markets. Looking around the camera store, I noticed that the shop owner had many great cameras, but one that caught my eye was the Fischer Baby camera made by Marchand.


The Company:

I don't have much to say here, as I've searched the Internet and cannot find out much about this company. It's most likely because they were a small French company in Charbonnieres, France, after WWII. They produced a minimal amount of toyish cameras in the 1950s sold in toy stores. Due to their build quality, which I'll get into more when I explain the camera below, they were poorly received and, therefore, went out of business.

 If you or anyone who reads this post knows anything about Marchand Co., which produced these cameras, I'd love to know, and I will update the blog post with that information.

The Camera:

There are a few items that drew me to this camera. The faceplate is typical, but it does have a 6 on one side of the lens and 9 on the other. My first thought was that it was a fascinating film format. I'm a real enthusiast of anything panoramic, so this was the first light bulb in my head. Then, when I got closer to the camera and picked it up, the bulbous size and extremely light weight of the camera were pretty fascinating. It has almost a circular look and feel to the camera. Being someone who enjoys panoramic cameras and images, the 6x9 format made this very intriguing.


The camera is straightforward and similar to a Box-style camera but even simpler as there is no aperture setting and only two shutter speeds. The Fischer Baby has a very simple shutter with a bulb setting  "P" for time exposures and an "I" setting for instant. The camera's shutter, at least on my camera, "clicks" when you press the shutter button down, which exposes the film, but it does the same thing when you pull the shutter button up to what most people would think it to be the starting position. The shutter speed is about 1/80th sec, and possibly even slower.

Another fascinating point about the camera is how thin the plastic is. It doesn't have a lot of "heft" to it, and it's pretty light—the camera loads like any other simple point-and-shoot style camera from the late 1940s to mid-1950s. There's a red window on the back of the camera so you know when you're at the next frame to take a photo. The transport continues, but you can wind past the next frame if you're not careful.

 The Baby Fischer has no frills in its design. Two clips on the side of the camera keep the front of the camera attached to the back of the camera. There is no locking mechanism, and the clips could open easily, exposing the photos already taken. My camera is missing its strap because one of the eyelets has broken off, which I'd guess is pretty standard due to its build quality.

The Results:

My first impression was that this camera takes 120 film. When I went to load the film, the 120 roll was too big, so I thought this must be a 620 film camera. Its re-spooling capability allows you to re-spool 120 films onto a 620 reel. I found an empty 620 film spool and a 120 roll of T-Max film, put them into my dark bag, and re-spooled the film.

 I had never done this before, and when I took the film out of the dark bag, it looked OK. It was not professionally done, but it was my first time doing so. After loading the film into the camera, I took photos with my second spare 620 spool.

 The results showed that my re-spooling wasn't perfect. In fact, it was poor, as there was some light leakage coming from the end of the spool where the film wasn't tight enough. Other than the light leaks, the results were pretty good.

The Conclusion:

After walking around my backyard and in front, too, the camera could have been better to work with. The viewfinder was challenging to look through and not precisely in its proportions. The winding was OK; you can see the film advance and frame numbers in the red window on the back. Since there wasn't a strap on my camera, I had to carry it, which wasn't uncomfortable, but I was always thinking about not dropping it. I'm glad I did a post on this camera and have already picked the camera for my next post, which will be on the Exakta 66 camera.

 Thank you for reading this post. I appreciate your time. Until the next post, please be safe and well.


Lark & Kandor "Sardine Can" Cameras

When I was younger and starting to collect cameras, I can remember looking at the Lark Camera in McKeown's camera book, the bible I use regularly, and seeing this odd and unusual-looking camera that appears to have been made out of a sardine can. The funny thing is, that's what they called this style of camera coming from the Irwin Company of New York.

 Another fascinating item about this camera is that few of them come up for sale on eBay, and when they do, they sell in the $100.00 range. My guess is because of their unusual design and looks, along with the popularity of Lomography that's taken place in the past twenty years and the rise of film photography again.

Recently, I had the opportunity to pick up not only the Lark camera in three different versions but also its twin brothers, the Kandor Camera, which came in different versions, too. The price was right for all five cameras and a few other camera gems. I snatched all five cameras and decided to write a blog post since you don't see much about them online.

HISTORY

Before I dive into the cameras I purchased and some of the refinements, Let me tell you what I know about the Irwin Corp. of NY, Irwin Corporate History which made these interesting cameras. The folklore of how the camera company started is that an American sailor was in France in the early 1930s and made a camera from a sardine can. After his release from the service, the sailor moved to Chicago and teamed up with some mobsters who helped him import sardine cans to manufacture these cameras.

This is a charming and far-fetched story, especially since the Irwin Corporation was located at 27 W. 20th Street in New York. After doing a bit of digging, I found where someone admits he made up that story. You can find it here: French Site

 In my opinion, there must have been some link between Irwin Corp. and some of the Chicago camera companies during this timeframe, as the faces of the cameras on the Lark and Kandor cameras are very similar to those of companies like Falcon Camera Co. and Herold Mfgr. My guess Utility Mfg Co, which had ties in NY and Chicago, was somewhat involved.

 Irwin Corp also made a few fundamental TLR cameras, as seen from the website above.

THE CAMERAS

When the cameras arrived, and I started taking them out of their bubble wrap, the first thing I noticed was how hefty they were. I was expecting a very tinny and flimsy camera, but these cameras have a bit of heft. Maybe sardine cans were heftier in the 1930s and 40s, but it surprised me.

Simple screws holding the lens barrel in place.

The camera measures 5" wide by 2.75" tall body, then another 1/2" for the viewfinder, which brings the total height to 3.25", and from the back of the camera to the front of the lens is 2.5". The Lark and Kandor cameras are a very oddly built camera with the lens barrel screwed onto the body by two screws placed on the top and bottom of the lens flange. As mentioned above, the face of the camera has a very similar look to the cameras from Utility Mgf. Co. 

Lark Camera showing viewfinder and Art Deco Design

 Another wonderful design of both the Lark and Kandor cameras is the beautiful Art Deco look to their faceplates and each model's unique design and look. Some of the cameras are somewhat plain, while others have chrome stripes on the body and elaborate faceplates, which just exude the look of the Art Deco period.

The front of the camera does not list a maximum aperture, but it does state that it has a 50mm Eyvar lens with shutter settings of either time for "bulb" or long exposures or Inst for normal snapshots. My best guess is that the "inst" shutter shoots at around 1/50 shutter speed.

More robust viewfinder on one of the Kandor cameras

The camera has a simple viewfinder strapped onto the top and held into place by two small chrome rivets. On the front, there is a chrome fitting with a rectangular mask, and on the rear, there is a chrome fitting with a round mask. The Kandor Classic has a more elaborate chrome-fitted viewfinder, so this must have either been a later model or just a more robust version.

To open the back of the camera to load the film, you unscrew a thumb screw on the back of the camera. The Kandor camera doesn’t have the screw on the back, but a more simple “press on” method. The back of the camera wraps around the body and has some foam where the body meets the back plate. The camera produces 1.25" x 1.75" size negatives on 127-size roll film. Two red windows on the back of the camera show the numbers printed on the film's paper backing, so you know what frame you're on when taking photos. On the top left of the camera, as you're holding the camera to take a pictures, is the winding knob to advance the film to the next frame.

I wish I had some 127 film to take photos with these cameras, but if/when I get some, I'll add to this blog post. For now, I don't have images I can share.

CONCLUSION

While these cameras aren't elaborate, as they are just the opposite, they are essential and just a step up from pinhole cameras. They are very well-constructed cameras, but their shining point is the look of the cameras. They are a real bright point to put into your collection, and while I've been looking for these for a while, to get five of them at one time and for a reasonable price, I plan on keeping them for a bit to spruce up the collection.

 I plan to do more writing and blogging in the future. I took a few years off to run a few photo companies, but I plan on retiring soon and getting back into writing about my camera collection again. 

 Thank you for taking time from your busy schedule to read my blog. I appreciate it. Until my next post, please be safe and well.

Seagull 4 Twin Lens Reflex Camera

It's been far too long since my last blog posting. I will do better by bringing cameras from my collection back to the forefront of my camera collection.

My camera with great leather case.

Last fall, sometime around October, I spotted a very underused and, more so, underappreciated camera on my shelves. It's from a camera company I rarely see written about. I'm writing this post about the Shanghai Seagull 4 Twin Lens camera.

HISTORY:

In my research on the Shanghai Seagull Camera Co., There's not a lot of information on the company. The camera industry in China is new and rarely shown due to the country's small number of camera companies. At least this is true in the Western world due to the Cold War and the frosty relations we had with China before Nixon's visit in 1972.

From the information found, the Shanghai Camera Company started in 1958 in Shanghai, China, and is considered the oldest camera company in China. They made several different cameras, from Twin Lens Reflex to 35mm cameras, which my father brought home for me back in the early 1970s, to folding cameras. There were many upgrades to the Seagull TLR line, and I'm not 100% sure of my model, but it's early. Most likely, it was sometime in the late 1960s or early 1970s.

Front view of Seagull 4

A new Shanghai Seagull Digital Camera Co. Ltd. started in January 2011. They state they absorbed the R&D and manufacturing of Shanghai Camera General Factory, which has a nearly 60 years history. They manufacture UAV digital cameras for observation and tactical planning, so I'm guessing they are drones.


THE CAMERA:

I've always enjoyed shooting with twin-lens reflex cameras. It was the first type of camera I owned. I shot weddings with TLR, and still, to this day, I enjoy looking through the viewfinder and popping up the magnifier to double-check focus.

To open the back to load the film. You pull down a small locking pin before turning the dial to open the back of the camera. This is a nice feature, so you don't accidentally turn the dial to open the back, exposing your film. I've not seen that on other cameras, so I'm unsure how helpful this is. When you open the back, the frame counter, which is located on the right side of the camera as you're holding it, resets to "0".

After conventionally loading the film, move the empty spool from the bottom of the camera to the top and put the fresh roll on the bottom. I am then threading over the lens area and onto the top spool. Turing the winding lever until you see the arrows from the paper backing pointing outwards. I close the back of the camera and wind the transport lever until the winding stops, and looking at the frame counter, I'm at number 1.

Here's where the camera gets a bit odd, and you'll need to determine the best way to proceed with your shooting. There is no double exposure prevention mechanism on this camera. I had maybe 7 or 8 double-exposed photos the first time I shot with it.

On the front of the camera is the average shutter speeds ranging from 1/300 to 1 sec. Along with "B". The shutter speed is set by sliding a button up or down until the marking along the lens points to the desired shutter speed. On the other side of the lens is a similar button with aperture settings from f3.5 to f22. You slide up or down to get to the desired aperture setting. This camera has no meter, so an external meter is needed.

Next to the shutter speed button is a longish bar with a knob on it which you press down to cock the shutter. Once cocked, you can press the shutter release button on the bottom right of the camera to expose your film. As mentioned above, you can do this as many times as you want to on the same photo. You'll need to either wind to your next frame, then cock the shutter and fire, or wind to your next frame just after taking a photo.

Camera Logo with Model and Serial number above.

MY EXPERIENCE:

On my first roll of film, there were many times when on a hike, I'd put the camera away after taking a photo, then walk to my next area to shoot and cock the shutter and take another on top of the last one. Once you realize there is NO DOUBLE EXPOSURE lock, you'll learn. The next time I use it, I will shoot, then wind. Walk to my next area to shoot, the cock, the shutter, shoot, and wind. Something I'm sure you're more intelligent than me and will remember.

My Granddaughter at the beach

My son, daughter in Law and Granddaughter enjoying the beach.

My wife and granddaughter headed to the beach.

Conclusion:

I enjoyed using this camera. The Seagull 4 is inexpensive, and the results are decent. It would be a great entry-level camera for someone wanting to get into medium format. I don't know if parts are readily available to fix it if it breaks down, but it's a fun camera to take photos with for now.

I appreciate you taking a few minutes to read my blog post. I have the next camera picked for the next blog post, and it won’t be long until I finish it. Until next time, please be safe and enjoy the never-ending hunt for fantastic cameras.

Bencini Koroll

Bencini Koroll

Front view of Bencini Koroll Camera

The interesting thing that caught my eye about this camera was the aluminum body. I had previously seen these in books and thought I'd jump on it if the right opportunity presented itself to get one at a reasonable price. With that said, I want to tell you about an exciting camera from Italy, the Bencini Koroll, a 645 format 120 camera.

History

Antonio Bencini started his photographic career fixing and maintaining french made cameras during WWI. In school, he was trained to be an aeronautical engineer. After the war, he and a partner started FIAMMA, a successful camera company making box cameras. In 1935, the oldest film company in Italy, Farrinia, purchased FIAMMA. Bencini moved to Turin and started Filma, a company focusing on simple 127 film size box cameras. Two years after he began Filma, Farrinia purchased the company, prompting Bencini to move to Milan, where he started ICAF (ICAF). Having a war in Europe was pretty evident given the circumstances in Germany. In his factory, camera production was halted during WWII so the company could manufacture aviation and bicycle parts.

Top View of Bencini Koroll Camera

After the war, in 1946, the company changed its name to CMF. During this time, cloth bellows in cameras weren't used. Bencini decided to transition to a sliding tube system of bellows with a focusable lens mounted on the end of the lens. Most of the Bencini cameras were either the sliding tube bellows or just a rigid lens system, gaining popularity during this time. Bencini cameras were popular throughout the1960 with their ever-popular "Comet and Koroll" lines of cameras. Still, the camera company lost favor in 1970 with the influx of Japanese cameras, and by the 1980s, the camera company had ceased production.

My Camera:

Having purchased my Bencini Koroll a while ago, it does have some cosmetic issues with scrapes and scratches. The shutter is accurate, and since there is no real aperture control, the setting of f11 is what I use when metering for exposure.

The camera measures 5.25" wide x 3.25" tall, 2.5" deep with the lens retracted, and 3.75" deep with the lens extended. My camera weighs one lb. and 1.2 oz without film loaded into the camera and without the strap. The Koroll is considered lightweight for a camera this size, and I attribute this to the fact it's an aluminum cast body lighter than other metals.

The camera loads just like any 120 camera, although getting the reels in and out is a bit difficult due to the tight spacing of the film chamber.

To take a photo, you need to pull the lens out from the camera, and you also need to rotate it to lock it into the taking position, which is similar to the Rollei 35 cameras. The shutter will not fire until the lens is out or pulled away from the body, which also engages the shutter button. The shutter won't fire if it's in the retracted or closed position, which is very nice for traveling or hiking. You won't accidentally fire the shutter with the lens retracted, causing double exposures or lost frames.

The one unique feature I like about this camera is the pull-out "foot," which stabilizes the camera when you put it on a table or flat surface. Using the foot is especially helpful when the lens is pulled out and in the "taking position."

The focus on the end of the lens is a straightforward "guestimate" focus system. There is no integrated rangefinder for critical focusing. If you're using f11 all the time for taking your photos, the focus isn't that critical since it's using a broad depth of field. Nothing is printed regarding the lens's focal length, but assume it's in the standard 75 to 80mm range.

Looking through the viewfinder was very challenging, especially for the people (like myself) that wear glasses. The rear part of the viewfinder is tiny and difficult to look through. Often when I used it, I just pointed the camera at my subject, and for the most part, I got the images I was expecting.

The day I was shooting with this camera was an overcast and foggy day at the coast. I did get some favorable images which you can see here.

Images from Camera

Video:

I’m starting to put a video review of the camera I post here on my channel on Youtube. To view the video, you can find it here:Bencini Koroll

Conclusion:

The Bencini Koroll camera was surprisingly fun to use and straightforward, and I took some fun and exciting images. That's something I look for in a camera. I can see myself packing this on a trip to foreign lands to photograph the streets of Bangcock, Paris, or even just walking around the neighborhood. The camera isn't expensive and was something I'd recommend you pick up at the next flea market, boot sale, or camera meeting if you see it; you won't regret it.

Until next time, be safe and keep looking for the odd and unusual cameras you can add to your collection. I know I always do.

Bolsey-Flex Trio Camera

As I was sitting at my desk a few weeks back as I was figuring out what camera to write about next, I looked down at a box of cameras I have in my office, and on top was the Bolsey Flex Trio, which is in the box and complete with the instructions. As I started putting together my thoughts about the camera, I had to pull out the camera, and many different ideas came into my mind.

My Bolsey-Flex Camera & Instructions

My Bolsey-Flex Camera & Instructions

The camera for its age isn't in great shape but does work. The camera uses 120 size film, which is a HUGE benefit to me since the film is so readily available. I decided to load a roll of Black and White film in it to shoot as I walked through my neighborhood. I processed the film and was somewhat impressed by the Bolsey-Flex. It's a Pseudo Twin Lens Reflex camera, which means it looks and feels like a TLR camera but works more like a Box Camera due to its simplicity.

Camera Research

I was researching the camera, only to find that a friend of mine, a brilliant writer and camera collecting blogger, Mike Eckman did a blog post on the same camera just a few months ago, which you can read here. With that said, Mike has quite a bit of information on the designer, Jacques Bogopolsky, and camera companies he worked for. The famous movie camera, Bolex, was named after Jacques Bogopolsky, and he also designed cameras for Pignons S.A., the original company that made Alpa Cameras.

For my blog post, I want to concentrate on the experience of using the camera, the image quality, and my overall thoughts on how such a beautifully designed camera handles out in a natural shooting environment. I want to offer a few facts on the camera in general. The camera is an all-aluminum cast body with beautiful light green coverings. In the box comes all you need to take the camera out into the world to take photos.

The Camera

The camera measures 4.75" tall without the viewfinder in the closed position and 6" with the finder in the "up" position. The camera is 3.75" wide, which includes the width of the knobs. It is 3.75" deep, including the lens in the focused to the closest focused position, and 3.5 with the lens focused to infinity. The Bolsey-Flex incorporates an elementary zone focusing lens which can focus from 5 feet to infinity. The focus on the camera is strictly a "guess focus" style. While this is a Psuedo TLR camera, the top lens does nothing more than frame the photo in the camera. There is no focusing capability when looking through the viewfinder.

On the Bolsey-Flex shutter, you have the capability of "I" for an instant, which shoots the shutter at 1/50th of a second shutter speed, and "T" for a time exposure. The camera does have a synchronized shutter which couples with the flash attachment. The camera also has an 80mm lens with three aperture settings, F7.7, f11, and f16. 

The flashgun takes 2-"AA" batteries to power the Type No.5 flashbulbs that fit the top. You unscrew the bottom of the flashgun to put the batteries into it. It would be best if you took the camera case off the camera to use the flash. The flashgun fits into the camera synchro port, which is below the lens and held by the screw that holds the case into place. When you trip the shutter, the camera sends a signal to the flashgun, which fires the flashbulb. 

My unit seems to be in good working condition. Unfortunately, I didn't have bulbs when I loaded the camera with film and did all my shots outdoors. It would have been fun to shoot with bulbs. I'll need to test another camera that uses a flashbulb in a future post, not that I have some bulbs to try.

To load film into the camera, there is a knob on the left side of the camera with "Open," Close" on it. Turn the knob to "open," and the top of the back swings down open to load the film into the camera. Nothing special here as the. Put the empty spool on the top and film onto the bottom area. The shutter won't fire until the winding lever is turned to advance the film. On the back of the camera is the red window with a sliding cover to see when the film is advanced to the following frame number.

 Images

Here are some of the images I took with the Bolsey-Flex camera.

Rocks

Rocks

Backyard Aspen

Backyard Aspen

Evergreen Tree

Evergreen Tree

Dogwood

Dogwood

Conclusion

I thought the camera did a very excellent job for a pseudo-TLR camera. It's not much more than a glorified box camera. The camera was easy to hold, the exposures were good, thanks to my sunny 16 rule when exposing to sunlight. The lens vignettes a bit, but I enjoy that. The ease of operation and see the frames in the red window when advancing were spot on. I'd recommend this very well-built camera to anyone.

 Thank you for taking some time to look over this post. Until next time, please be safe.

Lumiere Super ELJY, (Type 3)

Looking through many of McKeown's Camera Guides, which is the Bible of all camera collecting books, the Lumiere ELJY camera is one camera that always caught my eye. I believe it has to do with the size proportion of the lens to the camera body that caught my eye. The much larger proportion the lens has compared to the camera body reminds me of the Leica Dial-set Compur cameras of the mid-1920s.

My Lumiere Super ELJY camera.

My Lumiere Super ELJY camera.

The Company

The Lumiere company is a French company founded in 1893 by Charles Antoine Lumière, which started out as a film manufacturer and is most well known in the cinematography world. Charles's sons, Auguste and Louis Lumière, were the first to make a mark in the cinema world. The two produced short films starting in 1895 and what is now know as modern kind of movies.

In 1903, they invented a new photographic patent that was a successful color process for a film that lasted for years. They began to produce the Autochrome, a black & white plate but combined 3 color filters to create a color image that continued until the 1930s. They then started making sheet and roll film using the same process.

Lumiere started producing cameras in the 1920s through 1961 with all different cameras, including plate, folding, 35mm in different styles, colors, and shapes. Doing research on the blog and looking at all the different cameras Lumiere produced, I recognized a few other cameras in my collection. For this post, I'm just going to focus on the ELJY camera.

My Camera

There are many different models of the ELJY camera with versions and upgrades to the camera. The ELJY model that I own and am talking about is the Super ELJY, type 3. If you're interested in seeing the different models and variations, you can see them here (http://corsopolaris.net/supercameras/eljy/eljy.html). Personally, I didn't realize there were so many. The ELJY was produced between 1937-1960.

 The Super ELJY camera is a ruggedly built camera with a pull-out lens similar to the modern-day Rollei 35 cameras. To put the lens in the position to take a photo, you rotate the lens clockwise and pull the lens away from the camera body. The lens is on a very sturdy chrome barrel. Once extended, you turn the lens counterclockwise to lock the lens into position, and the lens won't slide back into the camera body.

 While the image size is 23x35mm, which is almost the same as 35mm, the camera takes a paperback roll film which is more similar to 127 or 120 films than 35mm. Some people say this is the "large format" miniature camera due to the camera and film size. The camera is more significant than the subminiature cameras that I have but considerably smaller than the 35mm camera, even the previously mentioned Rollei 35.

The camera is just over 3" wide by 2" tall without the finder up; with the finder up, it's 2.5" tall, and the camera is 1.75" deep with the lens retracted, or 2.25" with the lens extended. The lens is a Lypar 40mm f3.5 lens with aperture settings going to f20. It's odd because the aperture settings are 3.5,5,7,10,14 & 20. The shutter speeds go from "T" for time exposure, "B," 25, 50, 100, 125. The focus range is from 0.5m to Infinity.

 The camera has a simple pivoted, two-blade shutter which there is no cocking; just press the shutter release to take a photo, and there is a place for a cable release for the longer exposures. To open the back, the back door locking lever is on the bottom of the camera. The entire back comes off the camera to load and replace the film. There is also a tripod socket on the bottom of the camera. The red window on the back of the camera used to count exposures has a sliding door to open to view the film numbers.

On the top of the camera is the winding lever to advance the film. There is also a pop-up viewfinder. There is also a lever to slide out next to the viewfinder to correct for parallax when focusing close. When I first opened the camera, I noticed an exposed roll of film still in the camera. I'm going to have to find a way to process the film to see what treasures are on the film.

Thank you for taking a few minutes out of your busy schedule to read my blog. It's very much appreciated, and I would love to hear from you. One of the great joys of writing this article is hearing from people. Many tell me about their camera collection, which I enjoy hearing about. Until next time, please be safe.


Nikon 28Ti Camera

In this week's blog post, I'm writing about a camera I've had in my collection for a few years now and one that I've always wanted to own, ever since I laid eyes on it when the camera was introduced in 1994. The 28Ti  is the younger brother to the popular 35Ti camera, which came out a short time before the 28Ti and was similar to the Minolta TC-1, Contax T cameras, and a range of other well built "point & shoot" style cameras that targeted the more affluent and travel market.

My Nikon 28Ti, camera case, and interested photographer.

My Nikon 28Ti, camera case, and interested photographer.

The Company

Nikon started producing optical instruments such as microscopes and rangefinders in 1917 in Tokyo, Japan. During the early days, Japan had urgent needs for these types of optics. The person responsible for doing this was Koyata Iwasaki, the president of  Mitsubishi and the nephew of Mitsubishi founder Yataro Iwasaki.

 Plans started with establishing an optics company by combining the optical instruments division of Tokyo Keiki company and the mirror division of Iwaki Glass with Fujii Lens Manufacturing. This combination of companies started Nippon Kogaku K.K. which is, the Nikon we know today.

In 1921, photographic optics were becoming more refined. Nikon invited 8 German engineers to Japan to help Japan catch up with the development and design of photo optics. They created the Anytar lenses after the Tessar design. Buy 1931, Nikon lens designs were no longer in the Tessar design and optical quality shadow.

Nikkor lenses started in 1933 with the Aero-Nikkor 50cm f4.8 lens used for ariel mapping purposes. They also created a 70cm F5 and a 180cm F4.5 lens which is very difficult to find today.

 After WWII, Nikon started making 35mm cameras. The first camera, the Model 1, was introduced in March 1948 and was heavily advertised. Production couldn't keep up with the demand for domestic cameras of the time. There were many complaints about the design. In 1949, they had worked out many of the problems when the Model M was introduced.

 In 1950, the introduction of the Nikon S line and later the SP, along with a strong line of high-quality lenses, put Nikon on the radar for many newspapers and professionals photographers and made them the camera system they are now known.

My Camera

The Nikon 28Ti is a very sturdy camera with an all-black finish, which is more pleasing than the two-toned 35Ti camera. That's just a personal opinion for me. The feature that draws me to this camera is the analog dials on the top of the camera, which contrasts with the black camera body. The dials indicate things like aperture settings, focus distance to the subject, frame counter, and over/under exposure compensation. All of these are done with the precision of a fine Swiss watch and resembles one as well.

The size of the camera is approximately 4.5″ wide, 2.5″ tall, and 1.4″ deep and weighs in at 11.2 oz. The camera body is a titanium body with a retractable 28mm f2.8 lens, from what I can tell. According to technical specification, the lens is a Nikkor 28mm F2.8; multi-coated seven elements in 5 groups, with integrated coatings and extra-low dispersion elements. The camera's autofocus has 541 steps in a range which is slightly less than the 833 in the 35Ti. 

 The electromagnetic shutter has speeds range from 2 sec. to 1/500 in "P" mode (Program) or up to 1/330 in "A" mode for Aperture Preferred. There is also an "LT" mode similar to "B" and has a maximum time of 10 minutes.

 There is a "panoramic" mode that blades off the shutter area to achieve a panoramic photo on the negatives, popular in the 1990s. There is also the ability to over or underexpose images by up to 2 stops. The camera also features a Date feature on the camera, but I've yet figured out how to set them as the buttons to do so on the camera's back are very small and difficult to push.

Looking on top of the camera are the elegant dials which I enjoy, and when you press, items like +/- can be manipulated by the scroll wheel on the back right of the camera when the film advance would be on an SLR camera. Around the shutter release is the camera mode switch. Pressing the AF button on top and turning the scroll wheel allows you to focus manually. The Lamp button turns on the lamp on the dial display and lights up the viewfinder lines for the image area.

Top view of the Nikon 28Ti camera with the controls

Top view of the Nikon 28Ti camera with the controls

There is an "H" displayed in the viewfinder when the lighting is too bright and "L" when the lighting is too low for properly exposed images.

 On the right side of the camera is the dial that opens the back of the camera. The camera sets ISO with the DX coding. If no DX film is used, then the ISO is set to 100. The camera has auto wind and auto re-wind. There is a button on the baseplate that allows for re-wind the film mid-roll if needed.

 On the front of the camera is the flash control. You have flash on, Autoflash, No flash, and on the side of the camera by the flash control is a switch to set red-eye reduction. The lens automatically comes out when powered up and retracts when turned off. 

To me, the quality of the optics is what I enjoy. Some people prefer the less wide 35mm, but not me. Here are some images from a walk at my local dog park I did this week.

Images from the Nikon 28Ti Camera

Winston, a friends Korgi

Winston, a friends Korgi

Giving a friem=nd a drink of water

Giving a friem=nd a drink of water

Electrical tower in dog park

Electrical tower in dog park

Regular view

Regular view

Panoramic view

Panoramic view

Self Portrait.

Self Portrait.

Thank you for taking a few minutes out of your busy schedules to read about one of the cameras I need to take out and use more often—another fantastic camera in the collection. Until my next post in a couple of weeks, please be well.